The GoEngineer Trifecta: Creaform, Geomagic & Stratasys
Part of becoming a successful Application Engineer at GoEngineer involves becoming fluent in other tools beyond the specific products we support daily. In my particular case, Stratasys 3D printing is my forte. To broaden my perspective regarding some of the tools I don’t necessarily work with daily, I was encouraged to find a project centered on personal interest. This required me to step out of my typical comfort zone and learn something new.
After a weekend of 4-wheeling in my old Jeep Cherokee “rock crawler” that resulted in smashed and busted up taillight housings – I found my inspiration for this project. My goal was to design a 3D printable housing equipped with cheap and readily available trailer lights, so I could quickly and cheaply replace the aftermath of future “oopsie” or more truthfully “that was hairy” moments on the trail.
Race One: Creaform Handyscan 700 3D Scanner
After removing the busted taillights from the Jeep, I quickly realized that calipers alone would not be sufficient to capture all of the details I need. This includes surface profiles, mounting hole locations, and boundaries required to get a nice OEM-like fit for my custom designed housings. I knew this would require some 3D scanning to be accurate enough to comply with my vision.
Since we represent the full-line of Creaform 3D scanners I knew I would be able to utilize those to capture the geometry accurately. The only problem is that I had no clue how to use them. Luckily my fellow GoEngineer Applications Engineer, William Huertas, sits one cube over and is our resident scanning expert. He offered to guide me through the scanning process, but I made it very clear that I would be doing everything myself.
Learning Something New
Feeling quite intimidated – I pulled the smashed specimen out to begin the process. As I tried to clean the trail dust off before getting started, William stopped me dead in my tracks. The dust is a good thing and helps the laser gets picked up on otherwise translucent or reflective surfaces. Without any cleaning, I was directed to randomly cover the workpiece in these little ‘target’ stickers spaced every few inches. After 5 minutes of placing the targets, the part looked like it had chickenpox and I knew the real fun was about to begin.
With the scanner hooked up to the computer, I was prepared to spend the better part of two hours capturing all the data I would need. I was quite surprised to find that after about 5 minutes the only step left was to flip the part over, so we could scan the backside that had been previously been face down on the table. About 15 minutes after the Creaform Handyscan 700 had come out of its secure pelican case, it was going back in and all the data I would need was saved off to a thumb drive resting snugly in my pocket.
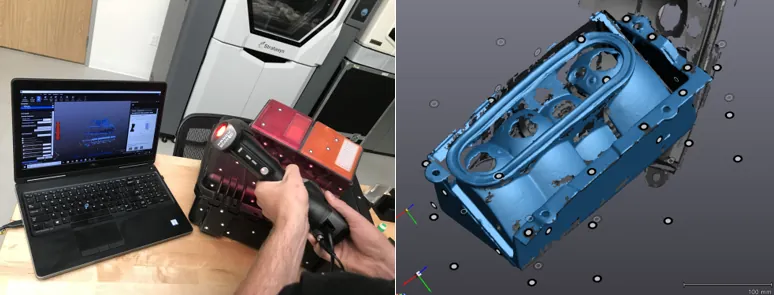
Figure 1: Scanning the broken taillight (left) and raw scan data (right)
Race 2: Geomagics DesignX Reverse Engineering Software
Before this whole exercise, it had always been a little bit of a mystery how raw scan data got back into a true CAD environment. I’ve since learned that the Geomagic DesignX software is the ideal tool to use for reverse engineering exercises like this one. Knowing nothing about this specific software I was once again starting to feel intimidated; uncertain of how difficult this was going to be. William once again came to my assistance.
After showing me how to align the two (half) scan meshes and directing some clean-up work we had a pretty good mesh representation of the original taillight. From there I was surprised how quickly we were able to extract a series of true CAD based planes and surfaces that I could use to start and terminate some basic extrude features. Using what’s called a “mesh-sketch” I was able to capture a section profile of the scan and use that as a stencil to sketch some profiles for CAD extrusion. I will admit William did the first one, but it was very intuitive for any traditional CAD users and I was soon making a new feature every few minutes.
DesignX
While every design feature of the final product could have been executed in DesignX, once all of the critical features (affecting fit) were done I decided to move the design into SOLIDWORKS where I am a little bit more fluent. For users in my situation, DesignX has the perfect “live transfer” to SOLIDWORKS tool where the planes, surfaces, sketches, and extrusions generated are automatically transferred into SOLIDWORKS with a full feature tree (history) intact.
Once I had the basic design into SOLIDWORKS my homework was clear. One short weekend later the detailed design was complete and ready for printing.
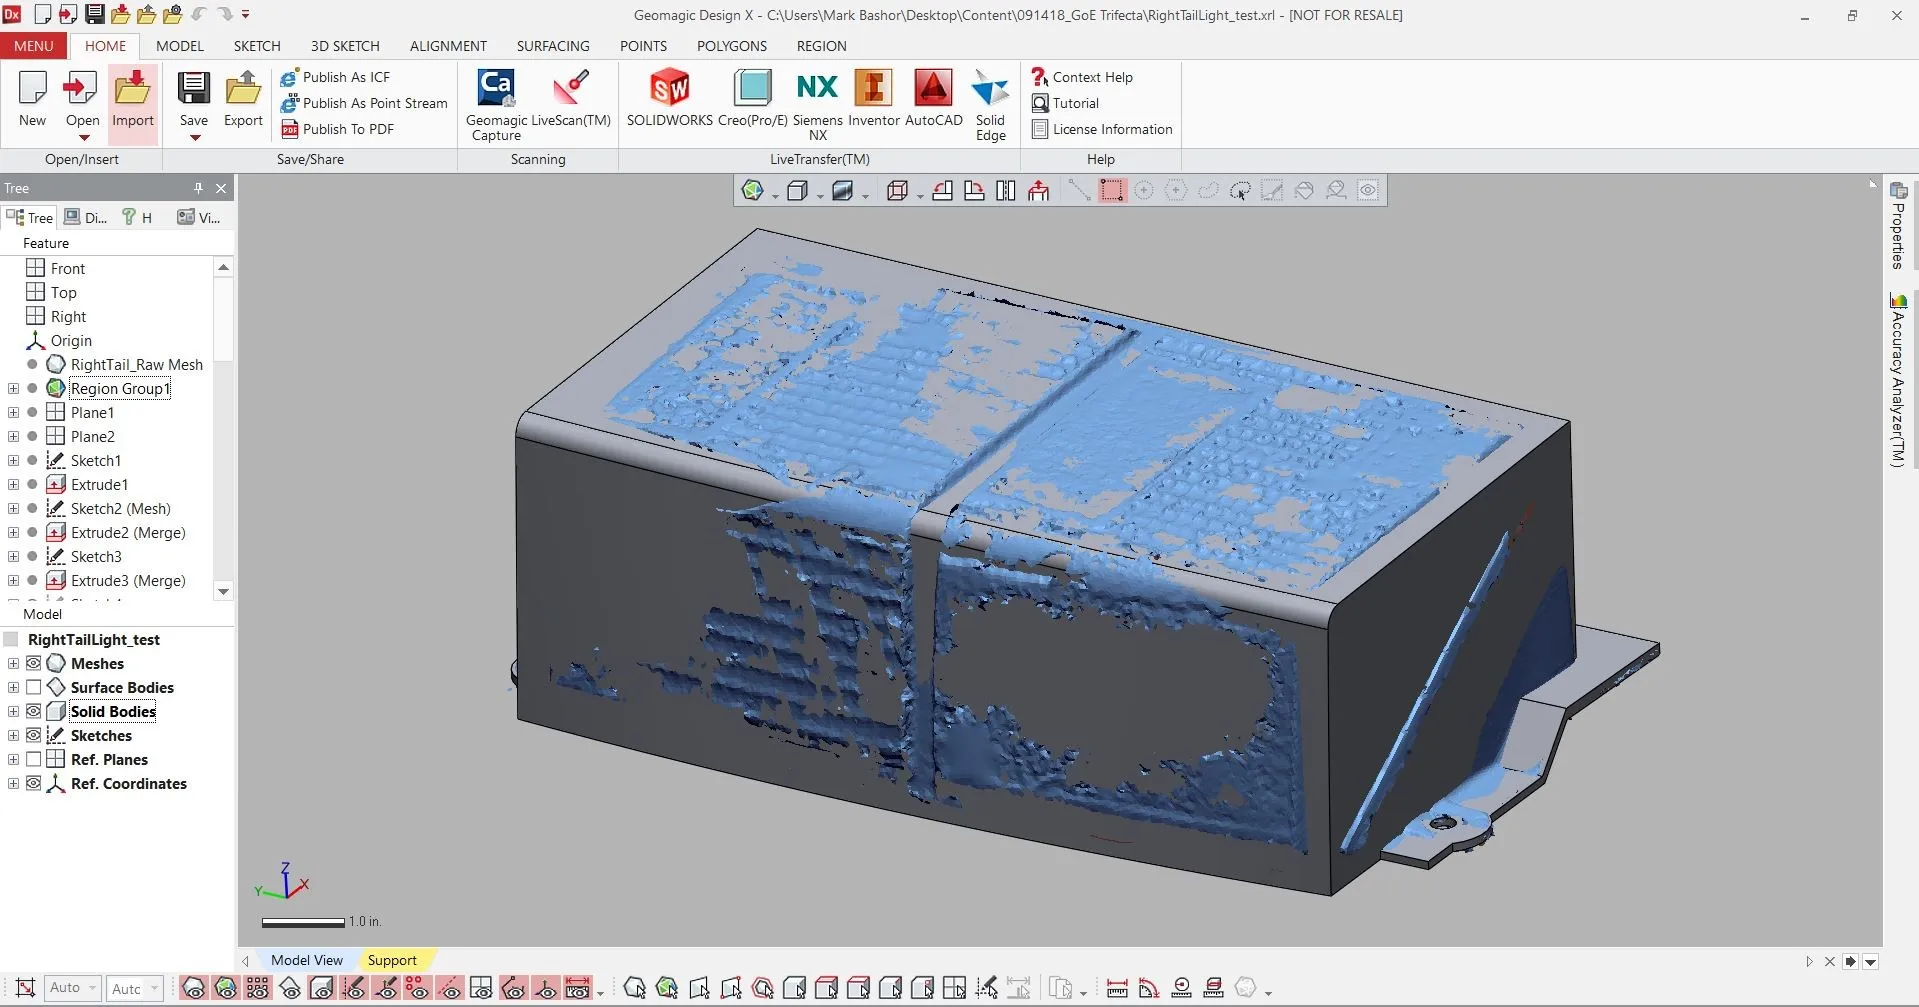
Figure 2: CAD Entities produced in DesignX with overlay of raw scan data
Race 3: Stratasys Fortus 450mc (FDM) 3D Printer
At this point in the project, my confidence level was high and I was moving into my area of expertise. All that was left was processing the files for printing and finding some time that the printer wasn’t needed for critical business activity.
Since the application of these housings was rather straightforward I just plugged them into the GrabCAD Print software and let the automated file processing engine take things from there. Minutes later I had them queued and ready to build in the next gap of idle Fortus 450mc printer time. Being mindful of company resources (and knowing full well I was going to paint them after the fact) I used this exercise as an opportunity to clear out all the near-empty random colors of ABS material cans that were piling up in the cabinet.

Figure 3: GrabCAD Print user interface ready to process the final design
3D Printing
Over the next couple of weeks, I managed to squeeze the print jobs for both the right and left housing. They would have fit at the same time in the Fortus 450mc’s 16 x 14 x 16-inch build envelope but I didn’t want to keep the printer tied up that long for a ‘fun’ project, so I ran them separately on nights the printer would have otherwise been idle. The ABS material used has a dissolvable support matrix but I was too eager to try them out, so I just chose to spend a few minutes removing supports by hand.
The last step before the final assembly was to paint. For this, I chose to use some generic “truck bed coating” available from the local auto supply. I used it because it was both black and I thought the texture would do a good job of hiding the layer lines. It certainly did! Finally, the painted housings were assembled with the lights and bolted right up to the Jeep with a fit and finish that would make the OEM jealous.
Conclusion
This was a very rewarding exercise, and I learned more than I initially expected about tools that were outside my comfort zone. My preference is always to speak about the products we sell and support from the first-hand experience. I find it’s better than parroting the taglines from the product marketing teams. I feel accomplished in that sense. It was truly eye-opening to see how- with a little guidance- these tools can be quickly and intuitively picked up and put into action. Oh, and the new tail lights fit, look, and work very well!

For more information on how you can incorporate these and others in the suite of engineering tools available from GoEngineer, please reach out to your local GoEngineer equipment sales representative or our team of talented application engineers.
Related Articles
Creaform Releases New HandySCAN 3D SILVER Series 3D Scanners
New Creaform 3D Scanner Updates for 2020
3D Printed Redesign of Corvette C4 Gas Pedal Mount
3D Printed Trim Panel for Custom Shifters
How to Design an Assembly in SOLIDWORKS for 3D Printing
Creating a 3D Printed Race Medallion Hanger Using SOLIDWORKS
![]()
About GoEngineer
GoEngineer delivers software, technology and expertise that enable companies to unlock design innovation and deliver better products faster. With more than 35 years' experience and tens of thousands of customers in high tech, medical, machine design, energy and other industries, GoEngineer provides best-in-class design solutions from SOLIDWORKS CAD, Stratasys 3D printing, Creaform & Artec 3D scanning, CAMWorks, PLM, and more
Get our wide array of technical resources delivered right to your inbox.
Unsubscribe at any time.