Kinetic Art Project: Creating the Silicone Mold - Part V
Thank you for returning to my Kinetic Art Project series. This blog focuses on creating the silicone mold for the fins.
Preparing the Part
At the end of my last post I had 3D printed the fins to create a mold. The prints came out fantastic, but I wanted a better finish. Unfortunately, because of the nature of FDM prints, the resolution is most obvious on a curved surface near to parallel with the print direction.
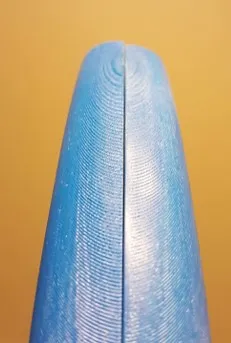
Figure 1 – Before (left) and after (right) the first round of sanding
As you can see in Figure 1, the layer profiles are farther apart where I focused my sanding on smoothing out those transitions.
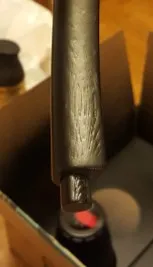
Figure 2 – Still needs some sanding
Primer and multiple layers of paint with a bit of sanding in between coats (Figure 2) helped create a smooth surface free of imperfections. (I thought it was interesting that the pattern in Figure 2 looked like wood.) Once I was satisfied with the finish, it was time to build the mold enclosure, a temporary form for the silicone.
Silicone Mold – form and shape
The enclosure needed to contain the form and maintain its shape. On scrap cardboard I traced and cut the fins and made an offset of about one inch. I then added 2″ strips around the sides and hot glued everything, including the fins to the bottom of the forms (so they won’t float away when I pour the silicone).
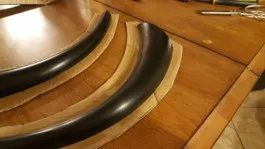
Figure 3 – Creating the mold forms
I applied a mold release agent to help prevent the silicone from permanently bonding to my part and thereby ruining the mold when I remove the fin.
I used Alumilite’s High Strength 3 silicone for its flexibility, high tear strength, and low viscosity. Plus, it does not require degassing, the process of removing the bubbles from the silicone introduced in the mixing process. Many industrial mold-making materials require the use of large vacuum chambers to get rid of bubbles. I do not have, nor do I intend to build a vacuum chamber, so a mold material that does not require degassing works great for my projects.
Silicone Mold – the right tools for the job
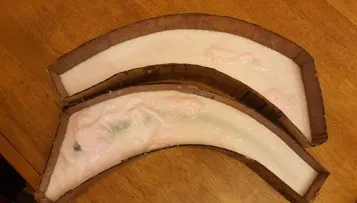
Figure 4 – The Cured Molds
Here’s where I show my naiveté. I started mixing the silicone without a proper container and stir stick. I used what was on hand, and I paid the price. Spilling from my bucket as I stirred, the viscosity was too much for my stirring stick, which broke many times and sent me ransacking my house for anything that might be strong enough while the catalyst began to cure parts of the silicone much faster than others because it was not properly mixed. By the time I found a suitable stirring stick (spatula handle), a nearly solid chunk of silicone had formed well before the 45-minute open time.
I decided there was no use crying over spilled milk (or silicone), so I chose to make do with what I had left. I fished out the solidified silicone, stirred what was left, and tried to pour as evenly as possible between the two molds but ended up a bit short. Some of the fin was still just above the silicone. In an attempt to raise the level of the silicone, I cut bits off the silicone chunk and stuffed them into the deeper portions of the mold to raise the overall level; I also used some of the chunk to cover the exposed portions.
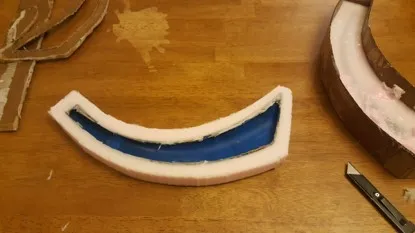
Figure 5 – Removing the supports
Then I let it cure. The demold time for this material is supposed to be 12 to 18 hours, but only after about 48 hours was I able to remove the cardboard and the fins. At this point I finally allowed myself to think this might actually work.
Silicone Mold – flat surface work-around
After I removed the fins and turned the mold right-side up I noticed a new problem. Because I botched the pouring of the silicone, the molds did not have a flat surface to sit on, and some portions were paper thin (see the dark spots in Figure 4). To protect the thin spots while leveling out the rest, I trimmed the bits sticking out the most and applied silicone caulking to the bottom of the mold. I turned the molds right-side up and let them cure on some aluminum sheets. Part of one of the molds was still a bit tacky and adhered to the aluminum, which is OK on the bottom of the mold.
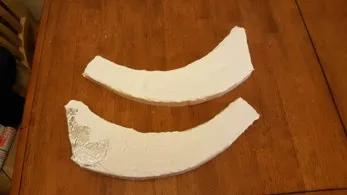
Figure 6 – Flattening the bottom
Now I’m ready to start making the fins. I will show you that process in the next article. You can read it here: Casting the Fins.

About Brandon Harris
Brandon is a BYU-Idaho graduate with a Bachelor’s Degree in Mechanical Engineering. He is an avid tinkerer, and consummate rapid prototype hobbyist with prior experience designing for the Architectural/Construction industry. Brandon is part of the technical support team for GoEngineer serving as a PDM specialist since August 2018.
Get our wide array of technical resources delivered right to your inbox.
Unsubscribe at any time.