Revision tables are an industry standard way to easily digest changes to a design or drawing since initial release or over several releases. These tables can list a variety of information such as the approval staff or location on the drawing that was changed. Though there are several factors, all revision tables will have the details or description of the change as well as the date the change was released.
SOLIDWORKS PDM Creating PDM Revision table
The 2018 release of SOLIDWORKS PDM revision tables can be driven by the workflow in SOLIDWORKS PDM. Now revision tables can be added to drawings with no extra work by the engineers or drafters that are creating the drawings. As soon as a drawing is approved its revision table will be updated with the relevant information.
Adding a revision table to PDM
There are several steps in setting up the vault to be able to push revision information to a drawing. Once these are completed the vault can be configured through the workflow to push this information to any drawing you’d wish.
Step One: Variables
Before variable data can be pushed to a revision table a new attribute needs to be added to the variables definition. Open the PDM administration application and log in as an administrator level account. Expand variables, open one of the variables to be pushed to the drawing, add the following block (listed below) and verify the correct extension is added.
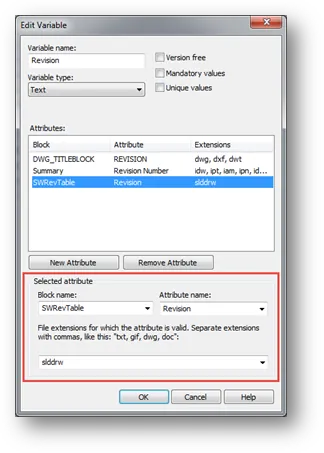
Block Name: SWRevTable Attribute Name: <variable name>
Extension: slddrw (Solidworks drawing)
After the required attribute has been added to the variables desired on revision table, the next step is to activate and configure the revision table extension in PDM. Collapse the Variables section and look for the new menu icon SOLIDWORKS.
Step Two: Revision table setup
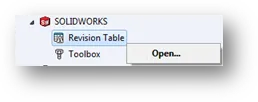
The Revision table can be found underneath the new SOLIDWORKS menu item. Either double click or right click and choose open to access the Revision Table options.
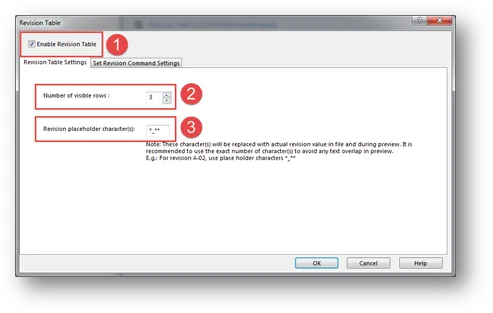
- First enable the revision table feature
- This is the number of rows to be used in the revision table within SOLIDWORKS
- This is the format to be used by the revision table. For this example *_** would correlate to to a revision format similar to B_04. Change this needed for the revision scheme defined in the vault.
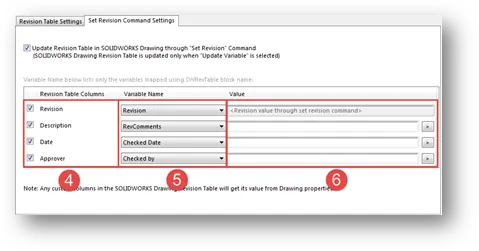
Note: steps 4-6, these options specifically apply to manually setting the revision using the ‘Set Revision’ command. These options do not apply to the rev table being updated through the workflow.
4. These are the embeded variables that are added to the Revision table by default inside of SOLIDWORKS, these can be added or removed with the check box to the left
5. These are the variables that were defined in the previous section. If these drop downs are blank see step 1 on how to create these.
6. These are for if the user wishes to overwrite or create default values, all of the variables are driven by the workflow so this was left blank.
Configuring the revision table information
Now although the revision table has been enabled there are several steps to configure and use this new feature. These steps are subjective and are going to depend on the environment to which this is being added. This will cover some examples to assist in this step. The 2 next things that need to be added is, first, a way to populate the variables and second, is a SOLIDWORKS template with the revision table added with the correct fields.
Step Three: Populating values with the workflow.
1. Navigate to the actions tab to create the required actions.
2. Choose “Add Action” to create the required variable setting action.
3. After the action has been created it will be found here.
Note: the actions found in this list are run in order. Depending on the environment, it may be required to re-order this list for proper operation. This will be dependent on other actions that are activated by this workflow transition.
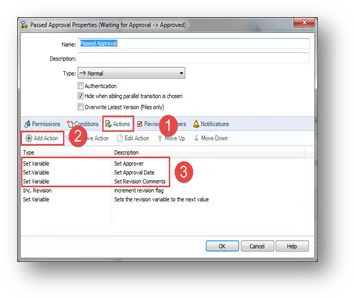
4. This is the description that will be found on the action list. Naming this is recommended to aid in locating the appropriate action.
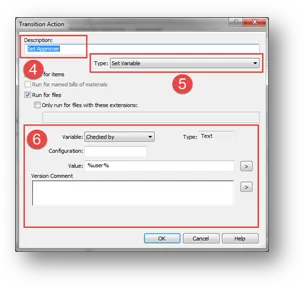
5. The type of action for this will be “Set Variable”.
6. This is where the variable is selected as well as the value that will be set to this action. In this window the user who initiated the transition is pushed to the “Checked By” variable.
Step Four: SOLIDWORKS Drawing Template
The last step is to configure the drawing template for SOLIDWORKS to add the revision table by default on all drawings as well as configure what columns will be added by default. Open SOLIDWORKS and then check out and open the drawing template that will have the revision table added to it.
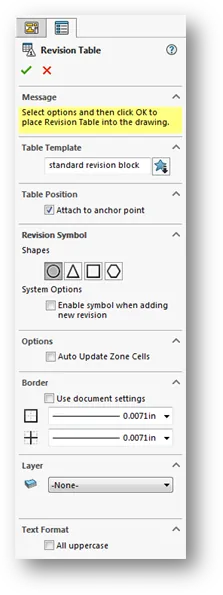
The revision table tool can be added by going to
insert > tables > Revision table
After this the menu to the right will open allowing the revision table to be configured. The default attach point is in the top right of the window. This was selected in case drawing sheets are changed. The table will update and move to the top right.
Once the table has been added, it will be loaded with the default columns: Zone, Rev, Description, Date, Approved. The example used here didn’t incorporate the Zone column, so it can be easily removed by right clicking on the Column and choosing
Delete > Column .
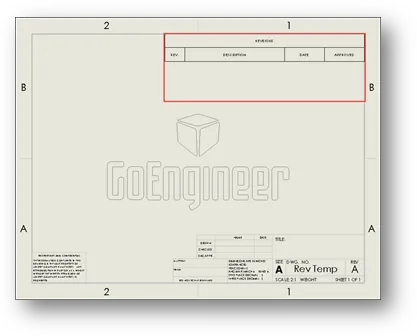
Once the template has been updated with the revision table, save the template and check it back into the vault. Now as users create drawings, it will have the header for the Revision table. As the drawing becomes approved, the table will automatically update with information from the transition.
![]()
About GoEngineer
GoEngineer delivers software, technology, and expertise that enable companies to unlock design innovation and deliver better products faster. With more than 40 years of experience and tens of thousands of customers in high tech, medical, machine design, energy and other industries, GoEngineer provides best-in-class design solutions from SOLIDWORKS CAD, Stratasys 3D printing, Creaform & Artec 3D scanning, CAMWorks, PLM, and more
Get our wide array of technical resources delivered right to your inbox.
Unsubscribe at any time.
×
![]()