The purpose of this document is to highlight the tools available to compare SOLIDWORKS PDM file versions from least to most effective.
There are three ways to compare PDM versions of a file:
- Visually inspecting changes from the file explorer and the Preview Tab in PDM.
- Using the Compare Command found in the History dialog box in PDM.
- Using the Compare Documents command found in the SOLIDWORKS CAD program.
Visually Inspecting Changes
This is the easiest and most straight-forward way of comparing version changes. Using the file explorer window, select a file located within the PDM vault with multiple versions, get the version needed to compare, and use the preview tab to inspect changes. Anyone with PDM Professional or Standard and any of the PDM client versions (CAD Editor, Contributor, or Viewer) installed can perform this visual inspection. The obvious disadvantages are that there is no side-by-side comparison, and there are no tools to track down the changes (aside from a keen eye and good memory).
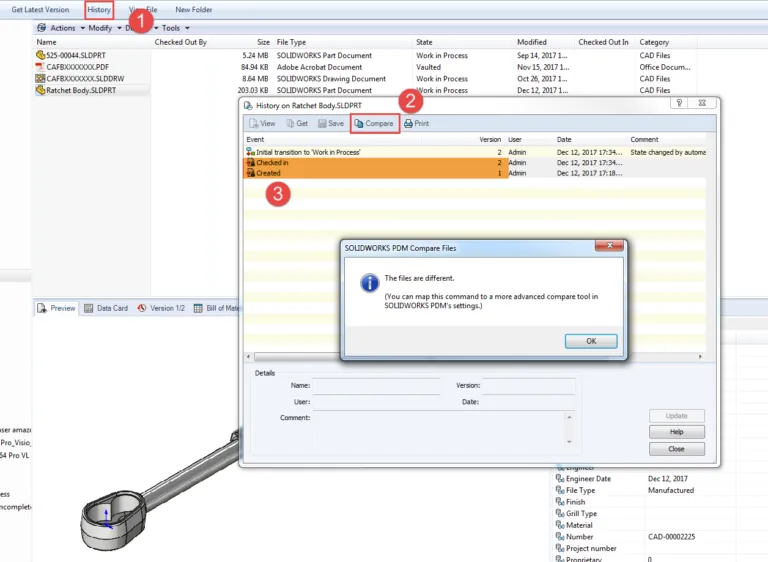
Using the Compare Command within PDM
A better way to compare versions of a file is by accessing the Compare command in the file explorer window in PDM:
1. Using the file explorer select a file within the PDM vault and select ‘History’ in the Windows Explorer Toolbar.
2. In the History Window, choose the versions to compare.
3. Select ‘Compare’.
At first, the results are not very promising. The dialog window is ambiguous in that it only states that there are differences in the versions without further explanation of what these differences might be; however, it gives a hint as to what can be done next to improve the results.
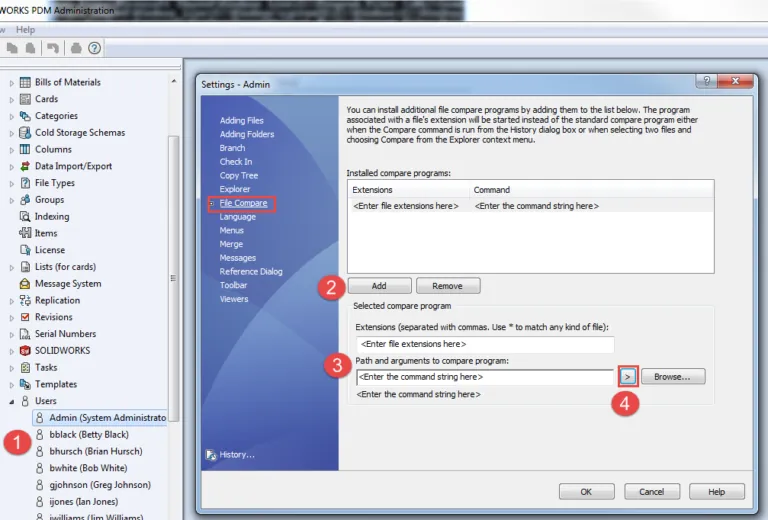
Adding a Comparison Application for the Compare Command
In order to get a more meaningful result from the Compare Command, an external comparison application* needs to be associated with the command:
1. Open the Administration Tool and log in to the PDM Vault. Under Users, right-click any user and select ‘settings’ to Open the settings dialog window.
2. In the settings dialog window choose the ‘File Compare’ tab and then ‘Add’.
3. Add the file extensions to be associated with the external compare application* and the full path to it. In the event the application is installed in a system folder, the system path will be replaced with the variable ProgramFiles to ensure the patch will be evaluated correctly for all clients regardless of operating system settings
4. Select the arrow to choose from other system variables. Make sure to use quotes to enclose paths containing spaces. Select Argument “%1%” for the first file name to be compared and Argument “%2%” for the second file name.
*It is beyond the scope of this blog to explain which external comparison applications can be used to configure the Compare Command, as these will vary depending on the document to compare.
Although a very powerful way to compare documents it does not come without its caveats. First, SOLIDWORKS PDM standard does not provide the functionality to add and configure a Comparison Application to the Compare Command; only SOLIDWORKS PDM Professional does, which means not every user will have this capability available for use. Furthermore, there is a need to understand the syntax necessary to set up the Compare Application that will be used. There is, however, an easier way to compare files albeit also with some limitations.
Using the Compare Documents Command within SOLIDWORKS
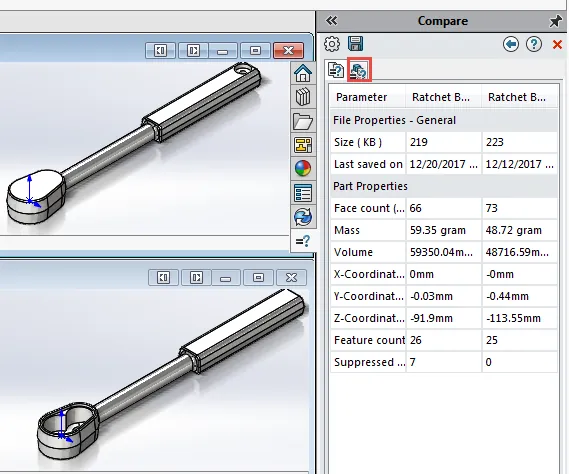
This command is used to compare files in SOLIDWORKS in general, but in this case, it will be used to compare versions of the same file for parts and drawings—specifically—in a PDM vault. Using it in this guise, the compare documents command allows us to compare the following: file property and part property changes, additions/deletions of features, volumes that have been added or removed in a model, and drawings changes.
After opening the part in question, from the Menu Bar pull-downs select ‘tools>compare>documents…’ and a new tab will appear in the task pane.
Comparing Features
After selecting the compare tab in the task pane:
1. Select the settings button to open the ‘Compare Options’ window. This will allow to specify details for the comparison analysis such as the color used to highlight unique and modified features, the color for unique face, the modified face, the material to remove/add for geometry, and so forth.
2. Select the file to compare from the reference document pull-down.
3. From ‘Items to compare’ select the checkbox ‘Document Properties’ and ‘Within SOLIDWORKS PDM Vault’.
4. Select the versions from the file to compare.
5. The comparison analysis can be run for differences in versions of parts or drawings only. Select whether to compare features, geometry, or Bill of materials (for drawings). In this case, select the ‘features’ checkbox and run the comparison.
SOLIDWORKS will start the comparison analysis of the versions selected, and the original window display will split into two windows showing the part versions selected. In the compare task pane, along with the ‘Compare Documents Result’ tab, the ‘Compare Features Result’ tab will also appear:
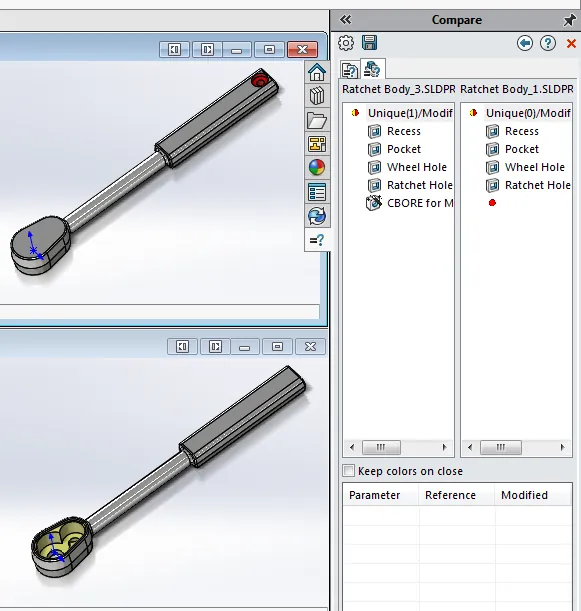
By selecting the ‘Compare Features Result’ tab, the display will change to include differences in features by highlighting changes to existing features in yellow, while using red for additions/deletions to the part. A red dot also appears by the deleted feature in the Compare Features Result pane to indicate the change:
Comparing Geometry
After selecting the compare tab in the task pane, follow the same steps highlighted under ‘Comparing Features’ with the exception of selecting the ‘Geometry’ checkbox instead (or in addition to features).
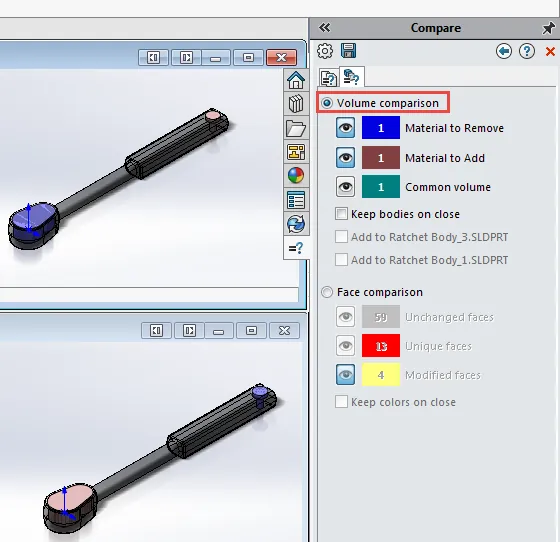
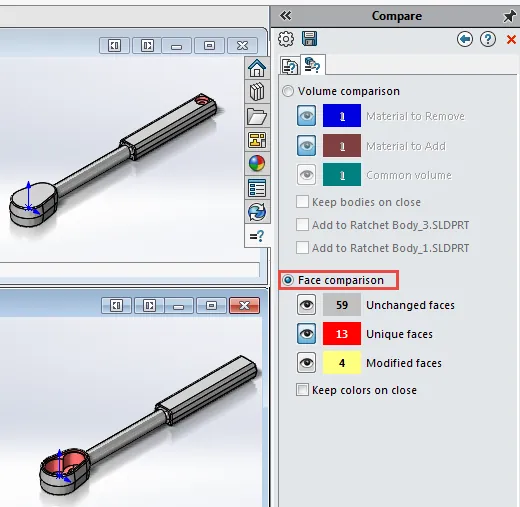
By selecting the ‘Compare Geometry Result’ tab, the display will change to include either a volume comparison or a face comparison (depending on the option selected). The volume comparison allows the user to change the view based on material to remove, material to add, and common volume, with a distinct color to highlight each. In this scenario, the ‘Material to Remove’ option (in blue) and ‘Material to Add’ option (in brown) are selected:
The Face Comparison allows inspecting unchanged, unique, and modified faces on both parts. In this case, the ‘show unique faces’ option (in red) is selected:
Comparing Drawings
Drawings can be compared similarly but with a catch. Open the drawing in question, and from the Menu Bar pull-downs select ‘tools>compare>documents…’ In ‘Reference document’, choose the drawing. Under ‘Items to compare’, select ‘document properties’ and ‘within SOLIDWORKS PDM vault’. Pick the versions needed and run the comparison.
The caveat is that this only compares the document properties for each drawing and not the entities defined in the drawing space. However, you might have noticed that there is a tool under 'tools>compare' that says DrawCompare. This does exactly what you would expect, but with one key point to make.
DrawCompare lets you compare drawings and review any visual differences but they must be separate files. This means that within PDM, you cannot use DrawCompare to compare two different versions of the same file. To do that, you'll need to save a separate copy of each version and compare them with DrawCompare.
In conclusion, PDM versions of a file can be compared by:
- Visually inspecting changes using the ‘preview’ tab in the file explorer in PDM. The advantage of doing so is that anyone with either PDM professional or standard running any of the PDM clients types can do this. This method is neither specific nor exact.
- Using the Compare Command found in the History dialog box in PDM. The advantage of using this method is that essentially, any file can be compared, as it can be highly configurable (provided the user can specify the external comparison application to be used). This advantage is also its undoing. For users not experienced enough with writing the necessary syntax, properly configuring the comparison command in PDM can be intimidating. It also requires PDM professional although it can be used with any client type.
- Using the Compare Documents command found in SOLIDWORKS CAD program. This is the most effective and easiest method for comparing file versions; however, it can only be used for parts and drawings and it requires the user to have PDM Professional, a PDM Client Editor, and SOLIDWORKS installed.
- DrawCompare lets you compare two drawings and see the differences. But the drawings must be separate files, so it cannot compare two versions of the same file unless they are saved separately.