Introduction to Structural Analysis Using SOLIDWORKS Simulation Tools
Sooner or later these questions may go through our minds:
- Was it called Mohrs Circle, Von Mises, von my-says?
- Where is my TI-86?
- Is my design strong enough?
What these questions have in common is Engineering theory and uncountable hours and years of stress (get it?). Gladly for SOLIDWORKS Standard licenses and up, you don’t need to worry about re-sharpening or learning FEA since everyone has access to SOLIDWORKS SimulationXpress, a quick analysis tool to help users evaluate design decisions.
Does that mean you can perform some FEA simulations for free? Yep, since 2008 users can effectively examine the effect of forces and pressures applied to a part model with SimulationXpress (previously known as COSMOSXpress). SimulationXpress uses the same solver you get with SOLIDWORKS Simulation Standard. You can activate SimulationXpress by following these instructions.
There are some limitations when dealing with complex setups, but the results would match if you ran SimulationXpress studies in SOLIDWORKS Simulation Standard. We’ll look at some of the differences further in this blog.
Case study
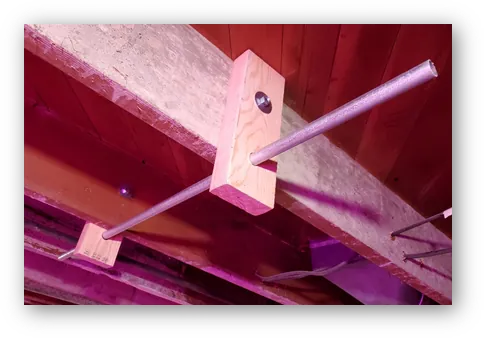
Let’s take quarantine as an example. I am eating well, staying at home, and becoming more gravitational. I found a decent spot in my unfinished basement to install a pull-up bar between joists with leftover materials from previous projects. I’m going to use SOLIDWORKS SimulationXpress to see how safe it is to hang from a ¾ in hole in a 2×4.
Since I’m not a carpenter, I wasn’t sure where the best placing for the bolt hole was, so I ran a quick SimulationXpress study to see where the stresses were the least. I assume the neutral axis of the joist will be the ideal bolt hole position since removing material from low stress areas is a common way to reduce design weight. I want to confirm the support beams contact is not doing anything funny to the stress distribution. This is where FEA is incredibly useful.
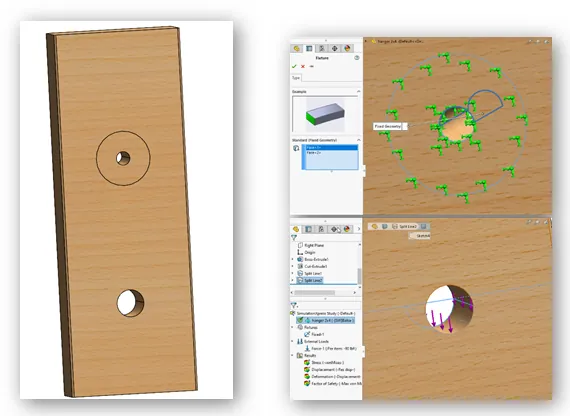
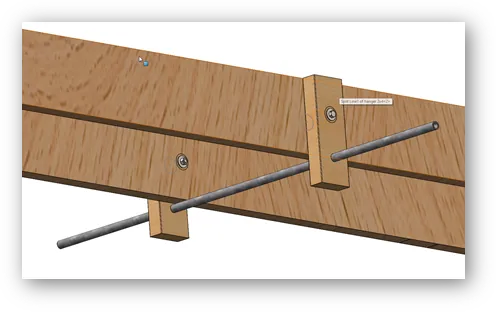
I modeled the joist with the hole for my 3/8 bolt and used Split Line to create a separate face for where the large washer and bolt will push. I added separate faces for the point of contact between the supporting beams and the joist for fixturing.
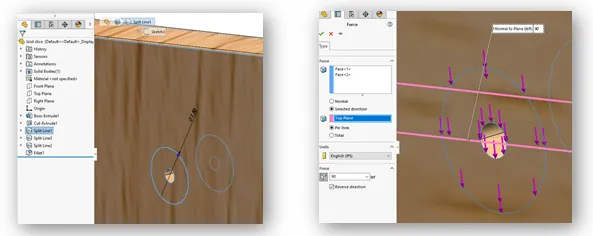
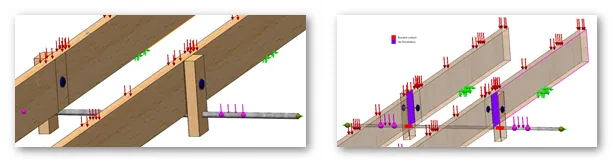
Since my weight is going on two beams, I set the load as half of my weight of 180lbs distributed along the two washer faces as 90lbs (purple arrows below). Assuming the torque keeps it from sliding down, SimulationXpress allows you to select the direction of the force.
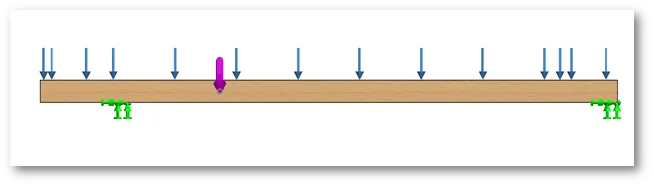
I added fixed faces in the joist points of contact with support (green arrows above). After some Googling, I found a couple of heavy equipment installation websites that claimed joist floors should hold up to 50lbs per square foot.
Assuming a safety factor of 10 to include a long fatigue life, I’ll add a 5 lbs/ft² pressure to the top face (blue arrows above). Due to the material complexity of structural lumber, I decided to assign the default Balsa wood as the material. My basis is if Balsa wood is safe, I can rest assured structural lumber will hold even better.
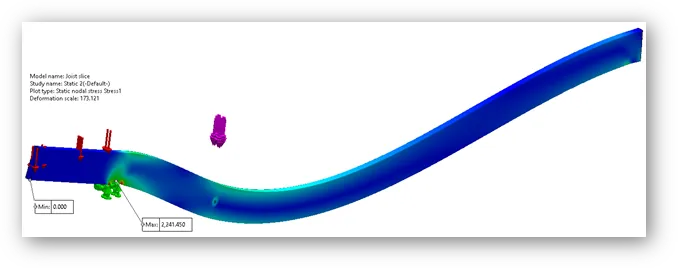
The results come out with a deformation scale of 173 so we can see what is happening. Unlike SOLIDWORKS Simulation Standard, SimulationXpress does not have the option to turn off deformation scale. In the plot above, the points of contact with the support beam can be seen as elevated stresses near the left and on the right of the joist. I can very clearly see the center of the beam is definitively a good place where to drill the hole since there is very little stress.
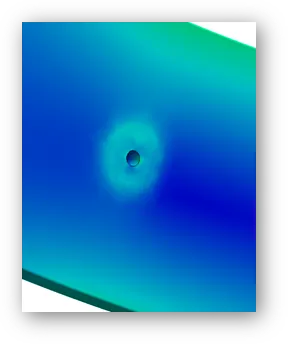
In fact, we can clearly see the bolt stress is almost fully isolated from tension and compressive stresses. It’s time I move onward with the plan.
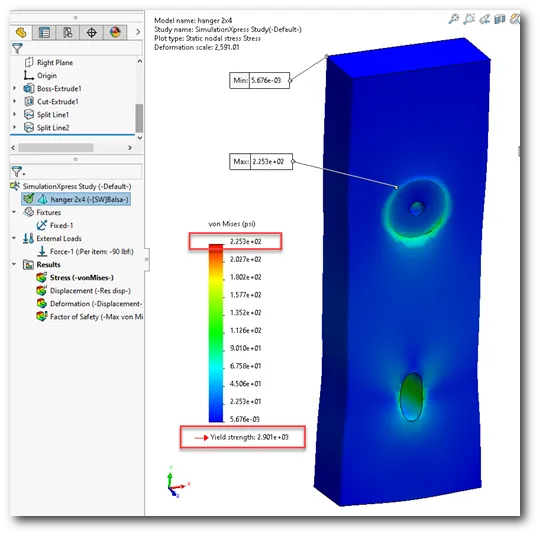
The next question is where to drill the hole for the pull up bar on the 2×4 piece bolted onto the joist. I also used Split line to select faces of interest. This time I split the bolt hole face since the worst-case scenario includes the forces concentrating here.
After running the results with high mesh density, I can see a maximum stress of 225 psi around the bolt hole, this means the pull-up bar will not be a concern at all. In fact, Balsa wood yield strength is 2900 psi giving me a safety factor close to 12 and since engineered wood is much more rigid, I am claiming this a victory.
In fact, if I check the safety factor plot on the entire part, I don’t see concentrations of stress unless I have it show me places with an FOS of 16 or below (see below).
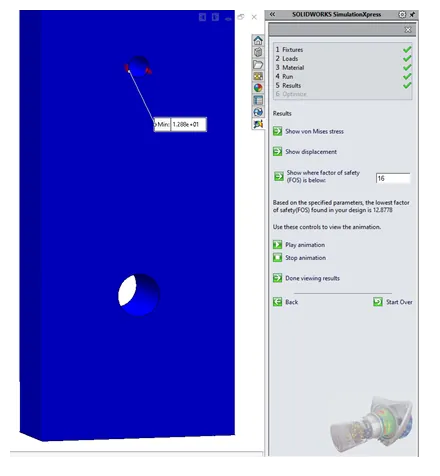
This reassures me that my pull-up bar is going to work without any bad surprises. And all by using the SimulationXpress functionality. Any SOLIDWORKS user could do this. If you need help getting started, the video below demonstrates how to activate it on your computer.
SOLIDWORKS SimulationXpress vs. SOLIDWORKS Simulation Standard
I used Split lines to avoid the need of multiple bodies, I did not simulate pre-load bolt stresses, nor did I take in account the slight torque generated by the 2×4 offset. This is because SOLIDWORKS SimulationXpress only supports single body, lacks bolt connectors, remote loads and a few other features. There are a few of other limitations listed below:
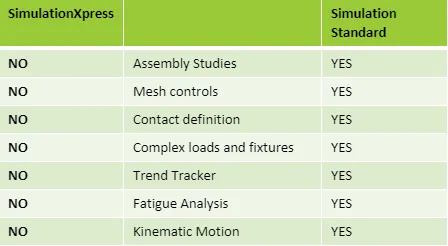
After all, SOLIDWORKS SimulationXpress is a free product. Regardless, it is a powerful tool, but to further study an assembly with contact forces and more complex setups, you would need SOLIDWORKS Simulation Standard. You can access a more detailed matrix of the SOLIDWORKS Simulation portfolio here.
How much different would the setup and results be? Let us find out!
SOLIDWORKS Simulation Standard Results
This is the first tier of the official Simulation Suite. Simulation Standard allows you to study full assemblies, manage computer resources, set up complex loads, study fatigue and even help you track how your design develops. You can even copy the setup from your SimulationXpress study into Simulation Standard.
How is this setup different?
- I create a Static study in the assembly file.
- Toolbox components will save you the trouble of creating individual Bolt Connectors during setup.
- Any assigned materials will be imported into the study.
- No penetration contact simulates component interactions to get accurate reaction forces.
- Advanced fixtures allow you to stabilize the study without unnecessarily stiffening components.
- A Beam mesh decreases calculation times without compromising result accuracy.
Below is how the Simulation Standard setup looks like:
Every color and symbol help quickly identify the assigned feature (left), we can even view contact faces (right). Note that all components are now part of the study.
SOLIDWORKS Simulation Standard also gives granular detail to view results. Viewing the displacement plot we can see there is a bending moment caused by my weight on the outside of the pull-up bar.

SOLIDWORKS Simulation Standard even allows me to see internal stress like the preloaded bolt pressure cone by applying a section view to the stress plot (see below). I can even see Contact pressure plots to make sure there are no stress concentrations in areas of interest that are out of sight.
These are just some of the benefits of SOLIDWORKS Simulation Standard .
Now I can get back into better habits with my pull-up bar. Let’s see how many pull-ups I can do by the time we all go back to work.

About Erick Vega
Erick has a B.S. in Mechanical Engineering and 6 has years of Microcontroller Automation experience. You can find him venturing out climbing into the Wasatch mountains, tinkering around with salvaged electronics or trying to program a Windows application that probably didn’t need to exist.
Get our wide array of technical resources delivered right to your inbox.
Unsubscribe at any time.