SOLIDWORKS: Splitting a Body into Multiple Parts
.jpg?format=webp)
Figure 1 – Final assembly
While working on projects in SOLIDWORKS, I sometimes find myself in the situation where I’m creating multiple parts that combine to make a whole. Over the course of my experiences, I have seen a few approaches to this.
One common way is the brute method, where you model each part individually and simply dimension them such that they will fit. This is crude and prone to errors if you need to make adjustments.
Another common method is to insert a master part into an assembly and then create each part in context. This is a great method, and there is an entire chapter dedicated to this in our SOLIDWORKS Advanced Modeling course. (Here’s a list of all of our professional SOLIDWORKS training courses.) There are many other ways, and each has its purpose.
.jpg?format=webp)
Figure 2 – Revolved surface in the final shape
In my example, I’m working on a project where two parts will be patterned, yet fit like puzzle pieces (Figure 1). Both pieces are really two parts of the same whole, so I modeled them in the same part file. I began by creating a revolved surface shaped as I wanted the final product. I then trimmed off the portions that will be patterned later.
I sketched the shape of the pieces on a plane normal to the remaining sliver. Here I used Convert Entities to capture the shape on the sketch and Offset to define what will be a gap in the parts (Figure 3). I then used Split Line to project that sketch onto the curved surface and Delete Face to remove the unwanted portions. What is left is two surface bodies that are perfectly shaped (Figure 4). I thickened the surface bodies to create a solid body and added some mounting geometry.
.png?format=webp)
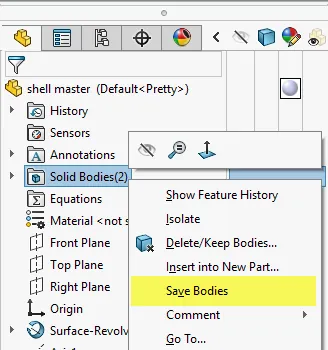
I was tempted to do a Save As at this point, creating two files from this one. I would then use Delete Body on the part I did not need and voila, two parts. The problem with this is they are not linked in any way, so if I changed something, I would have to do that twice. Instead, I used the Save Bodies command. This creates new files from the one part. These files are still referencing the original, so any changes done to the master file will propagate to the new files.
With my new files, I can add them to an assembly and have the parts articulated as intended.
.gif)
I hope you found this SOLIDWORKS tutorial helpful. Learn more about some of the tools I mentioned in this article below.
Convert Entities
Convert Entities will project the edges of a face to the active sketch.

Offset
Offset will copy a line at a set distance.

Split Line
Split Line will project a sketch onto a face, any closed contours will create a separate face.

Delete Face
Delete face will delete a face and has options to patch or fill the created void.

Thicken
Thicken will create a solid body from a surface body by extruding the face at a given distance.

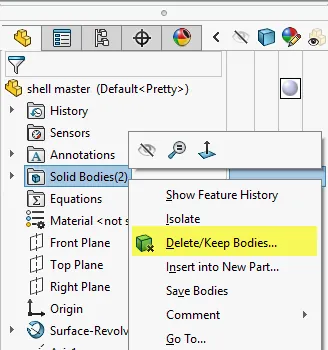
Delete/Keep Body
Delete/Keep Body can be found by right-clicking on the Bodies folder. It is a way to remove unwanted bodies.
Save Bodies
Save Bodies can be found by right-clicking on the Bodies folder. It will create a new part file from the selected bodies. The new part is linked to the original file, and Save Bodies is a feature that shows up in the feature tree and can be edited.

About Brandon Harris
Brandon is a BYU-Idaho graduate with a Bachelor’s Degree in Mechanical Engineering. He is an avid tinkerer, and consummate rapid prototype hobbyist with prior experience designing for the Architectural/Construction industry. Brandon is part of the technical support team for GoEngineer serving as a PDM specialist since August 2018.
Get our wide array of technical resources delivered right to your inbox.
Unsubscribe at any time.