A Tip for Changing Tips: Fortus 3D Printer Edition
Changing the tip/tips on a Professional Stratasys FDM 3D printer can seem like a pretty big job, but if you approach this with a ‘pit crew’ mentality of, get in and get out, it really is a quick and easy procedure. Here are a few “tips” for changing the tips.
Please note: Depending on what Fortus 3D printer you own, the display screen interaction may vary, but when you get under the hood, and you’re handling the head assembly itself, that aspect of these procedures will be the same.
How to perform a tip change
Working off the most recent platform, the Fortus 380/450 systems, going from the build screen on the main menu, select the “Tips” icon, on the bottom row of selections. On the next screen, the far-left icon (of the three new ones that appear) is the Tip/Material Wizard button. This Wizard is very intuitive, so just follow through the prompts and answer the questions.
Note: When you’re on the first screen of the wizard, it’s a little unclear as to what each of the buttons mean, so here’s a quick rundown. The far-right arrow button is essentially your “yes”. The middle “X” button will cancel the Wizard entirely, and the far-left arrow button will take you back a step if you want to make any changes to your previous selections.

As you’re answering the initial prompts, you’ll be asked to verify that you don’t have a part on the platen.
From that question, the system will raise the build tray, which will allow you to clean out the main chamber area.
It’s important to follow these procedures when you’re changing between material families. (e.g., if you switch to an engineering material package from the standard package).
So, remove the build tray, empty the purge bucket, and vacuum out the system as requested. The reason behind this is that there is a significant temperature change, from one material family to the next, and it’s very likely you’ll melt any fragments of material, left behind, in the chamber.
After you’ve completed those tasks and said “yes” (right arrow icon) to that screen, the system will start the material unload process, which will take around eight minutes.
The screen will now display a list of steps (i.e. removing the head, replacing the tips, putting the head back, and shutting the hood).
Taking a look under the hood
When you open the hood to remove the head assembly, note that the head is mounted in place by two captive, Allen screws, set in recessed holes on the head mounting bracket. Start by fully loosing those two screws.
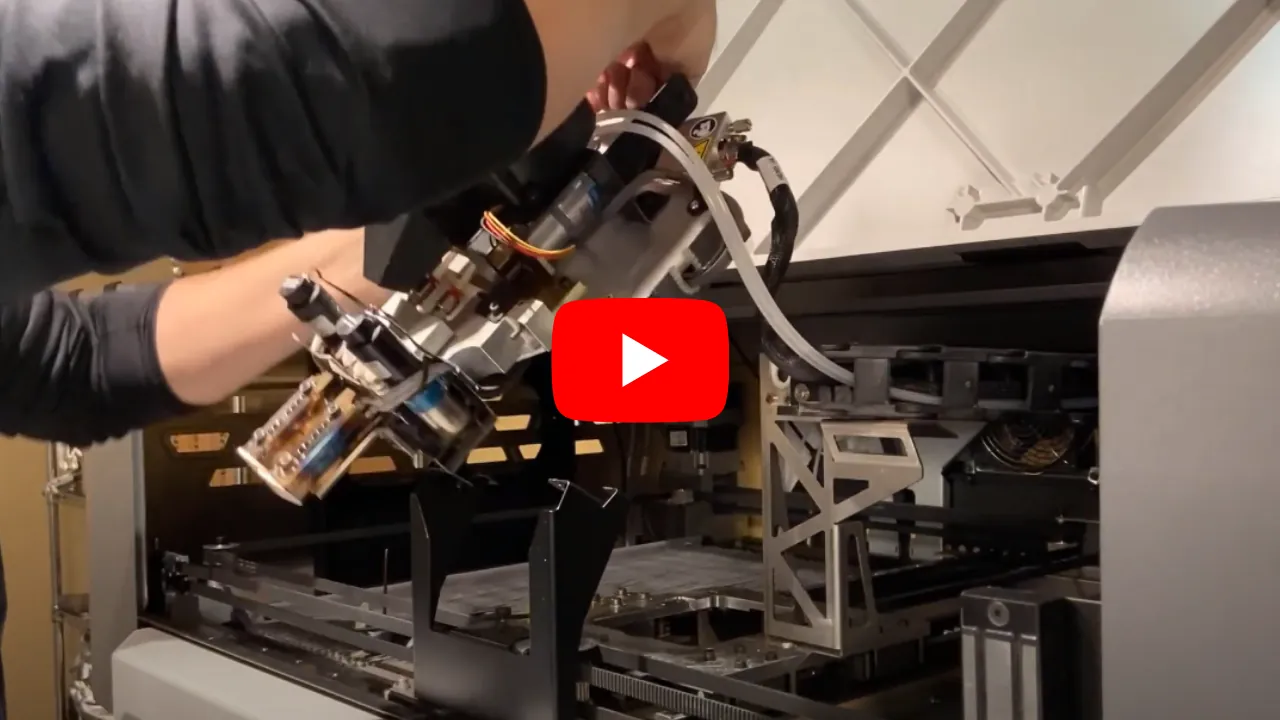
Pick up the head by the handle, with your right hand, and the left side, with your left hand (do not grab the head by the electrical head cable) and swoop it up and back to avoid the stationary head cable tower bracket and then place it into the service bracket.
Once in place, loosen the screws on the liquefiers to remove the tips. Note: These are not captive screws, so don’t take them completely out. Instead, loosen them enough to have about a 1/8” gap from the Allen screw head, to the liquefier block.
That gap is necessary as the tips have a collar that helps hold them in place when the liquefier is seated down.
With a pair of pliers, grab the tip, pull up (towards the liquefier) to free the collar, and then slide the tip straight down and out of the liquefier assembly.
Once out, place the tip safely (still using the pliers as the tip will be hot) on a surface outside of the machine head gantry.
 Safety Note: The liquefiers are always HOT (never cooler than 100°C/212°F). Please, always be aware that these features of the system are never cold.
Put the new tips in and tighten the screws on the liquefier so that they’re snug. (Do not torque or over-tighten these as the thermal expansion is high, going from 100°C to over 300°C when the tips are extruding material. Over-tightening the screws can bind them or cause them to sheer upon removal.)
Pick up the head by the handle and the left side to replace it back into the head mounting gantry. (The head has two locator pins to help you guide it back over the mounting holes for the captive securing screws.)
Once it’s seated, tighten the two screws that mount the head into place. As a quick check, take your hand and, using the head handle, move the head back and forth to verify that it’s been securely reseated/secured.
Remove any tools or old tips, from the gantry area, before closing the hood.
On the next screen, the Wizard is now going to ask you whether your newly installed tips have been used in the past. (A tip odometer) This is to help you track how much material has been run through your tips to monitor a tips recommended “useful” life.
Lastly, the system will ask you to install the build sheets, verify the vacuum, and put in the canisters of material, based on your previous selections in the wizard. The machine will then go through the rest of the process of loading the material and running a calibration procedure to include the tips and a calibration print part, to verify the tips location. (Please see our video on Fortus tip calibration for further details on that process.)
That’s a wrap! I hope you found this article about changing tips on a Fortus machine helpful. You can watch this entire process by checking out the video from our YouTube channel below.
Related Articles
Fortus Tip and Build Sheet Combinations: 3D Printing Tutorials
Stratasys F123 Series Print Head Storage Solutions: 3D Printing Hacks

About Michael Brenholt
Michael Brenholt has over 10 years of engineering experience and is currently an Operations Specialist and Stratasys Certified Application Engineer at GoEngineer based out of Atlanta, GA. He graduated from the University of Wisconsin-Stout with a Bachelor's degree in Industrial Technology and a Master’s Degree in Training and Development. Michael is an avid hobby actor, having performed in 22 stage shows, and enjoys the outdoors, hiking 33 waterfalls in a given summer!
Get our wide array of technical resources delivered right to your inbox.
Unsubscribe at any time.