Complete SOLIDWORKS Clean Uninstall Guide
If you need to uninstall SOLIDWORKS, this guide walks through the entire process including preparing your machine and uninstalling Windows items, SOLIDWORKS items, SOLIDWORKS prerequisites, and more. Let's get started.
*Disclaimer: This document assumes that SOLIDWORKS was originally installed using the default locations. If our installation location for SOLIDWORKS differs, please adjust the procedure below accordingly. The procedure in the following document requires access and edits to the Windows registry. Any such edits are done at your own risk and should only be attempted under the advisement of your IT professional. If you are uncomfortable with following the procedure below, please seek assistance. It is advised to backup your registry and any valued data before making any changes to the system registry. GoEngineer assumes no responsibility for any consequences, unintended or otherwise resulting from changes made to the system registry.
Preparing your machine
Confirm and create backup Copy Settings Wizard (CSW) or Manual Registry Export
- If the machine has multiple users. Run it for each user while they are logged in and setup a file naming convention like “SWSettings_UserName_Date.sldreg”.
- If the machine just has one user, then you can just create one file to hold all settings for example “SWSettings_Date.sldreg”
- For Manual Registry Export, go to the search bar and type in regedit.exe then press Enter. Depending on how your IT department has your permissions setup you may have to get one of them involved for this step.
- Once in the registry editor, navigate to the following keys, right-click on them and select Export. Then name them according to the file name suggested under each one.
- HKEY_CURRENT_USER\Software\SolidWorks
- HKCU_SWX_UserName.reg
- HKEY_LOCAL_MACHINE\SOFTWARE\SolidWorks
- HKLM_SWX_UserName.reg
- HKEY_LOCAL_MACHINE\SOFTWARE\Wow6432Node\SolidWorks
- HKLM_6432_SWX_UserName.reg
- HKEY_CURRENT_USER\Software\SolidWorks
- Backup all customizations like document templates, sheet formats, toolbox databases, weldment profiles, design library, etc.
- You can go to System Options | File Locations within SOLIDWORKS to verify the locations of any customizations. Note: Any files in custom locations will not be removed during uninstallation, but ones in any of the default folders will so make sure and double check this step.
- Create a restore point and/or backup of your system.
Items needed
- Obtain Software either via download from the customer portal or DVD. It is recommended that you obtain the latest service pack for the version you are planning to install.
- Local Admin rights/permissions on the machine. Domain admin will not suffice.
- For SA licenses you will need the serial number(s). For SNL you will need the serial number and license server name in this format “25734@ServerName”.
Uninstalling
Windows Items
- Disable UAC (User Account Control) by moving the slider to the lowest setting.
- Disable any Anti-Viral or Malware software if permitted. You may have to get IT involved in this step.
SOLIDWORKS Items
- Transfer License (For SA only, and only if you are moving machines or upgrading to a different major version)
While in SOLIDWORKS, go to the Help menu and select “Deactivate License”. This will bring up the SOLIDWORKS Product Activation dialog.
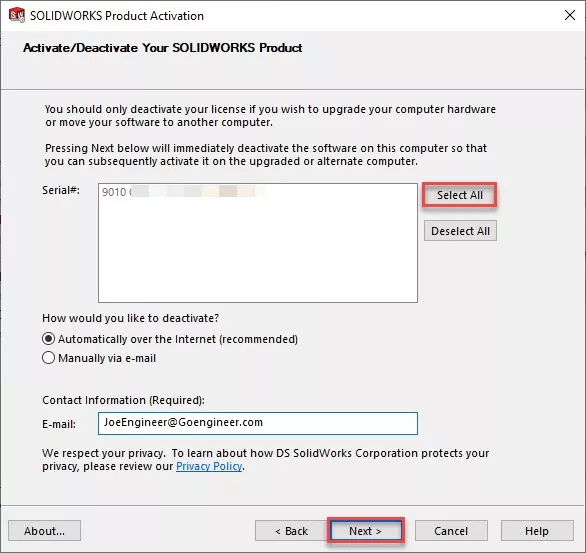
Then click the “Select All” button and click Next. Finally, you will see a completion dialog showing the activations were transferred successfully.
- Uninstall SOLIDWORKS via these steps below.
- Go to Start -> Control Panel -> Programs and Features. Select SOLIDWORKS 20XX SPX and then click Uninstall at the top of the list.
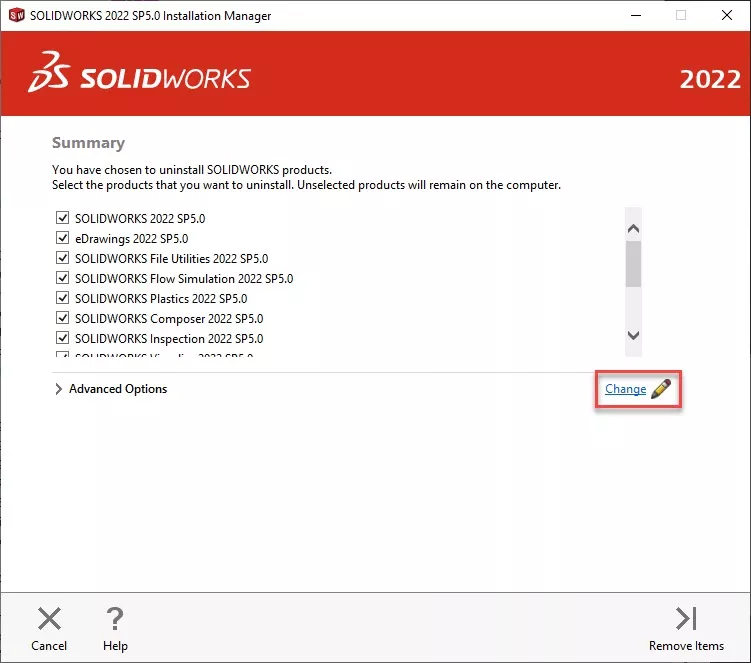
- This will open the SOLIDWORKS Installation Manager to the Summary page. Then select “Change” to the right of the Advanced Options section.
- In the dialog that comes up select the boxes for the items you want to have removed from the system. If you have multiple versions installed and you are not uninstalling the latest version some boxes will not be available.
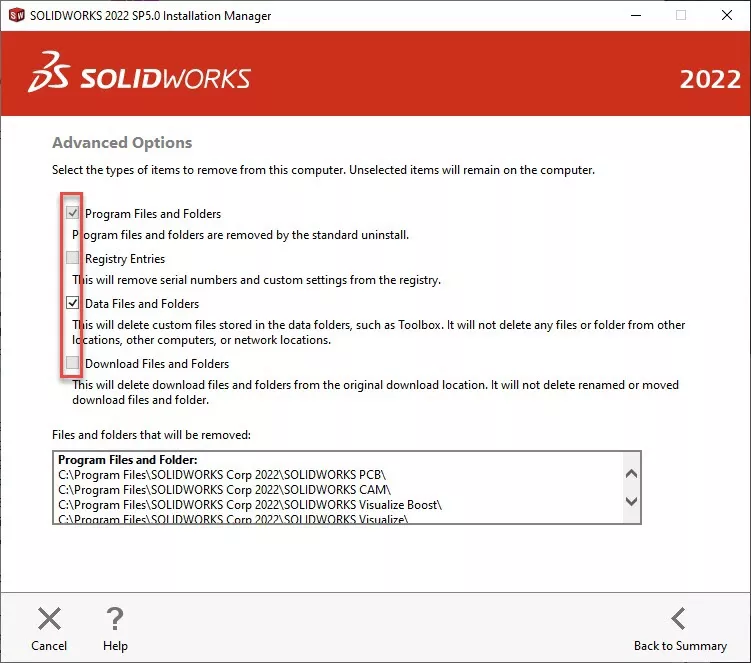
- Click “Back to Summary”, then click “Remove Items” to start the uninstallation process.
Note: This process will not remove any SOLIDWORKS Parts, assemblies, or drawings.
SOLIDWORKS Prerequisites
- Manually remove prerequisites. ** Not all may be installed on your machine depending on the SOLIDWORKS version. **
Bonjour
Microsoft .Net Framework 3.5 (Use Windows Components to Uninstall)
Microsoft .Net Framework 4.0
Microsoft .Net Framework 4.5
Microsoft Office Web Components 11
Remove all instances of C++ Runtimes
Note: Do not remove all if you have any programming or other CAD software installed. Contact us for the exact current list of runtimes to remove.
Microsoft Visual Studio 2005 Tools for Applications
Microsoft Visual Studio 2005 Remote Debugger Light
VBA 7.1- For SOLIDWORKS 2013 and higher, please follow these steps to uninstall VBA.
- Open Command Prompt (Start | All Programs | Accessories then right-click on Command Prompt and select “Run as Administrator”).
- Then type: msiexec.exe /X{90120064-0070-0000-0000-4000000FF1CE} and press Enter.
Manual System Deletion Steps
- Manually delete remaining folders and registry.
- Registry: (**Please use caution when Windows Start Menu > type “regedit” > press Enter) editing the Windows Registry, Deletions cannot be undone. **
- HKEY_CURRENT_USER\SOFTWARE
- \eDrawings
- ** If you have PDM installed, DO NOT DELETE. Delete only the IM & \SolidWorks SOLIDWORKS [version] subkeys. **
- \SOLIDWORKS 20XX
- \SolidWorks BackOffice
- \SRAC
- \Microsoft\VSTAHOST
- \Microsoft\VSTAHostConfig
- HKEY_LOCAL_MACHINE\SOFTWARE **Wow6432Node keys on 64 bit machines only**
- \eDrawings
- \SolidWorks the IM & SOLIDWORKS [version] subkeys. **
- \SolidWorks Corporation
- \SRAC
- ** If you have PDM Pro & Stnd installed, DO NOT \Wow6432Node\SolidWorks DELETE. Delete only the IM & SOLIDWORKS [version] subkeys. **
- \Wow6432Node\SolidWorks Corporation
- \Wow6432Node\Microsoft\VSTAHOST
- \Wow6432Node\Microsoft\VSTAHostConfig
- HKEY_CURRENT_USER\SOFTWARE
- SOLIDWORKS Directories: ()
- C:\Program Files\SolidWorks Corp\
- C:\Program Files\Common Files\eDrawings
- C:\Program Files\Common Files\eDrawings<year>
- C:\Program Files\Common Files\SolidWorks Installation Manager
- C:\Program Files\Common Files\SolidWorks Shared
- 64-bit Operating System Below Only
- C:\Program Files (x86)\Common Files\eDrawings
- C:\Program Files (x86)\Common Files\SolidWorks Installation Manager
- C:\Program Files (x86)\Common Files\SolidWorks Shared
- C:\Program Files (x86)\SolidWorks Shared
- Registry: (**Please use caution when Windows Start Menu > type “regedit” > press Enter) editing the Windows Registry, Deletions cannot be undone. **
Note: The “ProgramData” folder is hidden by default. Go to the Control Panel and select Folder Options. Open the View tab and select “Show hidden files, folders and drives” from the list and click OK.
-
-
- C:\ProgramData\COSMOS Applications\
- C:\ProgramData\SolidWorks
- C:\ProgramData\SolidWorks Electrical
- C:\ProgramData\SolidWorks Flow Simulation
- C:\SolidWorks Data - Note: delete all duplicates like (2) C:\SolidWorks Data (2)
- C:\Users\%username%\Documents\SolidWorks Downloads\SolidWorks [version]
- C:\Users\%username%\AppData\Local\Microsoft\VSTAHost\SolidWorks_VSTA
- C:\Users\%username%\AppData\Local\Temp\Solidworks
- C:\Users\%username%\AppData\Local\SolidWorks
- C:\Users\%username%\AppData\Local\TempSWBackupDirectory
- C:\Users\%username%\AppData\Roaming\SolidWorks
- C:\Users\%username%\AppData\Roaming\Microsoft\VSTAHost\SolidWorks_VSTA
-
Contact GoEngineer
Please contact us if you have any questions or issues with the steps above via one of the following methods.
SOLIDWORKS TRAINING
Expand your SOLIDWORKS skillset and enroll in a professional SOLIDWORKS training course. Choose how you want to learn, (online self paced or virtual classroom or in-person classroom or onsite) and the select your level of training.
Editor's Note: This article was originally published in August 2017 and has been updated for accuracy and comprehensiveness.

SOLIDWORKS CAD Cheat Sheet
Our SOLIDWORKS CAD Cheat Sheet, featuring over 90 tips and tricks, will help speed up your process.
![]()
About GoEngineer
GoEngineer delivers software, technology, and expertise that enable companies to unlock design innovation and deliver better products faster. With more than 40 years of experience and tens of thousands of customers in high tech, medical, machine design, energy and other industries, GoEngineer provides best-in-class design solutions from SOLIDWORKS CAD, Stratasys 3D printing, Creaform & Artec 3D scanning, CAMWorks, PLM, and more
Get our wide array of technical resources delivered right to your inbox.
Unsubscribe at any time.