SOLIDWORKS PDM Professional Automated SQL Backups

Please note: The following guide only applies to PDM Professional using SQL Standard. PDM Standard can only use SQL Express, which does not include these options.
Check out our PDM Standard SQL Backup guide for more information on your environment if you use PDM Standard.
SQL jobs and maintenance plans create workflows for the tasks needed to keep your database optimized, regularly backed up, and free of inconsistencies.
“Why do I need to create SQL-specific backup plans at all, though?” These days, this seems unnecessary when you’re likely already backing up the entire server with one tool. If you’ve read our PDM Backups Master List guide, however, you’ve likely learned why a snapshot isn't enough to ensure data retention in the event of a PDM server failure. Due to the nature of PDM’s SQL database usage, a snapshot may leave you with a mid-transaction database upon restore, and there’s a chance you’re left with a corrupt database afterwards.
Additionally, the databases’ log file does not truncate (complete, compress, and physically log the information) until an actual SQL-aware backup is completed. If that backup is not performed, the log will just keep growing until it fills the disk entirely. Backups are needed to preserve disk space. Snapshots are not SQL-aware – they don’t pause the database activity, and they don’t truncate your logs, which could leave you in a bad spot when you’re already in the middle of a disaster recovery scenario.
Methods for Automation
Maintenance plans and jobs configured through SQL Server Maintenance Studio will allow you to automate this action. Having frequent and regular database backups available will allow you to recover your data in the event of a failure.
There are two ways to set up backups in SQL:
Maintenance Plans (SQL 2022 and earlier): In SQL 2022 and earlier, the SQL Server Integration Services (SSIS) module was easily selectable as part of the base install. SSIS is what includes the Maintenance Plans section of SQL Server Management Studio (SSMS). So for SQL 2022 and earlier, we recommend Maintenance Plans.
Jobs (SQL 2025 and later): With SQL 2025 and beyond, SSIS is no longer a core component, and it requires some finagling with Visual Studio to get added back into your install. This is primarily because Microsoft is starting to push Maintenance plans into the “legacy” category, and therefore, move companies away from using them. Maintenance plans are extremely reliable and easy to use, but they can lack some scalability for larger or more complex environments. So, in looking to the future, we want to allow users a way to future-proof their setups now while still safely backing up their vault DB’s.
Prerequisites
To use either of these options, you will need to have SQL Server Management Studio (SSMS) installed. If you don't, you can get it here.
You’ll also need to ensure the SQL Server Agent is running on the SQL server in order to process the required tasks.
- To do so, open the SQL Server Configuration Manager (you can search for it in the Windows Start menu).
- Go to SQL Server Services in the left-hand menu, and ensure SQL Server Agent is running.
- If it’s not, right-click it and select Start.
Maintenance Plans
The Maintenance Plan Wizard includes prebuilt core plans, but manually creating plans gives more flexibility in execution.
Additionally, when implementing an SQL Server Maintenance Plan:
- SQL Server Integration Services is a required feature on SQL Server to run Maintenance Plans.
- Always ensure that a proper backup is in place before making any changes to the SQL database.
- Never manually create your own Index, or otherwise directly edit the Database.
- It is possible to run the plan while the vault is in use; however, overall performance may be affected while the plan is running. It is recommended to schedule this activity during off-hours.
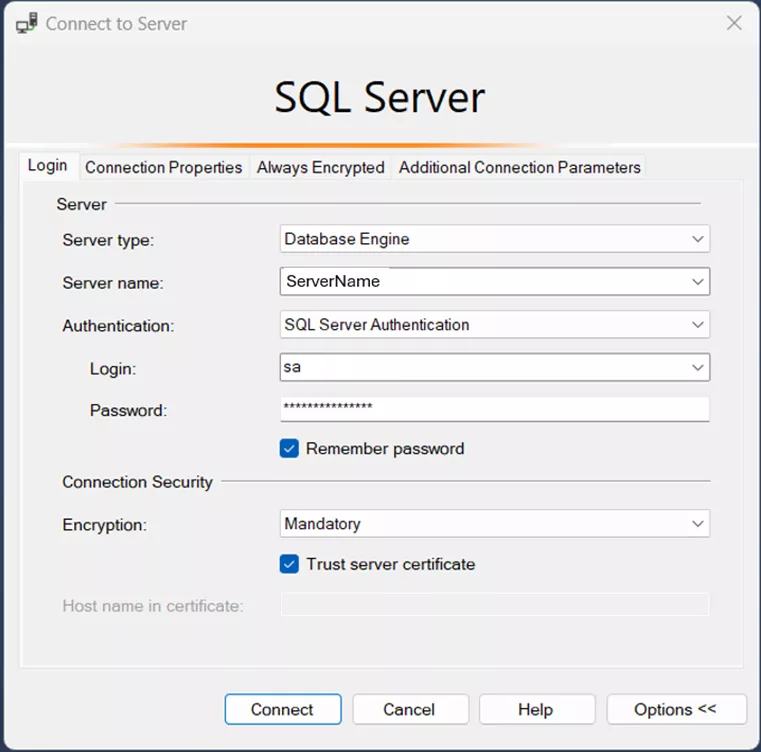
- Once installed, open SSMS and log into the database engine.
- In the Object Explorer to the left of the SSMS window, expand the Management node, and then right-click Maintenance Plan.
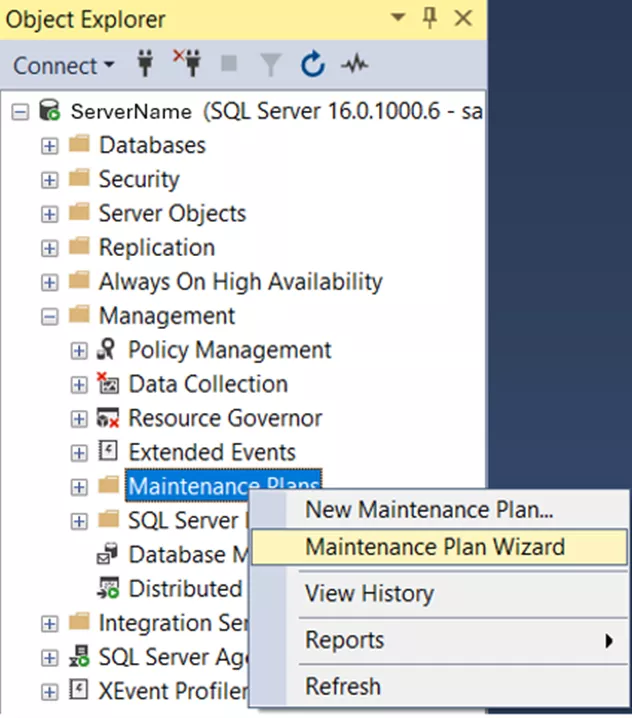
You’ll be able to choose between New Maintenance Plan and the Maintenance Plan Wizard. The New plan will allow you to create a plan manually. We will explore using the Wizard in this article. - Choose Maintenance Plan Wizard and then click Next on the new window.
- Select Plan Properties:
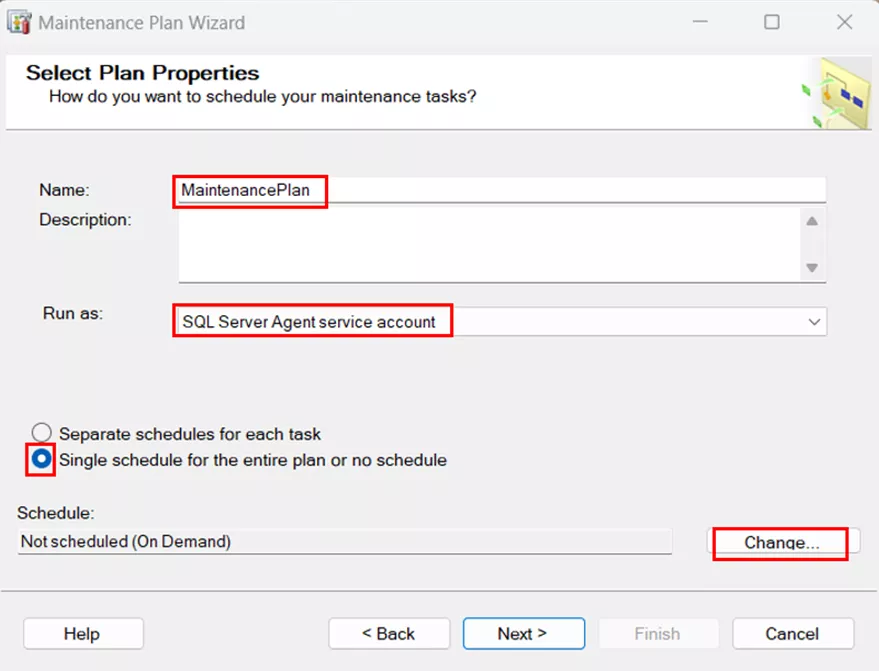
- Give your plan a name.
- Run As: SQL Server Agent service account.
- Select the button for Single schedule for the entire plan or no schedule.
- For the schedule, click Change.
- Set up the New Job Schedule:
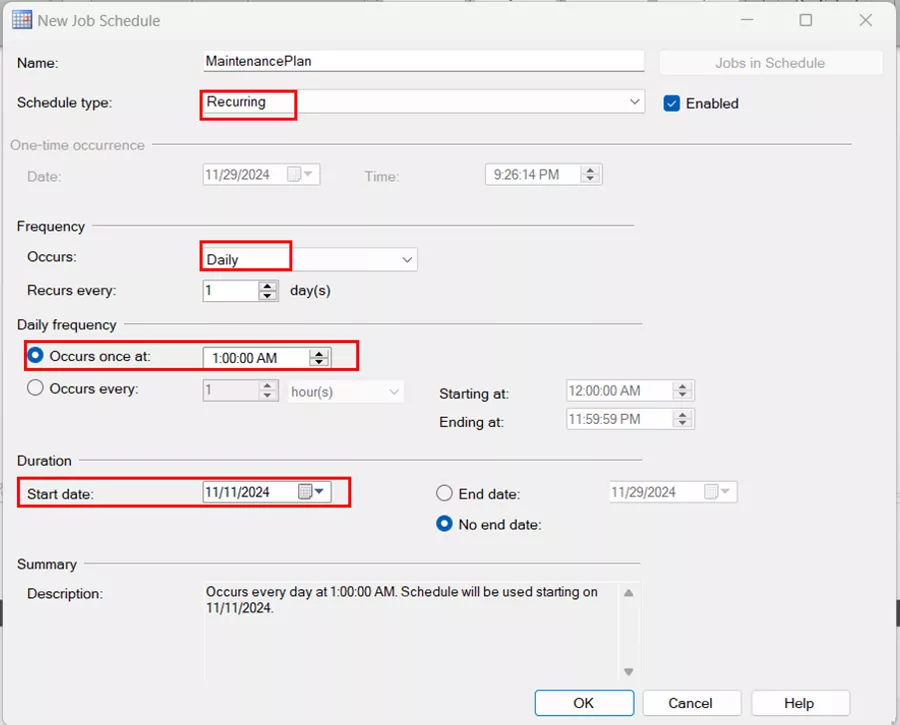
- Choose Recurring for the Schedule type.
- Choose Daily for the frequency of the action.
- Choose an off-peak time to run the action.
- Choose a date to begin the action and click OK.
- On the next page, select the Maintenance Task you wish to run. We will cover Backup Plans and Reorganize/Rebuild Plans.
Creating a Backup Task
- Walk through the steps for using the Maintenance Plan Wizard. Set the schedule to daily backups for the best possible chance of recovery.
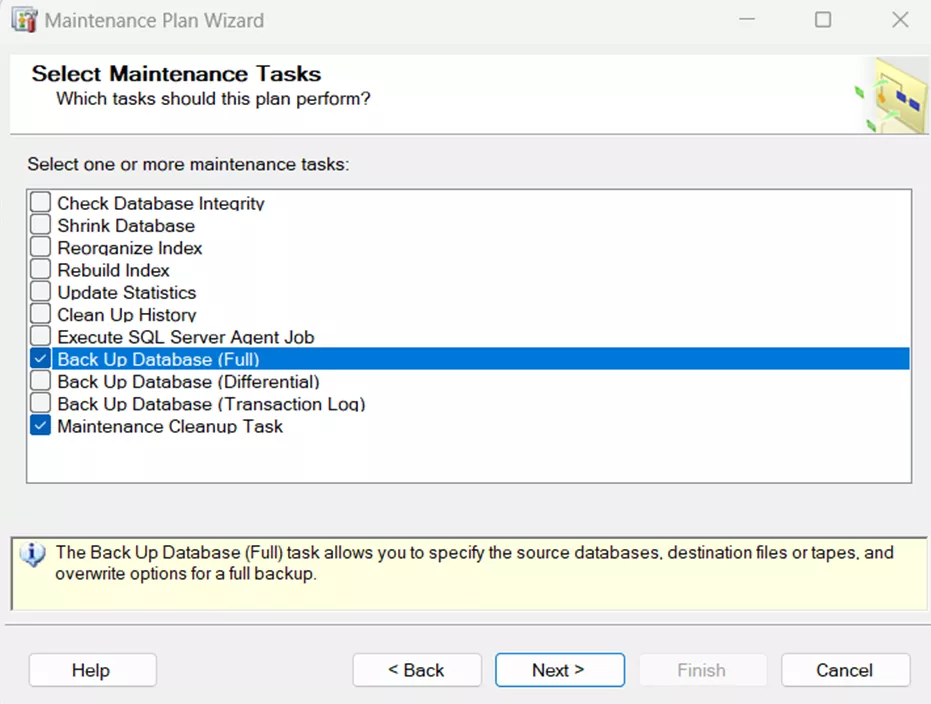
- On the Select Maintenance Tasks page, choose Back up Database (Full) and Maintenance Cleanup Task. Then, click Next.
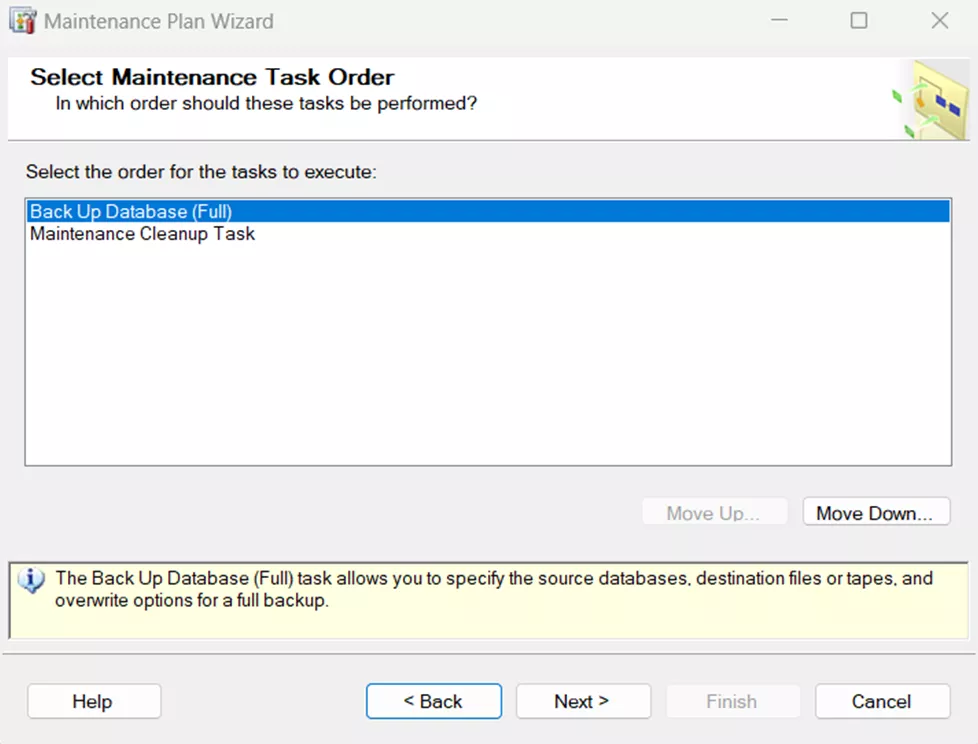
- On the Task Order page, ensure that the back up comes first, and the clean up task is second. Then, click Next.
- Define the Back Up Database (Full) Task.
- General Tab
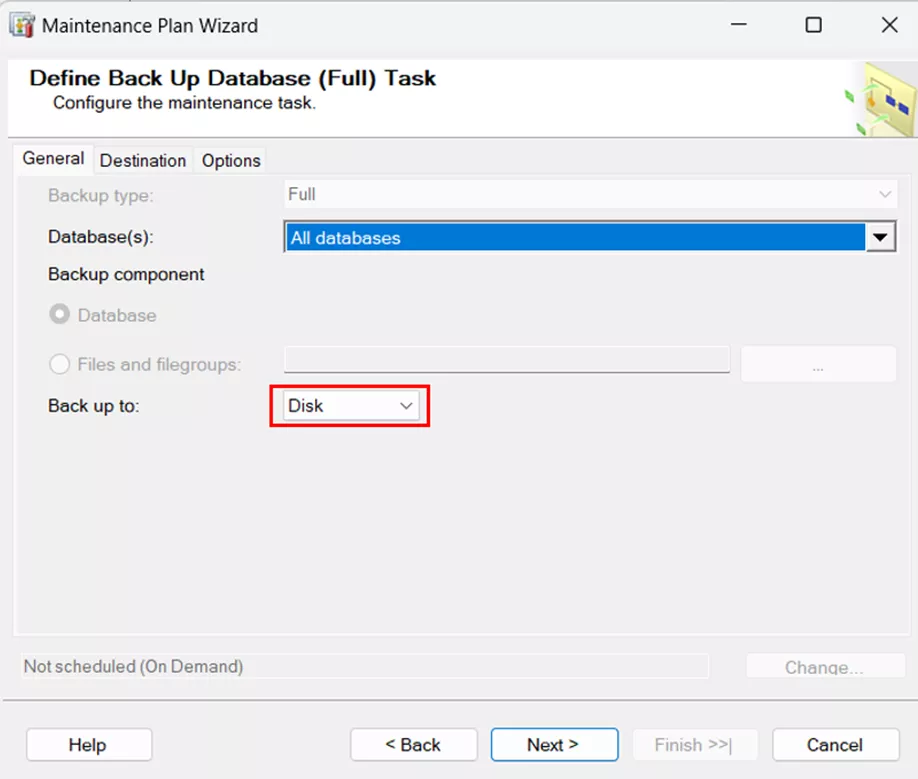
- Choose All Databases from the dropdown menu.
- Choose to back up to Disk. Then, click Next.
- Destination Tab
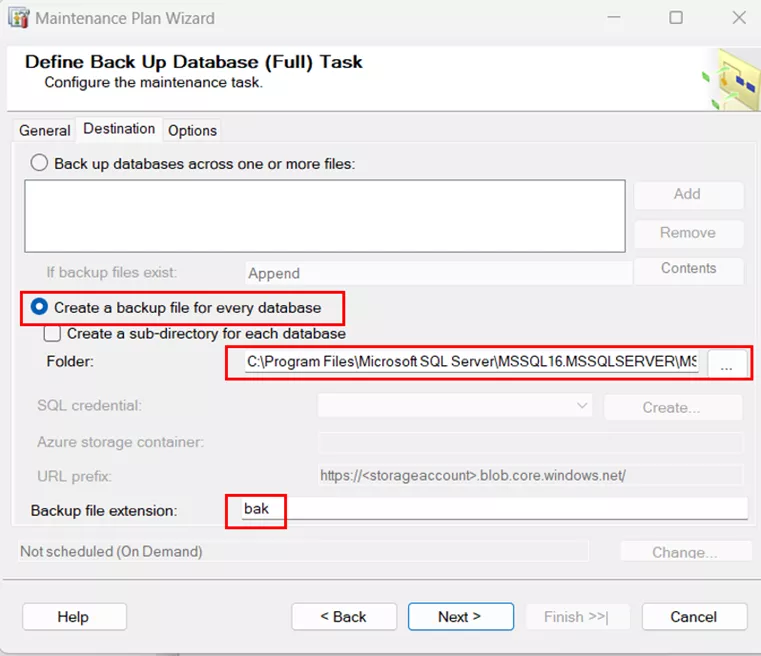
- Select Create a backup for every database.
- Choose a directory to put the backups in or leave it as the default.
- Ensure the extension chosen is bak and then click Next.
- General Tab
- Define the Maintenance Cleanup Task
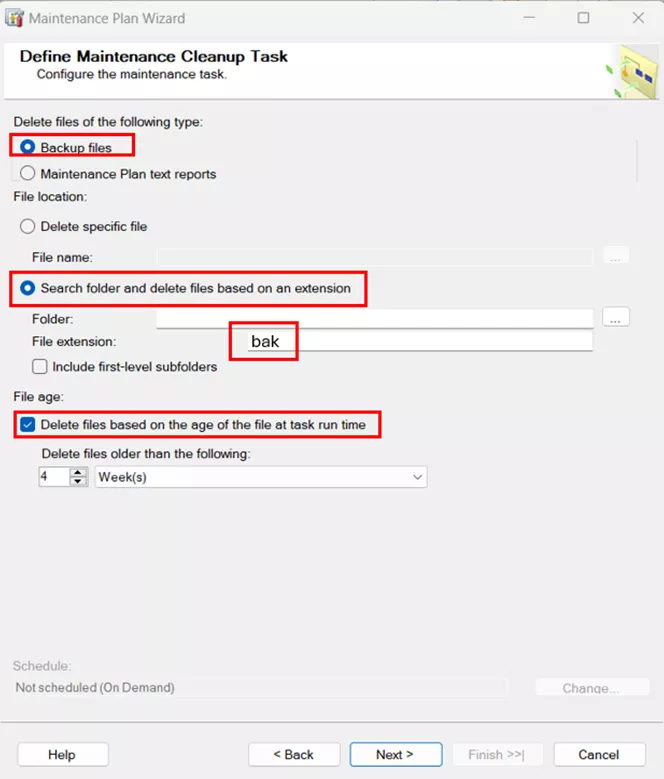
- For Delete files of the following type, choose Backup files.
- For File Name, choose to Search folder and delete files based on an extension.
- Make sure to put the extension of bak.
- For File Age, select the box for Delete files based on the age of the file at task run time.
- Choose how long you’d like to keep back up files for, and then click Next.
- Select Report Options

- Select the box for Write a report to a text file.
- Choose a location to store this file. Then, click Next.
- Complete the Wizard by clicking Finish.
Creating a Rebuild & Reorganize Index Task
Tables in the Vault Database contain indexes, which ensure efficient lookups. This is automatically maintained by the SQL Server, whenever an insert, update, or delete type change is made in the underlying data. Over time, due to growth, indexes get a bit fragmented. Updating and refreshing the indexes will help with more severely fragmented instances. In turn, the maintenance plan will improve performance for searching, browsing, and other interactions with the File Vault.
- Walk through the above steps for using the Maintenance Plan Wizard. Set the schedule to once a week to maintain a healthy vault.
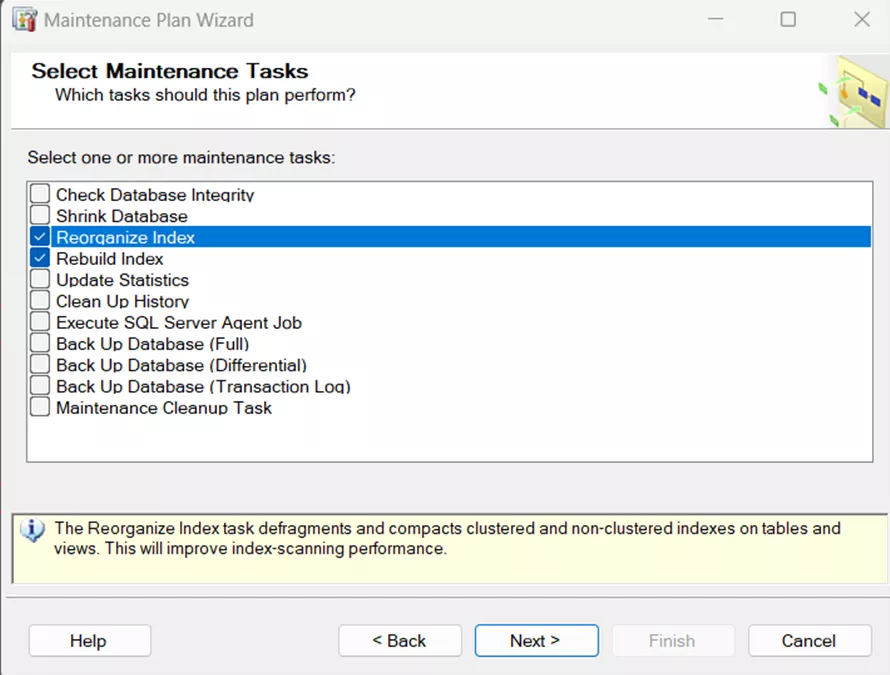
- On the Select Maintenance Tasks page, choose Reorganize Index and Rebuild Index. Then, click Next.
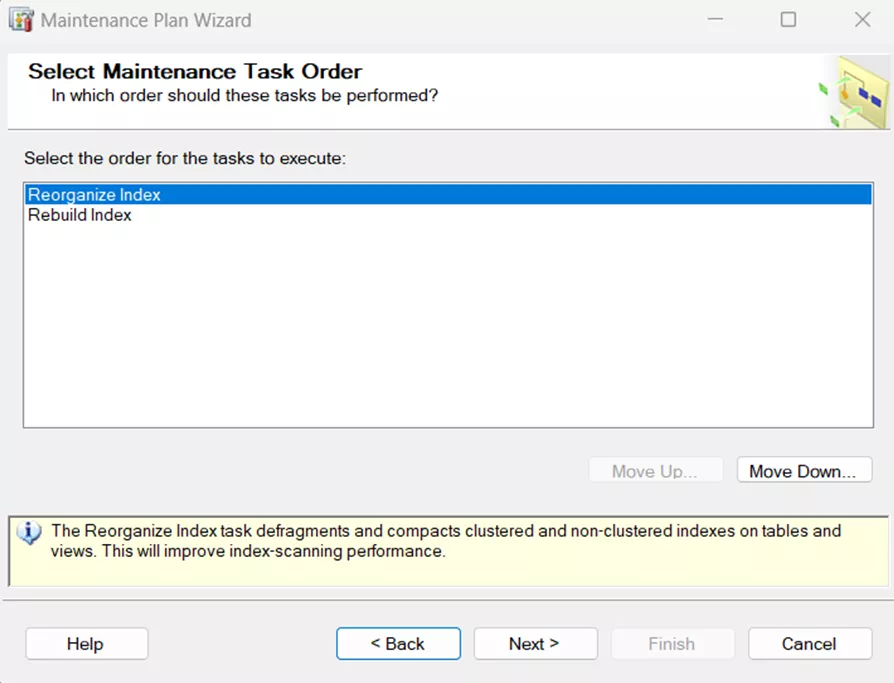
- On the Task Order page, ensure that the Reorganize Task comes first, and the Rebuild Task is second. Then, click Next.
- Define the Reorganize Index Task:
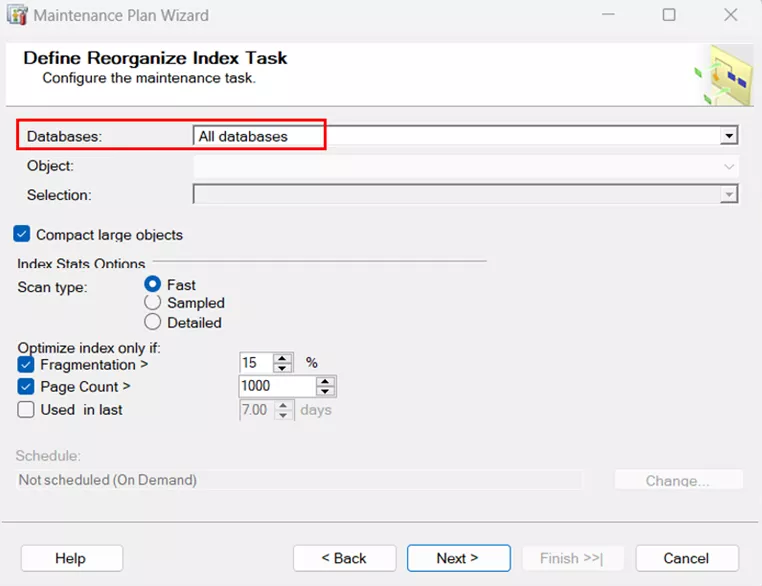
- Choose All Databases from the dropdown menu. Then, click Next.
- Choose All Databases from the dropdown menu. Then, click Next.
- Define the Rebuild Index Task:
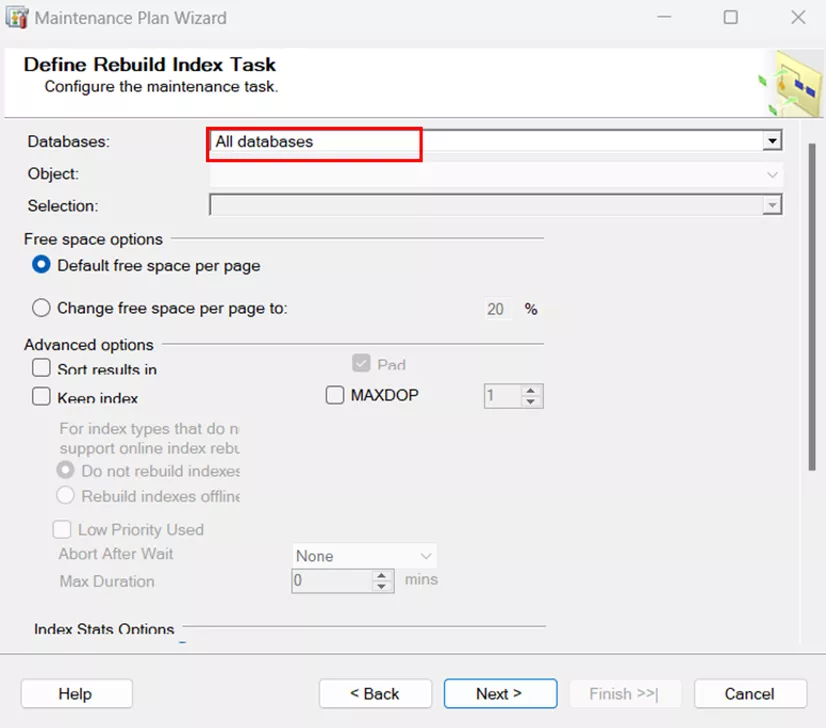
- Choose All Databases from the dropdown menu. Then, click Next.
- Choose All Databases from the dropdown menu. Then, click Next.
- Select Report Options
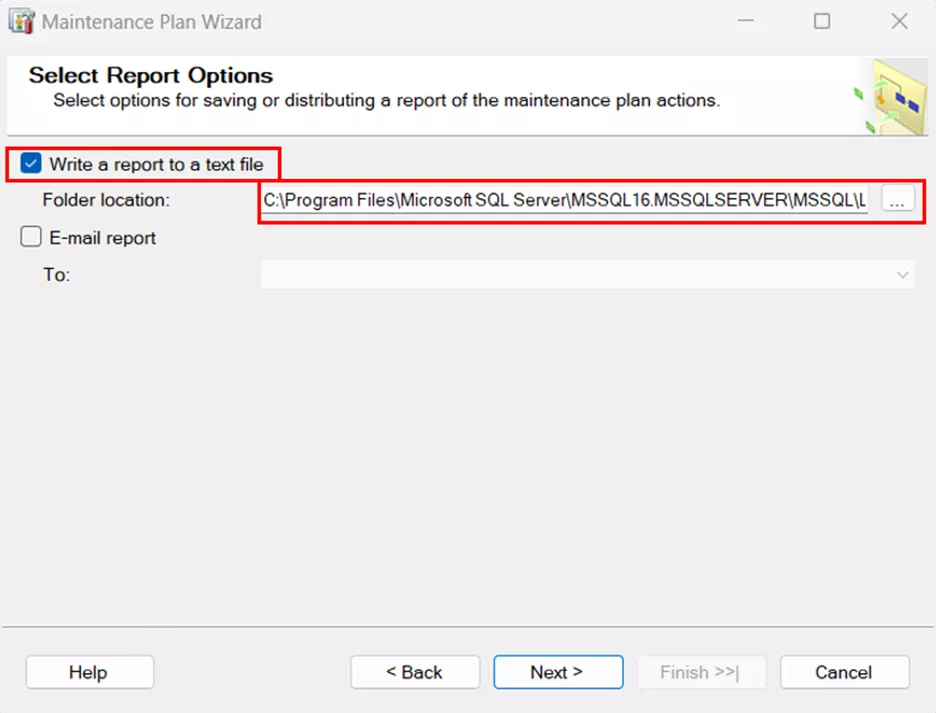
- Select the box for Write a report to a text file.
- Choose a location to store this file. Then, click Next.
- Complete the Wizard by clicking Finish.
Modifying a Maintenance Plan
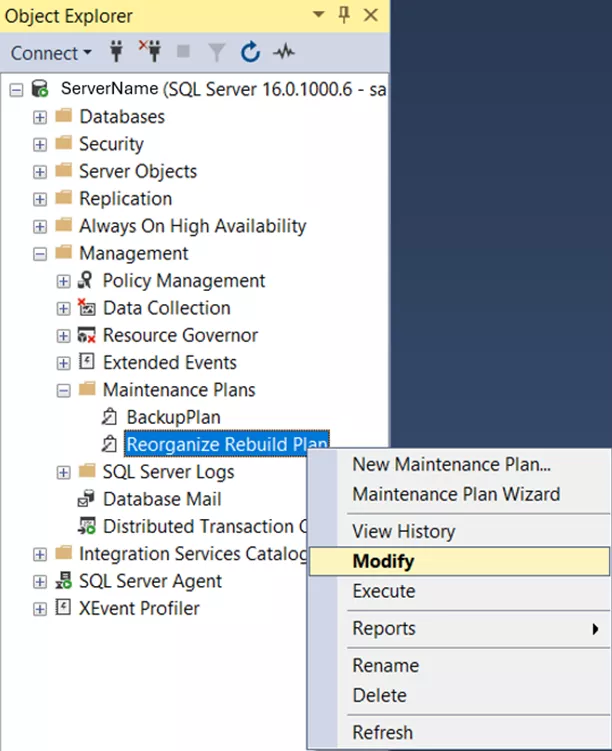
- In the Object Explorer to the left of the SSMS window, expand the Management node and the Maintenance Plan node.
- Right-click the plan you wish to change and select Modify.
- A flow chart will appear in the right-hand panel of the SSMS tool. You can drag new tasks from the toolbox to the flow chart to add them in.
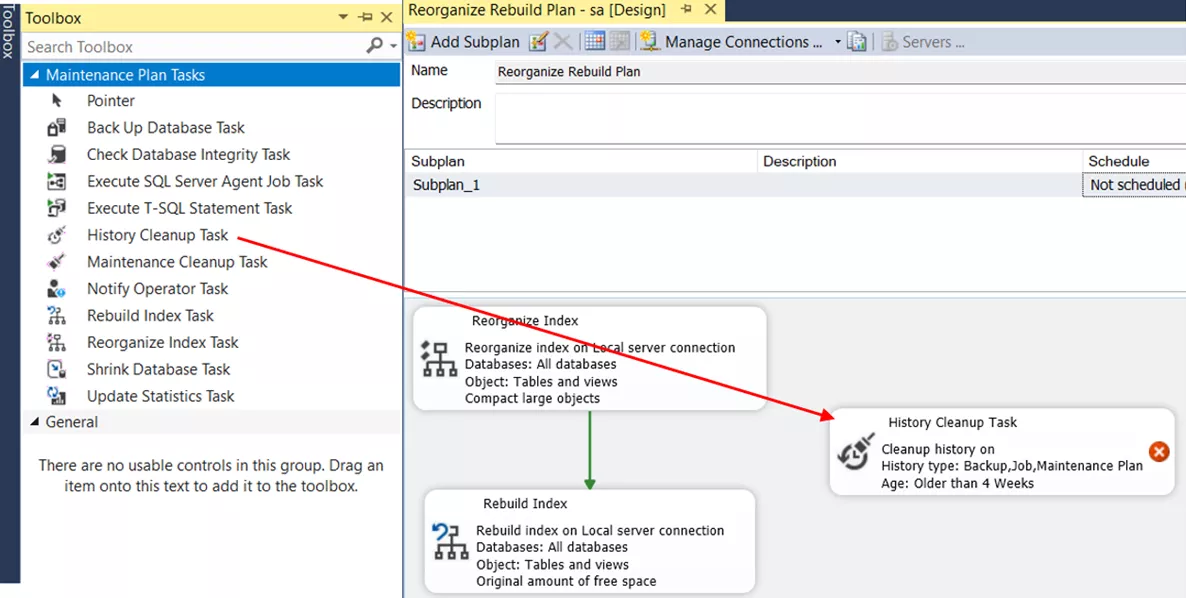
- To change the order of operations, select the box. A green arrow will appear. Grab the arrow and drag it to the next action box.
- Actions and arrows can be deleted by selecting them and clicking the delete key on your keyboard.
Jobs
Creating a Job
- On the SQL Server, log into your SQL instance via SSMS.
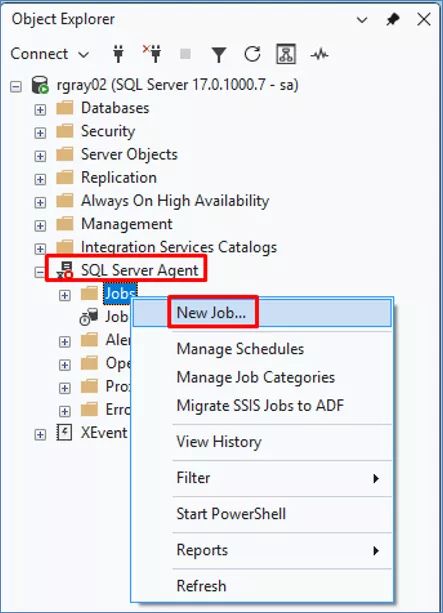
- In Object Explorer, navigate to SQL Server Agent and expand it.
- Right-click Jobs > New Job…
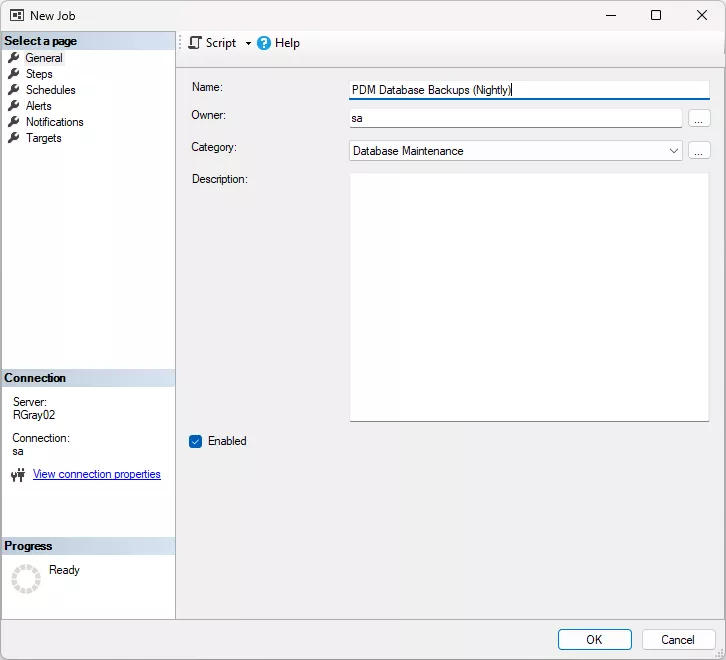
- On the General page:
- Define the Name of the job. Ensure it’s something easily recognizable, like “PDM Database Backups (Nightly)”.
- Ensure the Owner is ‘sa’.
- Category can remain “uncategorized”.
- Ensure the Enabled checkbox is checked if it’s not enabled by default.
- When finished, click Steps from the page list on the left.
Backup Step
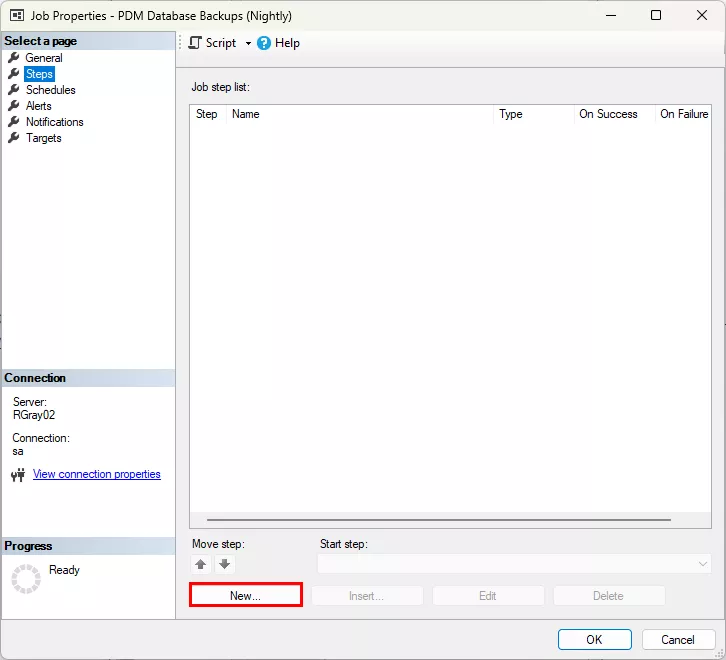
- On the Steps page, click New…
- The first step is taking backups. Name it “Backup – Vault” (replace vault with the name of your vault).
- If you have multiple vaults, you’ll need to create a unique step in the job for each vault’s database.
- Type is Transact-SQL script.
- Run as can be left blank.
- Database can stay on “Master”.
- In Command, paste in the SQL query below. Be sure you capture all of the text and preserve the formatting.
- Replace [VaultName] (in both locations) with the name of your vault’s database. Repeat this process and add a new step for each vault hosted on the server.
- Replace [Path] with the path (including drive letter) where you’d like the backups to write to. Be sure to preserve the text around the path.
Default is “C:\Program Files\Microsoft SQL Server\MSSQL##.MSSQLSERVER\MSSQL\Backup”. 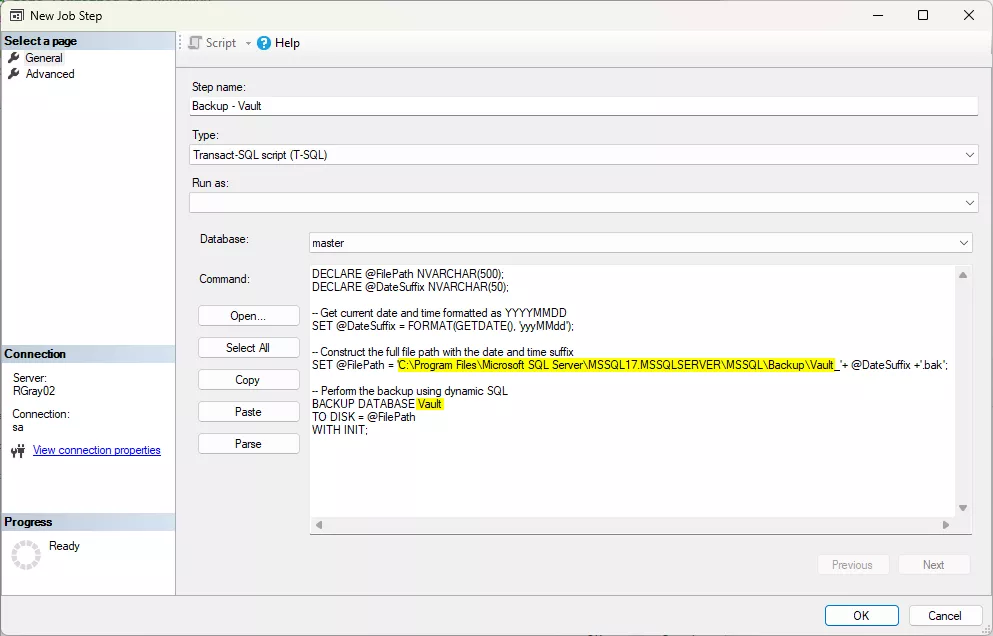
DECLARE @FilePath NVARCHAR(500);
DECLARE @DateSuffix NVARCHAR(50);
-- Get current date and time formatted as YYYYMMDD
SET @DateSuffix = FORMAT(GETDATE(), 'yyyMMdd');
-- Construct the full file path with the date and time suffix
SET @FilePath = '[Path]\[VaultName]_'+ @DateSuffix +'.bak';
-- Perform the backup using dynamic SQL
BACKUP DATABASE [VaultName]
TO DISK = @FilePath
WITH INIT;
When you've finished configuring the step, click OK to go back to the main Steps page. Repeat for each database.
Clean Up Step
After adding a step for each database in your environment (you should have at least 2 – one for each vault and one ConisioMasterDb), you'll need to add a step for cleaning up the old backup files. We only need one step to perform the cleanup action, as it captures all “.bak” files in the designated folder.
- On the Steps page, click New….
- Name the new step “Delete old backups”.
- If you have multiple vaults, you’ll need to create a unique step in the job for each vault’s database.
- Type is Transact-SQL script.
- Run as can be left blank.
- Database can stay on Master.In “Command”, paste in the SQL query below. Be sure you capture all of the text and preserve the formatting.
- Replace [Path] with the path (including drive letter) to the parent folder containing the backups that you defined earlier.
- For example, if your path earlier was “C:\Program Files\Microsoft SQL Server\MSSQL17.MSSQLSERVER\MSSQL\Backup\Vault_”, then you’ll set the path for deleting old backups to “C:\Program Files\Microsoft SQL Server\MSSQL17.MSSQLSERVER\MSSQL\Backup”
- You can replace the ‘30’ in this query with whatever number of days you’d like to keep. So if you’d rather delete anything older than 2 weeks, you’d set it to:
- SET @cutoff = DATEADD(DAY, -14, GETDATE());
- Replace [Path] with the path (including drive letter) to the parent folder containing the backups that you defined earlier.
-- Delete backup files older than 30 days
DECLARE @cutoff DATETIME;
SET @cutoff = DATEADD(DAY, -30, GETDATE());
EXEC xp_delete_file 0, N'[path]', N'bak', @cutoff, 1;
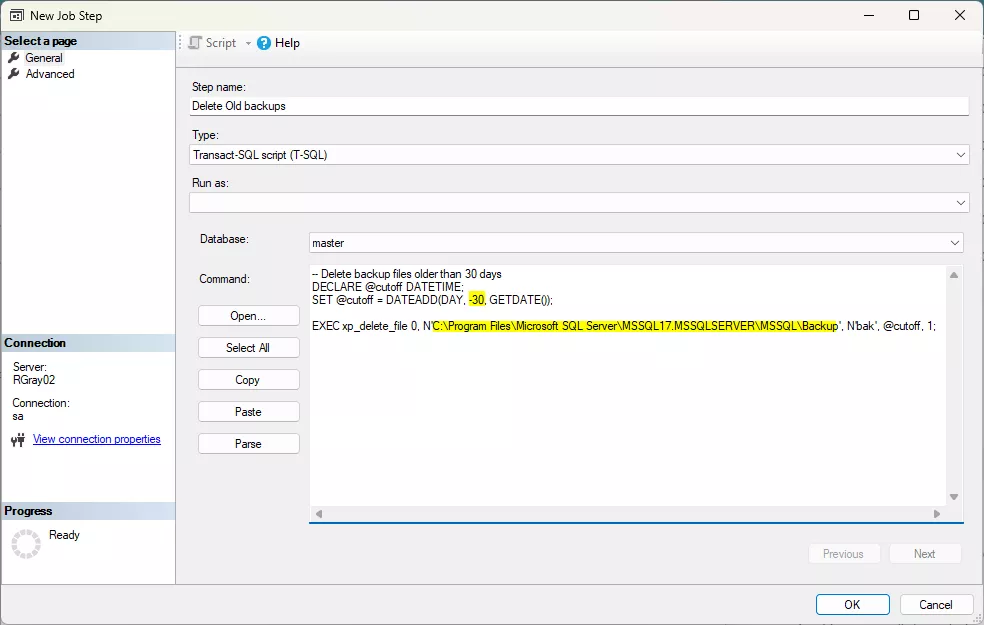
When you’ve finished configuring the step, click OK to go back to the main Steps page.
Schedule
- When all steps have been added, go to the Schedules page and click New…
- Set the Backup job:
- Schedule type: Recurring
- Occurs: Daily (we recommend running it at least once a day during off hours)
- Occurs once at: 12:00:00 AM (or whenever fits your environment’s schedule)
- Duration: Start immediately and do not set an end date
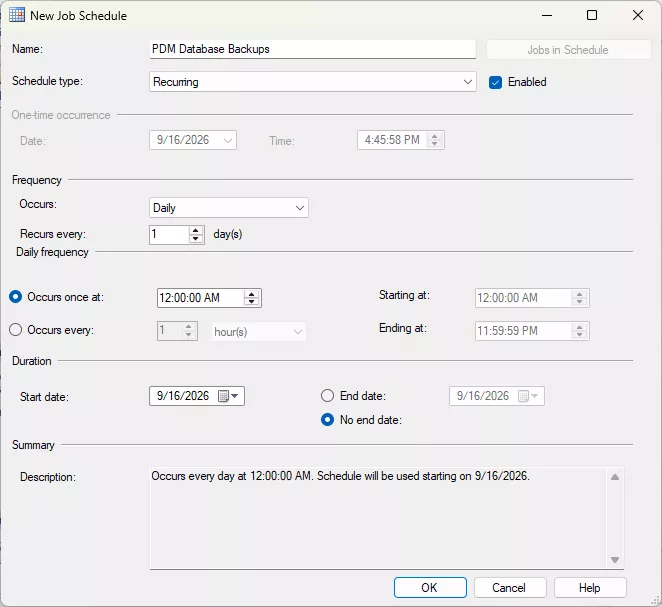
- When done, click OK on the schedule page.
- Review your job setup to ensure everything looks correct, and if so, click OK to save and close the job.
Index Maintenance Job
You’ll want to create a separate job for index rebuild and reorganization, as each job can only follow one schedule for all steps. We definitely want at least daily backups, but index rebuild and reorganization could cause performance issues if run that often. Usually, you want to run index maintenance no more than weekly. Though monthly would suffice for most environments.
- Follow the same steps as above to create and name a new job, then add a new step to the job.
- Name the new step “Index Maintenance / Vault”.
- Replace Vault with the name of your vault to keep things tidy.
- Type is Transact-SQL.
- Run as can remain blank, or set it to SA.
- Database can remain on “Master”
- In “Command”, paste in the following text. Be sure you capture all of the text and preserve the formatting.
- Replace [VaultName] with the name of your vault’s database. Repeat this process and add a new step for each vault hosted on the server.
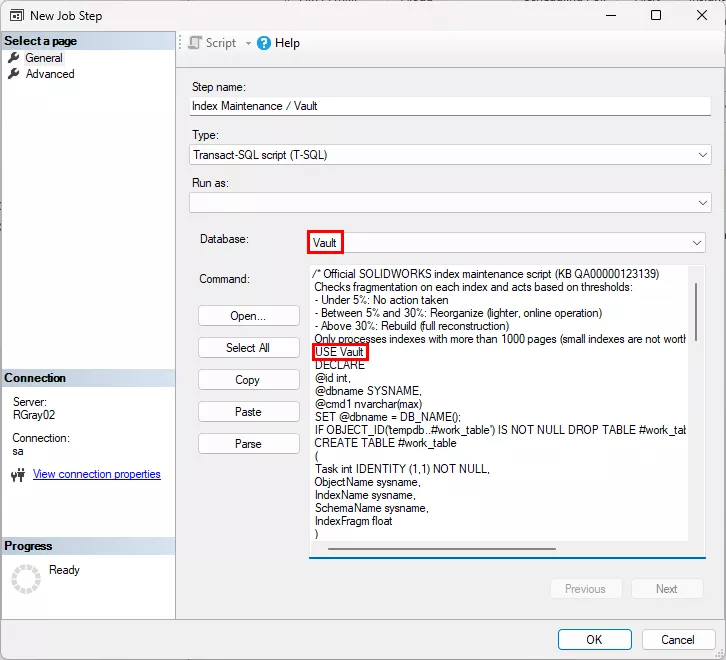
/* Official SOLIDWORKS index maintenance script (KB QA00000123139)
Checks fragmentation on each index and acts based on thresholds:
- Under 5%: No action taken
- Between 5% and 30%: Reorganize (lighter, online operation)
- Above 30%: Rebuild (full reconstruction)
Only processes indexes with more than 1000 pages (small indexes are not worth maintaining) */
USE [VaultName]
DECLARE
@id int,
@dbname SYSNAME,
@cmd1 nvarchar(max)
SET @dbname = DB_NAME();
IF OBJECT_ID('tempdb..#work_table') IS NOT NULL DROP TABLE #work_table
CREATE TABLE #work_table
(
Task int IDENTITY (1,1) NOT NULL,
ObjectName sysname,
IndexName sysname,
SchemaName sysname,
IndexFragm float
)
SET @Cmd1= N'USE ['+ @dbname + N'] ;
INSERT INTO #work_table
SELECT
o.name AS objectName,
i.name AS indexName,
s.name AS schemaname,
p.avg_fragmentation_in_percent
FROM sys.dm_db_index_physical_stats (DB_ID(), NULL, NULL, NULL, null) AS p
INNER JOIN sys.objects AS o ON p.object_id = o.object_id
INNER JOIN sys.schemas AS s ON s.schema_id = o.schema_id
INNER JOIN sys.indexes AS i ON p.object_id = i.object_id
AND i.index_id = p.index_id
WHERE p.page_count > 1000
AND p.avg_fragmentation_in_percent > 5
AND p.index_id > 0
AND s.name <> ''sys'';'
EXEC sp_executesql @CMD1
DECLARE
@Object_name sysname,
@index_name sysname,
@SchemaName sysname,
@Fragmentation float,
@command1 nvarchar(max),
@command2 nvarchar(max),
@task int
SET @task = 1
WHILE (1=1)
BEGIN
SELECT
@Object_name = ObjectName,
@index_name = IndexName,
@SchemaName = SchemaName,
@Fragmentation = IndexFragm
FROM #work_table
WHERE task = @task
IF @@ROWCOUNT = 0
BREAK
IF (@Fragmentation > 30) -- Rebuild
BEGIN
SET @Command1 = N'USE [' + @Dbname + '] ; ALTER INDEX [' + @index_name + '] ON '
+ @SchemaName + '.[' + @Object_name + ']'
+ N' REBUILD WITH (PAD_INDEX = OFF, STATISTICS_NORECOMPUTE = OFF, SORT_IN_TEMPDB = OFF,
ONLINE = OFF, ALLOW_ROW_LOCKS = ON, ALLOW_PAGE_LOCKS = ON)'
PRINT (@Command1)
EXEC sp_executesql @command1
END
IF (@Fragmentation > 5 AND @Fragmentation < 30) -- Reorganize
BEGIN
SET @Command2 = N'USE [' + @Dbname + ']; ALTER INDEX [' + @index_name + '] ON '
+ @SchemaName + '.[' + @Object_name + ']'
+ N' REORGANIZE WITH (LOB_COMPACTION = ON)'
PRINT @command2
EXEC sp_executesql @command2
END
SET @task = @task + 1
END
DROP TABLE #work_table
- Replace [VaultName] with the name of your vault’s database. Repeat this process and add a new step for each vault hosted on the server.
- Go to the Schedules page and click New...
- Set the Index Maintenance job to run either weekly or monthly during off hours (we usually recommend later at night on a weekend).
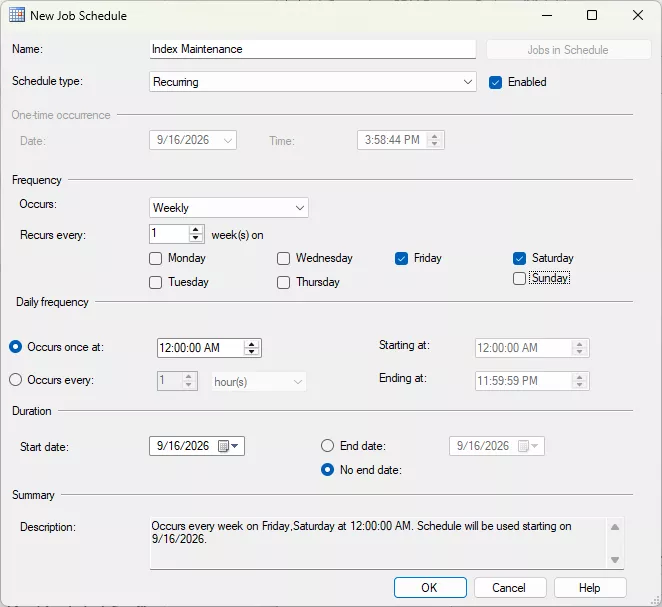
- When done, click OK on the schedule page.
- Review your job setup to ensure everything looks correct, and if so, click OK to save and close the job.
Final Thoughts
If GoEngineer is your reseller and you have any questions or issues, please reach out to our Support Team for more help! We’d be happy to assist.
Additionally, you can join the GoEngineer Community to participate in conversations, create forum posts, and answer questions from other SOLIDWORKS users.
Editor's Note: This article was originally published in January 2025 and has been updated by our Technical Team for accuracy and comprehensiveness.
Learn More About SOLIDWORKS PDM
SOLIDWORKS PDM 2025 - What's New
Configuration Properties in SOLIDWORKS PDM Data Cards
SOLIDWORKS PDM - Implement Working Revisions
How to Create Dynamic Lists in SOLIDWORKS PDM Standard Data Cards

About Rowan Gray
Rowan Gray is a Technical Support Manager at GoEngineer and CPPA/CPAP with a specialty in SOLIDWORKS PDM and related data/lifecycle management. They have been with GoEngineer since 2020, and have a strong IT background that helps them more fully support customers with whatever issues may arise in their PDM environment. In their free time, they enjoy playing video games, D&D, multimedia crafting, and spoiling their pets.
Get our wide array of technical resources delivered right to your inbox.
Unsubscribe at any time.