5 F123 Series Maintenance Tips for New Users
If you or a team member are new to using the F123 Series of 3D printers from Stratasys, there are a few maintenance tips that can help keep your printers running smoothly. The tutorials and tricks mentioned in this article are compatible with the F170, F270, and F370.
#1. F123 Series Print Head Options
The Stratasys F123 Series has a few different options for print heads: black, blue, and gray. What’s the difference?
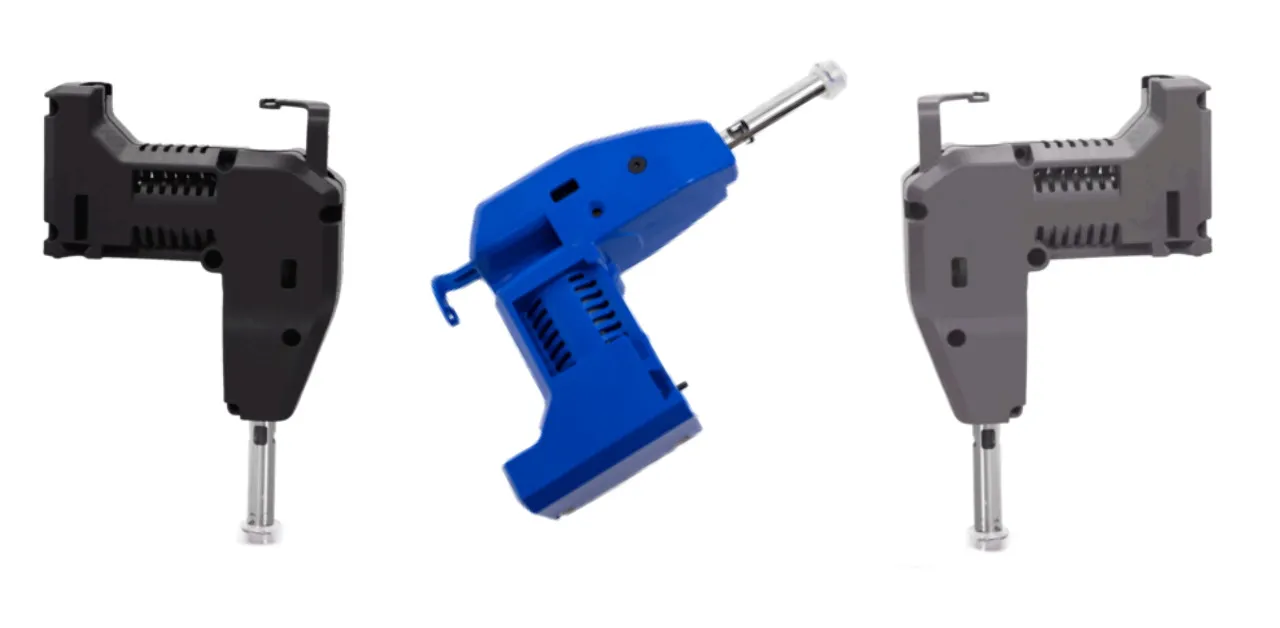
The black print head is used for all base materials, support material, and the new Nylon-based Diran material. Because this head works with model or support material, there is a space on the head to mark what that head is being used for - helpful for when taking them in and out of the printer.
The blue print head is for elastomeric TPU 92A material. This material also requires support material, so you can leave the black support head right where it is.
Lastly, the gray print head is for PLA material . This is a very low-temperature, draft type material so it has a secondary cooling head that goes into the support head spot that is used together to run PLA material.
#2 Changing a Print Head
Regardless of what F123 Series printer you own, or what print head you’re swapping out (black, blue, or gray) the process is always the same.
To open the top of the printer, you need to unlock it by opening the door, which will grant you access to the top headspace.
You’ll be able to move around the head gantry freely in any direction and it will always calibrate itself afterward.
Remove the material tube by raising the small clip and set it aside. The data cable has a locking tab on the front. Press it in and carefully raise the data cable up.
To remove the print head, pull the lock on the side forward, and the print head will come out. Set it aside. The new print head tip inserts down through the bellows. There are some alignment fixtures inside; wiggle the print head until it finds its spot.
Press the locking tab backward and carefully insert the data cable into the top.
Lastly, the material tube goes in tip first, and the tab on top locks onto the pin in the tube.
Once you have everything locked into place, open the door, close the top, close the door and you’re ready to load in the material.
You can watch me perform this entire process in the video below.
#3. How to Change Material
On the materials screen, select your material, and tell it to unload.
Tech Tip: Grab the filament as it’s unloading. That way, while the head and motor are kicking it back out, you can maintain control and prevent your material from getting cross-wound.
Material spools have a clip on the side to keep the material tidy. When you take the spool out, you’ll want to snip 6-8 inches off and clip the tail in place. (Don’t worry, there’s extra on every spool for this reason.)
Why cut off material? You can feel on the ends where the teeth from the drive gears in the print head dig into the material and gouge it out a little bit. Removing this portion ensures that the material feeds smoothly the next time it is used.
When you insert your new (or different) material, the drive will begin pulling in the material. Once it's in far enough, the load button on the touch screen will become active. Hit ‘load’ to complete the process.
It’s important to store your used material in a sealed mylar bag because they prevent moisture from getting into the material and causing problems with the print head.
When the material is finished loading, you’ll hear a click - that’s the door unlocking - our cue that the material is fully loaded and is ready to go.
Check out a material swap on the F370 in the video below.
#4. Head/Tip Calibration - How and When?
Calibration tells the machine where the extrusion tips are in relation to the print surface and each other, to ensure that material is extruded where it is supposed to. A calibration needs to occur any time you change or replace a print head and is the same process for every F123 Series printer. It doesn’t hurt to perform a calibration every so often just to make sure that your quality is top-notch.
Begin by selecting the automatic calibration option on the touch screen; a countdown will begin. This countdown is for the printer to come up to print temperature and stabilize (this way the heat soaks through all of the components to ensure tolerances aren’t affected by thermal expansion). The machine will test the position of the tips against the + shaped cutouts on the build platform.
When the automatic calibration is finished, you may then run a manual calibration to fine-tune the calibration. When this has finished printing, press ‘next’, and remove your calibration part from the printer.
Use your 10x magnifying loupe to examine the calibration pattern. On each side of the box are two parallel lines with a nearly parallel one in between. You’ll want to identify where the support toolpath is correctly centered between the model toolpaths. Best practice is to start at zero and move up and down until you find the offsets that you need to work with, turning the print and working vertically as you go.
I suggest watching my tutorial below for in-depth instructions and important information when performing a calibration.
#5. Purge Trick
If you’ve received a “material not in head” error or are struggling with loading material into your F123 Series printer, there’s a trick to try that will help get you through it.
On the materials screen, tap into the print head, go into the maintenance, and select the purge command.
You’ll want to watch the numbers on the left, which is the current temperature of the print head. The number on the right is the target temperature. We want it to get to 265 (or the actual purge temperature).
When you’re ready, hit the ‘purge’ button, and keep an eye on the numbers on the screen. At the same time, open the material drawer and lift the spool cover. When the current temperature reaches 265 and starts trying to purge the material, gently push the material to help it along.
You can watch me perform this trick on our F370 in the short video below.
I hope you found these tips and tricks helpful. Be sure to subscribe for more articles just like these.
Related Articles
A Tip for Changing Tips: Fortus 3D Printer Edition
![]() Stratasys Tutorial - Fortus Calibration Theory
Stratasys Tutorial - Fortus Calibration Theory
3D Printing with the F123 Series: Hardware, Software, & Materials

About Joseph Miller
Joseph Miller is a 3D Printer Technical Support Specialist based out of Atlanta, Georgia. He earned his Bachelor’s degree from Brigham Young University in 2008 and a Master’s degree from Capella University in 2013. Joseph has been working in the Additive Manufacturing industry for over 12 years and has been part of the GoEngineer family since 2019.
Get our wide array of technical resources delivered right to your inbox.
Unsubscribe at any time.