Managing Your SOLIDWORKS PDM Archive with Distribution
The location where our data is stored isn’t set in stone. There will be situations when we need more space, more speed, or in a bad situation – a failing drive. In part one, we covered vault cleanup and permanently removing deleted files. This blog contains methods used to relocate and redistribute our SOLIDWORKS PDM vault storage.
Disclaimer: Before taking any steps to relocate, remove or compress data please ensure that all files have been checked in by the users, backups have been taken of both the database and archives. In the event of a relocation have all users log off or go into Offline Mode before attempting the move.
PDM archive distribution
The archive file store can be relocated into as many as 16 locations. This load split is done from the archive server and can be done to any directories or drives that the server has access to. This can be for drives that are located on the network or physically attached to the server. This is the best method for addressing space concerns that doesn’t result in an entire server move as we are adapting the hardware that we are using instead of removing data.
Built-in archive relocation
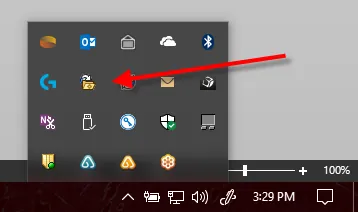
We start this process by launching the Archive Server Configuration application from the start menu. If upon launch a dialog is not shown, check the task tray by the clock as in the image below. Right-click this and select “Open”.

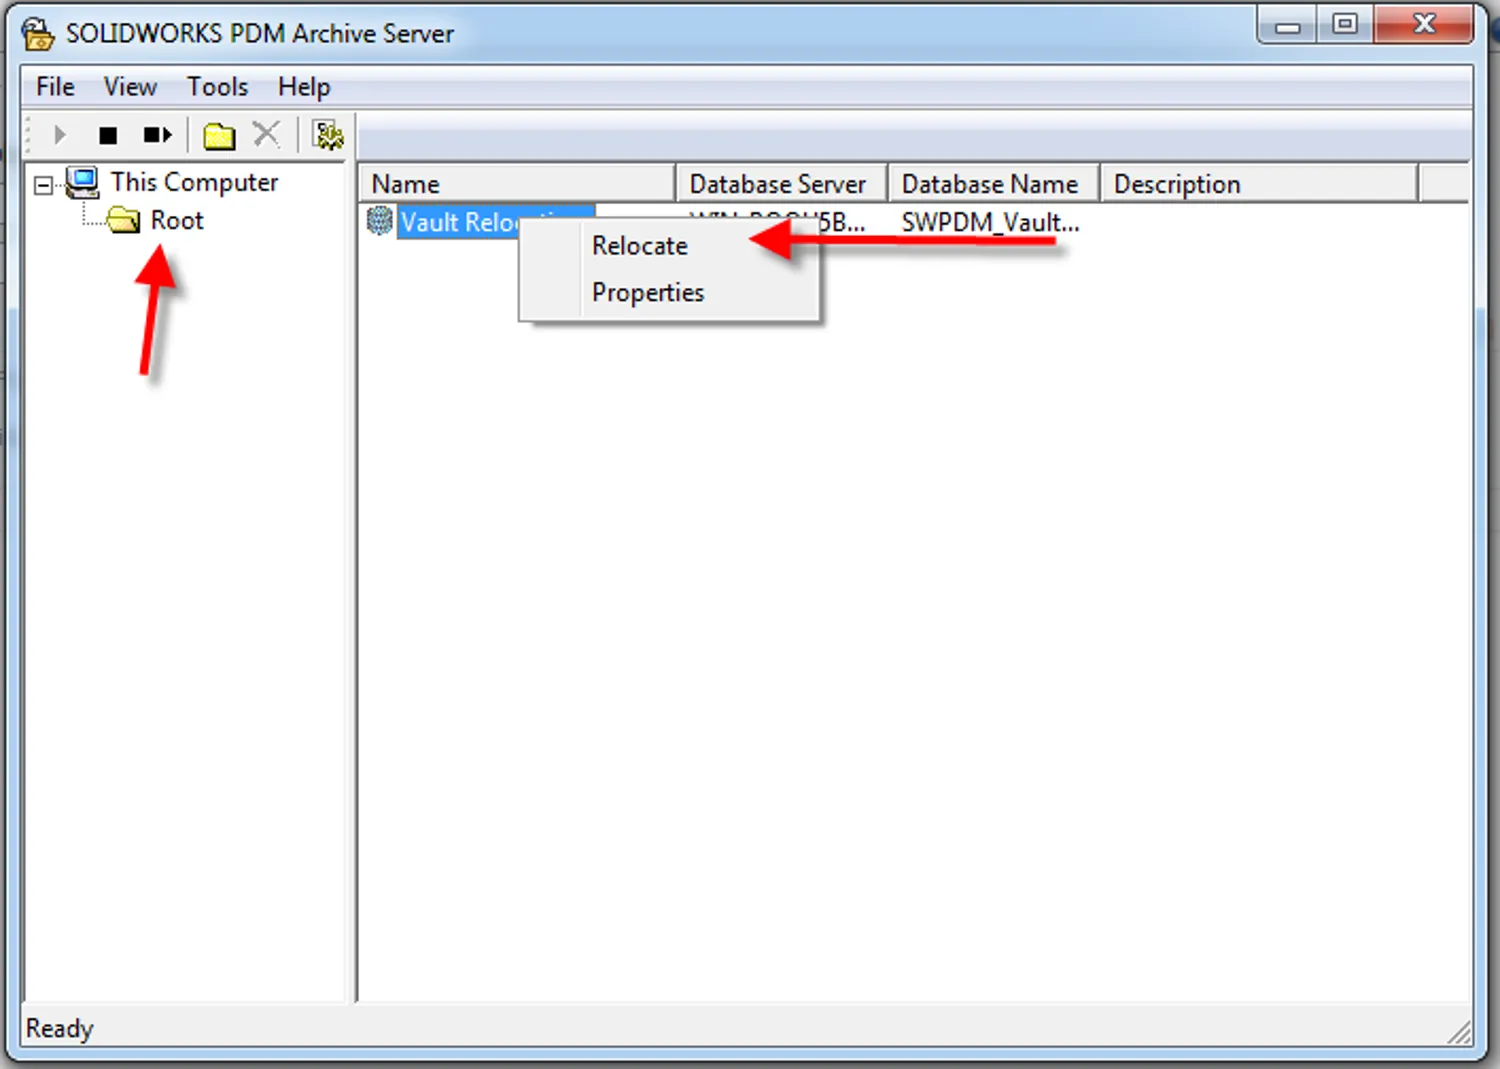
In the tool you will find your vault(s) listed in the main pane by selecting “This Computer” and the folder that is located underneath that. Select the vault that we want to relocate and right click. Select “Relocate” from the menu that shows.
Note: The directory that contains your vaults may be different than the image below.

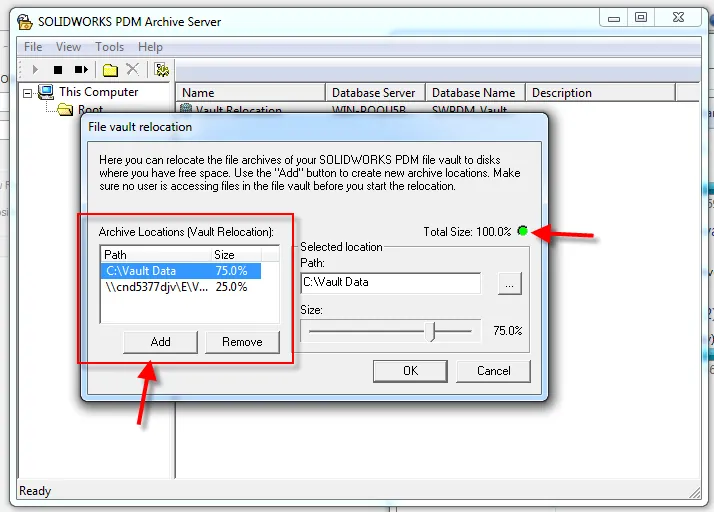
The resulting dialog will give us a few options in how we would like to relocate our vault data. In the example below, I am relocating 25% of my vault structure to a networked location.
Note: It is important to understand that the process moves the 25% of the archive structure not 25% of the total sum of data. The archive can be moved in 1/16th increments due to the nature of how the vault is organized. Each file upon entry into the vault is assigned a File ID that is translated into a hexadecimal (base 16) number and files are organized in the archive based on this number. Each file will land in a folder for the last digit of its hexadecimal ID. This relocation will relocate any number of those 16 folders to a new location. Folders will not be split into different drives and each folder size may vary with the number of versions and actual data size per file of the files located in these folders.

The relocation dialog will indicate that the percentage of the vault being stored must be 100% across all locations. The total size is displayed numerically along with a color indicator: green is good and red is either less than or greater than 100%.
The dialog will not close if this is the case. Percentages of the archive store are set by clicking the path in the highlighted area and then adjusting the slider. To add more paths click the “Add” button and direct to a new path.
If a full move is being performed adjust the original path to 0%. Clicking OK will prompt to make sure that all users are logged out of the vault before this move is started. Click OK to start the process from there. A progress dialog will indicate that files are being moved. his process should not be interrupted once started. Allow this to complete and users will be able to log in and use the vault without issue.
Considerations: If your vault is large, it may be best to relocate in small increments of 1/16th at a time. This will avoid overloading the server during the process and locking up.
Manual relocation
If your vault is particularly large to the degree of Terabytes (or close to) it may be best to perform a manual move. This method involves fewer dialog and safety checks, but is still fairly simple.
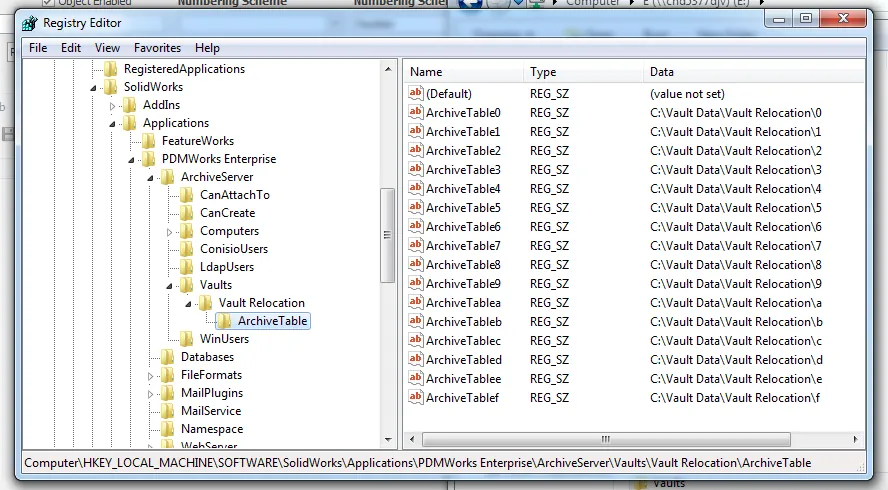
To start this process, stop the SOLIDWORKS PDM Archive Server service from running. Then obtain the directory of your current archive data by either looking in the Archive Server Configuration tool as detailed above or look at the registry settings for the archive locations. This will come in handy to have open later so is the advised method. Open the registry editor and navigate to the following keys.
HKEY_LOCAL_MACHINE\Software\SolidWorks\Applications\PDMWorks Enterprise\ArchiveServer\Vaults\[Vault Name]\ArchiveTable\

Each of these keys give the specific location to one of our archive folders. Here we can determine where they currently reside and then alter where the archive will look for that folder once restarted. With the Archive Server Service still stopped, locate one of these folders and manually move it to the new location. Then change the value for the respective key to the new path. After the move has been completed, the Archive Server Service can be restarted and the change will be in effect.
Stay tuned for part three to learn how to manage your SOLIDWORKS PDM archive with compression and cold storage techniques.
Related Articles
Managing Your SOLIDWORKS PDM Archive: Cleanup

About Bryce Hooper
Bryce has been using SOLIDWORKS since 2008 in multiple roles across multiple industries from industrial vacuum to RV frame design. He spent many of those years spent as a PDM administrator, implementing 3 PDM vaults along the way. He earned his CSWP in 2019, followed by his CSWE in 2013. Programming is a passion that has followed Bryce through his various positions, writing custom business applications to improve design processes. In his spare time Bryce is a gamer, a maker, and a brewer.
Get our wide array of technical resources delivered right to your inbox.
Unsubscribe at any time.
