SOLIDWORKS Electrical Auto-Archiver Setup
Automatically backup your SOLIDWORKS Electrical environment with Auto-archiver, now part of the SOLIDWORKS Electrical Schematic software. With Auto-archiver, there is no need for a user connected to a server environment to remember to back up the software!
Traditional back up methods on the electrical data and SQL are NOT the way to back up the electrical environment because they do NOT capture the Collaborative service that keeps everything stitched together. The correct method for backing up SOLIDWORKS Electrical Schematic is uilitzing the Archive Environment operation!
This archived environment should be created on a regular basis to prevent loss of work or data and placed into the libraries of the software. This process will also ensure all active projects are captured in the electrical environment.
In order to properly archive an environment, all electrical projects should be closed. The software should be turned off or closed on the client machines to prevent any opened documents from causing the archived environment operation to fail.
As of SOLIDWORKS Schematic 2021, the Auto-archiver is available for use. This software is installed when the Schematic software is installed.
Implementing this archiver takes a few steps that we will review.
When planning for your Auto-archiver, the Schematic software and the task to be used should be on the same machine. A server can be used, but you must verify that a Schematic client is installed there.
If using a client machine instead of a server, the Windows Task Scheduler needs to be used on that client machine, and the client machine will need to remain powered up during the off-hours that are selected for the time of the task to be initiated.
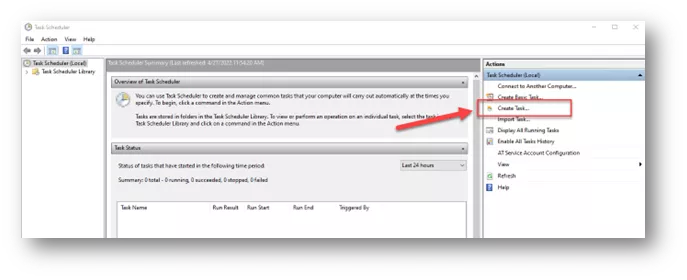
Windows Task Scheduler
The first step is to open the Windows Task Scheduler. I highly recommend that the SOLIDWORKS Schematic client software be placed onto the server so that this task scheduler can run on the server without needing a user’s computer to be up and running or logged into the computer.
The Windows Task Scheduler, available on any computer that is running Windows, is located under: C:\Windows\System32\taskschd.msc
I suggest that you create a shortcut on your Taskbar for this software. Upon opening, you will see this dialog box. From the right side browser, select Create Task...
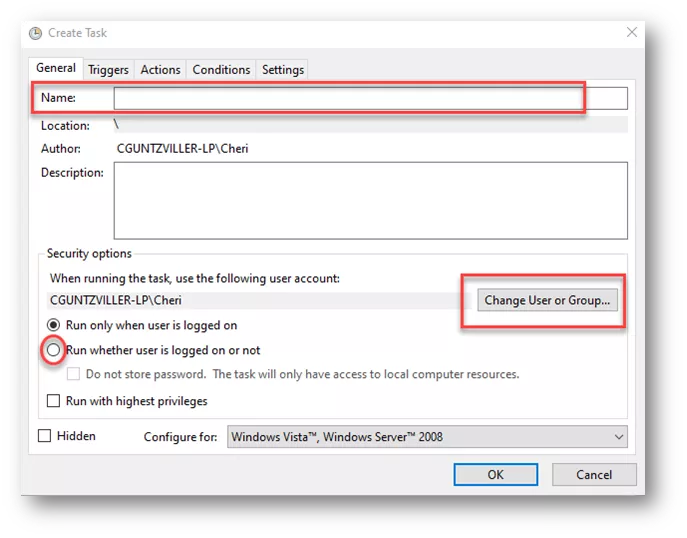
This will then bring up a secondary dialog box where we will place all our information.
You must be a full administrator on the server where the task is being created.
The secondary dialog box is shown below.
Name your task. It is best to NOT use special characters or spaces.
Using a System account, which will have administrative rights on the server, is the best scenario. This account will ONLY run this task.
Use the Chjange User or Group... button to select this account.
Select the Run whether user is logged on or not radio button.
DO NOT SELECT OK YET! We have only filled out the General tab.
Proceed to the Triggers tab at the top of the dialog box. Select New from the bottom left corner of the dialog. Here, we will schedule the task for when it should be started.
On the Triggers tab, you will need to make some decisions for how often you would like to have a backup or archive made.
Remember that this archive is saving all the work inside the software. If you don’t want to lose any work, then an archive made more often will be to your advantage.
Use this Triggers tab to determine you scheduling requirements.
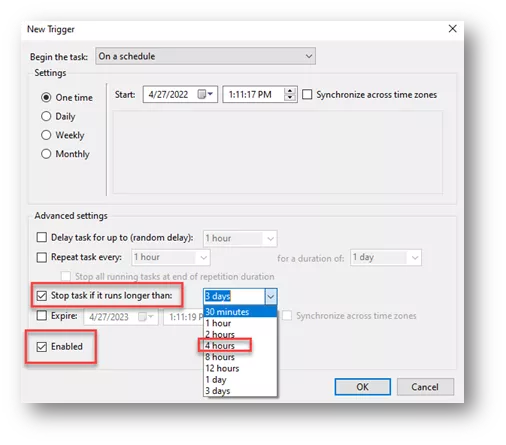
- Select a setting of either daily, weekly, or monthly with a date and time to begin.
- Check the box for Stop task if it runs longer than: and select a time.
- Make sure the task is enabled.
Select OK and go back to the Task dialog box.
Select the Actions tab to continue making the task.
Select New... at the bottom left corner, and a secondary dialog box will appear.
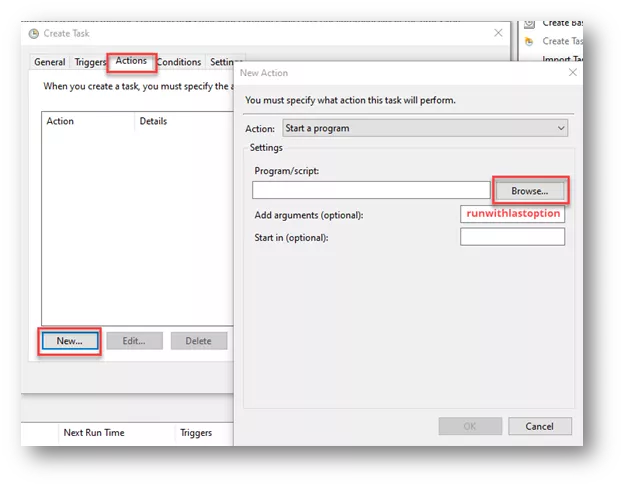
Now we need to Browse to find the location of the archiving program. This is normally found under:
C:\Program Files\SOLIDWORKS Corp\SOLIDWORKS Electrical\bin\EWEnvironmentArchiver\ewenvironmentarchiver.exe
Once the program is located and selected, make sure to use the Add arguments field and type in lower case runwithlastoption with no spaces.
Select OK and return to the Task creation dialog.
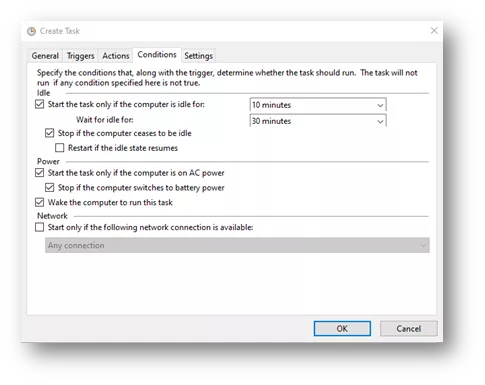
Proceed to the Conditions tab.
Below are the most common settings, but you can choose what these settings should be for your company.
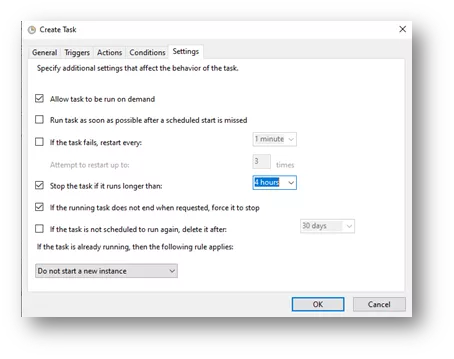
Proceed to the Settings tab.
Again, choose the settings for what best suits your company.
Below are some most common settings.
You can now select OK to complete the creation of the Task.
You are now finished with the Windows Task Scheduler however, we still need to complete a couple more steps.
SOLIDWORKS Electrical Schematic software
To complete the Automatic-archiver, we need to run the Archive environment once to set what the “runwithlastoptions” settings will be.
Proceed to the SOLIDWORKS Schematic software and open it.
When the Project Manager dialog window pops up – go ahead and close it.
Note: There should NOT be any projects, symbols, libraries, etc. open. The software should be closed for all users when creating a successful archive. Best Practice is for the users to close the software when it is not in use.
Once the Schematic software is opened, with the Project Manager and all projects closed, you can select the dropdown arrow below Archive Environment.
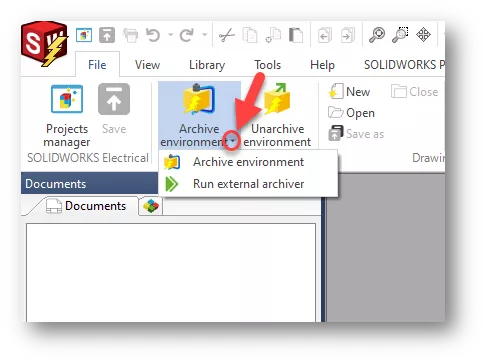
Select Run external archiver.
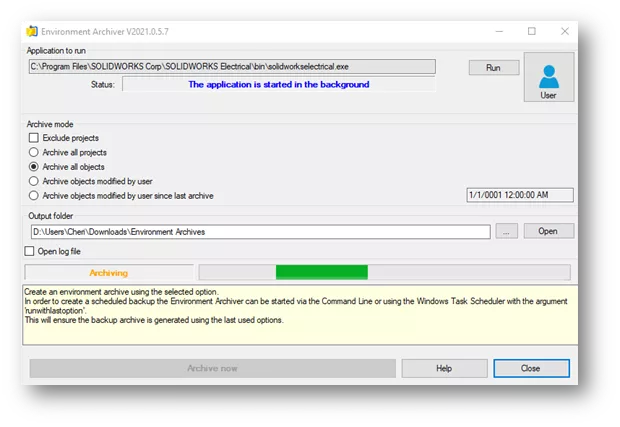
A new Dialog window will appear for the Environment Archiver.
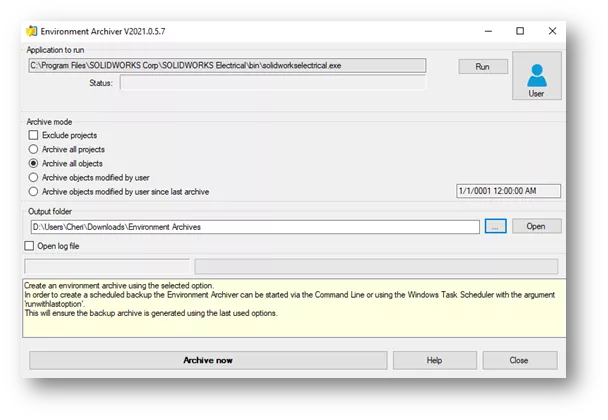
You will want to select Archive all objects or capture everything the software needs for backup purposes.
Secondly, you will want to use the ellipsis (three dots) in the Output folder selection to identify the location for your archives to be placed.
Once these selections have been made, click the Archive now button to save these settings for future use. These settings will then be the settings used by the external archiver with the Windows Task Scheduler.
You will be prompted for wanting to start the archiving now. Select Yes.
You should notice that the dialog window that shows the application started in the background, the archiving process in Archiving, and that the green status bar is moving.
Archive verification
The archive may take a bit of time to complete, so do not choose to run at a time when you or others are needing to use the software.
If the software is opened, and a user opens a project, the archive will fail. The only time to archive is when the software will not be in use.
There will be a notification for Archive complete when finished.
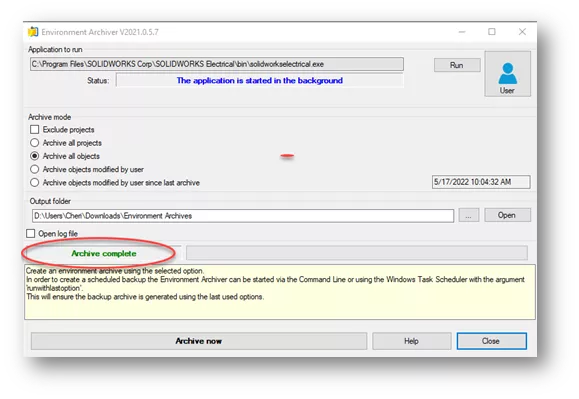
You can then Close the dialog.
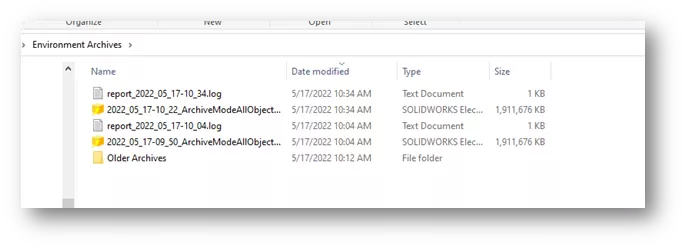
Please open the File Explorer to proceed to the location for your saved archive files. You will notice an archive file and a log.
The log will document what has transpired with the archive process. The file is the first of your archives.
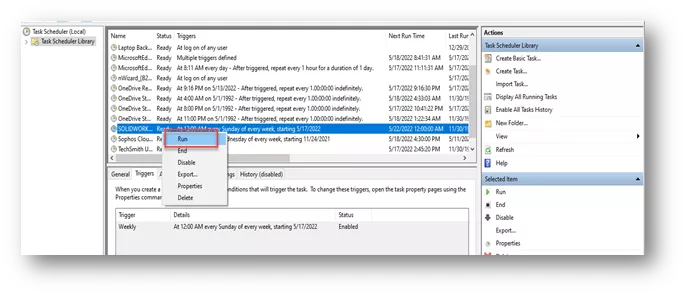
You can go back to the Windows Task Scheduler and find your newly created task. (You may need to choose the Task Scheduler Library to find the task.)
Once located, right mouse click and select Run.
To verify it is running, select the Display All Running Tasks from the right side of the Windows Task Scheduler. The Archiver should be in the list of running tasks.
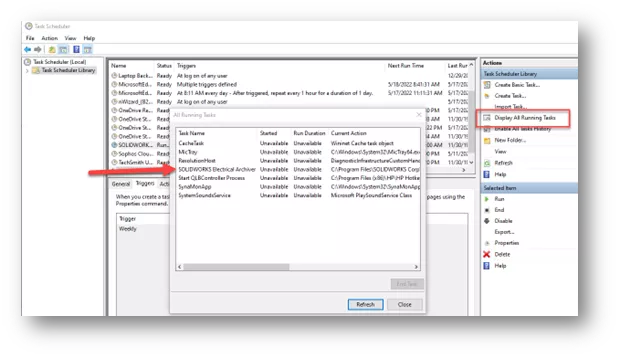
Once completed, you can check the folder again where the archives are placed. You should see another archive and another log.
If so, then you are complete! The task is fully setup and functional.
I hope you found this SOLIDWORKS Electrical tutorial helpful. Check out more technical articles and guides below.
More SOLIDWORKS Electrical Articles
Successful SOLIDWORKS Electrical Client/Server Connection
Create New SOLIDWORKS Electrical Symbols By Modifying Existing
SOLIDWORKS Electrical License: Standalone vs Network
SOLIDWORKS Electrical Schematics 2021 User Interface Customization Options
SOLIDWORKS Electrical Server Installation 'Better' Practices

About Cheri Guntzviller
Cheri Guntzviller is a Senior Electrical Specialist with over 35 years’ experience. She earned her Bachelor of Science in Electrical Engineering degree from Lawrence Technological University and joined the VAR channel in 2013 with DASI (now GoEngineer). She is a problem solver and is passionate about teaching and helping others solve problems. Based out of Michigan Cheri enjoys gardening, fishing, construction, and spending time with her family and pets. Cheri is a SOLIDWORKS Certified Electrical Specialist, Trainer, and Professional Presenter.
Get our wide array of technical resources delivered right to your inbox.
Unsubscribe at any time.