Analyzing SOLIDWORKS Simulation Drop Tests
This article is a companion piece to the latter half of this video. For more information about the options available when setting up a drop test, please see read this blog post and its associated Quick Tip video.
Animating Results
Animating a result plot is a helpful tool for sharing the results of your SOLIDWORKS Drop Test Simulation studies. To animate a result plot, right-click it and select Animate in the right-click menu.
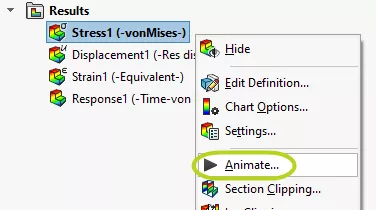
Figure 1: Animate Option in Result plot RMB menu
The first time performing a SOLIDWORKS Simulation Drop Test study is typically a little slow to load as the steps are being rendered. Afterward, however, it will run smoothly.
An animation of the Stress results shows how stresses spread through your model over time from the impact point. A color chart will appear in the lower right-hand corner of the Graphics Area, providing a key for the displayed results.
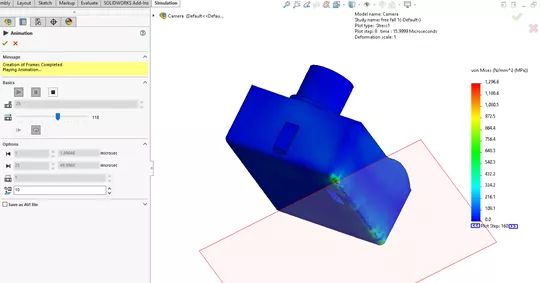
Figure 2: Animate PropertyManager and animated Stress result of Drop Test
To save the animation as a .avi, stop the animation, check the box for Save as AVI file, select a location for the animation using the Browse button, then play the animation again.
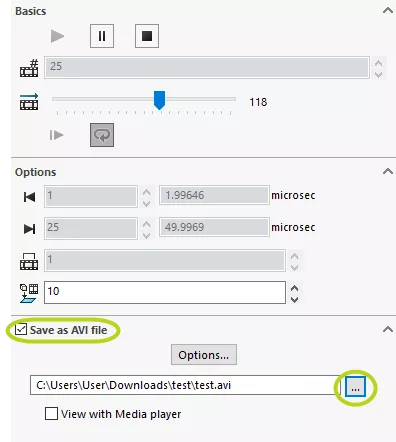
Figure 3: Animate PropertyManager with “Save as AVI file” checked
Displaying Contact Forces
In the Result Force PropertyManager, we can view the internal forces that develop as a result of the model hitting the ground. To access this, right-click the Results folder and select List Interaction/Friction Force…
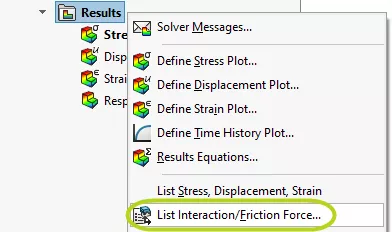
Figure 4: List Interaction/Friction Force option in Results folder RMB Menu
Select the faces in which we're interested, specify the time step at which we want to see the results, and click the Update button.
The moment of impact is when the time is 0 microseconds.
By changing the Plot Step, we can see how the contact forces update in the time following the impact.
The X, Y, and Z components of the forces are listed in flyouts in the graphics area and in the Contact/Friction Force section of the Result Force PropertyManager.
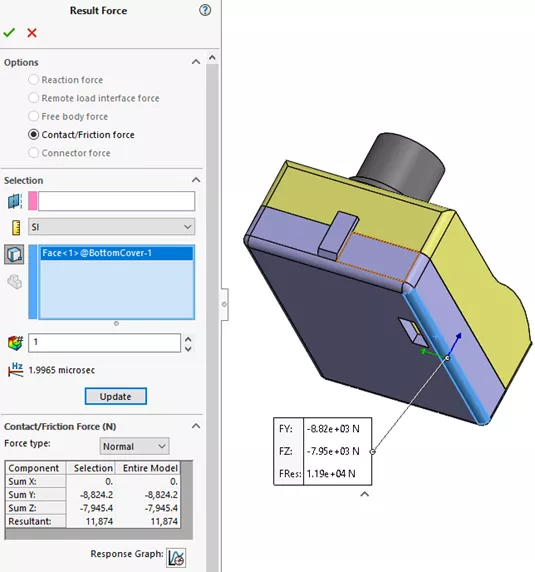
Figure 5: Result Force PropertyManager
I hope you found this quick tip for analyzing SOLIDWORKS Simulation drop tests helpful. Check out more SOLIDWORKS Simulation tutorials below.
More SOLIDWORK Simulation Tutorials
SOLIDWORKS Flow Simulation Transient Pressure Pulse Study
SOLIDWORKS Motion Analysis Motor Torque & Power
SOLIDWORKS Flow Simulation Fluid Mixing Tutorial
SOLIDWORKS Simulation Natural Frequencies, Mode Shapes, and Vibration Explained
How to Set Up a Thermal Study in SOLIDWORKS Simulation Professional

About Lauren McGarry
Lauren McGarry is a Certified SOLIDWORKS Expert based out of San Diego, California. She earned her Bachelor of Science degree from Case Western Reserve University and has been with GoEngineer as a Technical Support Engineer since 2016.
Get our wide array of technical resources delivered right to your inbox.
Unsubscribe at any time.