Creating Custom Reports in SOLIDWORKS PDM
The report generator can be a very powerful tool provided we know how to wield it. It allows us to query the database for information without the use of SQL Management Studio. We’ve explored adding reports to the Report Generator, but we haven’t explored creating custom reports in SOLIDWORKS PDM.
Doing this requires a little bit of SQL knowledge and understanding of where to look for items in the SOLIDWORKS PDM Database; meaning, some of this knowledge can be taught, but, for example, the structure of the database and information you are looking for will likely only come through experience.
It is okay to play around and potentially make bad queries here because we won’t be changing any values in PDM. If we make a mistake, we can remove the bad query and then replace it with an altered/corrected version. The report generator inherently doesn’t support any T-SQL that would perform any changes to the database.
To create reports, we start with either an existing CRP file or a blank text file. In the case of a blank text file, we save it as a CRP extension and edit it with notepad.
Each query that we add to this file will follow a similar format.
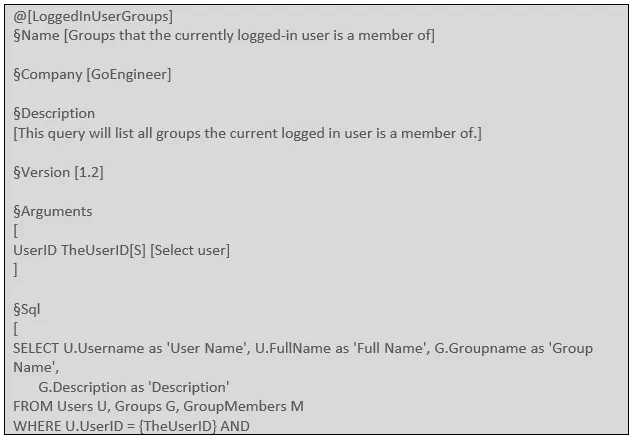

- The @ and brackets at the top is a unique identifier for the query. This should be a string of text without spaces, and it will only be seen on the properties dialog for the query and on add to set permissions.
- The §Name label can be any text that you’d like. This is what you will see in the top-left pane where all reports are listed before querying.
- The §Company and §Version arguments are again just for informational purposes. If we don’t share or iterate versions, this information may not be essential. It is, however, an option to help us track changes and origin.
- The §Description field is a brief explanation of what we are querying. This is any text and will be displayed in the properties under Description. Much like §Company and §Version, this is informational but non-essential.
- §Arguments is where we list any inputs that should be prompted on execution. There are some types here that we can utilize.
- FileID – Document ID of the selected file
- UserID – UserID of the selected user
- ProjectID – ProjectID of the selected folder
- String – A text string
- GroupID – GroupID of the selected group
- StatusID – StatusID of selected workflow state
Each of these items can be defined as variables on the execution to take an input. Each time we specify a type, we then give it a name, a count, and a prompt in that order. Counts can be a hard-coded value or the characters N, S, or M.
- N – We have a variable count and the user will be prompted to enter values or select from a list.
- S – On an argument of FileID means that the argument will be fetched from the selection list (files added to the selected files window). Results will display a different table for each file.
- S – On an argument of UserID retrieves the ID of the currently logged-in user.
- M – On an argument of FileID is the same as S, except that all files will be put into an array and the result will be displayed in one table instead of one result for each file.
- §SQL is where the bulk of the work comes in. This portion requires some SQL knowledge and some knowledge of the PDM database structure. Queries written here will largely follow standard T-SQL protocol with some slight changes for the report generator.
- Variables defined in the arguments section can be placed into the query as {VariableName} and will be substituted with the proper value on execution.
With all these notes on the separate clauses, there are also a few rules to follow when writing these reports.
- Each query in a CRP file starts with ‘@’ followed by a unique name within brackets.
- Each query contains each section listed above, written with the symbol ‘§’ the keyword, and enclosed in square brackets [ ].
- The order of the sections, however, may vary and names are case-insensitive.
If you’re struggling with basic knowledge of SQL, I recommend brushing up using W3 Schools. The tools and guides here can show a novice user how to start to put queries together.
Furthermore, if you are not quite sure where to get information from the PDM database, this will be a trickier question to answer. There are several examples of where to find certain pieces of information in the example reports. You can explore your own database (with lots of caution and recommended as a read-only user) to begin to understand the database structure using SQL Management Studio. Our blog contains several other examples of what can be retrieved (and how) through the report generator.
For information on sharing and using these reports please see our blog entry on using the report generator.
Learn More About SOLIDWORKS PDM
Managing SOLIDWORKS PDM Licenses
SOLIDWORKS PDM: Excel Document as a Form
Ultimate Guide to SOLIDWORKS PDM Permissions
SOLIDWORKS PDM Professional SQL Server Changes for 2022

About Bryce Hooper
Bryce has been using SOLIDWORKS since 2008 in multiple roles across multiple industries from industrial vacuum to RV frame design. He spent many of those years spent as a PDM administrator, implementing 3 PDM vaults along the way. He earned his CSWP in 2019, followed by his CSWE in 2013. Programming is a passion that has followed Bryce through his various positions, writing custom business applications to improve design processes. In his spare time Bryce is a gamer, a maker, and a brewer.
Get our wide array of technical resources delivered right to your inbox.
Unsubscribe at any time.