Import and Optimize the Complete Search Form: SOLIDWORKS PDM
Purpose
Import and optimize the standard EPDM (Now SOLIDWORKS PDM Professional) Complete Search form.
Prerequisites
- Standard EPDM client installation
- Windows File View vault folder
- Administrative level access to Vault
Thumbnail (Steps 1-7)
- Import Complete Search form
- Address any imported card variables
- Reorganizing the four primary checkbox controls
- Add Default Values
- Remove Content search tab (optional)
- Assign permissions
- Save
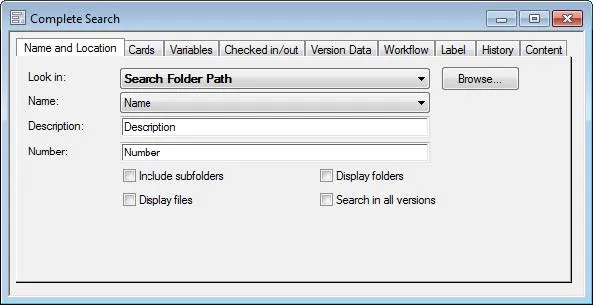
The Complete Search Form
The Complete Search is the comprehensive search form that ships with the EPDM software. This form could best be described as the “everything AND the kitchen sink” search in that it is a multi-tab form chock-full with every EPDM search method available.
The problem with this search is that, for many users, it can be daunting and non-intuitive to use in practice. A few quick changes using default values can enhance its ease of use and reduce the setup time prior to each use.
Even if the target vault already has a Complete Search form, import it again, and then simply Save-as a different name. This way you can compare these modifications to the behavior of the baseline complete search. Ultimately perhaps deleting the non-preferred version.
Step 1: Import ‘Complete Search’ Form
Once logged in as a user with permission to edit cards (typically an admin level account) there are two ways of importing a card file:
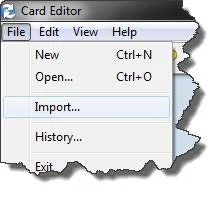
- Either open the Card Editor utility from the EPDM Admin tool, select Import from the File menu and then browse to the desired *.crd file(s). More than one card can be imported simultaneously.
- Alternatively, browse to the *.crd file and open it directly from windows (double click), this will launch the card Editor as well as import the card in one step.
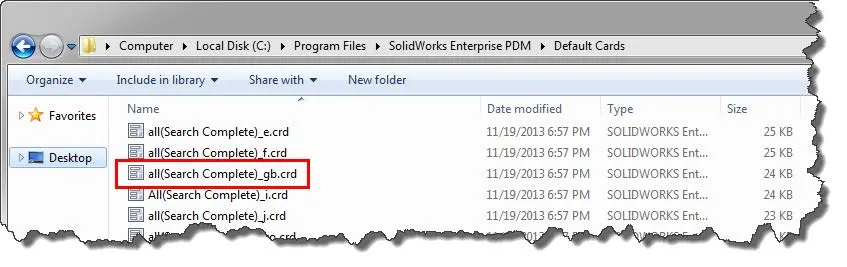
The Complete Search form can be found in the EPDM Program Files directory (%\Program Files\SolidWorks Enterprise PDM\Default Cards\...) on any standard EPDM client machine. Assuming a default C:\ drive software installation: the English language version of the complete search can be found here:
C:\Program Files\SolidWorks Enterprise PDM\Default Cards\all(Search Complete)_gb.crd
Step 2: Address any imported card variables
When importing the Complete Search form, it brings with it 3 card variables (Description, Revision, and Number). The vast majority of vaults already use variables named ‘Description’ and ‘Revision’, and so importing these variables again will not over-write or affect any existing variables by these names. If all three variables already existed in the vault then there is no need to take any action. The variable named ‘Number’ however is perhaps less widely used as compared to Revision or Description. If the vault does not use a variable named ‘Number’ the import process has now brought this variable along for the ride.
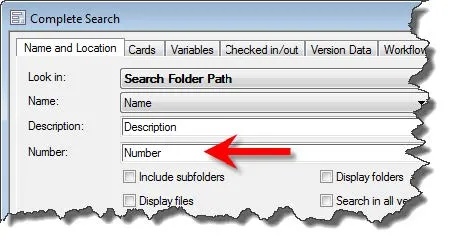
To remedy this, locate the Number edit box on the Name and Location Tab and then either delete the box and its associated label or re-associate it with a correspondingly useful search term from the existing card variable list (e.g. Part Number, PartNo, DocNumber, etc.). Once the card form is saved, go back later to the EPDM card variables list and delete the now imported but unused ‘Number’ variable.
Step 3: Reorganizing the four primary Checkbox Controls
In this example simply associating a checkbox with the secondary field to which it applies tells a clearer visual story to a user about the nature and use of these fields. Also shown here are some minor adjustments made to field labels to better communicate their function (e.g. the ‘Name:’ label changed to ‘File/Folder Name: etc.). Everything is rearranged with an eye towards greater clarity and intuitive use.

Found on the front Name and Location tab are four key checkboxes that control the behavior of the search:
- Include Subfolders dictates whether subfolders or only the selected folder will be searched.
- Display files
- Display folders each affect whether the Name field will search both file and folder names (either/or/both).
- Search in all versions is a global control that affects not only variables on the Name and Location tab, but also many other fields throughout the data card. This checkbox determines whether the data searched for should only be sought in the latest version of a record (if unchecked) or whether the data should be sought within all versions of the applicable records. This checkbox affects the search inputs found throughout the Complete Search tabs, in particular the Cards, Variables, Version Data, and History tabs are all affected by this toggle.
Step 4: Add Default Values
There are a few simple default values that can greatly enhance the behavior of the Complete Search form. Namely, these involve the Search Folder Path variable labeled Display Folders on the card (in which the path to be searched is specified) and then also the Display folders variable (checkbox). Here the standard behavior of these fields might not be considered optimal or best practice.
Search Folder Path without intervention always defers to searching the local folder in use when the search is opened. It’s probably more optimal to assume that the whole vault is to be searched unless a user manually intervenes and wants to narrow the search path. In other words: if the file sought was in that specific folder it would have likely been found without a search (and thus a broader search is justified).
The Display folders checkbox is on as standard behavior, indicating to the Name field that folder names are to be considered. It’s likely more common for users to prefer to only search against file names rather than both.
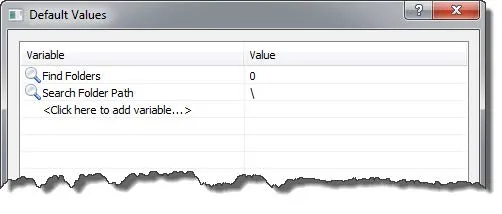
To optimize the card and correct for these non-optimal assumptions, open the search Default values editor from the Card menu within the Card Editor (shown above). The goal is for the Find folders variable to be defaulted off as a checkbox so the value is set to zero “0”. Search Folder Path then defaults to backslash “\” which is used as a wild card of sorts to indicate that the vault root level is to be searched (no drive letter or vault name is necessary in the path string).
This default in conjunction with the Include subfolders flag (already checked on by default) will result in the entire vault being searched unless otherwise narrowed by the user.

Notice that next time the search is run (right) from the file view, that the Folder path now defaults to “\” and the Display folders checkbox is off initially.
Step 5: Remove Content search tab (optional)
The Content search tab is a bit of a different animal than the other search types on this form. The other searches search only against SQL-based metadata and so are already searching an indexed relational database.
Content searching is by contrast is full-text searching of the document content itself. Unlike the other searches, this type will not work out-of-the-box unless a great deal of work is done on the back end of the system to configure windows indexing of the raw archive files on the server. Full-text search is seldom necessary in most cases as the data most frequently sought by users is already in SQL (e.g. file name, description, part number, etc.) and therefore this functionality is not as widely used. If indexing is not set up, it is a good idea to remove the Content search, as it will generate an error if used (without the server-side set up).
To remove the Content search, simply delete the corresponding tab: Select the background field on the tab control to show the Tab properties dialogue, then in the Tab names list find ‘Content’ at the bottom of the list and delete that row. This will remove the Content tab and all the fields therein.

Step 6: Assign Permissions
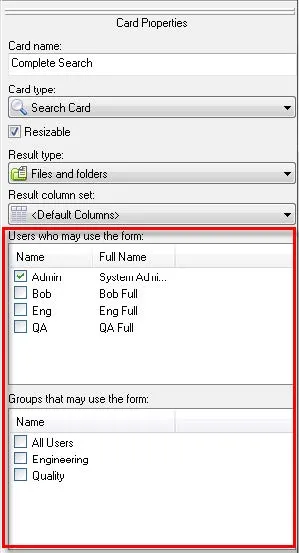
Search cards like many other aspects of EPDM can only be accessed by a user if they are granted permissions. While in the card editor, select the background of the card to access the overall Card Properties wherein permissions can be set to use this search either by group or individual user. As a best practice, it’s usually recommended to only set permissions at the group level and not on a per/user basis. Alternatively, once the new search is saved, permissions to use the search can be set from the administrative tool within the Group or User properties dialogues.
Step 7: Save the card
Save if you haven’t already. If there is already another version of the Complete search in the vault name this one differently on save-as.
Related Articles
Enterprise PDM SQL Maintenance Plan: Reorganizing and Rebuilding Database Indexes
Best Practices to Avoid Losing Work in Enterprise PDM
![]()
About GoEngineer
GoEngineer delivers software, technology, and expertise that enable companies to unlock design innovation and deliver better products faster. With more than 40 years of experience and tens of thousands of customers in high tech, medical, machine design, energy and other industries, GoEngineer provides best-in-class design solutions from SOLIDWORKS CAD, Stratasys 3D printing, Creaform & Artec 3D scanning, CAMWorks, PLM, and more
Get our wide array of technical resources delivered right to your inbox.
Unsubscribe at any time.