Managing Your SOLIDWORKS PDM Archive with Compression and Cold Storage
Data is going to pile up over time. It can be the biggest part of managing our data in the long haul. In parts one and two we shared how to manage your archive with cleanup and distribution techniques. Let’s discuss a few options here to reduce the footprint, or at least spread it around a little bit with compression and cold storage. Each of these methods for SOLIDWORKS PDM have their own give and take, so it is important to keep these in mind before implementing either solution.
Disclaimer : Before taking any steps to relocate, remove or compress data please ensure that all files have been checked in by the users, backups have been taken of both the database and archives. In the event of a relocation have all users log off or go into Offline Mode before attempting the move.
Compression
In SOLIDWORKS PDM we store our files on the archive in an uncompressed format. Using a technique to enable compression, we can save some space on versions of a file that aren’t the latest. This will at a set schedule check the archive and compress files into a .GZ compressed archive.
Adding compression to an archive server is best done through group policy. However, there is a more manual method to enable it for only specific vaults.
Note : There is no way to uncompress the archive once it has been compressed. Turning off the option only prevents new files from being compressed and will not change any currently compressed files. It is also worth noting that file structure changes to SOLIDWORKS file have largely rendered this process ineffective compared to when it was introduced. If other file formats are used, they may still compress at a high ratio and save considerable space.
Group policy compression
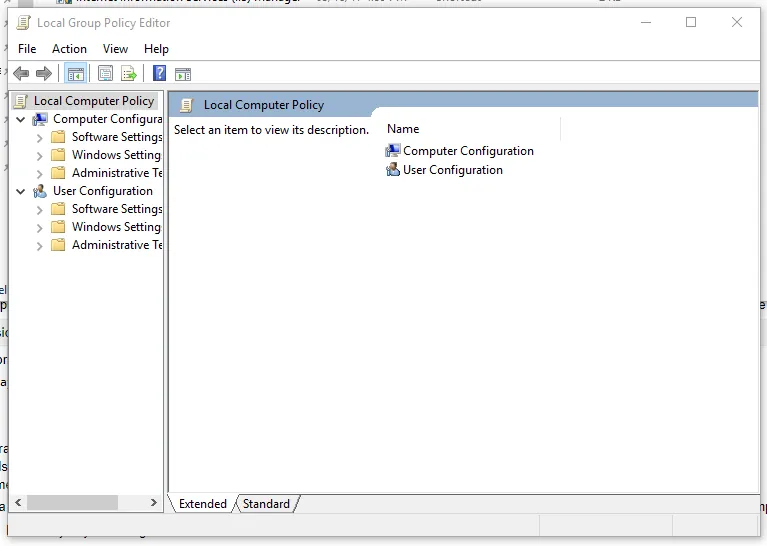
On the archive server, launch the Group Policy Editor dialog by going to the Start Menu and searching for ‘gpedit’.

In the dialog, expand Computer Configuration and right click Administrative Templates in the left pane. Select the menu option to ‘Add/Remove Templates’. Click the Add button to load a policy template. Navigate to your SOLIDWORKS installation media then to \SWPDMClient\Support\Policies and select PDMWorks Enterprise.ADM template. This policy is now available under the Administrative Templates category. Expand this folder, then Classic Administrative Templates (ADM) and SOLIDWORKS PDM Settings to select Archive Server. The Archive Compression Setting can be right clicked and edited.

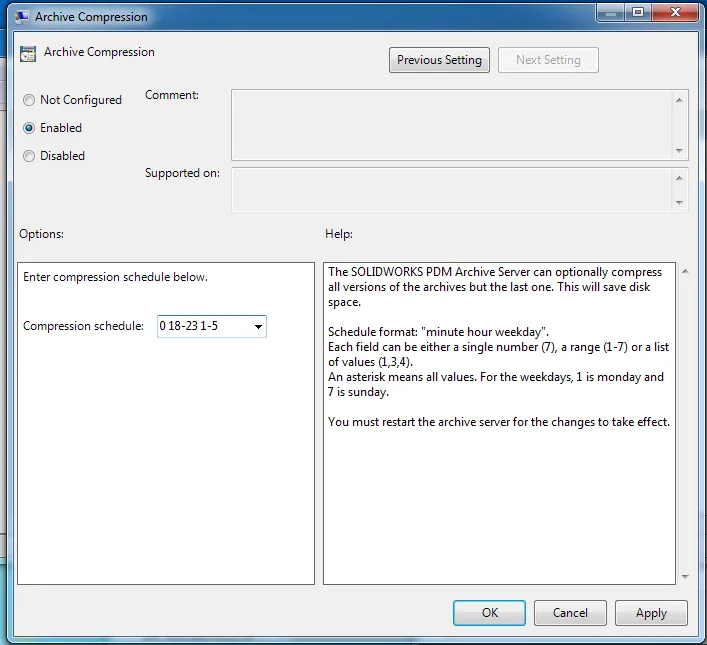
Set the radio button to Enabled and specify a schedule. Compression will compress any files in the archive that are not the latest based on this. It is recommended that this process not be too frequent to avoid taxing the server during peak hours. All vaults on this archive are going to be compressed. To make the compression vault specific, you must use the manual method.
Manual compression
Vault compression may be configured per vault if it is not configured per Group Policy. To do this, we must create a string value registry key named CompressionSchedule located at:
HKEY_LOCAL_MACHINE\SOFTWARE\SolidWorks\Applications\PDMWorks Enterprise\ArchiveServer\Vaults\[Vault Name]
The value of this key follows the same structure as both the group policy schedule and the Cleaner Service schedule.
Cold Storage Schemas
Cold Storage is an interesting option with two potential settings to help manage our vault archive. This tool has the ability to relocate old versions of files to other hard drives as well as the ability to delete old ‘unnecessary’ versions.
Note : In either schema setup there is no definitive way to determine how much data will be (re)moved ahead of running. All changes in both cases are permanent.
Cold Storage – Relocate
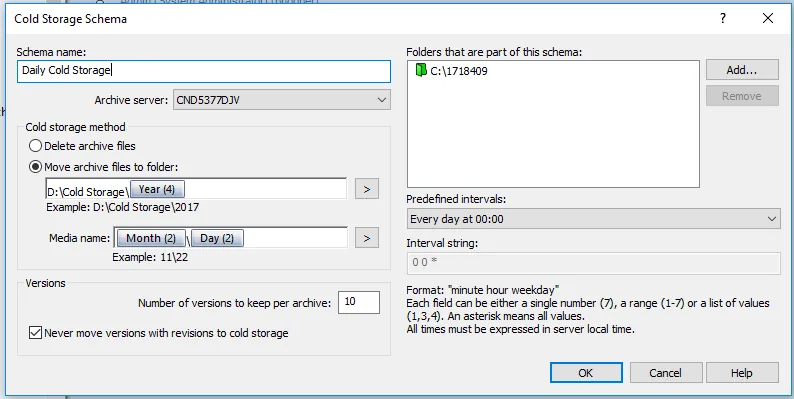
The primary function for Cold Storage is to help spread out files across different drives and directories. To do this the configuration needs to be set for the particular folders that this should apply to. We will also be setting the schedule and end path. This path must be accessible by the archive server.

The above example is putting all versions of files older than the last 10 (but not demarked as a revision) into the store. The store is going to the D: Drive filed under Year\Month\Day and is processing them every day at midnight. The entry under “Media Name” will be noted in the history as the location for the cold store.
It would be reasonable for a networked location or a secondary drive for this purpose. More so if we are in a situation where relocating the vault to this drive would not be optimal.
Notes: While this process does move data in some cases it can actually create additional data and take up more space than before. Files that go into the vault are assessed on whether or not the data in the file has changed or whether meta-data in the database has changed. If the file has not changed, the archive does its best to minimize the footprint of each file and will reference the same file for different versions. When cold storage processes a file for a version that does not explicitly have a unique file, it will copy that file and place it into a compressed package. This in turn has now created a second copy of a file that the archive had already determined not to be unique. In this way, we have made the issue of space worse.
The scheduling for cold storage is set on the same system as previously described under the cleaner service and compression schedules.
Files that have been cold stored require additional permissions to access. If a user does not have permissions, any attempts to get an older version of the file the latest version will be used and a warning will be displayed.
When attempting to use the rollback function it is impossible to roll back to a point beyond the last file that has not been put into Cold Storage. Cold Stored files are compressed and moved, there is no way to reverse this change.
Cold Storage – Deletion
Another function of the Cold Storage schema is to delete older versions after a defined version number. Setting this up is similar to that of the relocation schema, but is different in that we do not need to set a path. Change the radio button to indicate that the schema is for deletion and specify the number of versions to keep, then whether versions marked as revisions will be saved. The process will run on the set schedule and remove any version of a file beyond the specified version number. All deletes are permanent and cannot be reversed. This is noted in the history and versions previous to the deleted versions cannot be rolled back to similar to the relocation schema.

About Bryce Hooper
Bryce has been using SOLIDWORKS since 2008 in multiple roles across multiple industries from industrial vacuum to RV frame design. He spent many of those years spent as a PDM administrator, implementing 3 PDM vaults along the way. He earned his CSWP in 2019, followed by his CSWE in 2013. Programming is a passion that has followed Bryce through his various positions, writing custom business applications to improve design processes. In his spare time Bryce is a gamer, a maker, and a brewer.
Get our wide array of technical resources delivered right to your inbox.
Unsubscribe at any time.
