SOLIDWORKS PDM Web2 Guide: Server Setup, Accounts, Application Pools & Testing
Web2 is a useful tool to access SOLIDWORKS PDM over the internet. Most issues with Web2 can be traced to improper setup on the server. This guide will delve into the proper way to set up Web2.
Web2 Setup Overview
Here is a quick overview of the steps necessary to set up Web2.
Steps to set up Web2:
- Verify prerequisites are met
- Install IIS with settings as specified below (part of prerequisites)
- Install Web2 software with PDM Client
- Modify the Web.config file
- Install a local vault view on the server (see video linked here)
- Prepare the account that will be used for the application pool identity
- Create a local admin on the server that will be used as the Web2 account
- Log into the server using the Web2 account (Windows credentials to log into the server)
- Log into the local vault view with the Web2 account
- Browse to a file and preview the file in the local vault view
- Change the application pool identity to the Web2 account
- Test operation of Web2 on the server
- Select “*.80” to open Web2 on the server. Verify it is working properly, including the preview
- If “*.80” works, then use the URL on the server and verify it works. The URL is “ servername /SOLIDWORKSPDM” where “ servername ” is the name of the Web2 server.
User Guide
- For steps 1 through 4 please see the section Part 1: Set Up Web2: Install the Software
- For step 6 please see the guide Part 2: Set Up Web2: User Account
- For steps 7 and 8 please see the guide Part 3: Set Up Web2: Application Pool Identity
PART 1: Set up web2: Install the Software
In this section, we will present the steps to properly set up Web2 on the server. Each step will be covered in detail throughout this guide.
Prerequisites on the server for Web2
Prerequisites will vary depending on the version of Web2 being installed. The prerequisites can be verified by looking in the Installing PDM Web2 section in the PDM INSTALLATION GUIDE for the version you are installing or by going to the SOLIDWORKS and SW Data Management System Requirements.
For example, Web2 2021 needs the following prerequisites:
- Microsoft .NET 4
- Microsoft Internet Services 7 or higher (IIS)
- Windows Server 2016 or higher
- Microsoft Visual Studio C++ 2013 runtime
Install IIS
IIS is short for Microsoft Internet Information Services. This is extensible web server software created by Microsoft. Web2 uses this software.
To install IIS
IIS comes with Windows. We only need to turn it on in the Windows Features dialog. This dialog can be accessed through the Control Panel. If Category is selected, then choose Uninstall a program.
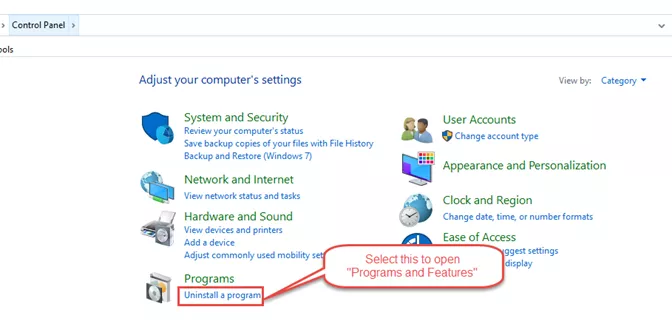
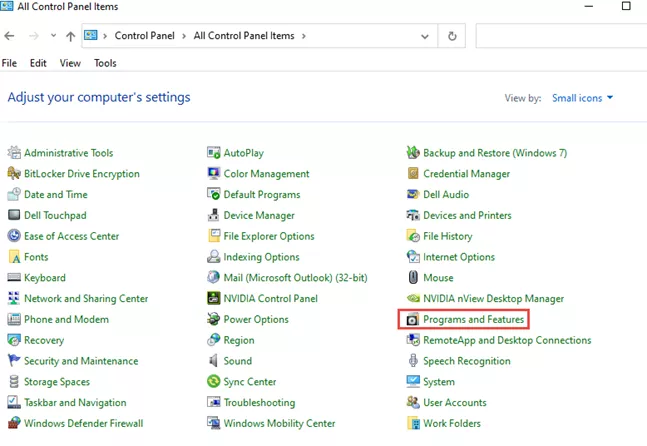
If Icons are selected, then choose Programs and Features.
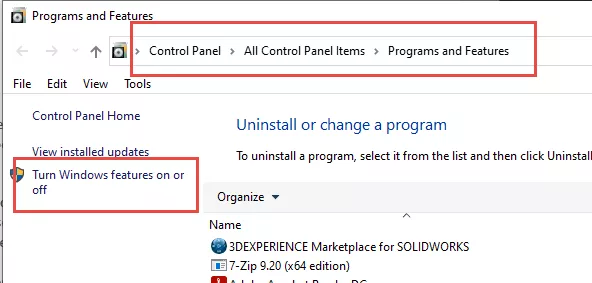
In Programs and Features select (in the top left) Turn Windows features on or off.
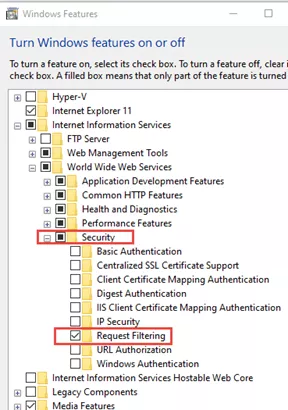
In the dialog Windows Features, expand Internet Information Services.
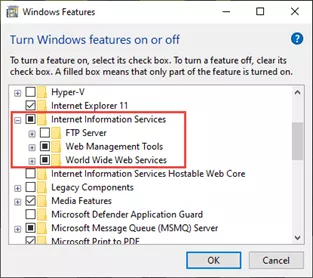
Expand Web Management Tools and select IIS Management Console .
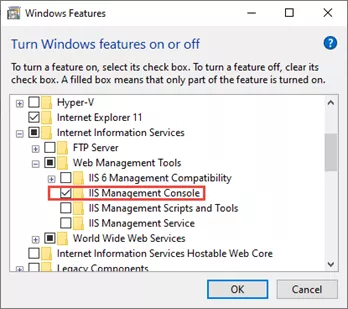
Expand World Wide Web Services.
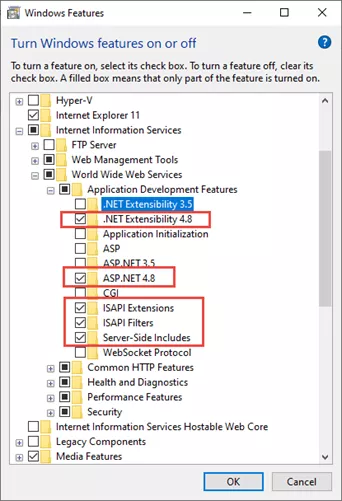
Under Application Development Features select:
- .NET Extensibility 4.x (depends on which .NET 4 is installed)
- ASP .NET 4.x
- ISAPI Extensions
- ISAPI Filters
- Sever-Side Includes
Under Common HTTP Features select:
- Default Document
- Directory Browsing
- HTTP Errors
- Static Content

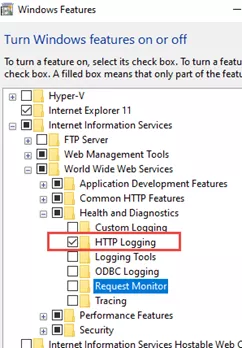
Under Health and Diagnostics select:
- HTTP Logging
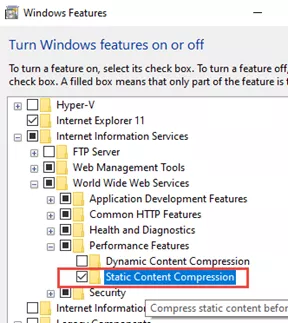
Under Performance Features select:
- Static Content Compression
Under Security select:
- Request Filtering
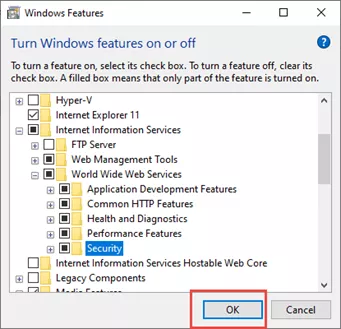
Select OK on Windows Features. IIS will install.
Install Web2 Software
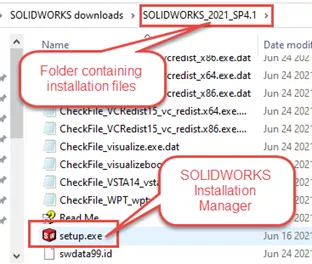
Run the SOLIDWORKS Installation Manager to install the Web2 software. Using SOLIDWORKS Installation Manager will ensure that all prerequisites are installed. SOLIDWORKS Installation Manager is accessed by running setup.exe from the first level of the folder containing the installation file set.
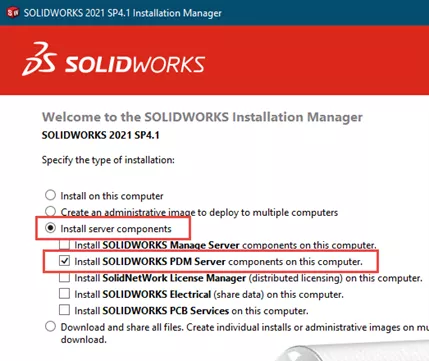
In the SOLIDWORKS Installation Manager, select Install Server Components and check the box for Install SOLIDWORKS PDM Server components on this computer.
Select Next at the bottom of the window.
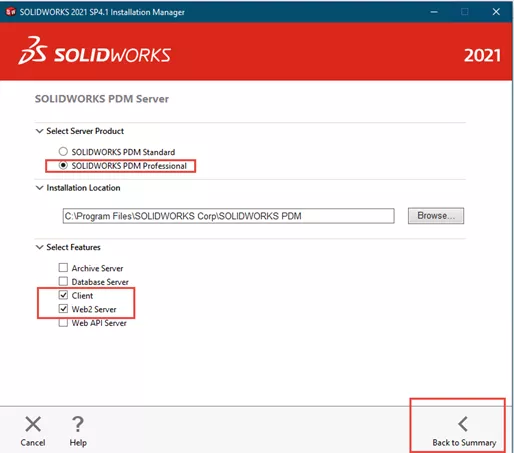
Select Change for SOLIDWORKS PDM Server. This will allow selection of components to install.
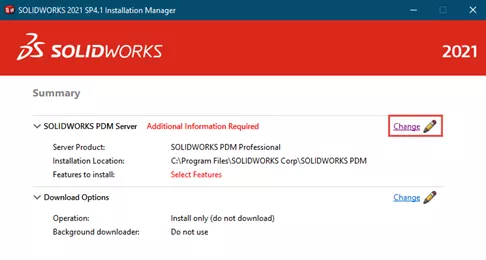
Select SOLIDWORKS PDM Professional for Server Product.
Under Select Features choose Client and Web2 Server.
Choose Back to Summary.
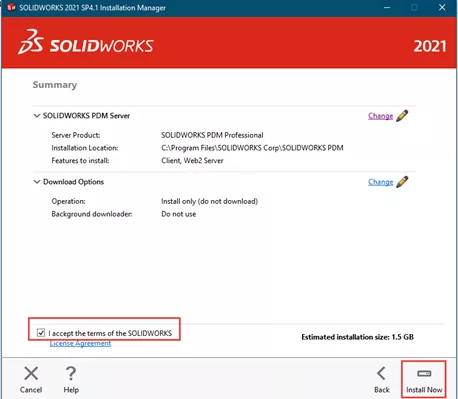
Accept the terms of the SOLIDWORKS License Agreement.
Select Install Now.
SOLIDWORKS Installation dialog will show.
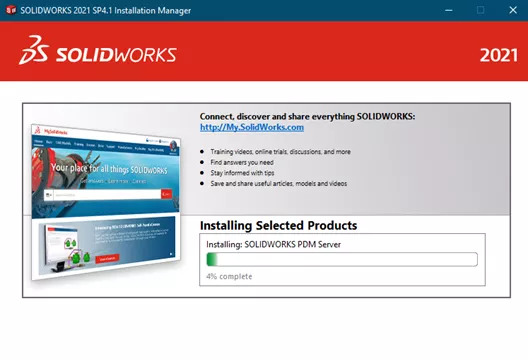
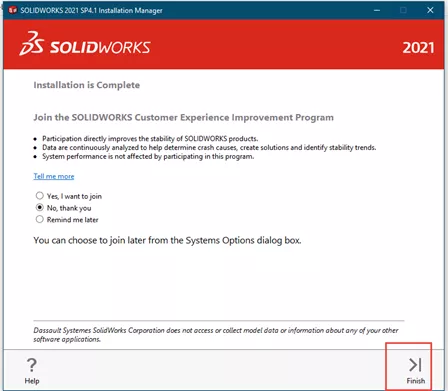
Choose Finish to complete the install.
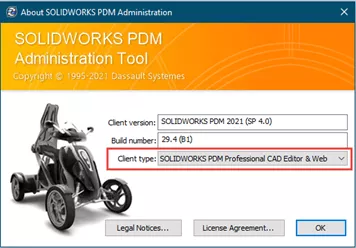
Verify the Client install type
If the Web2 users are expected to add and edit files in the vault, then the PDM Client must be an Editor or Contributor. A PDM Client that is only a Viewer will limit Web2 users to only viewing files in the vault. To verify the client license configuration, start the PDM Administration tool.
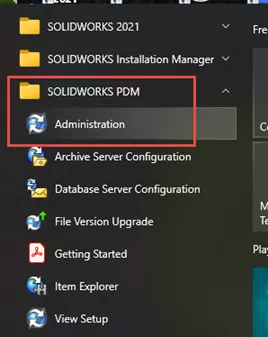
The PDM Administration tool can be started by going to the Windows Start menu, then SOLIDWORKS PDM: Administration.
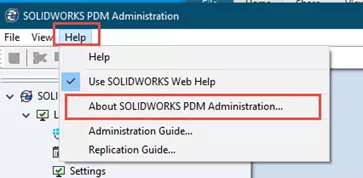
In the PDM Administration tool, select Help: About SOLIDWORKS PDM Administration…
Verify the Client Type is SOLIDWORKS PDM Professional CAD Editor and Web or SOLIDWORKS PDM Professional CAD Contributor and Web.
Install a vault view on the Web2 server
Installing a vault view has already been covered in several other documents. Please watch the video Creating a Vault View Using the ‘View Setup’ Tool.
Modify the Web.config file
This can be done by modifying the file directly or by using IIS. If you wish to modify the document directly, browse to the file C:\inetpub\wwwroot\SOLIDWORKSPDM\Web2\Web.config”. The file is an XML format. Double-clicking it will open the file in Microsoft Visual Studio 2005 Tools for Applications.
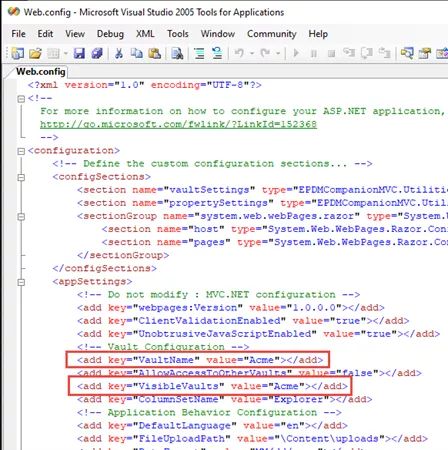
The two most important items to edit are the VaultName and VisibleVaults. “VaultName” is the name of your primary vault. “VisibleVaults” lists the vaults that are visible to Web2 users so it must contain the name of the primary vault.
Access to multiple vaults using Web2
If it is desired for the Web2 users to have access to more than one vault, then a local vault view must be created for each vault on the Web2 server. Additionally, “VisibleVaults” must contain the names of the other vaults. The format is to list the vault name with “|” between them.
Example:
Optional Settings
There are optional settings that can be used to control download permissions or to set the vault to View only. Please refer to the SOLIDWORKS PDM Installation Manual, the section Configuring SOLIDWORKS PDM Web2 for more information.
Editing the Web.config file in IIS
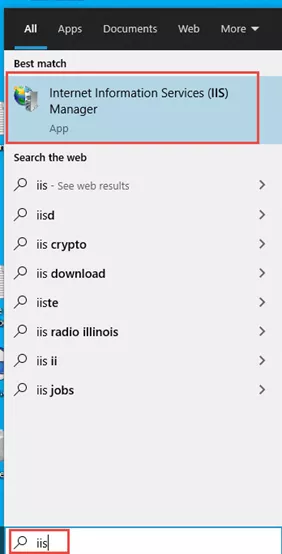
The Web.config file can also be modified in IIS. On the Web2 server, start the IIS Manager by typing IIS in the Windows Search area. Select Internet Information Services (IIS) Manager from the list.
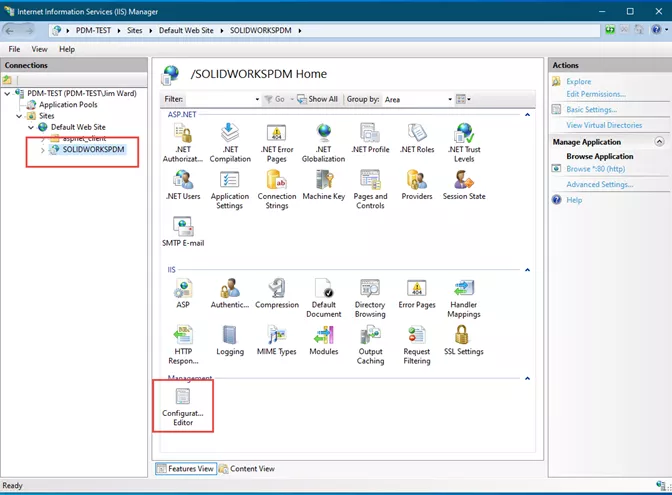
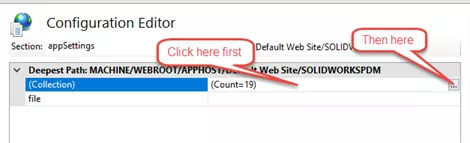
In the IIS Manager expand Sites until SOLIDWORKSPDM shows. Select SOLIDWORKSPDM. Double-click Configuration Editor.
In the Configuration Editor: Section choose appSettings from the drop-down list. The Count will vary a little depending on the version of PDM.
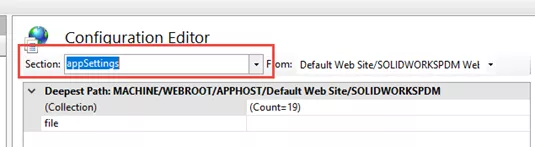
Right-click in the same box as the (Count = 19) so the three dots show on the right and select.
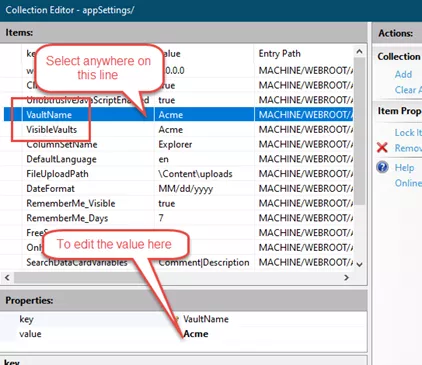
This brings up the Collection Editor. It is a little easier to edit the values here rather than as an XML document. Select anywhere on the line that lists the parameter you want to edit. The property will be listed below, and it can be edited.
Be certain to edit both the “VaultName” and “VisibleVaults”.
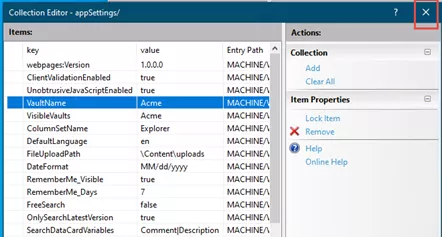
Once edits are complete, select the “x” in the top right corner of the dialog.
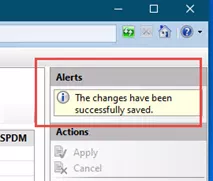
Now select Apply in the top right corner to save your changes.
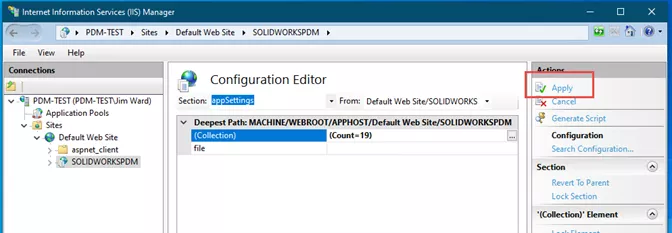
There will be a confirmation the changes were saved successfully.
This concludes this portion on installing Web2 on a server. Please continue to the next section that explains setting up and assigning the Web2 user account.
PART 2: The web2 User Account
Web2 requires an account on the server to run. By default, a “NetworkService” account will be assigned. However, this account will not allow Web2 to run properly. Instead, a special account will need to be created. The requirements for that account are listed below.
Many issues with Web2 not working correctly can be traced to the account used to run Web2. Setting up the account correctly is very important for the proper operation of Web2.
Web2 User Account requirements
Account set up:
- The account must be a member of the local Administrators group
- The account must be a member of the local IIS_IUSRS group
- The account must be a PDM login
Once the account is set up, the following actions must be performed:
- Log into the Web2 server as the Web2 User
- Log into the local vault view as the built-in 'admin' account for PDM
- Browse into the vault and view a file
- Assign this user as the account to run Web2 under
Create the Web2 User account in Windows
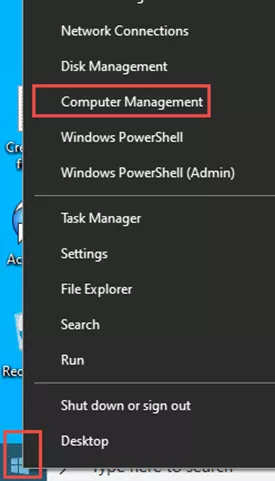
Right-click the Windows Start menu and choose Computer Management.
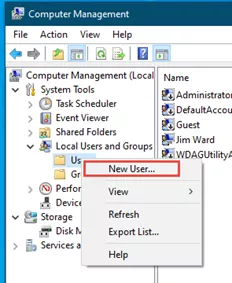
Expand Local Users and Groups . Right-click Users and choose New User.
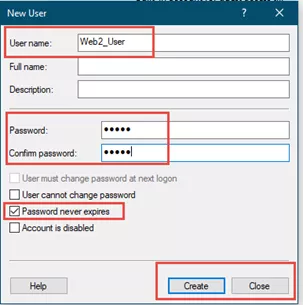
Create a name for the user and a password. Uncheck User must change password at next logon and check Password never expires. This will ensure that Web2 will continue to work. Change the password as frequently as your security dictates but do it manually so the Web2_User login continues to work.
Choose Create then Close to complete creating the account.
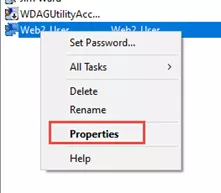
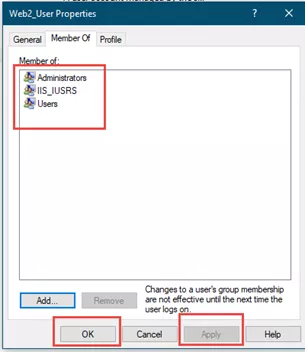
We need to add this user to two groups. Right-click Web2_User from the list and choose Properties or double-click the user.
Select Member of and Add.
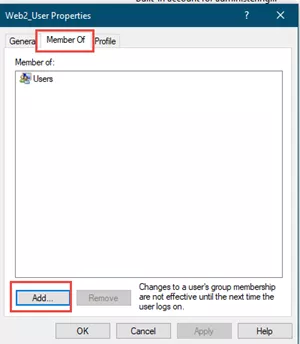
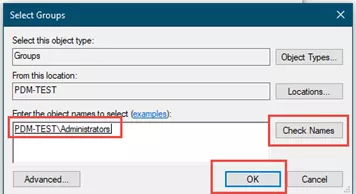
Type Administrators then Check Names. Note the name must match exactly the name of an existing group. Select OK.
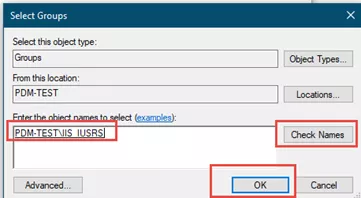
Repeat the process with the ‘IIS_IUSRS” group.
You may find it easier to go to each group and add the user from there.
With the groups listed in the box Member of, select Apply and then OK .
Close the Computer Management window.
Create Web2 Registration
Once you've created this Windows user and added them to the proper groups, you'll need to log into the server with this Windows user. Then, log into the vault view as the built in 'admin' user.
Once logged in, right-click on any file to trigger the menu. This creates background registry entries and associates the proper prerequisite files for Web2 to work properly with the local vault view.
The Web2 identity is now set up properly and is ready to be used as the application pool identity for Web2. Please see Application Pool Identity and Testing Web2 for the configuration of the next steps of the Web2 setup.
PART 3: Application Pool Identity and Testing Web2
When Web2 is first installed, the default Application Pool Identity is the built-in account “NetworkService”. This will not allow Web2 to work properly. The Application Pool Identity must be a special account that has been prepared. Please see the section Set up Web2 – User Account for directions on preparing the account Web2User for use as the Application Pool Identity.
This section will describe how to assign the Web2User as the Application Pool Identity for Web2 in Internet Information Services (IIS).
Once the user is assigned we will go over testing operation of Web2.
Access the Application Pool Identity
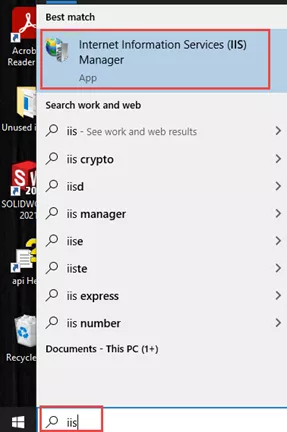
Start the IIS Manager by typing IIS in the Windows search field and selecting Internet Information Services (IIS) Manager.
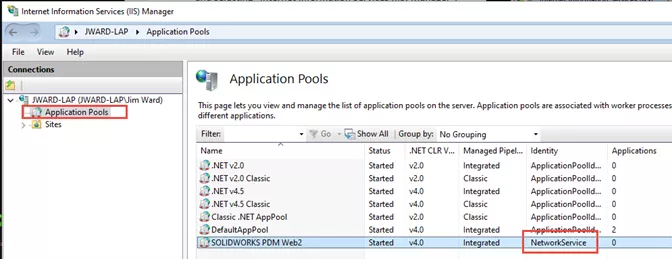
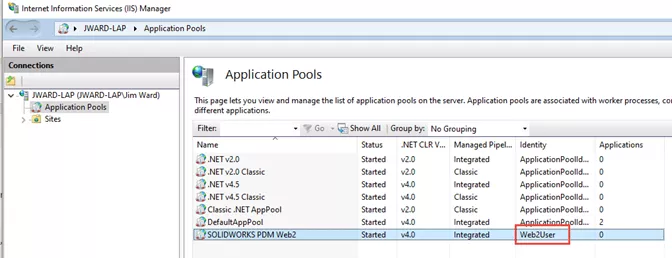
Select Application Pools in the top left. Notice that the application pool identity for SOLIDWORKS PDM Web2 is NetworkService.
Right-click SOLIDWORKS PDM Web2 and choose Advanced Settings .
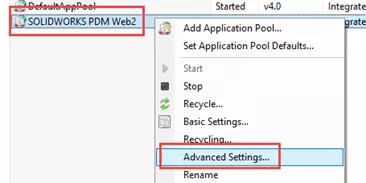
In Advanced Settings: Process Model: Identity, click next to NetworkService. Three dots will appear. Select these three dots to edit the Identity.
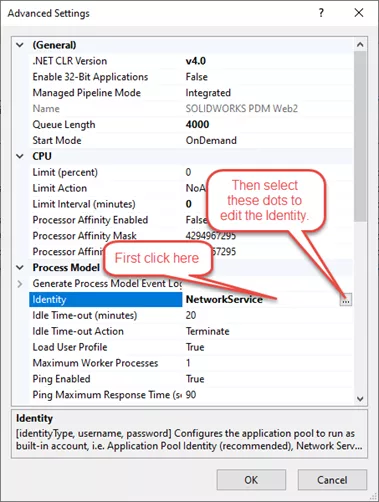
In the Application Pool Identity dialog, select Custom account and Set…

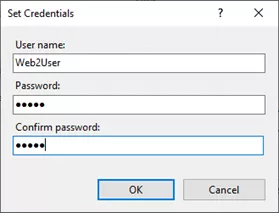
Enter credentials for the Web2User.
Select “OK” twice to get back to the “Advanced Settings” dialog.
In the Advanced Settings dialog verify that Load User Profile is set to True.
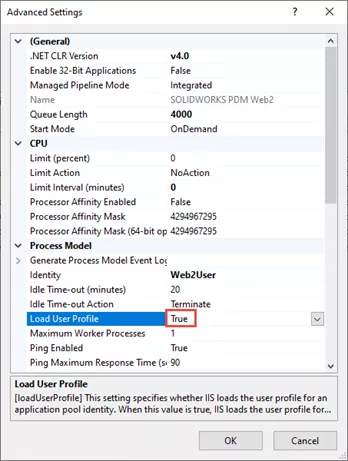
Select OK to exit the dialog.
Back in Application Pools verify that Web2User is now the Identity for SOLIDWORKS PDM Web2.
Congratulations! You have successfully set the Web2User as the Application Pool Identity for SOLIDWORKS PDM Web2.
The next step is to test the operation of Web2.
Testing Web2 Server
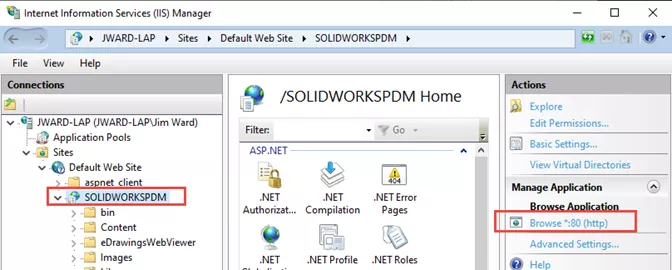
The first step in testing the Web2 server is to test operation of Web2 on the Web2 server. This is done by expanding the Sites until SOLIDWORKSPDM is revealed. Select SOLIDWORKSPDM and the (on the right) Browse *80 (http). This will open the default website.
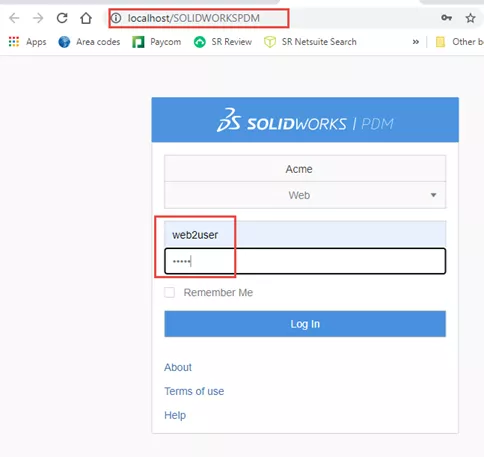
This will start the Web2 application on the local server and bring up the Web2 login screen.
Log in with a valid SOLIDWORKS PDM account. It is fine to use “Web2User” for the account.
Once successfully logged in, your vault should appear. Browse down a few folders and select a file.
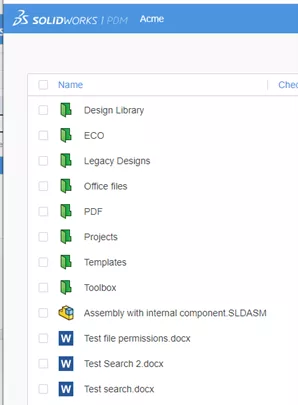
A preview of the file will appear.
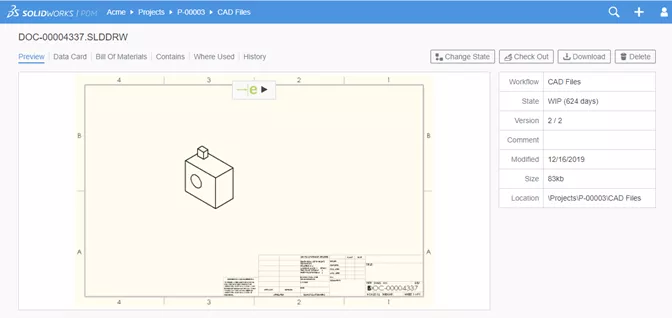
This verifies Web2 is working on the server. Run the same test on a client. The address for Web2 is http:// servername /SOLIDWORKSPDM where “ servername ” is the name of your Web2 server.
Congratulations! Your Web2 server implementation is now complete.
More SOLIDWORKS PDM Guides
SOLIDWORKS PDM: The Complete Guide to Client Installation
SOLIDWORKS PDM Guide to PDM Standard Backups
Ultimate Guide to SOLIDWORKS PDM Permissions
SOLIDWORKS Manage Client Install Guide
VIEW ALL SOLIDWORKS PDM TUTORIALS

About Jim Ward
Jim Ward is a Sr. SOLIDWORKS Support Engineer at GoEngineer. He has a BSME from CSU, Chico and has been managing SOLIDWORKS PDM since 2008, first for a major corporation until 2015, then as a PDM Support Specialist at GoEngineer since 2016.
Get our wide array of technical resources delivered right to your inbox.
Unsubscribe at any time.