Using SOLIDWORKS Task Scheduler to Create or Modify Custom Properties

Article by GoEngineer on Mar 05, 2017

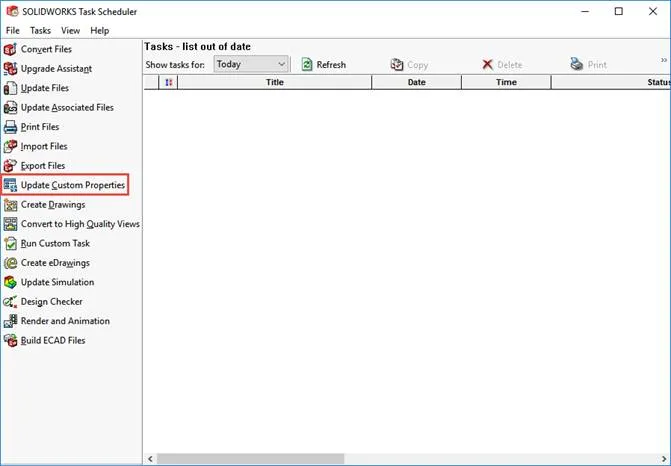
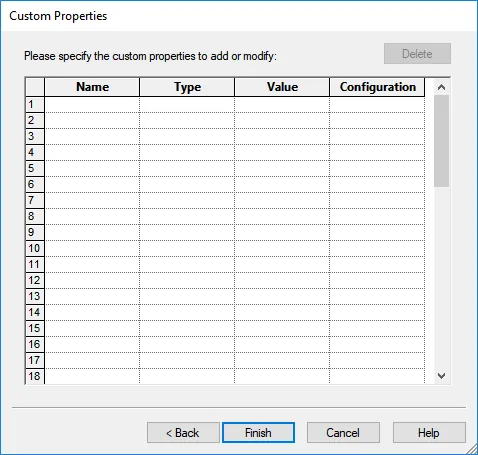
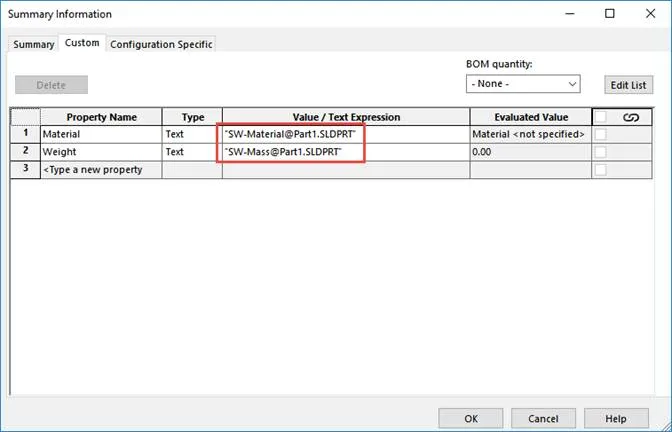
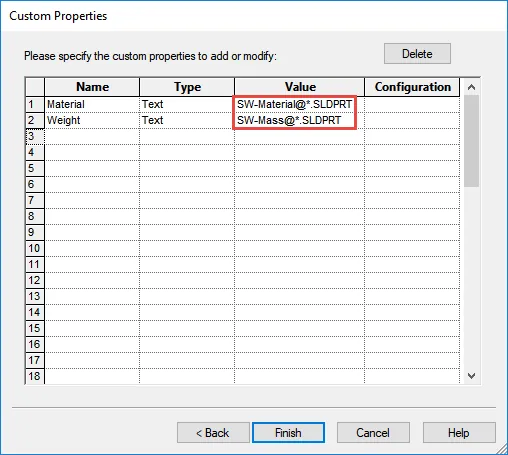
WHAT: SOLIDWORKS Task Scheduler is a very useful tool that can perform hundreds, if not thousands of tedious tasks that follow simple rules the user specifies. One of the many useful tasks that can be run with the Task Scheduler is ‘Update Custom Properties’. This function allows you to create new or modify existing custom properties for individual files, batches of files, or entire folders.

WHY: This is useful when many files were saved without custom properties but those constant or file-specific properties need to show up in the assembly-level Bill of Materials (BOM).

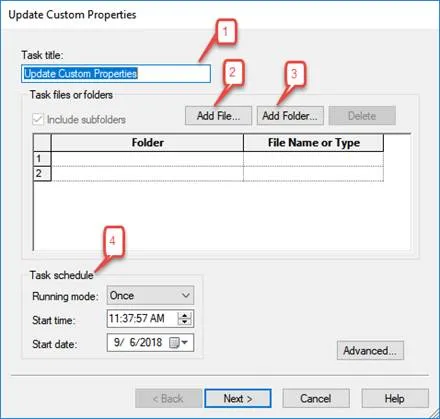
HOW: This guide will show you the basics on how to perform this function for individual files as well as large batches of files. Important notes and nuances are highlighted in red text, so make sure to read them before proceeding.

IMPORTANT NOTE: According to SOLIDWORKS Help: “You must have a SOLIDWORKS Professional, Premium, or Office license to perform all Task Scheduler tasks. With an active Standard license, you can convert files.” To check if you have a Professional or Premium license, click the drop-down arrow next to the SOLIDWORKS ‘Help’ icon and select ‘About SOLIDWORKS’.

solidworks task scheduler

Create the Task

1. Open the SOLIDWORKS Task Scheduler by hitting the Windows key or clicking the Start Menu and typing ‘SOLIDWORKS Task Scheduler 20XX’ (your version).
2. Click ‘Update Custom Properties’ on the sidebar or click Tasks > Update Custom Properties.

create a task solidwork task scheduler
  • The following dialogue box appears:
update custom properties

3. In the dialogue box, you may type a title for the task in the ‘Task Title’ box (bubble #1). Now you need to select the files or folders whose custom properties you wish to update.

  • To select individual files:
    • a. Click ‘Add File’ (bubble #2).
    • b. Browse to the file you want, select it, and then click ‘Open’. You can also Ctrl + select multiple files.
    • c. Repeat steps a and b to select additional files that will be updated with the same custom properties.
  • To select folders:
    • a. Click ‘Add Folder’ (bubble #3)
    • b. Browse to the folder that contains the files that will be updated with the custom properties and then click ‘OK’.
      • IMPORTANT NOTE:
      • – If the folder you select includes drawings and assembly files, they will receive incorrectly linked custom properties. If your folder contains multiple file formats, you can:
        • 1) Move the assembly and drawing files to a separate folder with SOLIDWORKS Explorer (to maintain the references) so you can simply select the entire folder, or
        • 2) Use the ‘Add File’ option, sort the folder so as to only select the .SLDPRT files, and use Ctrl + select or Shift + select to select all of the part files. If you need linked custom properties such as weight added to the assembly files, you must run that task separately.
      • – The importance of this will be evident in the next step.
    • c. Repeat steps a and b to select additional folders.
    • d. If you do not want to include subfolders, clear the check box for ‘Include subfolders’.
    • To delete a file or folder from the list, click on any cells from its row and click ‘Delete’.

    4. Schedule the task:

    • a. Under Task Schedule (see bubble #4), you can set the:
      • Running mode – specifies how often the task runs. You can choose Once, Daily, Weekly, or Monthly.
      • Start time – time at which you would like to start the task. If you want the task to start immediately, simply leave this value alone.
      • Start date – date on which you would like to start the task.
    • Because creating or modifying custom properties is typically a one-time occurrence, leave these values at their defaults. This will run the task after you have finished creating it.

    5. Click ‘Advanced’ if you want to change task options such as backup file location and time-out duration.
    6. Click ‘Next’.

    Specify the Custom Properties to be Created or Modified

    • The following dialogue box will appear:
specify custom properties to be created or modified
  • There are four columns into which you can enter information about your custom property. The first three are required. (If you want custom properties to be assigned to specific configurations, you must type their configuration names into the Configuration column. Otherwise, leave it blank.)
    • Name – the name of the custom property. When you click on this cell, a drop-down arrow appears with a list of the SOLIDWORKS default custom properties. You can select one of these or enter your own.
    • Type – indicates the value type, such as Text, Date, Number, or Yes or No. Unless you are specifically looking for a Date, Number, or Yes or No, use the ‘Text’ option.
    • Value – the custom property value. This must be entered manually
      • a. In order to create a custom property that will be constant across all files, simply type the value you wish (i.e. company name, finish, etc).
      • To create a custom property that is file specific (such as Material or Weight), you will need to enter in the exact text expression that will link the file-specific property. In order to find the text expression of your desired property, follow the steps below:
        • 1. Create a new part file.
        • 2. Click the ‘Summary Information’ icon or click File > Properties.
          summary information solidworks task manager
        • 3. In the dialogue box, select or type any value in the Property Name column.
        • 4. In the Type column, select ‘Text’.
        • 5. In the Value / Text Expression column, select the part-specific property you want. The result should look something like this:
          summary information solidworks


          • In this case, the Material and Weight (the text expression for weight is SW-Mass) values were selected. The text expressions you see links to file-specific values. A SOLIDWORKS assembly-level Bill of Materials (BOM) currently cannot pull these values from within the part file. A custom property must be created from which the BOM will pull the value.
          • We are interested in everything between the quotation marks. Either keep this window open so you can look at it or highlight the text and use Ctrl + C or right-click, Copy to copy the text.
        • 6. Enter in or paste the text expression into the Value column of the Update Custom Properties window. DELETE THE QUOTATION MARKS. The task will fail if the quotation marks are not removed.
        • 7. DELETE THE FILE NAME AND REPLACE IT WITH AN ASTERISK (*). If the file name is not deleted, every file will receive the text expression with the file name you copied and the property will not link properly. The asterisk symbol tells each part file to use its own file name. The result should look something like this:
          custom properties solidworks task scheduler


          • These are correct text expressions. The quotations are removed and the suffix is @*.SLDPRT.
        • NOTE: If you include the assembly or drawing files in the task, they will receive a custom property with the suffix @*.SLDPRT. In order to link properly, the value column must use their respective suffixes, @*.SLDASM or @*.SLDDRW. This is why you must run the tasks on part, assembly, and drawing files separately. The steps to run the tasks are the same.
        • 8. Click ‘Finish’.
    • The task and its title, scheduled time, scheduled date, and status will appear in the Tasks panel. The status of the task is now set to ‘Scheduled’.
    • Once the task is complete, all of your files will have new or modified custom properties.

    Important Notes

    • To modify an existing custom property, you will need to enter in the values exactly as they appear in the existing custom property. The only differing value will be in the Value column. You will follow the same steps as you would to create a new custom property.
    • To run a scheduled task, your computer must be on at the scheduled start time. The SOLIDWORKS Task Scheduler window does not need to be open. If your computer is off at the scheduled start time, the task will run when your computer is turned on.
    • After the task completes, double click ‘Completed’ to see the SOLIDWORKS Task Scheduler Report.
 

About GoEngineer

GoEngineer delivers software, technology and expertise that enable companies to unlock design innovation and deliver better products faster. With more than 35 years' experience and tens of thousands of customers in high tech, medical, machine design, energy and other industries, GoEngineer provides best-in-class design solutions from SOLIDWORKS CAD, Stratasys 3D printing, Creaform & Artec 3D scanning, CAMWorks, PLM, and more

View all posts by GoEngineer