Managing SOLIDWORKS Simulation Results with PDM
If your organization uses SOLIDWORKS PDM, you have taken a step in the best direction to avoid data duplication and enforce revision controls during the product design process. Considering these benefits, your team may have stumbled across this conundrum – Do I manage my simulation results in the PDM vault? To answer this question, let’s understand the Simulation tools in SOLIDWORKS.
Understanding SOLIDWORKS Simulation tools

Figure 1: Analysis programs in SOLIDWORKS.
The analysis portfolio in SOLIDWORKS boasts three distinct tools:
- SOLIDWORKS Simulation – Structural Analysis (FEA)
- SOLIDWORKS Flow Simulation – Fluid Flow and Heat Transfer Analysis (CFD)
- SOLIDWORKS Plastics – Injection Molding Simulation
While these tools are fully integrated to the CAD interface, each program has its own set of metadata associated with the analysis setup and results. In this article, we will address the management of simulation results from the structural analysis tool, SOLIDWORKS Simulation.
Understanding SOLIDWORKS Simulation data
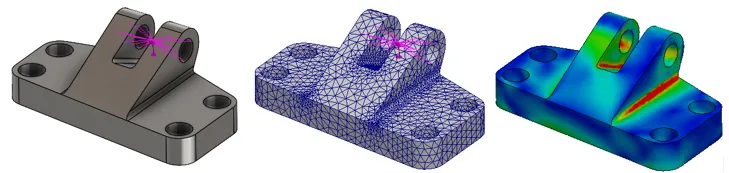
Figure 2: SOLIDWORKS Simulation – From part to progress.
SOLIDWORKS Simulation creates two pieces of information when an analysis is run:
- The Setup
- Solver settings
- Material assignments
- Contact conditions
- Mesh information
- Loads and constraints
- The Results (including the generated Mesh)
The setup information is written into the part or the assembly file. This information does not need management. Whereas the results are stored as a separate CWR file in a user-defined location. By default, these files are saved in the folder of the assembly/part file that you are analyzing.
It is recommended to save results under a sub-folder in the assembly/part folder to avoid unnecessary analysis metadata clutter and to conveniently manage these results files. Here’s how you do it (Figure 3):
- Activate the Simulation add-in
- In the SOLIDWORKS menu bar, navigate to Simulation>Options
- In the window that follows, navigate to the Default Options tab and select the Results item
- Enable the ‘Under sub folder’ option and type in a folder name to store the Results
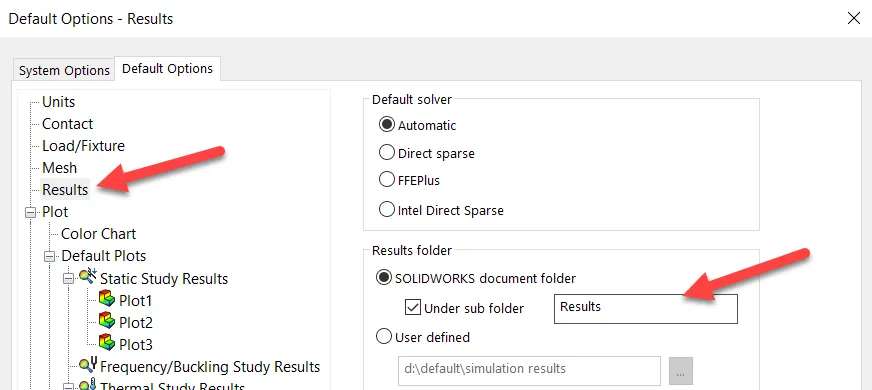
Figure 3: Simulation Options window.
It is important to note at this stage that these results files could range from a few MBs to a lot of GBs. Below is a table with some sample analysis data.

Introspection
As an organization, you will need to define the goals behind managing these large results files. Here are a few possible reasons:
- Access to simulation results by all users with the appropriate permissions
- Virtually unlimited space available for the vault in the archive server for the large results files
- Design verification process to take place within the vault
Mange your Simulation results
Here are a few things you will need to configure to manage simulation results in the PDM vault.
Step 1: Enable setting in Explorer View
You will need to enable the setting ‘Include SOLIDWORKS Simulation results in Check-in’ in the Vault folder from the windows explorer view (Figure 4). This is done from the ‘Display’ menu in the explorer view.
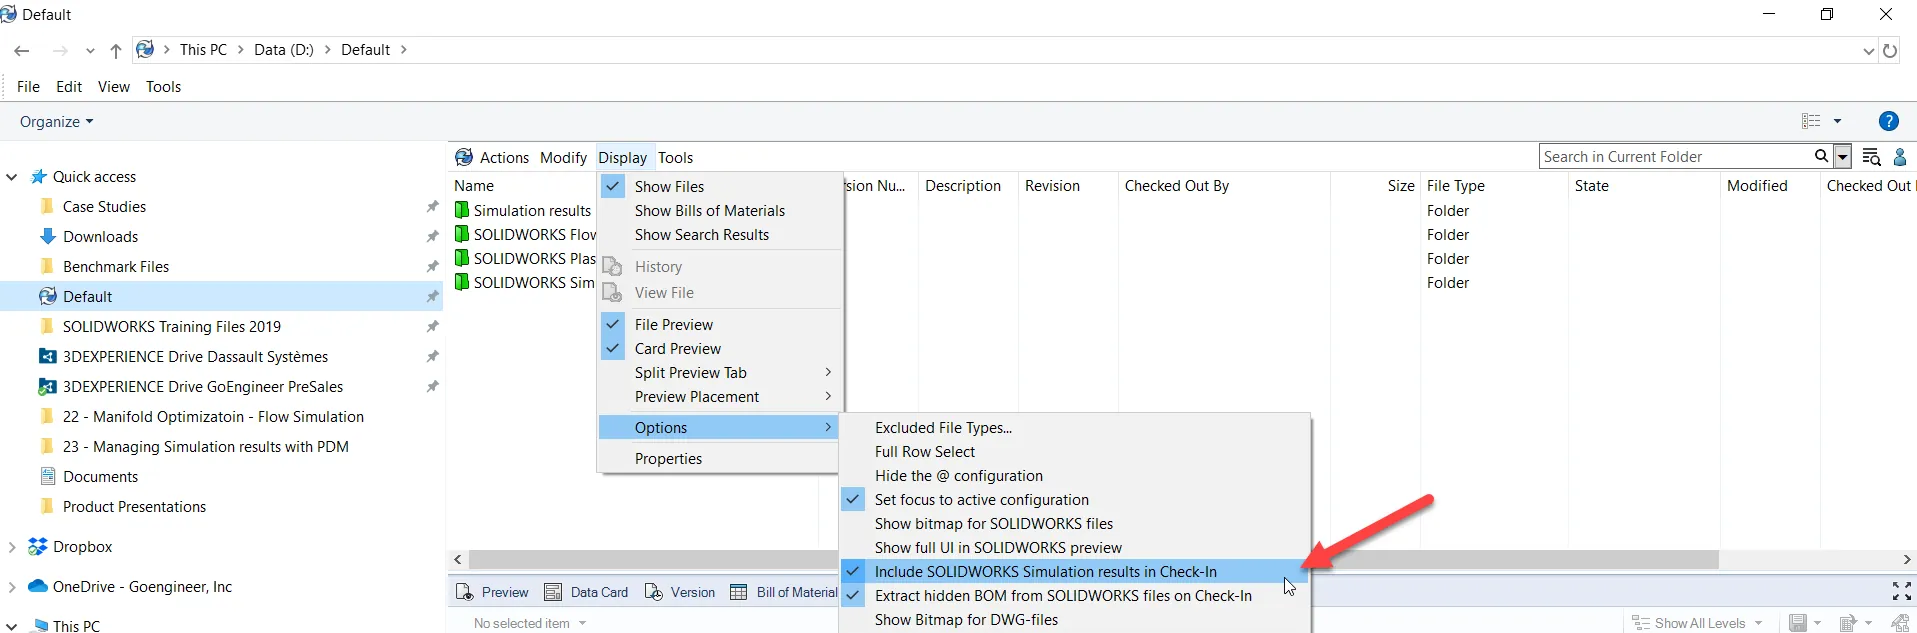
Figure 4: Step 1 to configuring your vault for simulation readiness.
This setting enables the PDM tool to recognize the associativity between the CWR results file and the part file for which this was generated. This will ensure that .CWR files are included in the Check-in/Check-out dialog box. When users plan to run an analysis on the part by modifying an existing study, they can ensure that the part files and the simulation files are checked out.
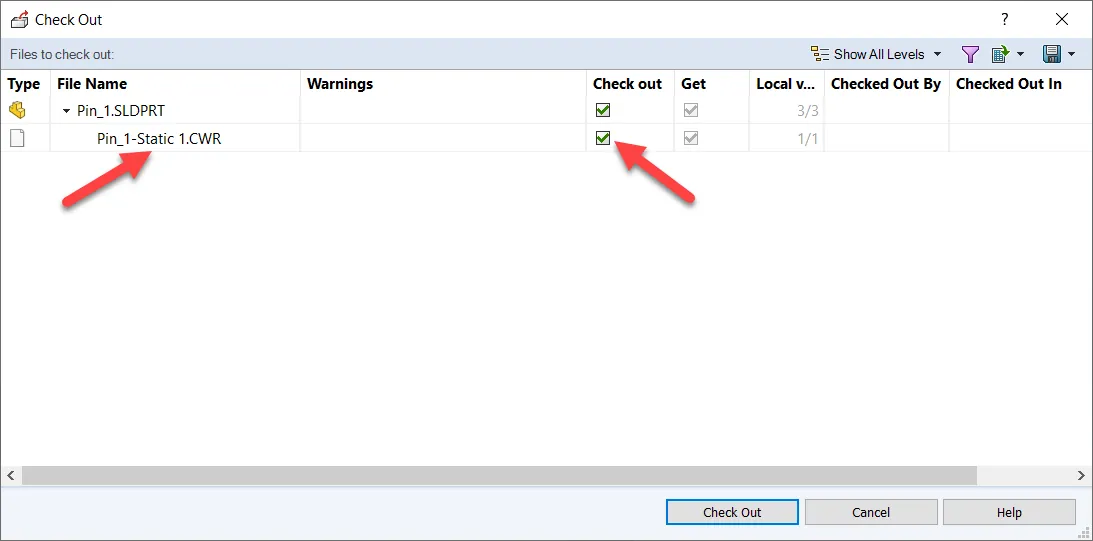
Figure 5: Check Out dialog box showing part file and result file.
This is important because the software will prevent the creation of any results files when the simulation is modified, if the .CWR file isn’t checked out. You will receive the following error message:
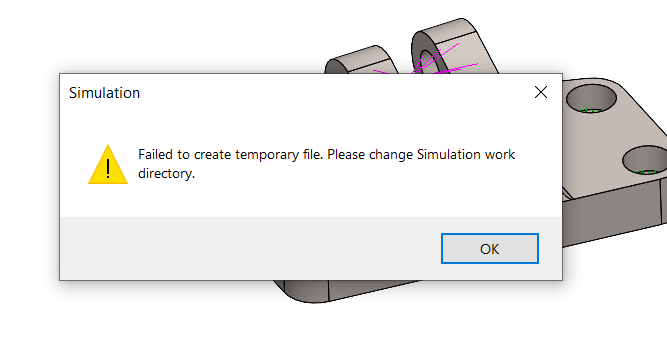
Figure 6: Error message when the results files aren’t checked out during a simulation run.
Step 2: Enable setting in the SOLIDWORKS PDM Administration Tool (Optional)
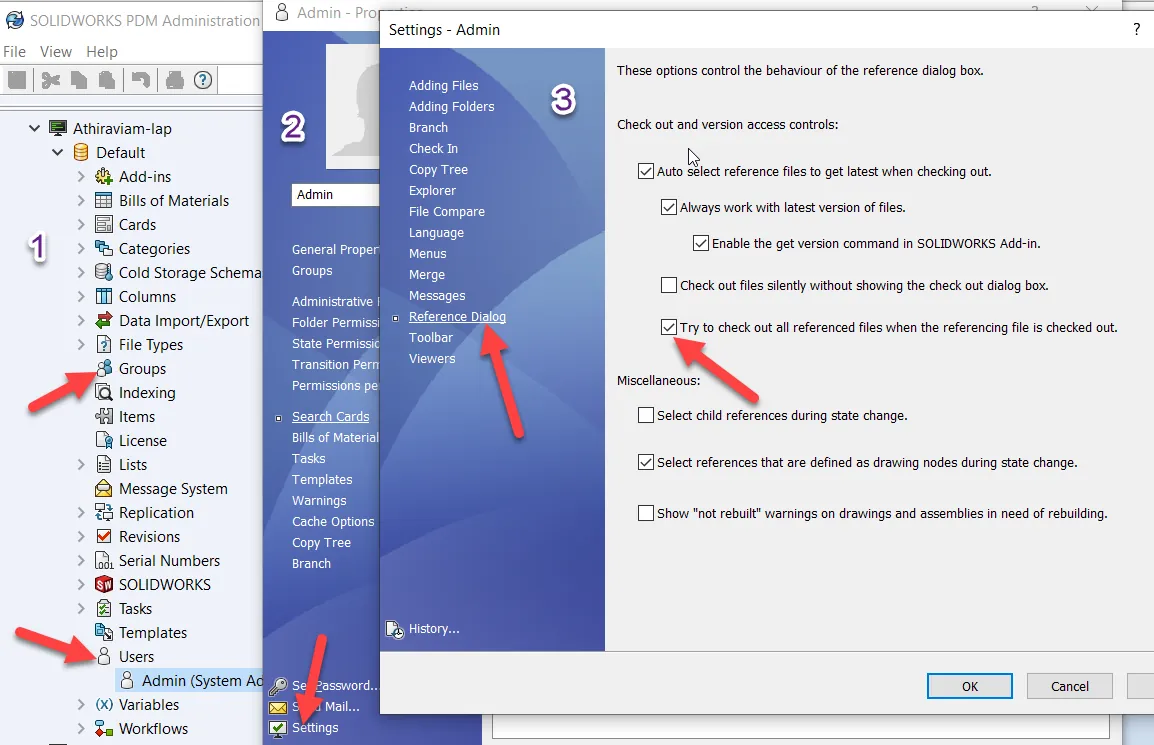
Figure 7: Steps to enable the results files during access in the SOLIDWORKS PDM Administration tool.
During the check-out process, the files referencing the component are listed in the dialog box (Figure 5). Since working with the simulation studies requires the results files to be checked out to avoid the Figure 6 error message, you can enable this setting for just the simulation user group.
You can do this from the SOLIDWORKS PDM Administration tool to configure ‘Group’ settings (Figure 7). You will need to enable the ‘Try to check out all referenced files when the referencing file is checked out’ option in the ‘Reference Dialog’ settings.
From experience, this is just an optional step that can be circumvented by simply reminding the simulation user to ensure that they are checking out the results files while working on an existing simulation study.
Step 3: Setup workflow for Simulation results
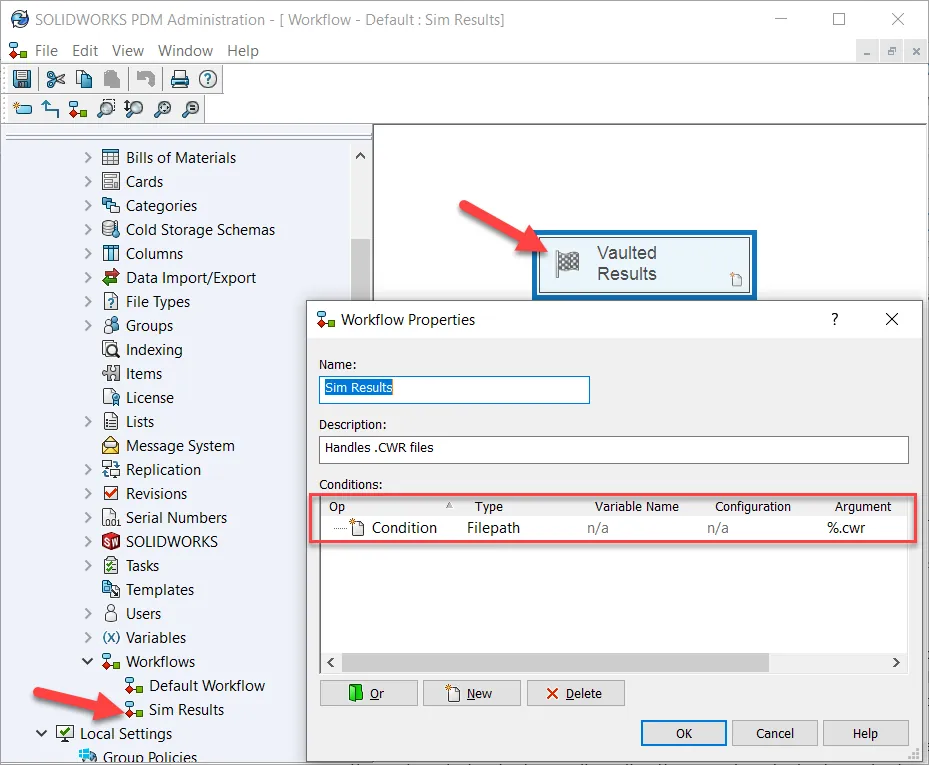
Figure 8: PDM Administration tool – Workflow setup.
Typical PDM workflows involve parts, assemblies and drawings going through different workflow states such as ‘Under Editing’, ‘Waiting for Approval’ and ‘Approved’ to indicate a few things such as:
- The stage of the development and approval process of the product
- The user groups who are permitted to access the product
- Revisioning or updating part numbers
Unlike CAD files, the simulation result files need not go through these stages. To implement this, a separate workflow node can be created to filter and store the CWR files from the default product development and release workflow.
Figure 9 shows the properties of the ‘Sim Results’ workflow that has one workflow state called ‘Vaulted Results’ and a condition to add any file with the extension ‘%.cwr’ to it. This will not break the relationship between the results file and the component.
Step 4: Disk space considerations
Consider the following process:
- When you run a simulation on a component, the software creates results files
- Checking-in these results files will create a version that will be tied to the component version
- If you update an existing study or simply run it again, the part and the results file will be versioned
- In this process, you have created 2 versions of the results files for the same study associated with different version of the part file
The reason I have laid this out is to emphasize that the multiple versions of the results will ultimately occupy a lot of space in the vault. This isn’t an issue if you have virtually unlimited storage which is the case for most professional vaults implemented in industry. If you’d like to limit the number of versions for a certain study to save space, consider the cold storage scheme described in the next section.
Step 5: Cold storage
A cold storage schema in PDM enables you to delete or move older versions of your files in the vault. This can be used to maintain only the latest version of the simulation files while deleting older versions from the archive server. (Need help managing your SOLIDWORKS PDM archive? Check out our tips on cleanup, distribution, and Compression & Cold Storage).
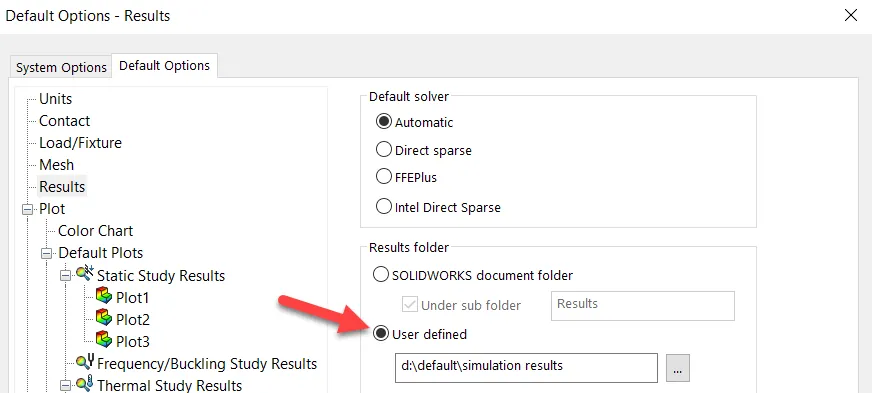
Figure 9: Simulation Options window – User defined results folder.
The only caveat behind this approach would be that all the simulation results files will need to be stored in a common folder inside the vault. You will need to update the simulation options to point to this folder location. (Ref: Figure 9)
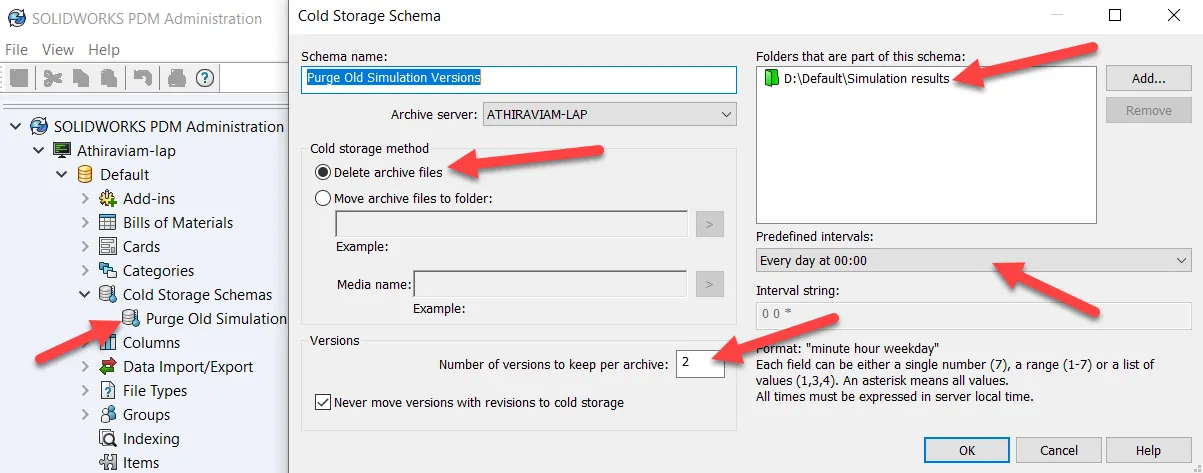
Figure 10: Cold Storage Schema setup in the PDM Administration tool.
A cold storage schema can be set in the PDM administration tool. Figure 10 shows the schema that’s set on my machine. The following settings were configured on my schema:
- I have a common simulation results folder in my vault named Default
- I have set the Cold storage method to ‘Delete archive files’
- I am keeping just two of the latest versions of a results file
- The deletion process will be executed at midnight everyday
Dude, where are my versions?
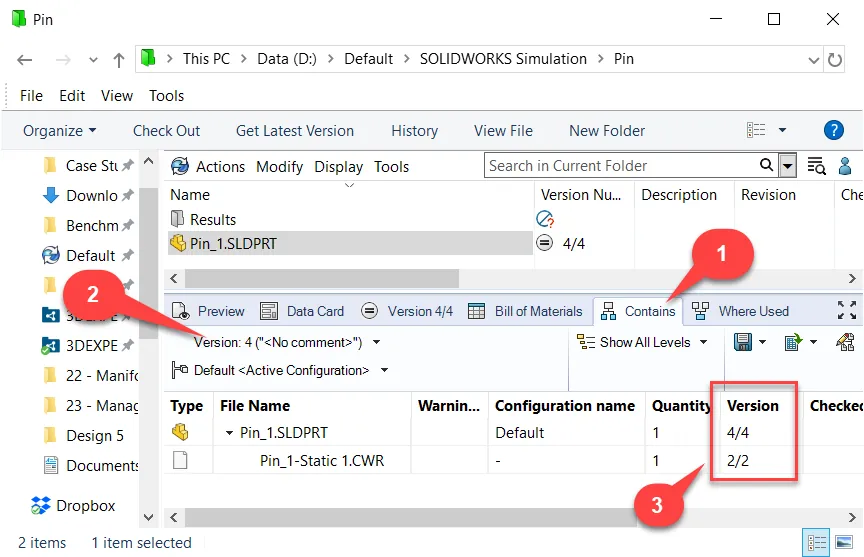
Figure 11: Windows Explorer vault view showing version numbers for part and results files.
The associativity between the part versions and the results versions can be verified using the ‘Contains’ (for the part) or ‘Where used’ (for the results) options in the windows explorer view. You can toggle between the different versions of the part and results files with the option ‘2’ listed in Figure 11.
Consequences
It is important to note that there are a few consequences to leaving the setting described in Step one disabled:
- The simulation results will not be visible in the Check-in dialog box while checking in a part
- The simulation results will have to be checked in manually through Windows explorer.
- This will version the simulation results file
- The simulation results will have to be checked out manually while opening the part to review the analysis. Failing to do so will result in the error described in Figure 7 when trying to update and re-run the analysis
- The simulation results file will not be listed in the ‘Contains’ or ‘Where used’ sections in the windows explorer view of the Vault (Ref: Figure 11)
Summary
In conclusion, managing simulation results in a vaulted environment is possible, but requires some due diligence from an administrative standpoint. Besides enabling some vault related PDM options, users will need to be aware of checking out the results files while reading results or updating an analysis study.
Typically, simulation is an iterative process that involves running multiple analyses of different versions of a part and assembly making minor changes to the design along the way. This process tends to be chaotic and leads to generating a lot of metadata associated with the analysis. In order to avoid having to manage this data, we recommend creating local copies of the files that are analyzed outside the vault.
The only time working within a vault could be feasible is if there is a minor design change that requires design validation with an established analysis methodology.
I hope you found this article for managing your SOLIDWORKS Simulation results with PDM helpful. If you’d like to learn more about getting the most out of your SOLIDWORKS investment, schedule an appointment with one of GoEngineer’s application engineers.

About Arun Thiraviam
Arunachalam Thiraviam is a Simulation Product Specialist with GoEngineer. He is involved in educating and assisting customers with studying the quality of product design through FEA, CFD and Injection Molding analysis. He has a Master’s Degree in Mechanical Engineering from North Carolina State University where he was involved with studying the Dynamics of floating Vertical Axis Wind Turbines. Besides engineering, he plays the guitar and writes music in his free time.
Get our wide array of technical resources delivered right to your inbox.
Unsubscribe at any time.