Creating and Using .CVS Files for SOLIDWORKS PDM Local Vault View
What is a Local Vault View?
A local vault view is the required user interface that allows the user to access files and work within the SOLIDWORKS PDM vault, from their workstation. In this interface, users can check files out and in, transition them through the workflow, and perform many other vault activities.
Creating a Local Vault View
Generally, a local vault view can be created by running the View Setup Wizard. This is installed with the PDM software. The person running the Wizard needs to know the Server name where the SOLIDWORKS PDM vault is hosted, and they need to have Attach Access to this server. If the person running the Wizard is the Admin, this is easy. However, in a larger rollout, the admin may not be the one to complete this step. This is where the .CVS file is useful. A .CVS file can be used to create the local vault view from an executable file, which the user can launch from their desktop.
Creating a .CVS File
To create the file, you must be on a machine with SOLIDWORKS PDM installed, which does not already have a local vault view for that vault.
- Locate the ViewSetup.exe file in your system. Some default locations are:
- C:\Program Files\SOLIDWORKS Corp\SOLIDWORKS PDM\ViewSetup.exe
- C:\Program Files\SOLIDWORKS XXXX\SOLIDWORKS PDM\ViewSetup.exe
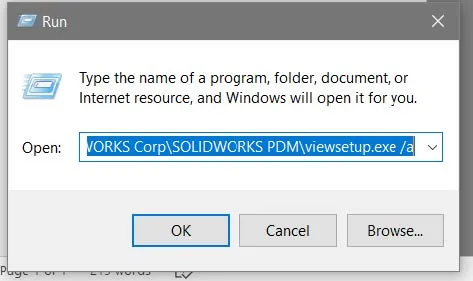
- Open the Start menu, type Run, and hit the Enter button. Then enter this command: "C:\Program Files\SOLIDWORKS Corp\SOLIDWORKS PDM\ViewSetup.exe" /a
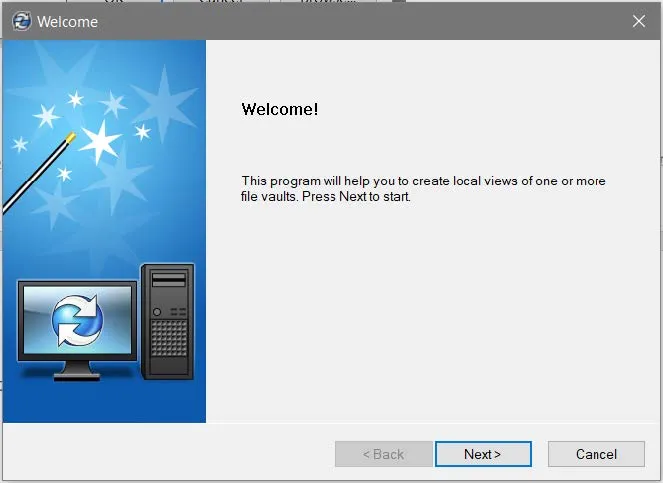
- The View Setup Wizard will start. Follow the steps for creating the vault view.
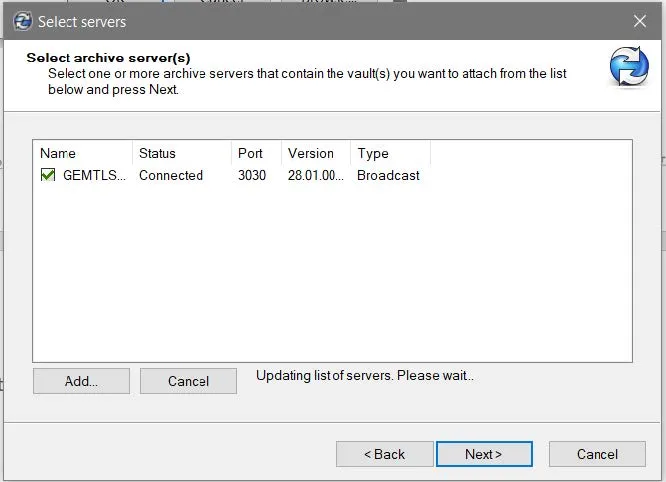
- Select the server where the vault is hosted.
- If a log-in page like this pops up, you’ll need to enter administrative credentials for the Archive Server, or credentials for a user with attach access.
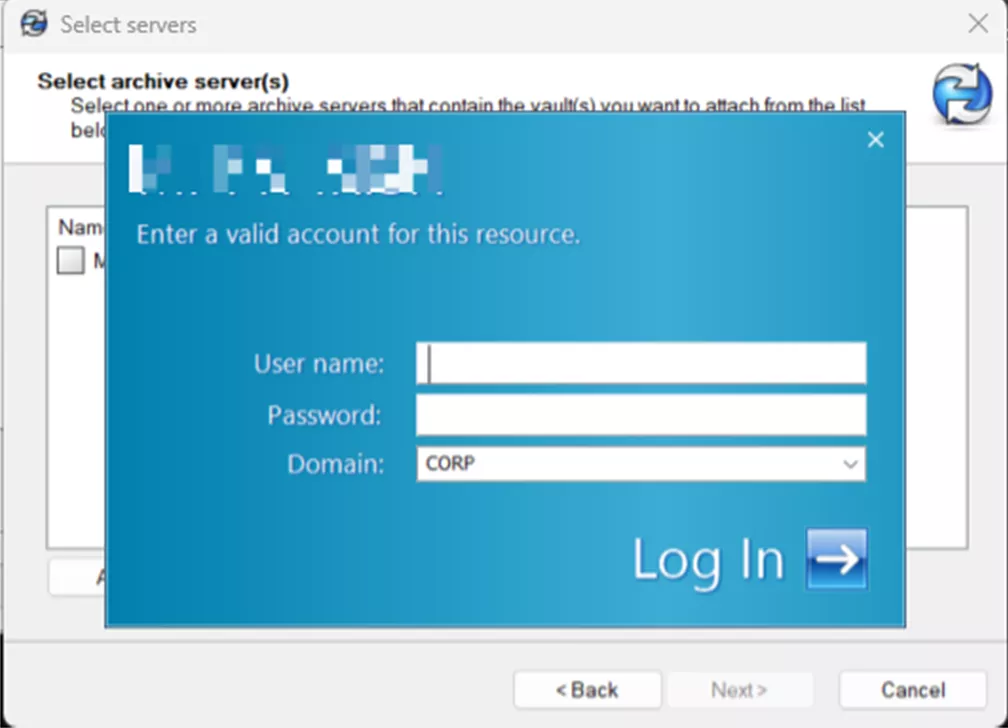
- If a log-in page like this pops up, you’ll need to enter administrative credentials for the Archive Server, or credentials for a user with attach access.
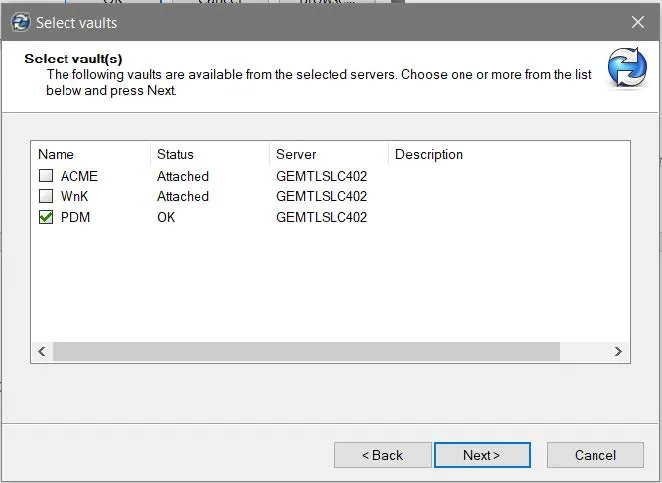
- Select the vault you want to add.
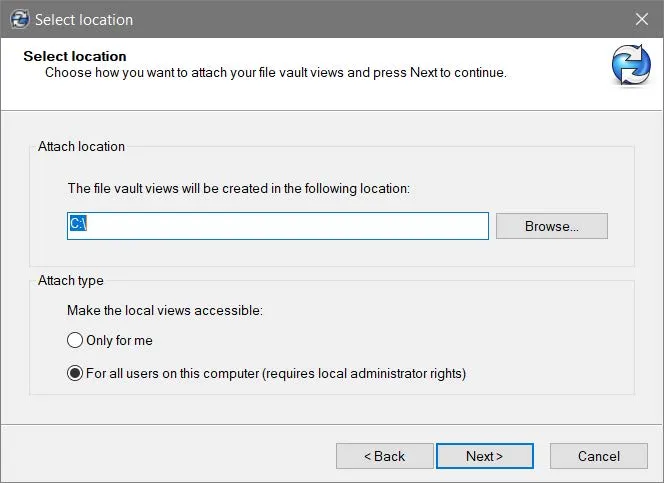
- Select the location you’d like to install the local vault view. By default, this is the C:\ Drive. Be sure to select the For all users on this computer option.
- Click Finish.
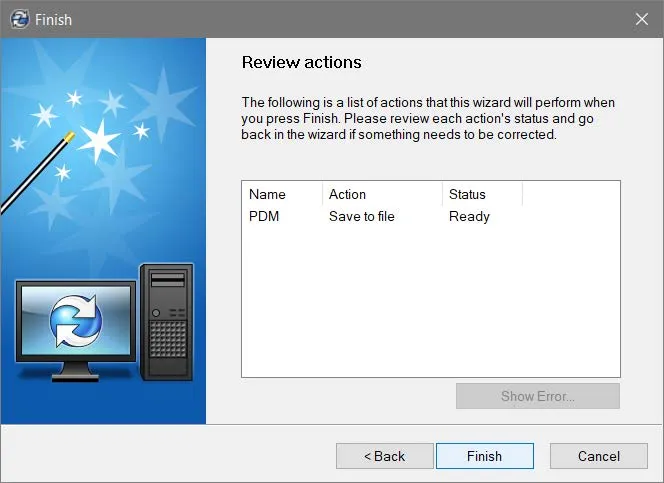
- If the status does not say Ready, select the line of text and choose Show Error...Send that log to your support team for assistance.
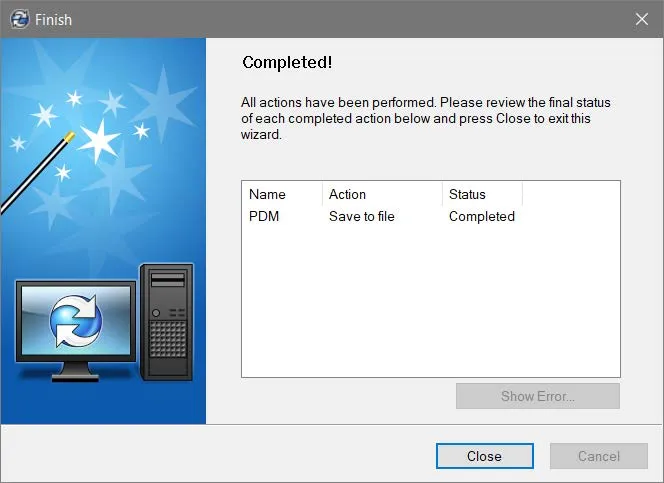
- When Finish is selected, the wizard will prompt for a location to save the .CVS file. Choose a location to save the file.
- The wizard will finish with a Completed page. Click Close and move on to the usage instructions.
Distributing the .CVS File
Now that you have a .CVS file, you can distribute it in one of two ways.
- Export for manual installation.
- Export the file to any target client machine in need of a local vault view.
- Double-click the file.
- The View Setup Wizard will open to the final screen prompting the user to click Finish to complete the local vault view setup.
- Use the trigger /q to run the .CVS file without the final screen showing up.
- On the target client machine, Locate the ViewSetup.exe file. Some default locations are:
- C:\Program Files\SOLIDWORKS Corp\SOLIDWORKS PDM\ViewSetup.exe
- C:\Program Files\SOLIDWORKS XXXX\SOLIDWORKS PDM\ViewSetup.exe
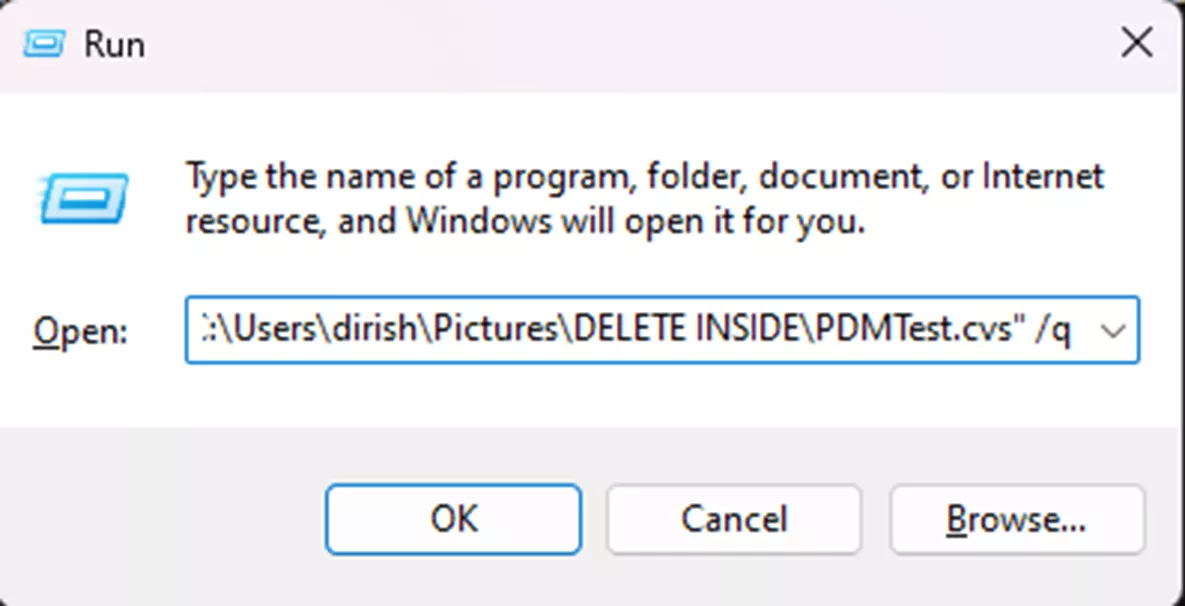
- Open the Start menu, type Run, and hit Enter. Then, enter this entire command: "C:\Program Files\SOLIDWORKS Corp\SOLIDWORKS PDM\ViewSetup.exe" "Path to the .CVS file" /q
- No changes will seem to have been made, but you will find the PDM Vault View icon in the location chosen for installation (the C:\ drive by default).
- On the target client machine, Locate the ViewSetup.exe file. Some default locations are:
A Word of Caution
- To script the view using option 2, you'll need to ensure the file path entered for the .CVS file actually contains the file before running it. Be sure to double-check the ViewSetup.exe and CVS file paths before running the script or it may fail.
- If you are working in a replicated environment and have multiple archive servers, the .CVS will be pointing to the same archive server the client you used to create the .CVS file is pointed to. If you need to point to a different archive server for the client(s) you'll be running the .CVS file on later, you'll have to edit the CVS file and change the "ServerLoc" value as described in the "Editing the .CVS File" section below.
Editing and Understanding Your .CVS File
Once you’ve created the .CVS file, it is ready for use. However, the file can be opened in a text editor to change details like the Vault Name and server information or to modify the local vault view location.
Editing the .CVS File
To make edits, open the file in a text editor and change the portions that need to be altered.
You can change any of these lines to match alterations to your PDM system.
- Location: Specify the desired folder for the local vault view to reside.
- ViewType: This can be set to SharedView or PrivateView.
- [FileVault]: Here you put the exact name of the vault. This portion is case-sensitive.
- VaultID: To find the correct Vault ID, you’ll need to:
- Open the PDM Administration tool.
- Right-click the vault name and choose Properties.
- Leave the { } brackets out when copying the ID.
- DbName: This is also case-sensitive and needs to match exactly. This is the name of the database for this vault.
- DbServer: This is the name of the SQL Database Server machine.
- ServerLoc: This is the name of your PDM Archive server hosting the Vault.
- ServerPort: Put down the archive server port in use. By default, this is 3030.
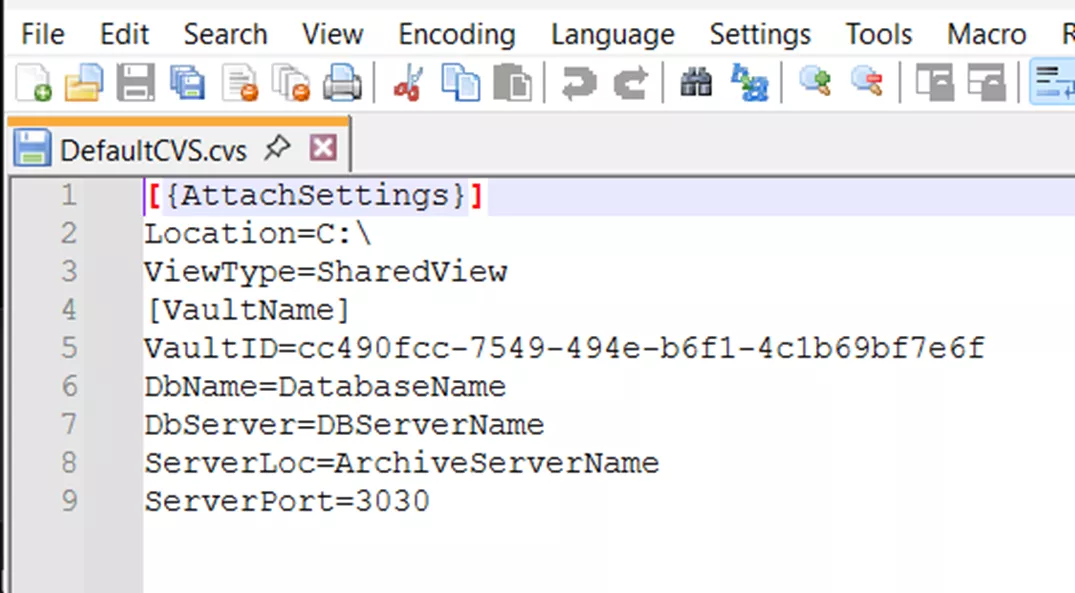
Here is a copy-friendly version of that default .CVS file for your convenience:
[{AttachSettings}]
Location=C:\
ViewType=SharedView
[VaultName]
VaultID=cc490fcc-7549-494e-b6f1-4c1b69bf7e6f
DbName=DatabaseName
DbServer=DBServerName
ServerLoc=ArchiveServerName
ServerPort=3030
Final Thoughts
In conclusion, the View Setup Wizard can be launched with the viewSetup.exe command along with triggers in order to distribute the file vault view using login scripts, Microsoft Windows Active Directory, and other distribution methods—significantly decreasing the deployment time in environments of 10+ client machines.
If GoEngineer is your VAR and you have questions about anything mentioned in this process, please feel free to reach out to our Technical Support Team for assistance! We’d be happy to help.
24 Tips to Master SOLIDWORKS PDM
SHORTCUTS ⋅ SEARCHING ⋅ PDM ADD-IN
24 of our expert tips to help you master using SOLIDWORKS PDM. Improve performance, find files faster, and work like a pro.
Editor's Note: This article was originally published in September 2021 and has been updated for accuracy and comprehensiveness.
More SOLIDWORKS PDM Articles
SOLIDWORKS PDM How to Reset the SQL ‘SA’ User Password
How to Grant Users Attach Access Permission in SOLIDWORKS PDM
Changing the Default File View in SOLIDWORKS PDM
Changing a SOLIDWORKS PDM User Password

About Danielle Irish
Danielle Irish is a SOLIDWORKS PDM Support Engineer based out of metro Detroit. She has a degree from OCC in CAD Design and Engineering. Danielle has extensive experience in customer service as well as a 10 year adventure in Automotive Engineering. Danielle enjoys challenges and puzzles, and is an avid gamer and fiber artist.
Get our wide array of technical resources delivered right to your inbox.
Unsubscribe at any time.