How to Move Your SOLIDWORKS PDM Server Components
It is sometimes necessary to move SOLIDWORKS PDM data to new server(s) with different names. This could be due to a necessary upgrade, server crash or outage, policy compliance changes, or a variety of other reasons. Knowing how to do so correctly is critical for your environment to be down for as little time as possible while still coming away with a fully functioning vault at the end of the process.
This guide is not exhaustive and does not cover every possible scenario that can be performed for this task. However, it is based on typical server setups found while supporting our customers. Therefore, should you come up with questions after reading this guide, contact us, and let’s clear things up for you before you move any SOLIDWORKS PDM component.
Additionally, it is important to read this entire guide and ensure you have access to everything you need before starting your move. Missing steps or not having required credentials or Windows rights can cause disastrous delays or even lost data.
A server migration has four main sections:
- Moving the Database
- Moving the Archive
- Moving the SolidNetwork License Manager
- Pointing the clients to the new server
There will also be an Extra Configuration at the end of this guide to specify a few extra notes for configurations that might come up.
Depending on the project, you may only need to move one server component, for instance, just the archive. That is entirely possible! It’s not only feasible but recommended by SOLIDWORKS to have all of your PDM server components on separate machines on the network to ensure each has its own tailored set of hardware and enough resources to function at its best. If you only need to move one server component, you can typically follow these sections individually (except for updating the clients at the end, of course), but there are a few items that will always need to be updated, and they will be notated.
Before You Start
Before beginning to move any components of your SOLIDWORKS PDM server, there are a few items to complete to help ensure that the move is successful and efficient. Regardless of which portion of the vault you are planning to relocate, complete all of the following steps:
- Create a backup of the three major components (if you’re unsure how to do this, you can use our backup guide here), and place them on the new server (or have them in a network or physical drive accessible by the new server).
- PDM File Vault(s) and ConisioMasterdB databases from SQL Management Studio
- The 16 Archive Folders on the Archive server
- The Archive Server Settings
- Confirm that the new server meets the minimum SOLIDWORKS system requirements. Ensure the new server meets the requirements for hardware and software so your vault is hosted in a fully supported environment and functions optimally.
- Have the necessary software downloaded and ready to install
- Note: If you are doing an upgrade and a migration, you can install the newer version of PDM on the new server and load your backups normally. Please be sure to run the database upgrade tool mentioned in Extra Configuration.
- For both SOLIDWORKS PDM Professional and SOLIDWORKS PDM Standard, you can find our hosted installation media sets here.
- Ensure all clients have exited SOLIDWORKS PDM or are working in offline mode. Block logins from the Admin tool if users may still be in the vault for any reason.
Once you’ve confirmed the four major points above, you are ready to get started!
Moving the Database Server
1. Install SQL Server Software
- For detailed steps on how to install and configure specific versions of SQL to use with PDM, refer to the Installation Guide for PDM (be sure to install SQL Standard for PDM Professional and SQL Express for PDM Standard):
-
- For PDM Professional: Installing and Configuring SQL Server
- For PDM Standard: Installing and Configuring SQL Express
Note: Be sure to take note of the instance name during installation! This is extremely important for several steps later on. You can also find it by logging into SQL Server Management Studio and looking at the top of Object Explorer. This lists your server name and instance name (if you used a named instance, you will see it following a backslash after the server name, like “server\instance”. This whole value is how SOLIDWORKS PDM recognizes your database server, so be sure to have it handy).
-
- Install SQL Server Management Studio once you’ve installed SQL Server. You may need to restart the machine after installing SQL Server in order to do so.
-
- You can find the installation media directly from Microsoft here.
-
2. Restore the Database Backups
-
- Open and log into Microsoft SQL Server Management Studio on the new server and click Connect.
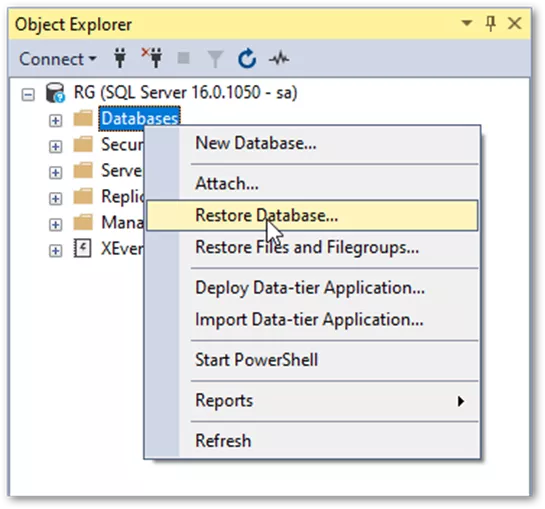
- Right-click Databases from Object Explorer and select Restore Database…
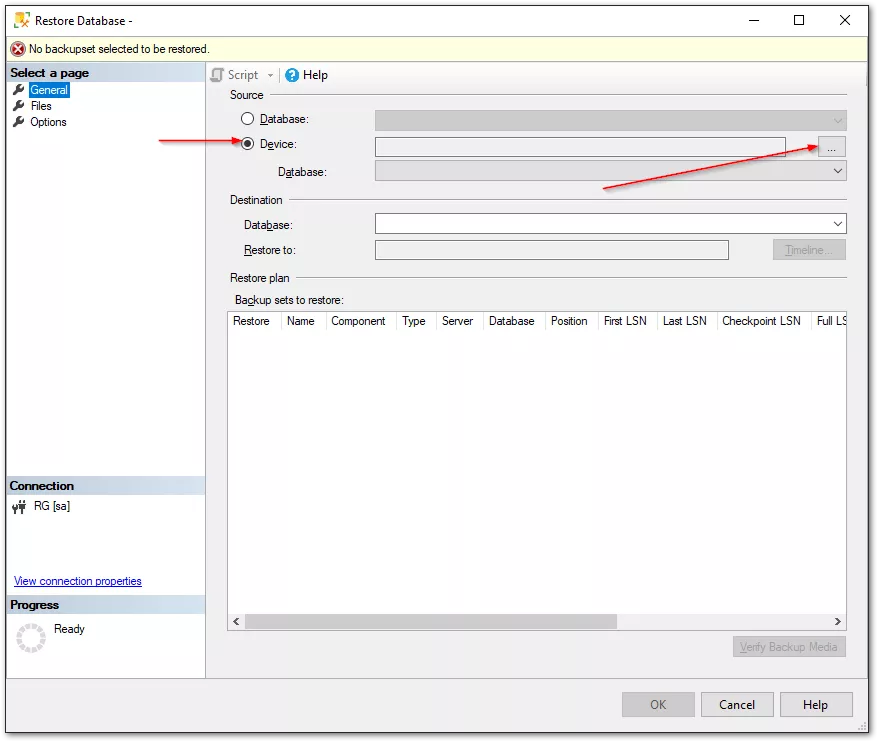
- In the Restore Database window, switch the Source to Device. Then click the … button to the right.
- In the Select backup devices screen, click Add and select one of the .bak database backup files you created earlier (order doesn’t matter).
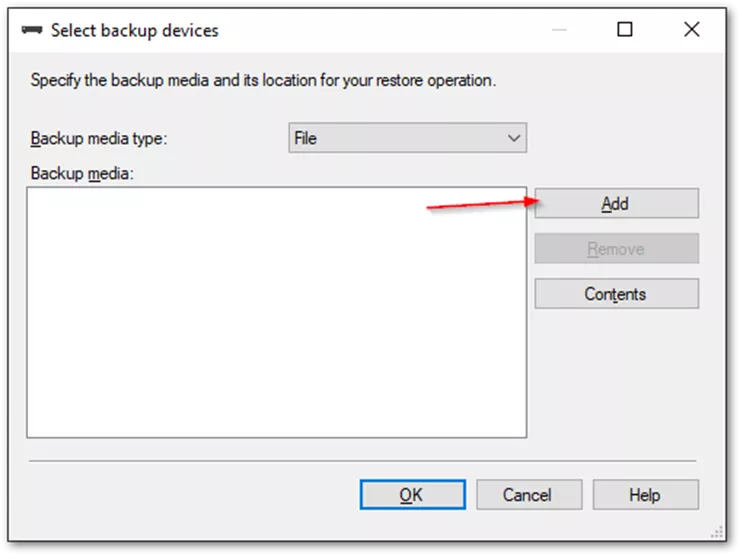
- When finished, click OK and head back to the Restore Database screen.
- Go to the Options tab from the left menu.
- Check the Overwrite the existing database (WITH REPLACE) box.
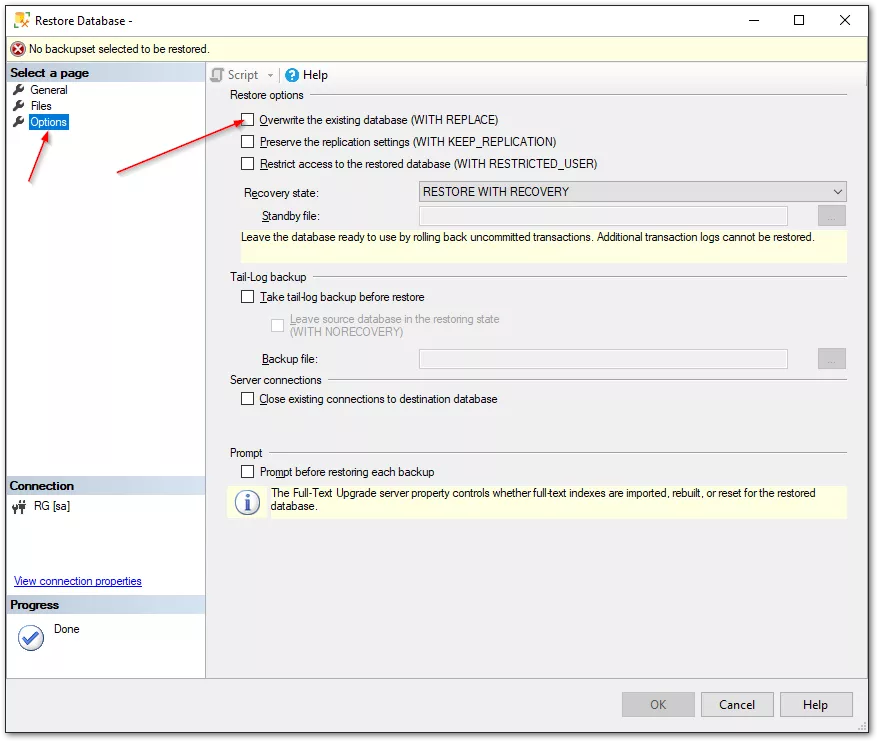
- Click OK to complete the restore action. You should receive a message saying the restore was successful.
- Using the same steps, repeat for all other databases. You should have one for the ConisioMasterDb and one for each vault you’re migrating.
3. Install the Database Server Component(s)
-
- Run the setup.exe for the SOLIDWORKS Installation Manager (sometimes referred to as the SLDIM). It should be located in the root folder of the installation media you downloaded previously.
- If you receive a message about a pending reboot, you can click past it. You don’t need to reboot yet.
- Select Install Server Components from the welcome screen. Select SOLIDWORKS PDM Server and click Next.
- If you’re moving the SolidNetWork License (or SNL) server to this machine, choose that option as well.
- If installing the SNL, you will be prompted to enter your applicable serial numbers here. When finished, click Next.
- You’ll be taken to the Summary page. Click Change next to SOLIDWORKS PDM Server.
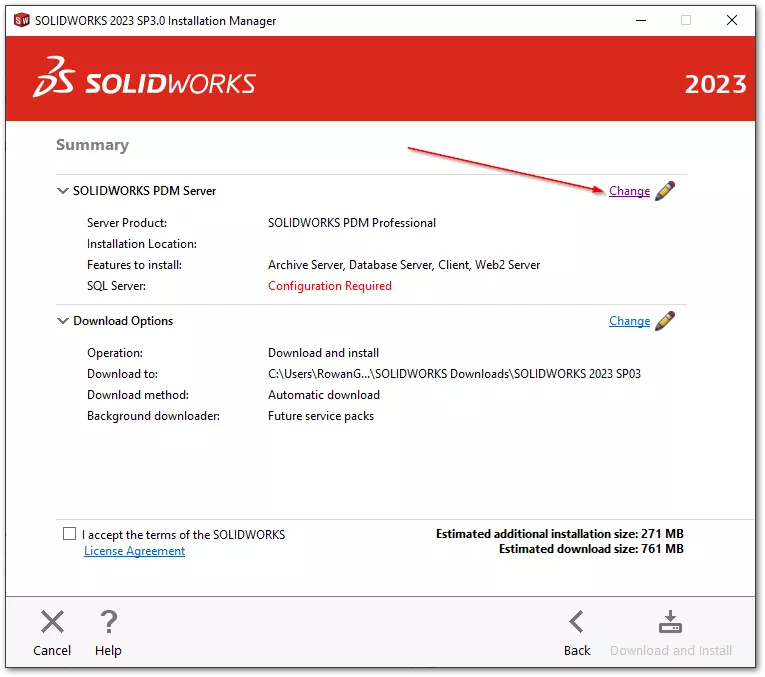
- On the SOLIDWORKS PDM Server options page, you’ll want to select different options according to your needs:
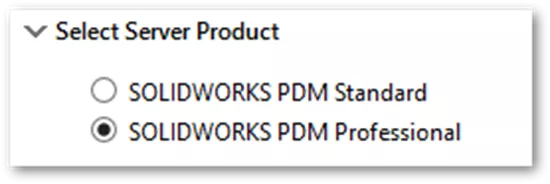
- Select Server Product: Be sure to choose SOLIDWORKS PDM Standard or SOLIDWORKS PDM Professional according to what you currently have. If unsure, you can always select Professional, as a Professional install can support Standard vaults.
- Installation Location: If not set automatically, the default location is C:\Program Files\SOLIDWORKS Corp\SOLIDWORKS PDM

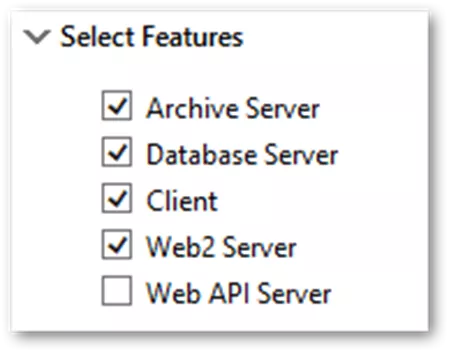
- Select Features: If you’re moving all PDM server components to this new machine, you can select Archive Server, Database Server, and Client. If you’re only moving the Database, select only Database Server and Client.
- If you utilize Web2 or the Web API server, be sure to select those as well, if applicable.
- It is recommended to install the client on all machines hosting server components for troubleshooting purposes.
- SQL Server: Enter the SQL server name (include the instance name if you set one) and enter the SA credentials set up during the installation of the SQL server.
- Do not leave this as “localhost”. Always use the explicit server name (or IP address, if you have configured PDM as such).

- Do not leave this as “localhost”. Always use the explicit server name (or IP address, if you have configured PDM as such).
- When finished, click Back to Summary.
- Select Server Product: Be sure to choose SOLIDWORKS PDM Standard or SOLIDWORKS PDM Professional according to what you currently have. If unsure, you can always select Professional, as a Professional install can support Standard vaults.
- Once you’ve configured the installation to fit your needs, agree to the terms of service and click Download and Install.
- When the install has finished, reboot the server.
- Run the setup.exe for the SOLIDWORKS Installation Manager (sometimes referred to as the SLDIM). It should be located in the root folder of the installation media you downloaded previously.
4. Update the Registry
-
- Once the restore of your database components has been completed, you’ll need to update registry values for both the archive and database.
- Open the Windows Registry Editor by searching “regedit” in the Start menu.
- On the Database server:
- Navigate to the following key: Computer\HKEY_LOCAL_MACHINE\SOFTWARE\SolidWorks\Applications\PDMWorks Enterprise\MailService\Server
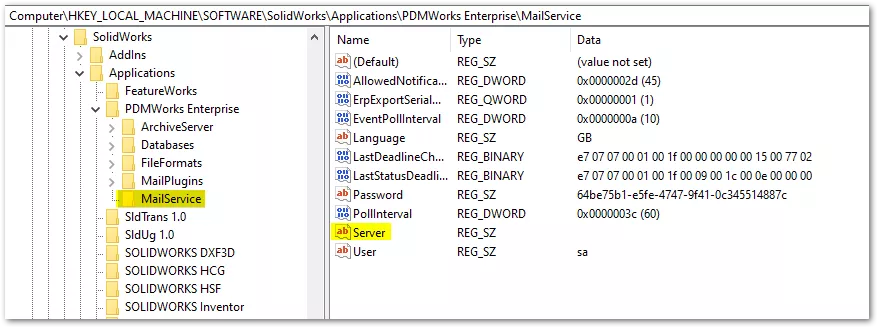
- Then, update the Server key by double-clicking it and entering the SQL server name (and instance name, if applicable).
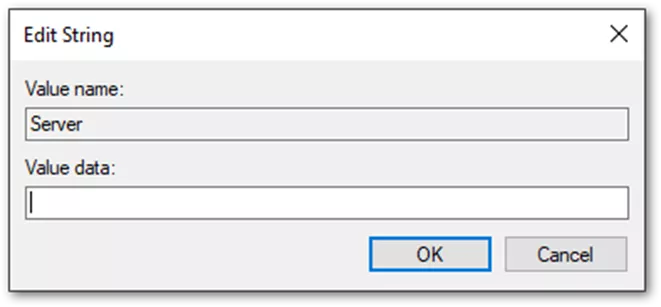
- Navigate to the following key: Computer\HKEY_LOCAL_MACHINE\SOFTWARE\SolidWorks\Applications\PDMWorks Enterprise\MailService\Server
- On the Archive server:
- If you’re moving the archive as well, skip this section for now and come back to it during the Moving the Archive: Update the Registry section.
- You’ll need to log into the archive server and update the following registry keys:
- Computer\HKEY_LOCAL_MACHINE\SOFTWARE\SolidWorks\Applications\PDMWorks Enterprise\ArchiveServer\Vaults\Vault Name
- Server: This should match the SQL server name and instance name.
- SQLDbName: This should match the name of the restored vault database from SQL Server Management Studio under Databases in Object Explorer. (Do not change DbName, only SQLDbName).
- Computer\HKEY_LOCAL_MACHINE\SOFTWARE\SolidWorks\Applications\PDMWorks Enterprise\ArchiveServer\Vaults\Vault Name
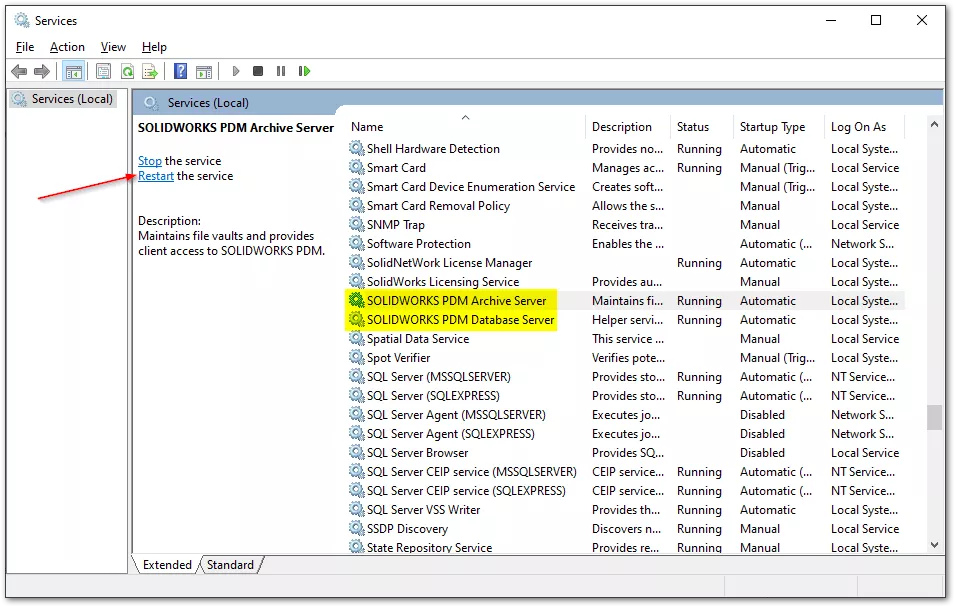
- Restart the SOLIDWORKS PDM Services for any machine you edited the registry on. You can do so by searching Services from the Start menu.
- Locate SOLIDWORKS PDM Archive Server & SOLIDWORKS PDM Database Server (they may be on separate machines, depending on how you installed your server components).
- Select each one and click Restart. The services can be restarted in any order.
Moving the Archive Server
1. Install the Archive component(s)
Note: If you have already installed all server components on the new server when moving the database, you can skip this section. This only applies if you’re not moving the Database with the Archive/SNL.
-
- Run the setup.exe for the SOLIDWORKS Installation Manager (sometimes referred to as the SLDIM). It should be located in the root folder of the installation media you downloaded previously.
- If you receive a message about a pending reboot, you can click past it. You don’t need to reboot yet.
- Select Install Server Components from the welcome screen. Select SOLIDWORKS PDM Server and click Next.
- If you’re moving the SolidNetWork License (or SNL) server to this machine, choose that option as well.
- If installing the SNL, you will be prompted to enter your applicable serial numbers here. When finished, click Next.
- You will be taken to the Summary page. Click Change next to SOLIDWORKS PDM Server.
- On the PDM Server options page, you’ll want to select different options according to your needs:
- Select Server Product: Choose SOLIDWORKS PDM Standard or SOLIDWORKS PDM Professional according to what you currently have. If unsure, you can always select Professional, as a Professional install can support Standard vaults.
- Installation Location: If not set automatically, the default location is C:\Program Files\SOLIDWORKS Corp\SOLIDWORKS PDM
- Select Features: If you’re moving all PDM server components to this new machine, you can select Archive Server, Database Server, and Client. If you’re only moving the Archive, then only select Archive Server and Client.
- If you utilize Web2 or the Web API server, select those as well if applicable.
- It’s recommended to install the client on all machines hosting server components for troubleshooting purposes.
- SQL Server: Enter the SQL server name (include the instance name if you set one) and enter the SA credentials you set up during the installation of the SQL server.
- Do not leave this as “localhost”. You always want to use the explicit server name (or IP address, if you have configured PDM as such).
- If you’re unsure of your instance name, log into SQL Server Management Studio and look for the server name and instance (indicated by a backslash \ if present) in the top of Object Explorer.
- When finished, click Back to Summary.
- Select Server Product: Choose SOLIDWORKS PDM Standard or SOLIDWORKS PDM Professional according to what you currently have. If unsure, you can always select Professional, as a Professional install can support Standard vaults.
- Once you’ve configured the installation to fit your needs, agree to the terms of service and click Download and Install.
- When the install has finished, reboot the server.
- Run the setup.exe for the SOLIDWORKS Installation Manager (sometimes referred to as the SLDIM). It should be located in the root folder of the installation media you downloaded previously.
2. Restore the Archive Folders
-
- Copy the 16 archive folders (0-9 and a-f) to the new server. If possible, maintain the exact same file path between the older server and the new.
- For example, if the archives were located under “C:\Program Files\SOLIDWORKS Corp\SOLIDWORKS PDM\Data\Vault Name” on the old server, then recreate that path on the new server.
- If this is not possible, there will be instructions on updating the archive folder paths in the registry under the Update the Registry section later on.
- Copy the 16 archive folders (0-9 and a-f) to the new server. If possible, maintain the exact same file path between the older server and the new.
3. Restore the Archive Settings
-
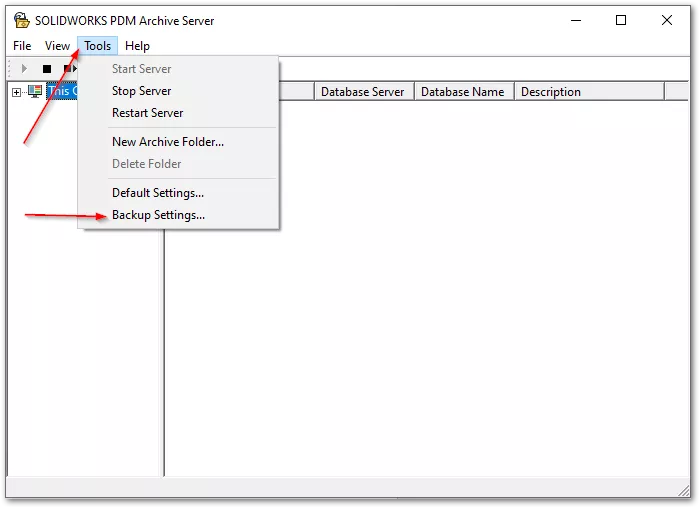
- Open the Archive Server Configuration tool on the new server (located in the Start menu under SOLIDWORKS PDM).
- If you attempt to access the tool and it fails to open, try looking in the system tray for the Blueberry and Manila folder icons. It may already be running in the background.
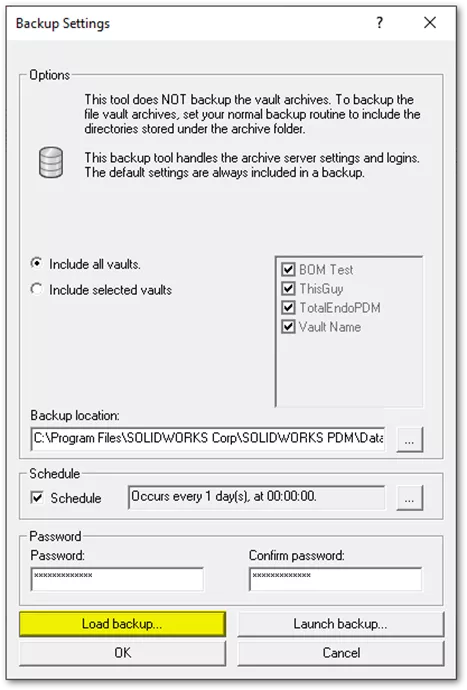
- Go to Tools > Backup Settings…
- Click Load Backup… and select the .dat file you created when backing up the archive settings on the original server.
- Open the Archive Server Configuration tool on the new server (located in the Start menu under SOLIDWORKS PDM).
4. Update the Database
-
- Log into the database server and open SQL Server Management Studio.
- Connect to your vault’s SQL instance using the SA credentials.
- From Object Explorer, expand Databases > Your Vault Database > Tables.
- Find dbo.ArchiveServers and right-click > Edit Top 200 Rows.
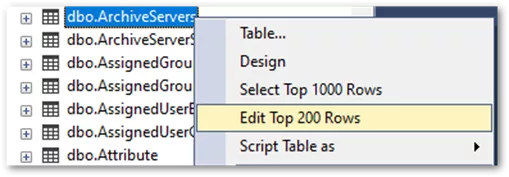
- Find the old archive server name under the “ArchiveServerName” column, click into it, and edit the field to reflect the new name. Hit Enter or click into another field to commit the changes.

- Locate the dbo.SystemInfo table, right-click > Edit Top 200 Rows, and update the ArchiveServerName field to reflect the new server as well.

- When finished, restart the PDM Archive and Database services.
- You can do so by searching Services from the Start menu.
- Locate SOLIDWORKS PDM Archive Server & SOLIDWORKS PDM Database Server (they may be on separate machines, depending on how you installed your server components).
- Select each one and click Restart. Order doesn’t matter.
5. Update the Registry
Note: If you have already moved the database, now is when you would also update the registry keys indicated under the Moving the Database: Update the Registry section.
-
- Open the registry editor by searching “regedit” from the Start menu.
- Navigate to the following keys:
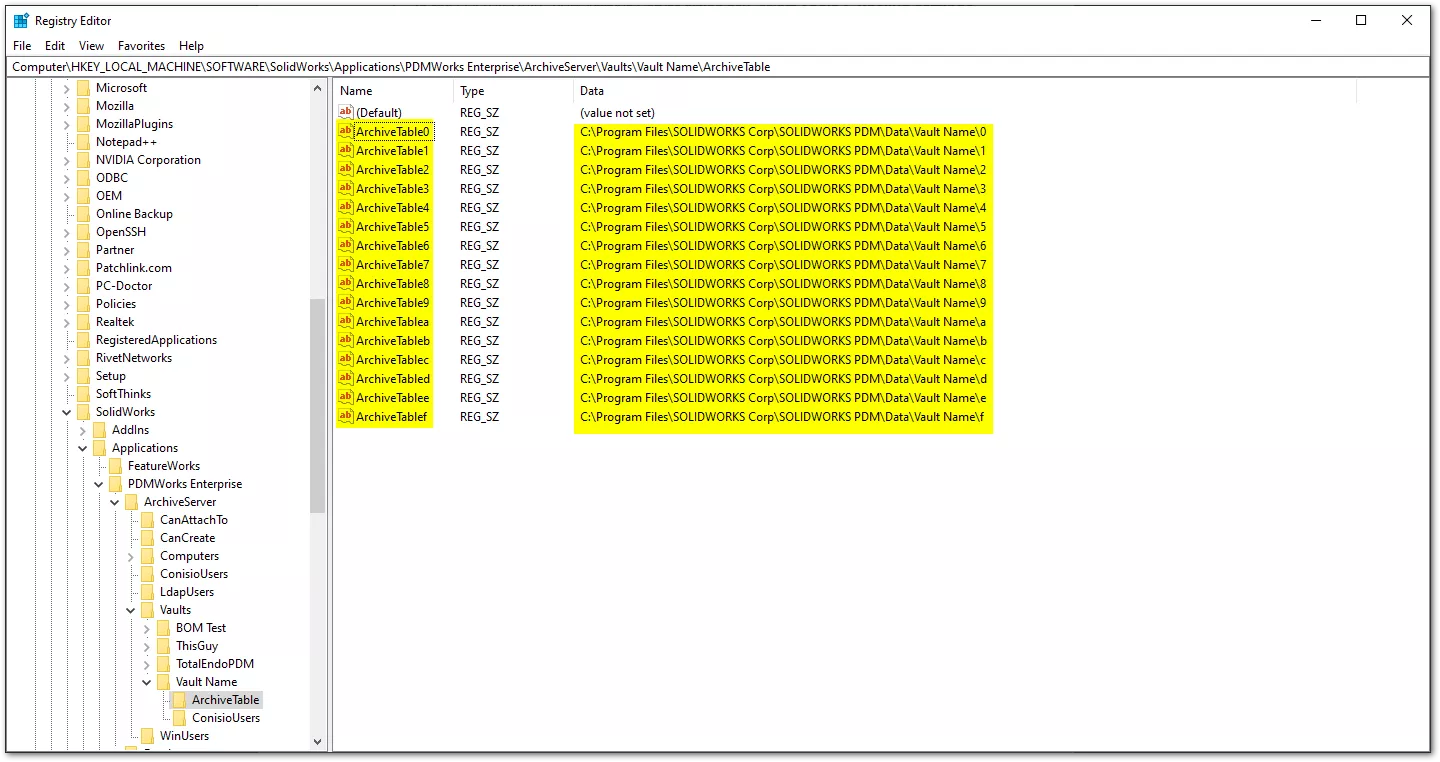
- Computer\HKEY_LOCAL_MACHINE\SOFTWARE\SolidWorks\Applications\PDMWorks Enterprise\ArchiveServer\Vaults\Vault Name\ArchiveTable
- Update each of the ArchiveTable# keys to reflect the path of the corresponding archive folder.
- If you moved the archive folders to a different path on the new server than on the old, ensure this is reflected here.
- For example, ArchiveTable0 would need to have the full path (including drive letter) to the corresponding 0 folder, like so: C:\Program Files\SOLIDWORKS Corp\SOLIDWORKS PDM\Data\Vault Name\0
- Update each of the ArchiveTable# keys to reflect the path of the corresponding archive folder.
- Computer\HKEY_LOCAL_MACHINE\SOFTWARE\SolidWorks\Applications\PDMWorks Enterprise\ArchiveServer\Vaults\Vault Name\ArchiveTable
- When finished, restart the PDM Archive and Database services.
Moving the License Server
The license manager can be installed during either of the Installing Server Components sections. PDM uses network licensing and only requires a simple change to point to a new license server. SOLIDWORKS requires a bit more configuration, however. To ensure the SOLIDWORKS clients are updated accordingly, we recommend following the steps indicated in this guide for a smooth transition.
Once you’ve installed the SNL server on a new machine, updating the PDM side of things is simple.
-
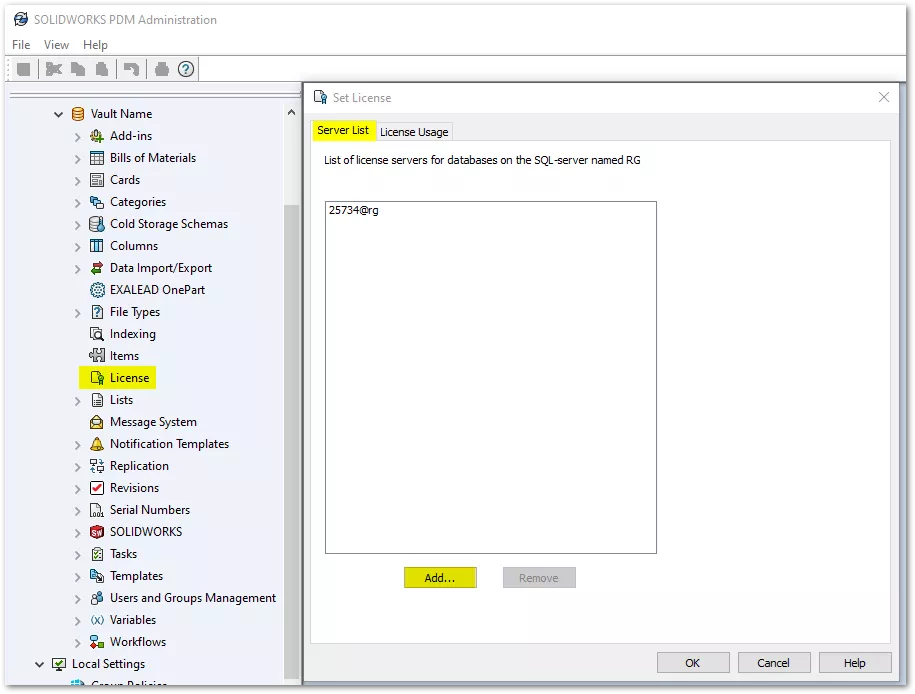
- Open the PDM Administration tool and double-click the License node.
- Under the Server List tab, click Add…
- Enter the new server name formatted with the port, like so: 25734@server
- Click OK.
- Highlight the old server and click Remove. When asked if you’re sure, click Yes.
Pointing Clients to the New Server
Note: Before starting to configure clients, be sure to allow logins from the admin tool once more if you had previously blocked them.
1. If the Database Was Moved
On each client machine, open the Registry Editor and update the DbServer key to reflect the new database server name and instance under the following paths:
-
- For Shared Vault Views:
- HKEY_LOCAL_MACHINE\SOFTWARE\SOLIDWORKS\Applications\PDMWorks Enterprise\Databases\Vault Name
- HKEY_LOCAL_MACHINE\SOFTWARE\Wow6432Node\SOLIDWORKS\Applications\PDMWorks Enterprise\Databases\Vault Name
- For Private Vault Views:
- Computer\HKEY_CURRENT_USER\SOFTWARE\SolidWorks\Applications\PDMWorks Enterprise\Vaults\Vault Name
- For Shared Vault Views:
2. If the Archive Was Moved
On each client machine, open the Registry Editor and update the ServerLoc key to reflect the new archive server name and instance under the following paths:
-
-
- For Shared Vault Views:
- HKEY_LOCAL_MACHINE\SOFTWARE\SOLIDWORKS\Applications\PDMWorks Enterprise\Databases\Vault Name
- HKEY_LOCAL_MACHINE\SOFTWARE\Wow6432Node\SOLIDWORKS\Applications\PDMWorks Enterprise\Databases\Vault Name
- For Private Vault Views:
- Computer\HKEY_CURRENT_USER\SOFTWARE\SolidWorks\Applications\PDMWorks Enterprise\Vaults\Vault Name
- For Shared Vault Views:
-
Delete the following key on all clients: HKEY_CURRENT_USER\Software\SOLIDWORKS\Applications\PDMWorks Enterprise\ConisioAdmin
Always reboot client machines after registry changes are made for these updates to take effect.
Extra Configuration
1. Upgrades
- If you’re upgrading at the same time as you move your server components, you can install the upgraded version of SOLIDWORKS PDM onto the new server immediately. After you’ve finished all steps of the server configuration, but before moving on to updating the clients, run the database upgrade tool on the server to complete the upgrade.
- Find the SWPDMServer/Upgrades folder inside the installation media you downloaded to the new server.
- Run the Upgrade.exe application found there.
- Enter your SQL server name including instance and click Next. You will be prompted to enter your SQL server credentials.
- Select the vaults you want to upgrade and then continue through the prompts until it is completed.
2. Archive Replication
-
-
Only the main archive server is listed in the SystemInfo table. All archive servers are listed in the ArchiveServers table in SQL Management Studio. When updating the database, be sure to only update the correct server if you have multiple.
- In the PDM Administration Tool, you will need to update the replication settings to reflect the new server name.
- In the Administration Tool, right-click on Replication Settings and click Open.
- Under Connections, select the first row.
- Under Selected connection, for IP Address or DNS name, type the new IP Address or name.
- Restart the archive server services on each server affected by the replication change.
-
3. Content Search
- If you utilize content search, you will need to set it up once more on the new archive server. You can find the instructions for doing so under the Configuring Content Search section of the Installation Guide.
Conclusion
Your vault contains your company’s intellectual property and is often vital for day-to-day operation. Moving a PDM server can be complicated, and this guide only covers the most smooth, basic migration. Every environment is different, and there may be variables that need to be accounted for in order for a successful move. If you don’t feel confident in any of the steps listed here in this guide, we highly recommend you reach out to our team to look into having the migration done as a paid project by the Services team here at GoEngineer.
You can always reach out to your account manager, or directly to our Technical Support team if you have questions or require other assistance!
More SOLIDWORKS PDM Articles
How To Set Up Barcodes in SOLIDWORKS PDM Data Cards
SOLIDWORKS PDM Preview Tab Mismatch
SOLIDWORKS PDM Error: The Owner SID on a Per-User Subscription Doesn't Exist

About Rowan Gray
Rowan Gray is a Technical Support Manager at GoEngineer and CPPA/CPAP with a specialty in SOLIDWORKS PDM and related data/lifecycle management. They have been with GoEngineer since 2020, and have a strong IT background that helps them more fully support customers with whatever issues may arise in their PDM environment. In their free time, they enjoy playing video games, D&D, multimedia crafting, and spoiling their pets.
Get our wide array of technical resources delivered right to your inbox.
Unsubscribe at any time.