SOLIDWORKS Delete Hole Feature Explained
The Delete Hole feature is an effective but slightly elusive command in SOLIDWORKS that restores closed interior profile(s) from surface bodies. It is very similar to the Untrim Surface feature because it can quickly patch or fill trimmed surface geometry.
![]()
Delete Hole is like Delete Face but for surface bodies. This command is usually easier and more efficient than trying to use a Filled Surface feature.
Accessing the Delete Hole command
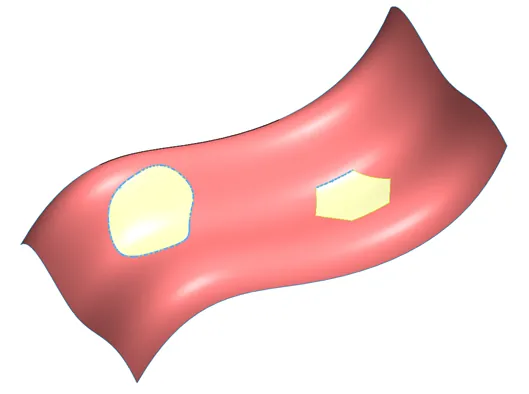
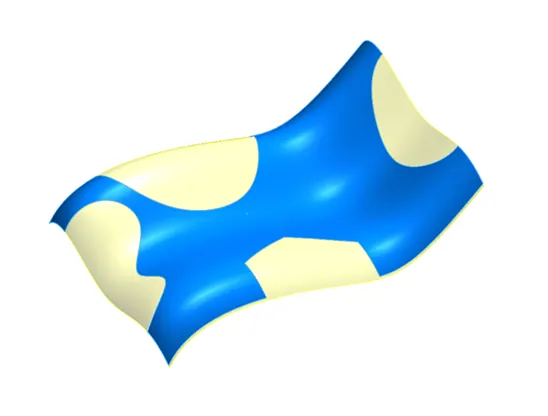
To use the Delete Hole command, select an edge to remove, right-click, and select Delete Hole. Then, select the hole(s) to patch as shown below.
Confirm the loop(s) you want filled that show a yellow preview of the patched surface(s).

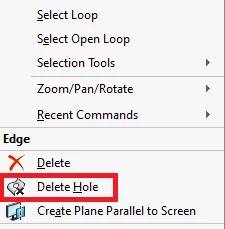
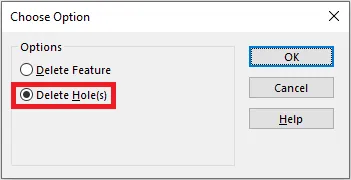
A second (and faster) way to access the Delete Hole command is to select an interior loop edge then press the Delete key. This method will prompt to delete the entire feature or the hole, select Delete Hole(s) (CTRL- select edges from multiple loops to remove more than one at a time).
Be careful not to delete a feature or whole body. The loop geometry does not have to be circular, it can be rectangular or any irregular shape. It just can't be on the exterior edge of a surface.
A third way to select Delete Hole, if you are using SOLIDWORKS 2019 or SOLIDWORKS 2020, select Insert, Surface, Delete Hole or now find the delete hole feature on the Surface CommandManager tab.
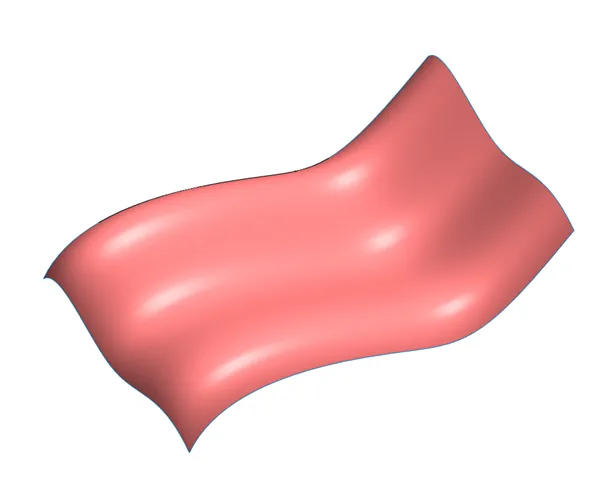
You can see how the geometry above is now filled in as if it was never trimmed to begin with. Using Delete Face in conjunction with Delete Hole is a very convenient way to remove geometry where there isn't a direct feature to edit or remove, such as STEP or IGES imported geometry or any other non-native SOLIDWORKS files.
This command only works on surface models and only restores interior loops. To convert a solid body to a surface body, use Delete Face with the Delete option (pick a planar surface to remove if there isn't an obvious choice).
Once you remove the holes in the desired surface geometry, you can turn the surface body back into a solid body. Use the "Thicken" feature if it is one body or use Knit Surface if it is multiple surfaces (make sure it is an enclosed volume first).
Alternate Technique for outside edges
When trying to patch outside edges of a surface, use the Untrim Surface Command with the External Edge option. A preview of the results is shown below.
As with most surface modeling, some experimentation with different techniques might be needed to get the results you desire.
Related SOLIDWORKS Articles
Multiple Contiguous Features in SOLIDWORKS 2020
Creating Multiple Parts from One Part File in SOLIDWORKS
Using the Move/Copy Body Feature in SOLIDWORKS

About Maurice Cherian
Maurice Cherian is Technical Support Engineer at GoEngineer. He was introduced to CAD while working for the Navy. Maurice has over seventeen years of Software Training and overall CAD experience. He has been using SOLIDWORKS since 2008 and is a certified expert and instructor. He provides SOLIDWORKS training and Tech Support. Maurice is active in the SOLIDWORKS User Group Community in San Diego, presenting and hosting multiple times over the last eleven years.
Get our wide array of technical resources delivered right to your inbox.
Unsubscribe at any time.