SOLIDWORKS Electrical vs Routing: Which Product Should I Choose?
If you're new to SOLIDWORKS, knowing and understanding which products you need can be a bit daunting. In this article, we will examine the differences between SOLIDWORKS Electrical and SOLIDWORKS Premium Routing, to help you better identify which product is best for your needs.
First, determine what type of material will you be routing. Wires? Harnesses? Cables? Flexible tubing? Black pipe? Copper pipe? Large hoses? Broadly speaking, these items/materials fall into two categories: Flexible or Rigid.
Flexible
A flexible-type route refers to the material used and dictates the fittings required. With wires, cables, harnesses, and flexible tubing, end fittings may be required, but no fittings are required in the middle of the route.
Rigid
A rigid-type route is used for materials that do require additional fittings mid-route to facilitate changes of direction. Black pipe, Copper Pipe, and Large hoses all fall into the Rigid category.
Single or Multiple?
Choosing between SOLIDWORKS Electrical or SOLIDWORKS Premium Routing also depends on the complexity of the route, and the required degree of automation. How many devices need to be connected within a single route, and how many materials/components are needed to connect them? Do you want to route them automatically with a click of a button, or are you willing to do some drag-and-drop operations, and manually define the route?
SOLIDWORKS Electrical
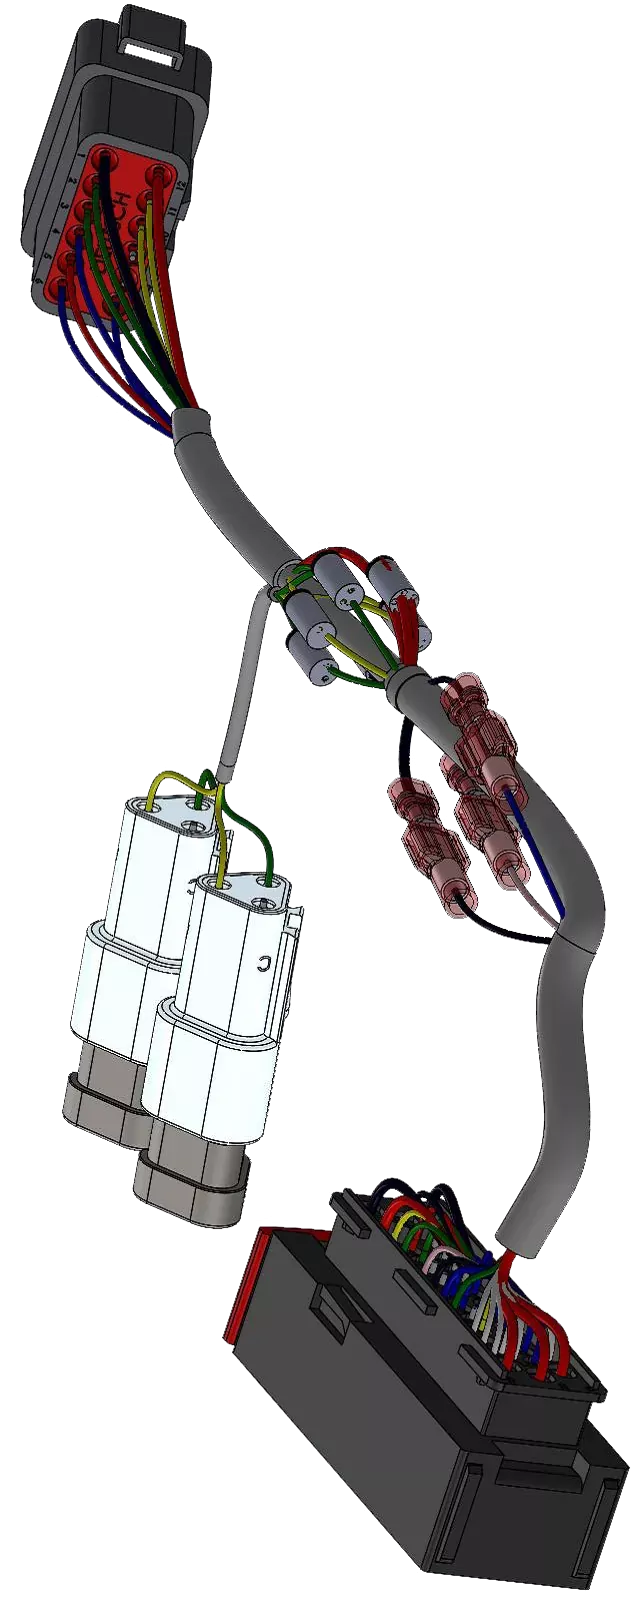
SOLIDWORKS Electrical requires that a schematic be created before you start routing a design. By creating this documentation, a from-to list is created automatically.
All your connectivity (specifically point-to-point connections) is captured and can easily be adjusted. In addition, using SOLIDWORKS Electrical 3D allows a 3D sketch on your assembly to be utilized for your route to follow.
In brief, the following steps are followed:
- Document your harness design in SOLIDWORKS Schematic, making sure that all components have manufacturer’s parts with circuits and terminals. All wires used should have color and sizing along with a bend radius designated. Components and wires should be added to a harness in the project.
- Place components into a SOLIDWORKS Electrical assembly.
- Designate a 3D sketch on the assembly that can then be converted into an EW_Path. This path will be utilized by the routes.
- Select Route Wires, Route Cables, or Route Harness. Multiple routes of each category can be accomplished at one time. A sub-assembly will be created for each wire style when routing wires, each harness, and each cable.
The complete detail of the route has been captured by Schematic and translated into the SOLIDWORKS environment. All types of reports and tables can be placed with all information already captured.
This software is perfect for designs that are wire, harness, cable, or flexible tubing specific. These routes do not require a hard radius or curve at a specific position, nor do they require intermediate elbows in the middle of the route.
SOLIDWORKS Premium Routing
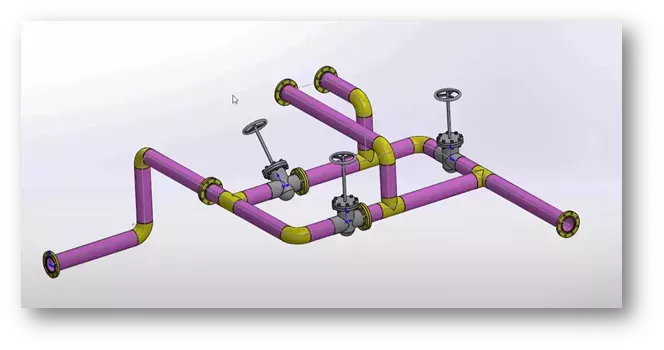
SOLIDWORKS Premium Routing uses a different approach.
There is no need to create any documentation prior to routing a harness.
Working with an assembly, a user can drag and drop a component and start routing. This is a more manual process, where you drop and route from one device to another.
Once the route is created, you can edit the route to merge routes together as well as define the internal connectivity of the connection. There is only one connection per component, meaning that each wire internally will not be defined.
Using the Edit Route command inside of Routing, a user can define the pin that the wire connects to and other data. Keep in mind that the user will do everything manually. When the route is created, it will be an optimized route, meaning it will be the shortest route from point to point.
Once the route is created, the Edit Route will allow you to pull, stretch, bend, break, split and more.
In brief, the following steps are followed to create a route using SOLIDWORKS Premium Routing:
- Create an assembly.
- Drag and drop a Routing model from your design library.
- Start the auto–route.
- Drag and drop another model. (Note: Elbow, couplings, and flanges may be required)
- Right-click and add the model to the route.
- Continue adding models as needed.
- Save your assembly and open the route sub-assembly.
- Edit the route using the route properties, edit your connections, and assign to wires.
- While editing the route, adjust by splitting, pulling, and bending the route as needed to hold to the form required.
With SOLIDWORKS Premium Routing, there is a bit more manual editing required for the form of the route, along with all the required internal connectivity. Also, reports would only relate to the assembly.
What this means, is that only the 3D models inserted into the assembly are the ones that are then reported. If a connector has pins, wedges, a hood, and an insert, only if those models are inserted into the assembly would they show in the SOLIDWORKS reports.
Conclusion
Tubing can be confusing but consider whether a tubing bender is required to conform to a contour. This can help determine which product is best.
SOLIDWORKS Electrical 3D and Schematic is perfect for documenting your design and following up with creating assemblies for any of your FLEXIBLE designs (no tubing bender required). This software is great for working with multiple wires and plastic tubing. Keep in mind that a flexible route needs no elbows in the middle, instead, it follows more of a spline that fully bends. This software is also perfect for when you are wanting to pre-define a path for these flexible pieces to follow and simply route all of them at one time. This set of products does require three licenses (SOLIDWORKS Schematic Professional, SOLIDWORKS Electrical 3D, SOLIDWORKS).
SOLIDWORKS Premium Routing does not require any documentation to start creating your assembly. This product is perfect for RIGID designs. Starting at one end of your route, placing a device, a route can then be defined in a straight line to the next bend or elbow, landing at the other end of the route. Each route is individually completed and edited with additional parts. Hard pipe uses couplings, elbows, and other devices – these are RIGID. While you are laying out your route you are defining where the route will go, there is no pre-definition required. When working with hard tubing, a tubing bender would be required during the manufacturing process. Lastly, SOLIDWORKS Premium Routing can handle spline or flexible designs but each would be created individually.
If you are still unsure which product should be used, simply request a demo. Both SOLIDWORKS Electrical and SOLIDWORKS Premium Routing have a purpose for specific tasks. We can help you make the decision that will best fit your needs.
Related Articles
Comparing SOLIDWORKS Packages: Features in Standard, Professional, and Premium
SOLIDWORKS Electrical License: Standalone vs Network
Ultimate Guide to SOLIDWORKS Licensing: Types, Activation, & Borrowing

About Cheri Guntzviller
Cheri Guntzviller is a Senior Electrical Specialist with over 35 years’ experience. She earned her Bachelor of Science in Electrical Engineering degree from Lawrence Technological University and joined the VAR channel in 2013 with DASI (now GoEngineer). She is a problem solver and is passionate about teaching and helping others solve problems. Based out of Michigan Cheri enjoys gardening, fishing, construction, and spending time with her family and pets. Cheri is a SOLIDWORKS Certified Electrical Specialist, Trainer, and Professional Presenter.
Get our wide array of technical resources delivered right to your inbox.
Unsubscribe at any time.