Deleting a Local Vault View in SOLIDWORKS PDM
When working with SOLIDWORKS PDM, it is sometimes necessary to recreate the local vault view. While the instructions to create the vault view are covered in any number of articles, most of them do not cover the removal of a faulty view that is necessary before you can re-add it. The goal of this article is to provide a linear path through this process and the various scenarios you might run into along the way.
 PLEASE NOTE
This information is provided as a courtesy to our customers to guide them on removing a vault view that can’t be removed by normal means. Incorrectly editing the Windows Registry could severely damage your computer, and these steps should only be undertaken by an IT professional.
GoEngineer Support is not responsible for any issues that arise as a result of users incorrectly editing their registry, and recommends taking backups before making any changes.
Standard Vault View Deletion
Under normal circumstances, you should be able to delete a vault view with just a couple of clicks. This removes the folder and associated registry keys in one go.
- Go to the vault view in your Windows Explorer folder.
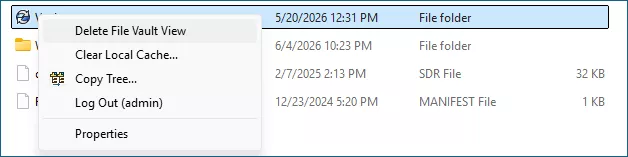
- Right-click the blueberry icon for the vault > Delete File Vault View.
- Windows 11 may require you to select Show More Options to see that selection.
- You may also receive a login screen for the vault view you are deleting. Bypass that by clicking the X in the top right-hand corner. Then click Yes if asked to disable automatic login.
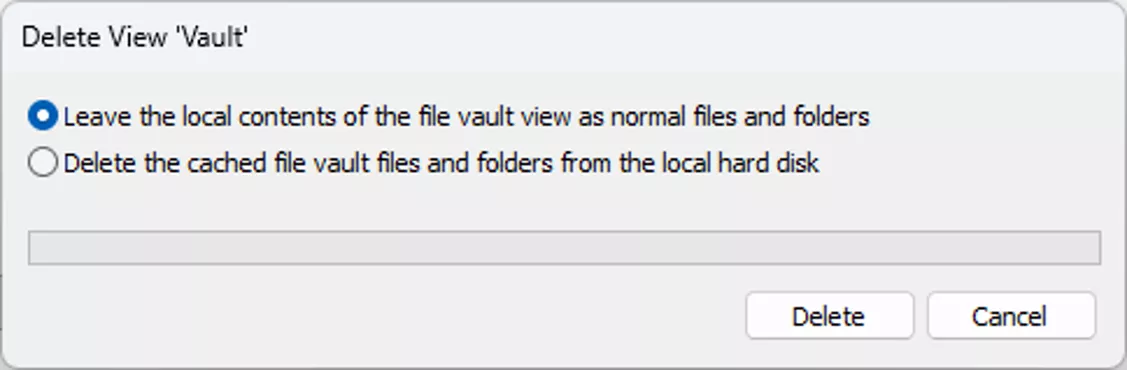
- A warning message will appear asking if you want to leave the local contents as normal files or delete any leftover cached files and folders. Make your choice and click Delete.
- If you’d like to leave the local cache behind (e.g., if there are cached files you need to save), you can choose the first option. Be sure to rename this folder to something other than the vault name if you plan to recreate the vault view.
- If you don’t need to keep any of the cached files, choose the second option.
- These steps should have removed the vault view, but if you still see leftover files or run into any errors, keep reading to proceed with Manual Vault View Deletion.
Possible Errors
When trying to delete a vault view, or even when trying to make a new one, you may run into a few common issues. All of these can be addressed by the manual removal section below, but first, let’s walk through a few of the scenarios you might come across and why they occur.
“The view was created by '[system\user]'. Only '[system\user]' or an administrator can remove it.”
![SOLIDWORK PDM Error The view was created by '[system\user]'. Only '[system\user]' or an administrator can remove it](https://cdn.goengineer.com/solidworks-pdm-created-view-error-only-system-user-or-admin-can-remove.png?languageIso=en-us&v=639167197112383198&format=webp)
Sometimes, in the process of deleting the vault view, a user may receive an error stating the view was created by a particular user, and only that user or an admin may delete it. If the currently logged-in Windows user on the PC is not the same user that created the view, and is also not a Windows Administrator, this can pop up. You can get around this by logging out of the PC and logging back in as the original creator or another admin, but there are other options available to bypass this.
By manually turning the vault view into a regular Windows folder and removing the Registry Keys and desktop.ini that make the vault view different from a regular Windows folder, you can remove it quite easily.
Attached: Missing Information
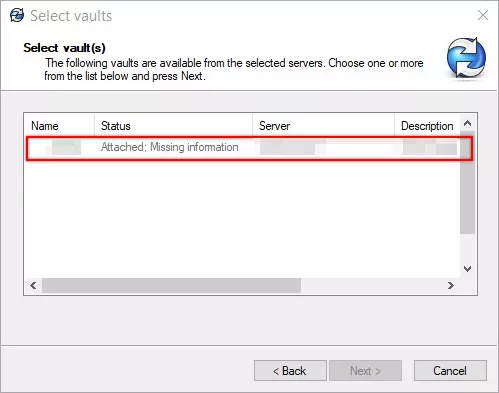
This is probably one of the more common errors we see when it comes to vault views. “Attached” as a status means a vault view already exists. If you go to create a vault view and just see “Attached”, the view is whole and functional and can likely be found on your C:\ drive.
If you see Attached: Missing Information, however, it means you have an orphaned vault view. One or more of the components that drive a vault view (registry keys, the desktop.ini file, etc) is missing or corrupt, and preventing the view from behaving correctly. You can’t create a new view without clearing out the old pieces that have been left behind.
"No database is connected to this view."

This one can be a bit tricky. "No database connected to this view" is similar to the “Attached: Missing information” error, but it often happens when you have multiple vault views on a system and one of them is corrupt/orphaned, but perhaps not all of them. Having a private and a shared vault view on the same system, or multiple private views across different Windows profiles, can cause this error to pop up and wreak havoc when you’re trying to do seemingly unrelated activities, like writing an email in Outlook or uploading a file in your browser.
We have a section in the manual removal process below that will specifically help you search for rogue Registry keys that could be feeding this issue.
Manual Vault View Deletion
Manually deleting a vault can be required when you can’t delete it via normal means, or if you have remnants of a vault left over that aren’t immediately obvious (or potentially there isn’t even a blueberry icon to click on to add or delete).
When manually removing a vault, you’ll want to make sure you remove all components. That includes:
- If a vault view icon/folder is still present, you’ll need to turn it into a regular folder.
- Removing all Windows Registry keys:
- Keys for Shared vault views
- Keys for Private vault views
- Other users’ keys
Turning the Vault View into a Regular Folder
This section only needs to be done if the vault view icon ![]() still exists and you cannot right-click > Delete it normally. If you can right-click > Delete, or if you don’t have a vault view folder leftover in File Explorer, you can move to the Registry section.
still exists and you cannot right-click > Delete it normally. If you can right-click > Delete, or if you don’t have a vault view folder leftover in File Explorer, you can move to the Registry section.
- Click the Windows Start button or search from your taskbar.
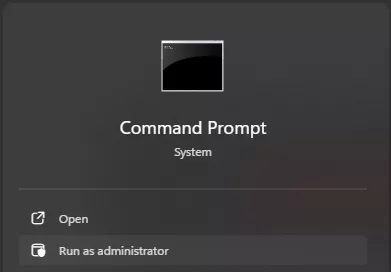
- Search for Command Prompt by typing CMD.

- Find Command Prompt and select Run as Administrator.
- In the Command Prompt, type the following commands and hit Enter after each line:
- CD “C:\path_to_vault_view”
- attrib -s -h -r desktop.ini
- del desktop.ini
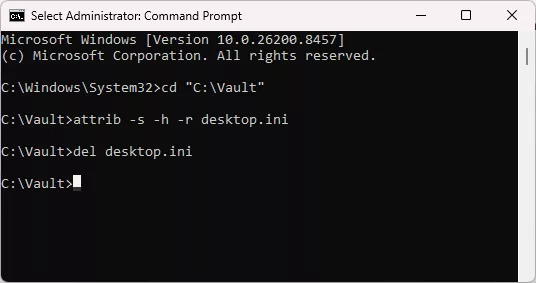
- At this point, you should see the blueberry icon disappear from your vault folder and switch to a regular Windows folder icon.

- Exit the Command Prompt. You may need to close out of and reopen File Explorer to see the changes take effect.
- You can now delete or rename the leftover file vault view folder to allow for a new vault view to be created.
Note: If, for any reason, you cannot delete the folder after following these steps, it may be necessary to restart the computer.
Registry Cleanup
With the folder removed, we can then move on to clean up the registry keys that stick around behind the scenes.
Note: Not all of the keys below may exist. If you look for the keys we describe and they do not exist, it is ok to move to the next key. You’ll just want to ensure any of these keys that do exist are cleared out for any vaults you’re trying to clean up.
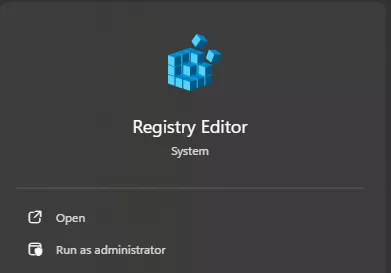
- Click the Windows Start button or search from your taskbar.
- Search for the Windows Registry Editor by typing regedit.

- Find Registry Editor and select Run as Administrator.
- You’ll need to navigate to each of the following keys and perform a right-click > Delete. Be sure to only delete the keys named after the vault you’re trying to remove.
- If you want to be extra safe, you can right-click > Export each file to save a backup copy of the Registry in case you need to re-import them later.
Shared Keys
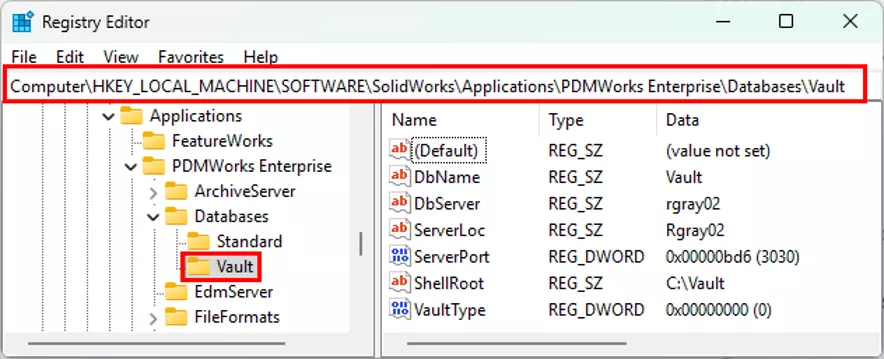
The first ones you’ll want to look for are the keys found under “HKEY_LOCAL_MACHINE”. These exist for vaults created as “shared” views, which are accessible to all users.
- HKEY_LOCAL_MACHINE\SOFTWARE\SolidWorks\Applications\PDMWorks Enterprise\Databases\[VAULT NAME]
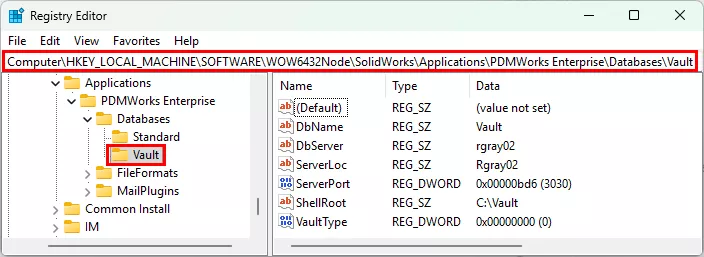
- HKEY_LOCAL_MACHINE\SOFTWARE\Wow6432Node\SolidWorks\Applications\PDMWorks Enterprise\Databases\[VAULT NAME]
Private Keys & Keys from Other Users
Next, you’ll look for the keys for any private vault views housed under the current Windows user’s profile – HKEY_CURRENT_USER (though this only applies if launching the Registry Editor as admin did not require you to enter the Windows credentials of a user other than the one logged into the computer) or views that may have been created under other users that have logged into the computer – HKEY_USERS.
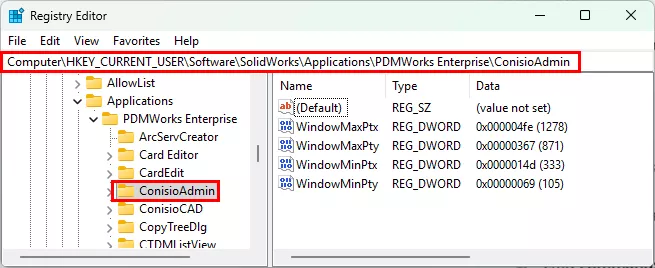
- HKEY_CURRENT_USER\Software\SolidWorks\Applications\PDMWorks Enterprise\ConisioAdmin
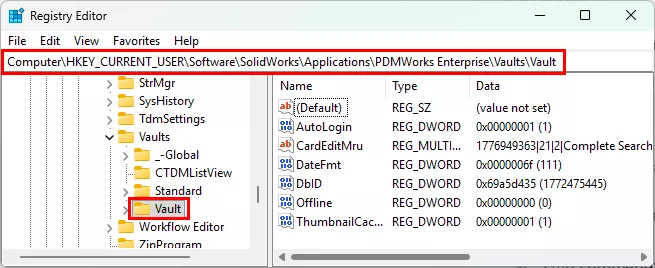
- HKEY_CURRENT_USER\Software\Solidworks\Applications\PDMWorks Enterprise\Vaults\[VAULT_NAME]
We often find that the particularly sticky “no database connected to this view” error is a result of leftover keys in other users’ profiles. Going into this is very similar to the “HKEY_CURRENT_USER” paths seen above, but the starting point is a little different.
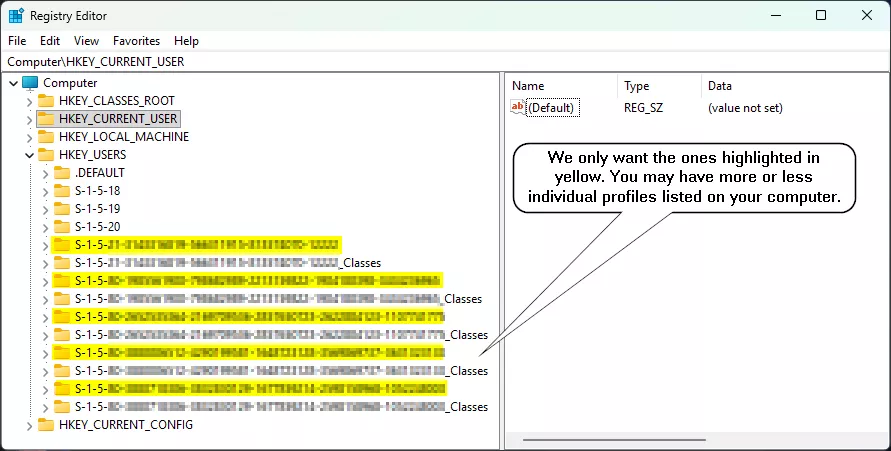
You’ll go into “HKEY_USERS” and notice a lot of hives underneath labelled with “S-1-5-“ followed by a long string of numbers. The ones with longer SIDs, but without the “_classes” appended to the end are what we want to check. The shorter SID’s and the ones with “_classes” can be ignored.
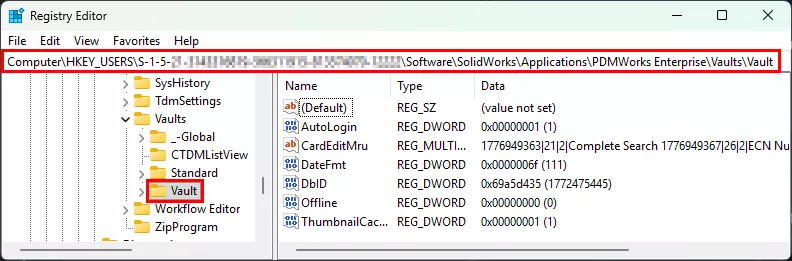
In each of the appropriate hives, it will be roughly the same path as before, just switching out the first part - HKEY_USERS\S-1-5-….\Software\SolidWorks\Applications\PDMWorks Enterprise\Vaults\Vault.
As mentioned before, you may not see the keys in all of these profiles. That’s expected - just skip to the next one.
Recreating the Vault View
After combing through the registries and removing these keys, you should finally be able to create a new local vault view. If you aren’t sure how to create a vault view, you can run through these steps for “How to Create a Vault View”.
Final Thoughts
This should cover most of the situations you’ll run across when you’re stuck with leftover vault views or strange errors. Though, as always, if GoEngineer is your VAR and you have questions or issues with anything we’ve discussed in this article, please feel free to reach out to our Technical Support Team for assistance! We’re happy to help. To learn more about SOLIDWORKS PDM, check out the additional articles listed below.
24 Tips to Master SOLIDWORKS PDM
SHORTCUTS ⋅ SEARCHING ⋅ PDM ADD-IN
24 of our expert tips to help you master using SOLIDWORKS PDM. Improve performance, find files faster, and work like a pro.
Editor's Note: This article was originally published in September 2015 and has been updated for accuracy and comprehensiveness.
Related Articles
SOLIDWORKS PDM – Create Local Host File Workaround as Temporary Solution
Troubleshooting SOLIDWORKS PDM Notifications
Add the Released Version to the Face of the Drawing in SOLIDWORKS PDM
Fix SOLIDWORKS PDM Error Opening Archive
![]()
About Joe McWhorter
Joseph McWhorter is a SOLIDWORKS PDM Support Engineer based out of Chicago, Illinois. He joined GoEngineer in 2022 and holds a Bachelor's Degree from Augustana College. In his free time, he enjoys reading and cooking with his children, while collecting hobbies like they're trading cards.
Get our wide array of technical resources delivered right to your inbox.
Unsubscribe at any time.