Updating Data Cards with XML Import for SOLIDWORKS PDM Professional
When it comes to metadata, it can be very important for business systems to stay in sync. Updating this data can be a long, grueling process, sometimes involving long weekends and late nights. Using SOLIDWORKS PDM Professional’s XML import function can reduce the need for manual input when updating metadata to match ERP/MRP.
Components of the XML Import function
The XML import function for SOLIDWORKS PDM has several moving parts for it that are important to understand to ensure that the import works as intended. Data to import must be entered into a specifically formatted XML file.
Each of these files is consumed and removed from an import folder location by the SOLIDWORKS PDM Database Server service.
It is important to know that the XML import folder must be accessible by this service. Once a file is consumed, the files must pass through a transition with the import step as part of its actions. We’ll get into some of these steps below.
XML File Structure for data import
SOLIDWORKS PDM has very specific requirements for importing from XML. The first and most important is in the XML structure. We can find an example of this in the SOLIDWORKS Help documentation.
Our example looks a bit like this:
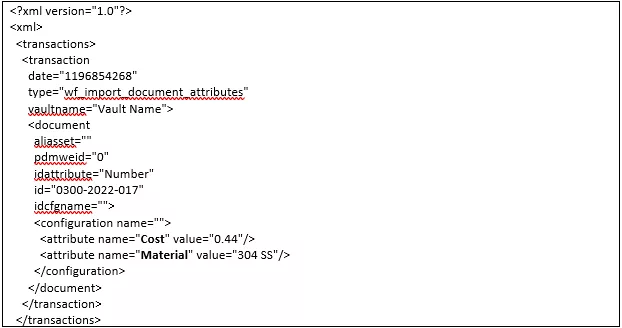
There are parts of this that we can alter and some that we cannot if we expect it to work for us. The first few tags are part of the fundamental structure and cannot be changed. For instance every file must contain the tag “<?xml version="1.0"?>” followed by “<xml>”. It must also end in “</xml>”. These are basic XML rules for all files of this type, not just for PDM.
Further tags for “<transactions>” must be included and a PDM specific. There can only be one “<transactions>” tag per document.
In this tag, we can have multiple “<transaction …>” tags with differing properties. The property for type should always be "wf_import_document_attributes". Without this tag, the XML file will not be read correctly, and data will not be imported.
The value for Date is less important but should be updated if at all possible. This data is a value known as Unix Time. It is the number of seconds since 12am Jan 1 1970.
There are many calculators available to find this value for the current time. his value must be a non-zero integer. The “vaultname” property here is for the vault name where this data will be imported. This field is not case sensitive, but it is important to know that if the vault is mispelled, the file will not be consumed and nothing will happen.
The “aliasset” tag is an optional tag and corresponds to an alias set created in PDM. The idea behind an alias set is that we may call a variable one thing in PDM and something different in our ERP/MRP source data. The alias set helps us translate these values into the proper variables without manual alterations to make them match.
Inside each “<transaction …>” tag is one or several <”document …>” tags. These tags are how files are located in the vault to import data into. There are multiple methods for PDM to find files with this tag. The most specific is the “pdmweid” property. This value is for the internal id of a file in PDM.
Each file has a unique id, so this can only target a single file in this way. Finding this id isn’t necessarily obvious in the interface, but it can be done by adding an id column through the admin tool. A value of 0 will turn this option off, otherwise, the following tags will be ignored.
When the intent is to be more general, the “idattribute” and “id” tags can be used to locate a file. The “idattribute” is for the name of the variable used to identify the file. The “id” is the actual value.
In the example above, we are looking for a file with the value of 0300-2022-017 in the Number field. The “idcfgname” tag can be used to further refine this by selecting a specific configuration of the file to update. Leaving this blank won’t look for a value on any specific configuration. These values may select multiple files when using this method compared to using the file id.
Inside of each document tag is a configuration tag. This is a simple tag with only one property. This is the “name” property with just the name of the configuration to update. Leaving this blank will update all configurations.
For each configuration tab we can finally create “<attribute …>” tags. Each configuration can have multiple of these tags, one for each variable we’d like to update. Each tag has a property for “name” of a PDM variable and the corresponding “value”.
It is important to know that bad information in this file can lead to a few different scenarios.
If the vault name is spelled incorrectly, the file will not be consumed and will be completely ignored by the process entirely.
If the information identifying a file cannot be found in the vault specified, the file will be read and then a property of “ignored=-1” will be added to the transaction tag. Correcting the information and removing the ignored property will allow the file to be processed by the system at the next interval.
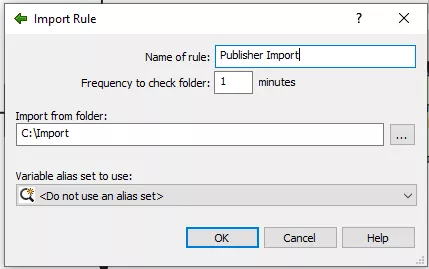
Import Rule
Next we need to configure SOLIDWORKS PDM to know where to look for our XML files. The option is in the PDM administration tool and is a straight forward set up. Give the rule a name and point it to a folder that is accessible by the PDM Database server service. This will likely be on the server. If an alias set is used in this process select it here.
Transition setup
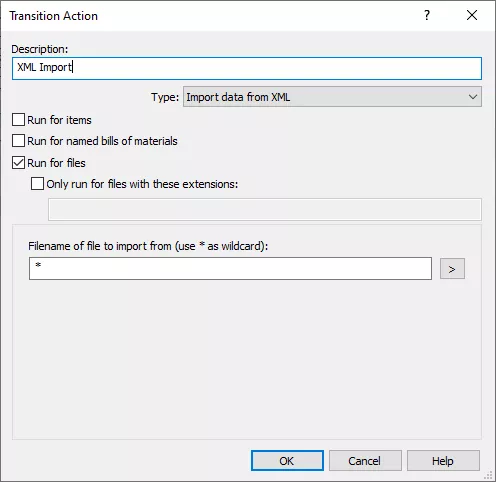
So far, the XML files are propertly formatted and being read out of an import folder. SOLIDWORKS PDM must now be told when to inject this data into the file.
We do this by creating an action on a workflow transition. Create a new action and select Import data from XML as the type. To filter this by file type, this can be done by running this action for only specific file types. If we need further refinement, transition conditions are a good choice.
SOLIDWORKS PDM must also be told what to look for in the name of the file to import. Here I’ve set mine to be very general as only XML files will go into my import folder. This can be more specific to only import polled XML files that match the file name specified here.
With all of these pieces in place, SOLIDWORKS PDM will automatically update your data to keep things in sync with any system capable of exporting.
Related Articles
SOLIDWORKS PDM: Custom Column Sets in Web2
Modify Your Quick Search Variable List in SOLIDWORKS PDM
SOLIDWORKS PDM Copying a Value from the Folder into a File’s Properties
How to Set Up Dynamically-controlled Card Lists in SOLIDWORKS PDM

About Bryce Hooper
Bryce has been using SOLIDWORKS since 2008 in multiple roles across multiple industries from industrial vacuum to RV frame design. He spent many of those years spent as a PDM administrator, implementing 3 PDM vaults along the way. He earned his CSWP in 2019, followed by his CSWE in 2013. Programming is a passion that has followed Bryce through his various positions, writing custom business applications to improve design processes. In his spare time Bryce is a gamer, a maker, and a brewer.
Get our wide array of technical resources delivered right to your inbox.
Unsubscribe at any time.