How to Set Up Dynamically-Controlled Card Lists in SOLIDWORKS PDM
In SOLIDWORKS PDM Professional, lists on data cards allow control of data, so it is the same among files and is easily searchable. Dynamically-controlled card lists allow the choices on one list to be determined by the selection on another list.
For example, choosing “Bearing” on one list may drive a different list to list possible “Inside Diameter” values, while choosing “Screw” will give a selection of “Drive Types” in the same second list.
This article demonstrates how to set up Dynamically-controlled card lists in SOLIDWORKS PDM Professional.
Note: This information can also be found in the “PDM Administration Guide” under “Card Lists: Creating Dynamically Controlled Card Lists”.
Creating the Lists
First, we must plan the lists we will need and the variables to hold the values for those lists.
There can be a lot of lists, as each choice in a driving list must have a corresponding list for the second list.
Note that these lists can be chained. A selection on list one can determine the choices on list two, and the selection on list two can determine the choices on list three, etc.
In this example, we will use states and cities. The variable names for each will be State and City. These will specify the place a component is manufactured. There are manufacturing facilities in Texas, North Carolina, and Louisiana. In Texas, the facilities are in Amarillo and Houston. In North Carolina, they are in Cary and Clinton. In Louisiana, they are in Baton Rouge and New Orleans. Therefore, the lists will be:
- Louisiana
- Baton Rouge
- New Orleans
- North Carolina
- Cary
- Clinton
- Texas
- Amarillo
- Houston
Creating the lists in the PDM Admin tool
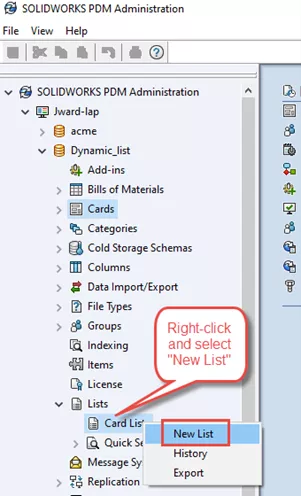
Expand Lists, right-click Card Lists and choose New List.
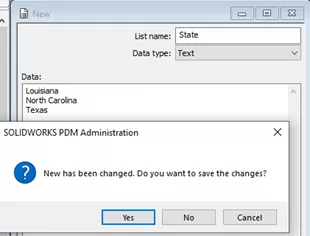
Name the list State.

We will choose Text as the data type and type in the names of the states.
The data type From SQL Database allows us to use an SQL query to form the list.
Text with Alias allows the use of a displayed name, but a different value will be assigned to the variable.
Selecting the X in the top right corner brings up the dialog that allows for saving the changes.
Select Yes.
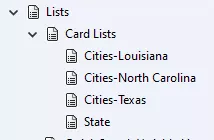
We now create the (3) lists of cities for each of our states. When complete, we have (4) lists.
Create the variables to hold the values
We need a variable for the State and another for the City. We could even create a third variable that combines these into Manufacturing Location.
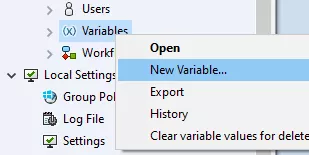
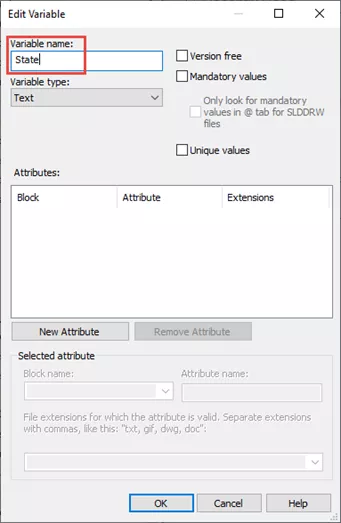
In the PDM Administration tool, right-click Variables and choose New Variable.
In the Edit Variable dialog box, type in the variable name State.
We won’t be keeping this value in the file, so we won’t be creating any attributes. Just select OK to save this variable.
Create another variable called City in the same way as State. Again, we won’t be keeping this value in the file so, we won’t create any Attributes.
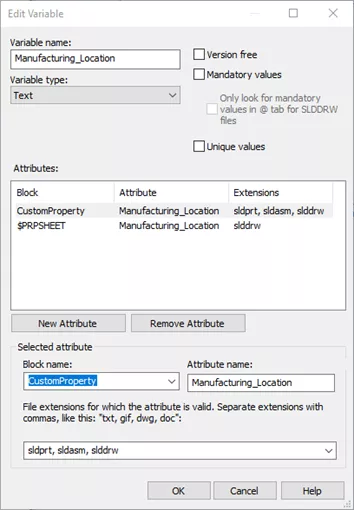
The last variable for this project is Manufacturing Location. But this value will be kept in the file. We will combine State and City in the data card to create Manufacturing Location.
We create two attributes.
The block CustomProperty specifies the value that will be applied to the Custom tab in the properties of the file. This corresponds to the “@” tab on the file data card in the local vault view (PDM in Explorer).
The block $PRPSHEET specifies the value that will be copied from the model to the drawing. When the drawing is open in SOLIDWORKS and then saved, the value is copied. Whatever is in the drawing will be replaced by the value from the model the drawing references.
Select OK to save the variable.
Add the lists to the data card
Now, we need to add the lists to the data card. This is where we specify the dependency in the lists.
We will add three controls to the data card; two drop lists and one text that is a combination of the choices from the drop-down lists.
Open the data card for the models.
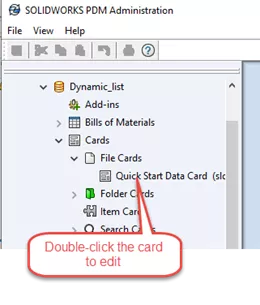
To do this, go to the PDM Administration tool and select Cards: File cards.
Double-click the card to edit. It will open in the PDM Card editor.
In the card editor, select the icon Aa and then click on the card to add a label. In this case, we will do the State first.
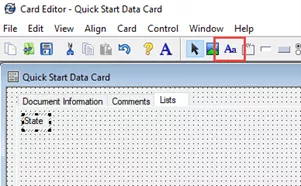
Now, select ComboBox Droplist and place it on the data card.
Select Special Value and then State from the drop-down menu. On Flags, select Show in Explorer and Updates all configurations.
DO NOT select “Read-only,” as users must be able to select the state from the drop-down list.


Add the City label and drop-down list. Tie the control to the variable City. Select the flags “Updates all configurations and Show in Explorer but DO NOT select “Read-only” as the user has to select from the list.
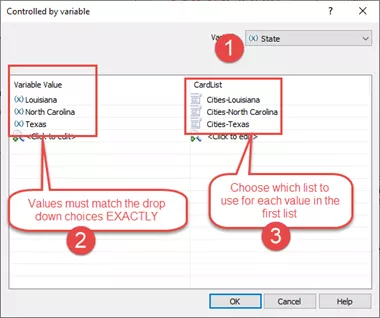
The last thing to do is select Controlled by variable and then Details.
This is where the magic happens.
In the Controlled by variable details dialog, specify the variable, then the variable values. Since the values MUST MATCH EXACTLY the values from the list, you may want to copy them from the list and paste them here.
Specify which list goes with which value from the first list.
Select OK to close the dialog.
Combine the chosen values
This next step is optional. It is not needed for Dynamically-controlled card lists. However, I wanted to show how the choices from these lists can be combined into a single value for the file properties.
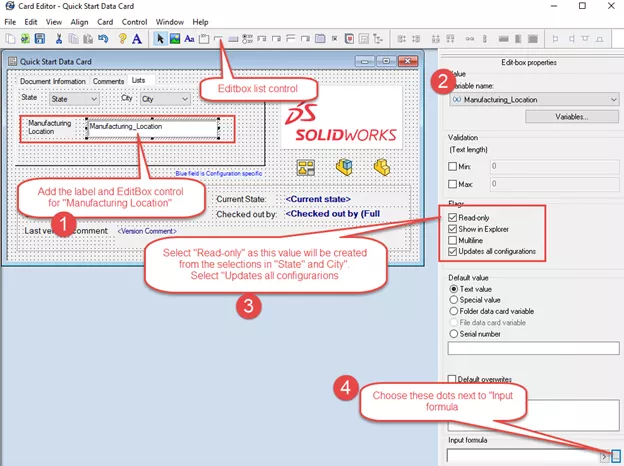
Add an Editbox list control and label for the Manufacturing Location. Tie it to the Manufacturing_Location variable.
Select the flag Read-only (as the value will be calculated from the choices for State and City). Select the flag Updates all configurations.
Lastly, select the ellipsis next to Input formula.
In the Input formula dialog, select the > for options.

Choose Variables and then the variable State.
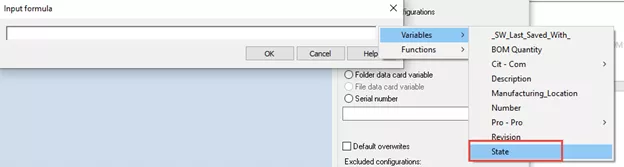
Add a “, “ then choose the variable City.

The input formula is complete so select OK.

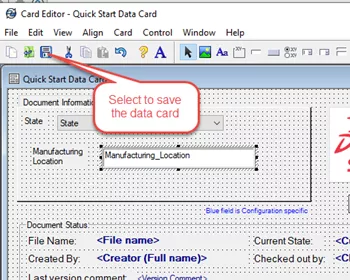
Now, save the data card.
Testing functionality
Go to the local view (PDM in Explorer) to test the functionality.
Find a SOLIDWORKS part or assembly file.
With the file checked out (cards cannot be edited unless the file is checked out) select the State. Note the City choices change depending on which State is selected.
Choosing Louisiana the options for City are Baton Rouge and New Orleans.
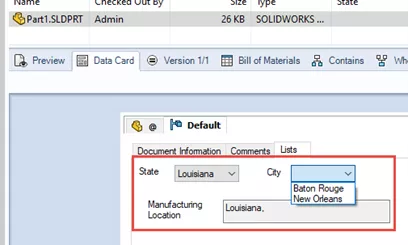
Also, note that Manufacturing Location has Louisiana and the City will be added as soon as I select it from the drop-down list.
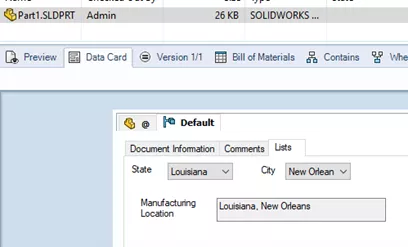
Here, Louisiana, New Orleans is chosen from the drop-down. The Manufacturing Location updates to that value.
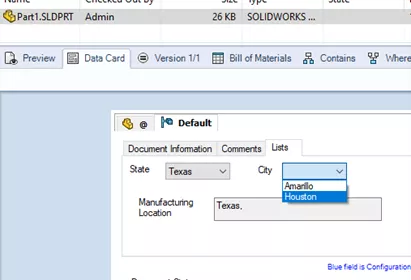
Here, Texas is selected, and the cities update.
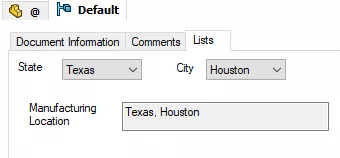
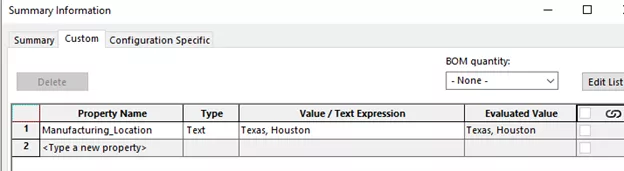
Choosing Houston for the city causes the Manufacturing Location to update to Texas, Houston.
Save the changes in the data card and then open the file in SOLIDWORKS. This allows us to see that Manufacturing_Location has been added to the file’s Custom property with the value chosen in the data card.
More SOLIDWORKS PDM Articles
SOLIDWORKS PDM Copy Tree Explained
New SOLIDWORKS PDM Column Configurations
SOLIDWORKS 2022 Data Management: PDM, Manage, & Admin
SOLIDWORKS PDM Gray Folders and Local Files

About Jim Ward
Jim Ward is a Sr. SOLIDWORKS Support Engineer at GoEngineer. He has a BSME from CSU, Chico and has been managing SOLIDWORKS PDM since 2008, first for a major corporation until 2015, then as a PDM Support Specialist at GoEngineer since 2016.
Get our wide array of technical resources delivered right to your inbox.
Unsubscribe at any time.