Getting Started with SOLIDWORKS Hole Tables
It’s not uncommon for parts to have many holes of different sizes and positions. Getting all of the dimensions and callouts onto a drawing can quickly turn into a cluttered mess of confusing numbers and symbols. This is where Hole Tables come in handy. Inserting a Hole Table in SOLIDWORKS will organize all this information automatically, in a clean table-based format that is easy to read and understand.
Create a Hole Table
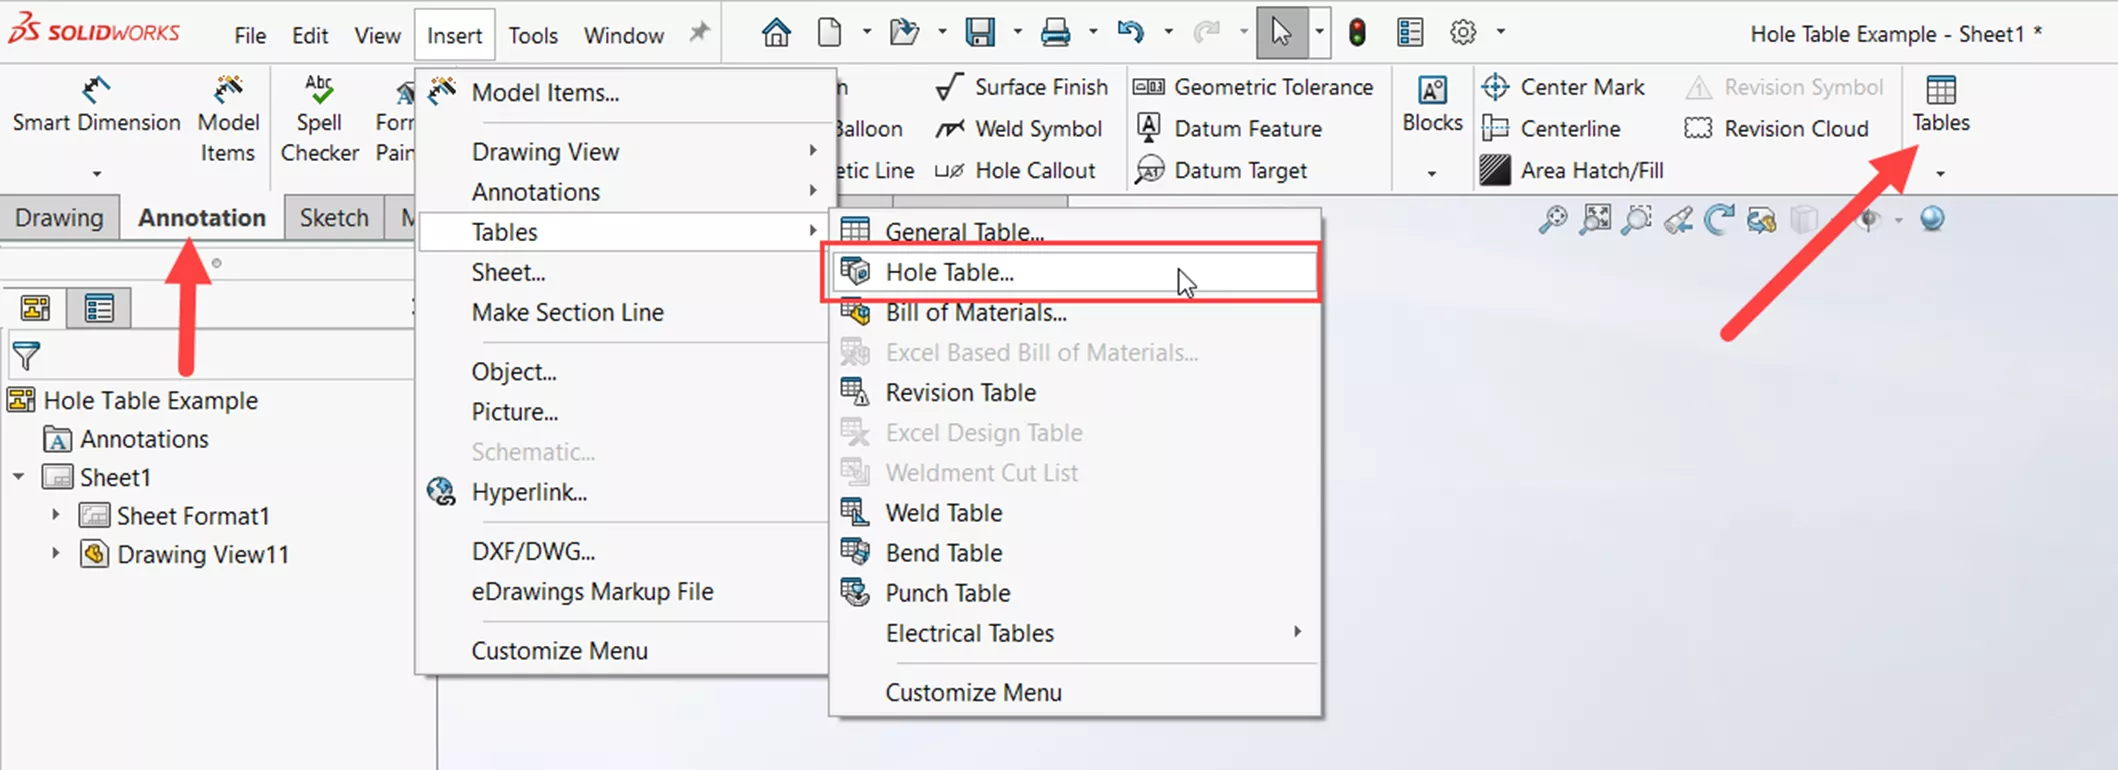
To start a Hole Table, go to Insert > Tables > Hole Table. You can also get there from the Annotation tab in the CommandManager.
The Hole Table PropertyManager is fairly straightforward.
Several Hole Table templates are installed with SOLIDWORKS. And, like all tables, you can create a custom template that can be used.
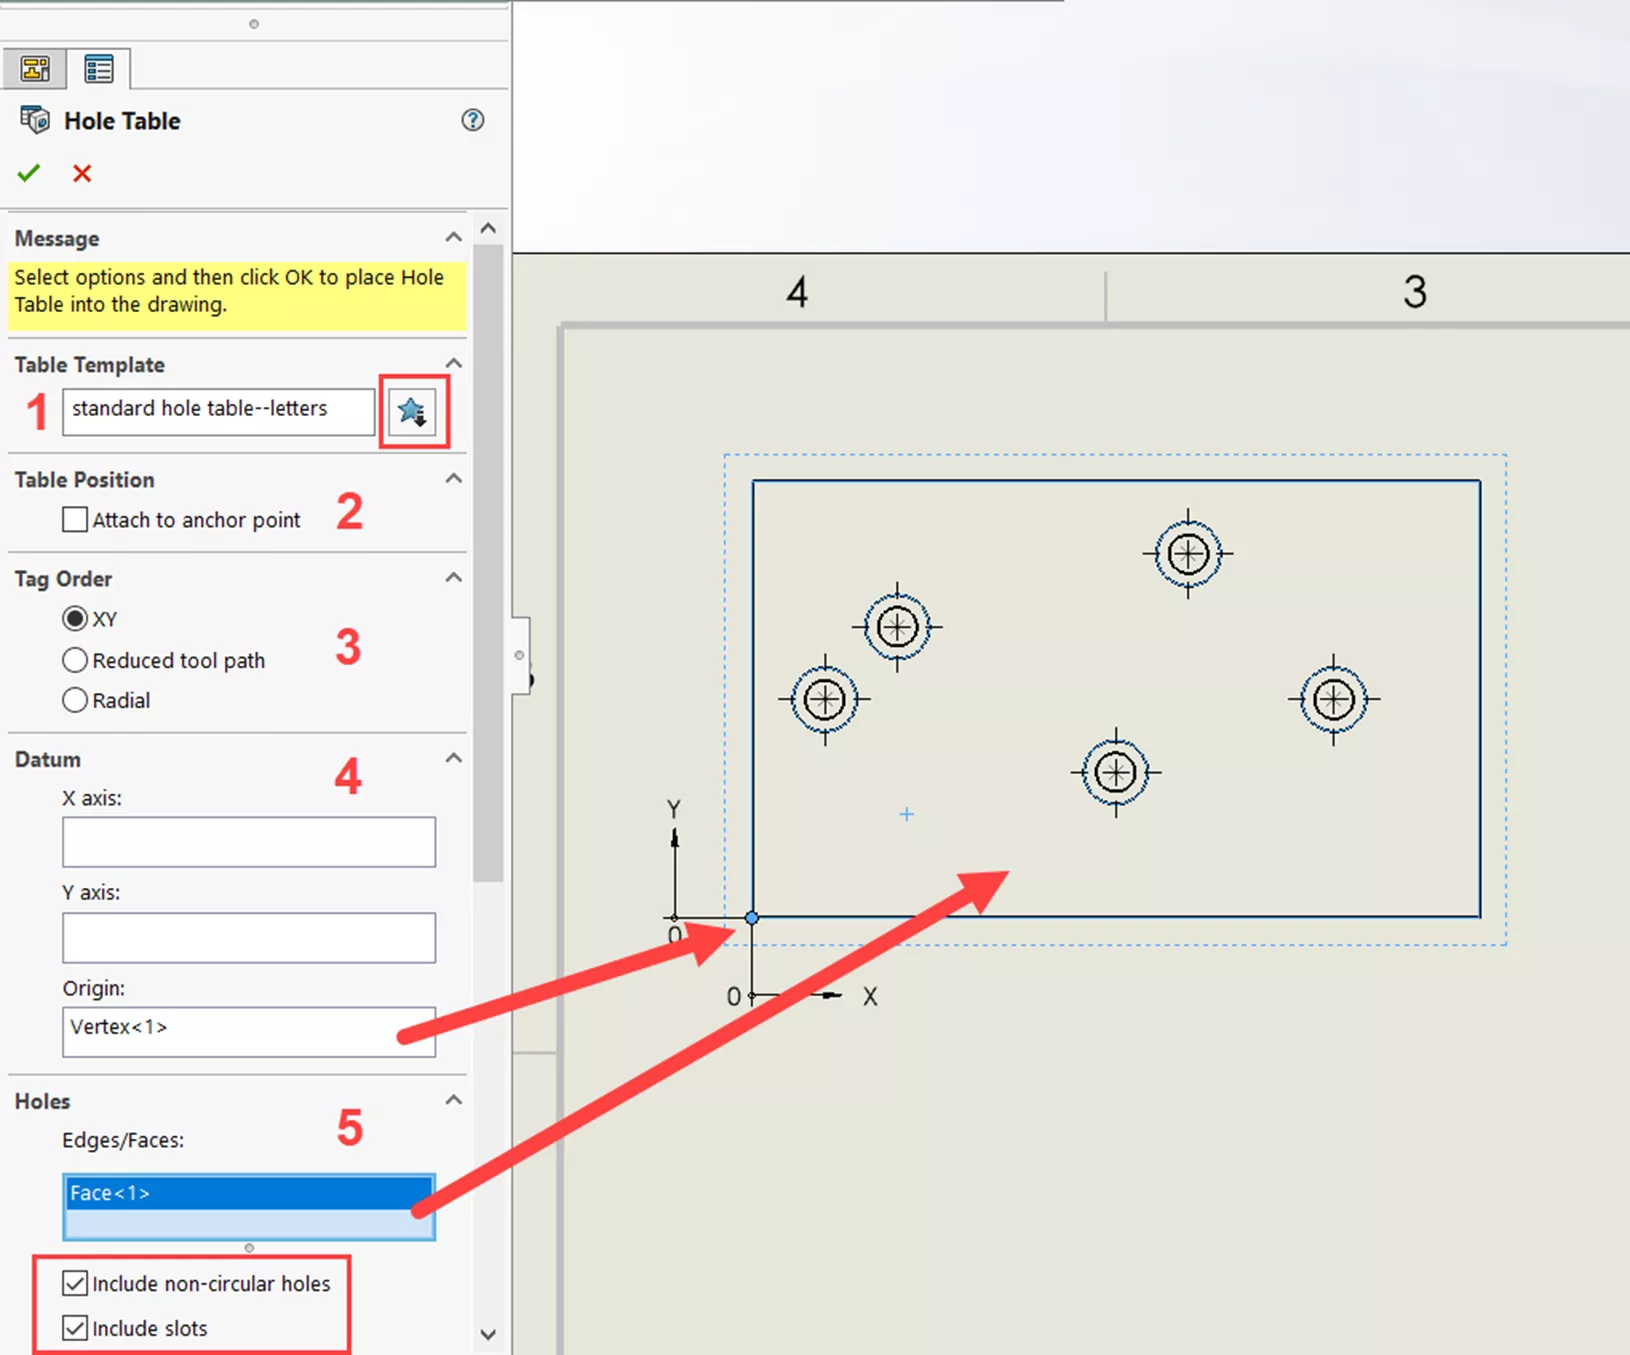
For this example, I will use the standard template (1). To use another, select the star icon under Table Template to browse for a template. As with any table in a SOLIDWORKS drawing, if there are set anchor points, the Attach to anchor point option can be selected to pin the table to that location (2).
You can also specify the order tags appear in the view under the Tag Order section (3). The XY option tags the holes according to their XY positioning closest to the selected datum. The Reduced tool path option looks at holes of the same size and tags them based on the shortest length between them, which helps minimize manufacturing time. The Radial option is generally used for lathe-turned parts (but can be used otherwise) and tags them radially from the origin.
The next section is for choosing where to place the datum (4). The easiest selection for the datum is to pick a specified origin; you can select any sketch point, vertex, or circular edge. In this example, I selected the bottom left corner of my part as the datum. You can also choose linear edges as X and Y directions to set this datum point.
In the Hole section, select the holes you want represented in the table (5), either individually (click an edge of each hole) or all the holes on a face (select a face with holes). In this example, I chose to select the face. Keep in mind that these selections can include more than just round holes if you check the options Include non-circular holes and Include slots.
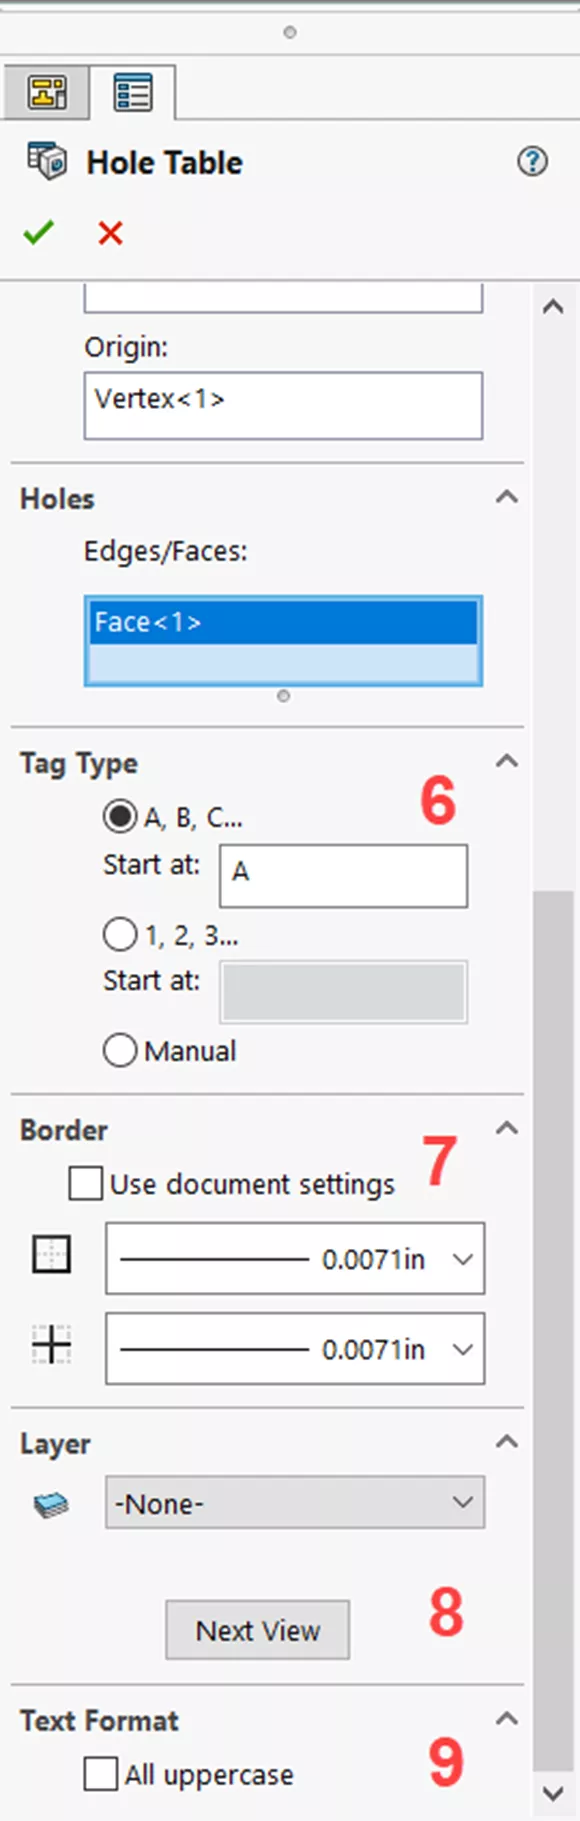
For the tag type, choose how you'd like each hole in the drawing view to be labeled (6). They can be organized alphabetically or numerically, or use the Manual option for full customization. From there, the remaining options to choose are border options (7), whether you want to add the table to a layer (8), and the appearance options for text in the table (9).
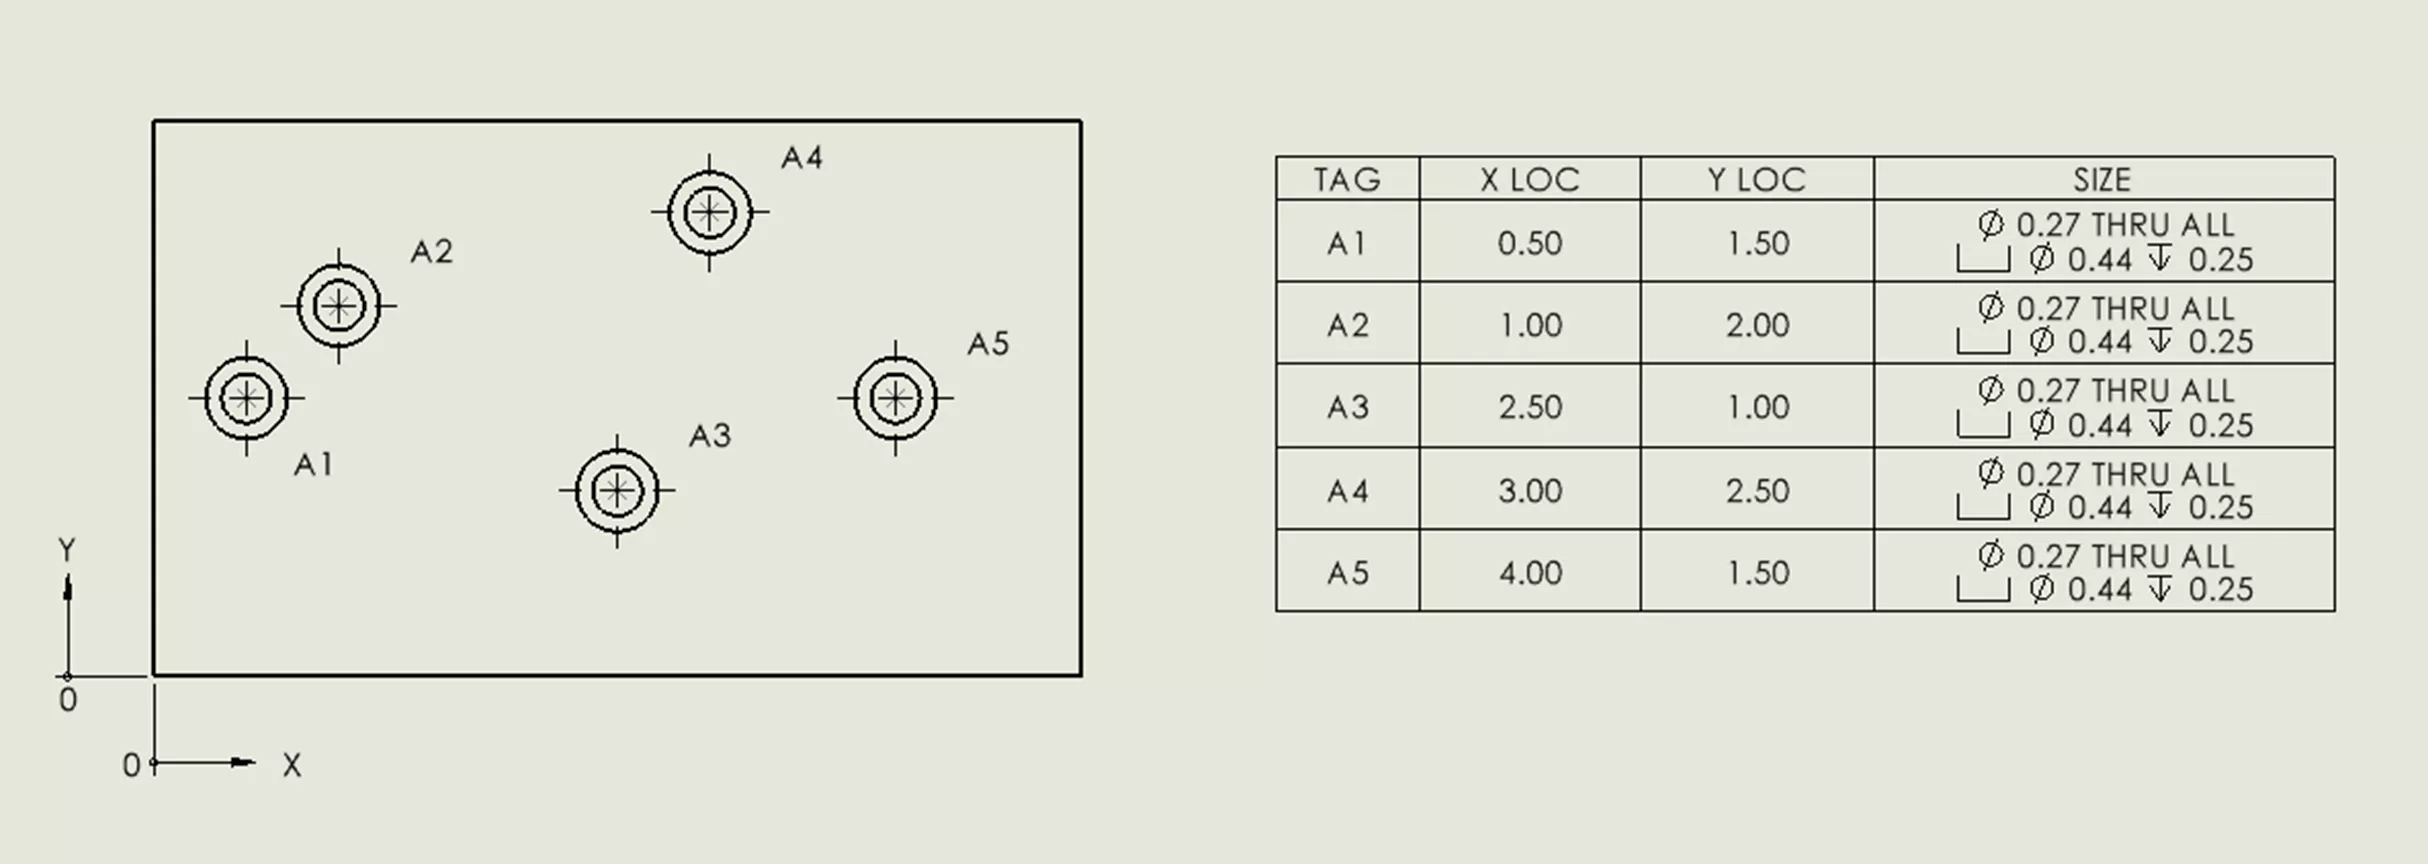
Once you’ve gone through all of those options and the table is accepted and placed, you will see the labels for each hole appear in the drawing view. If needed, the labels for these holes can be moved to more convenient locations.
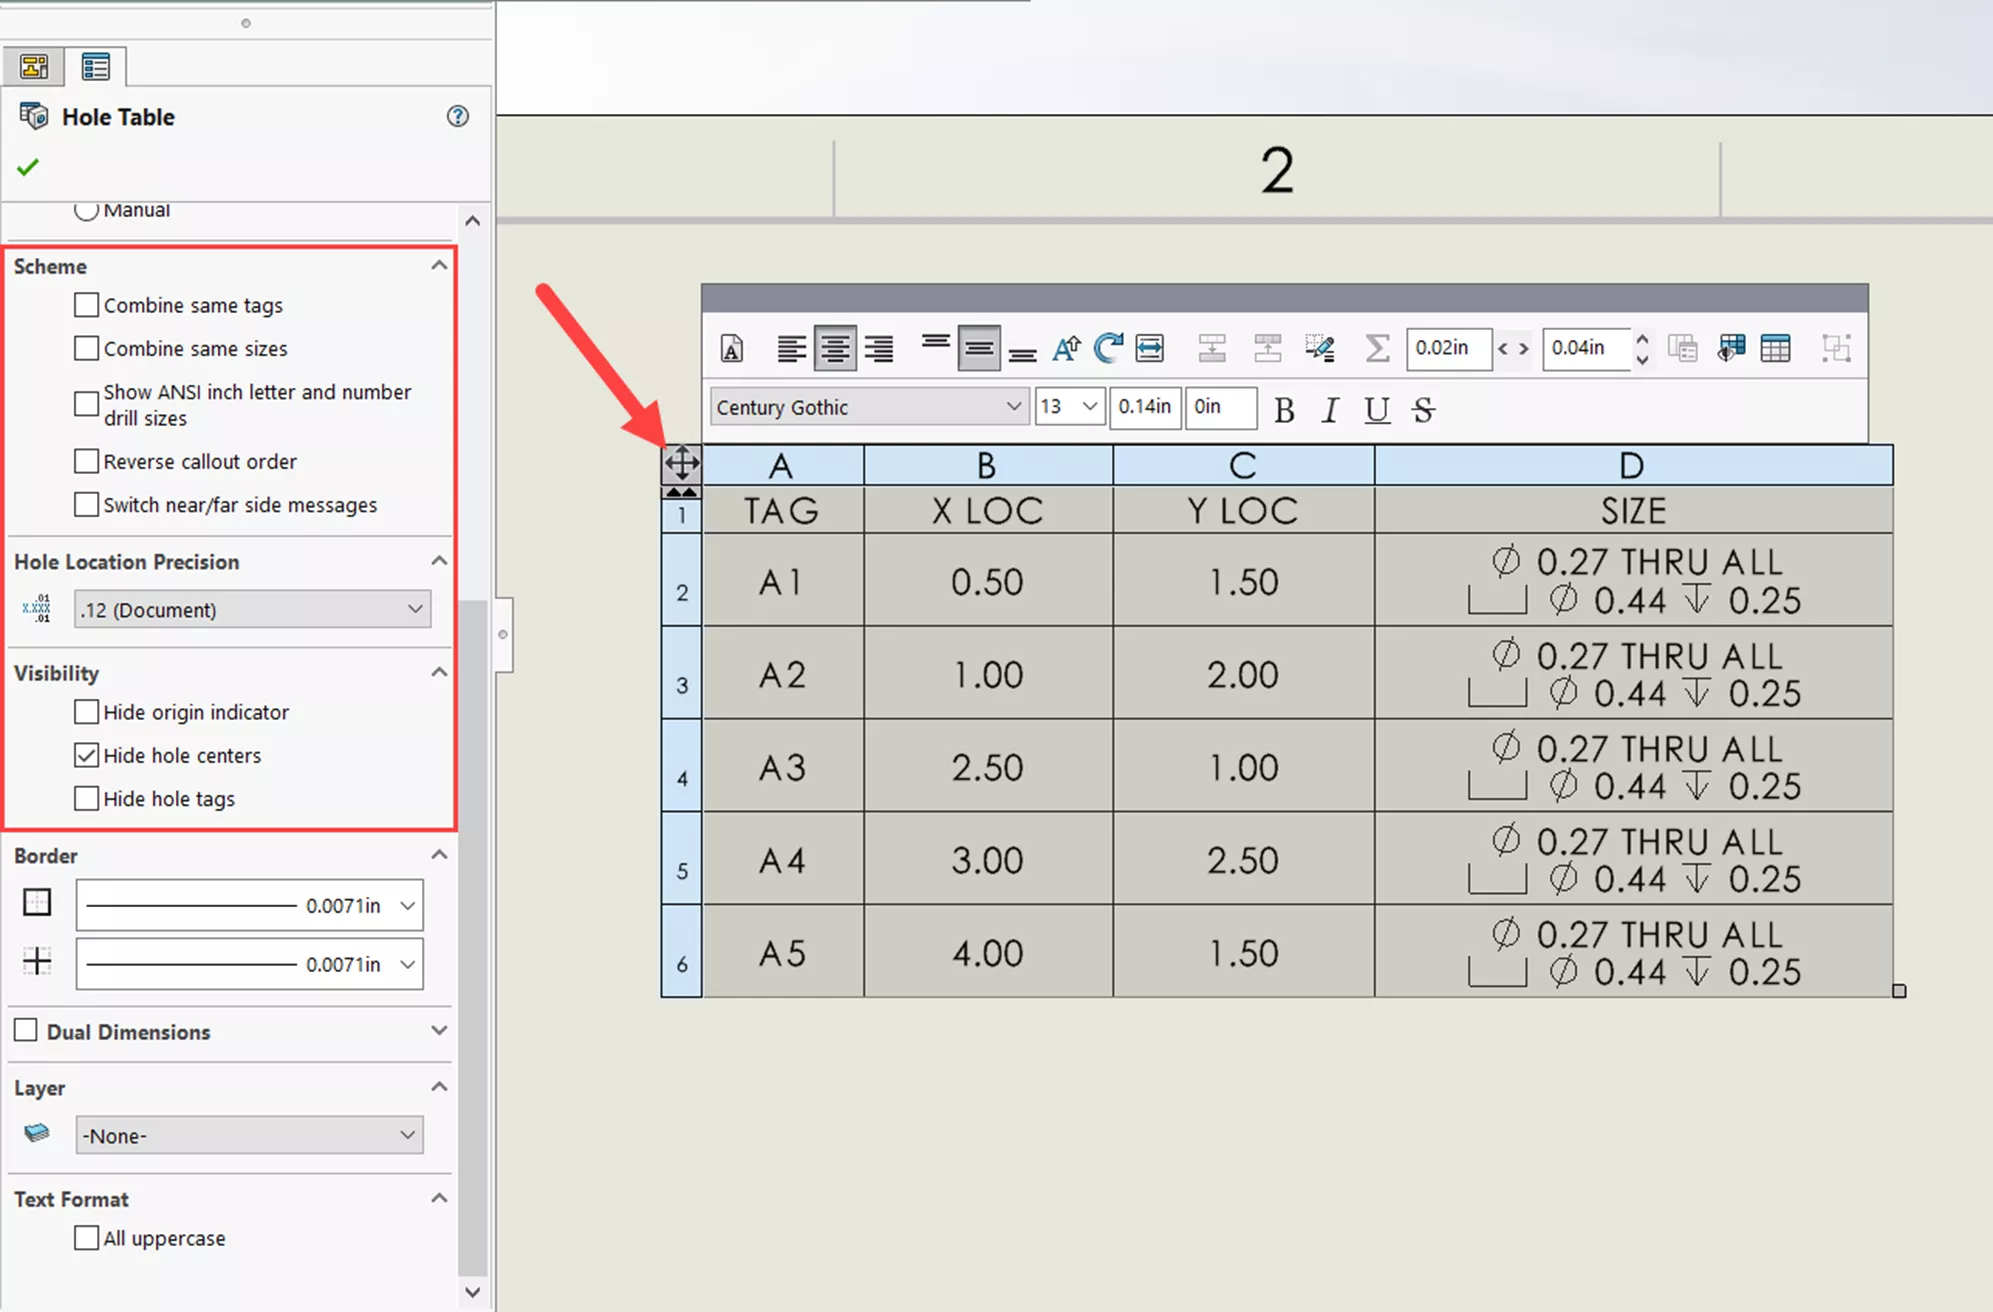
Once you place the table, there are more options for organizing it. To do so, click the arrow icon at the upper left corner of the table (below).
- Scheme is used to organize the table.
- Combine same tags will make the table much smaller but removes the locations of each of the holes. So, dimensions will need to be specified in the drawing view.
- Combine same sizes keeps the table the same size but combines the cells the same size information.
- Show ANSI inch letter and number drill sizes displays hole specification from the Hole Wizard information if they are Hole Wizard holes.
- You can also choose to change the precision of the values in the table under Hole Location Precision, and the appearance of the drawing view under Visibility.
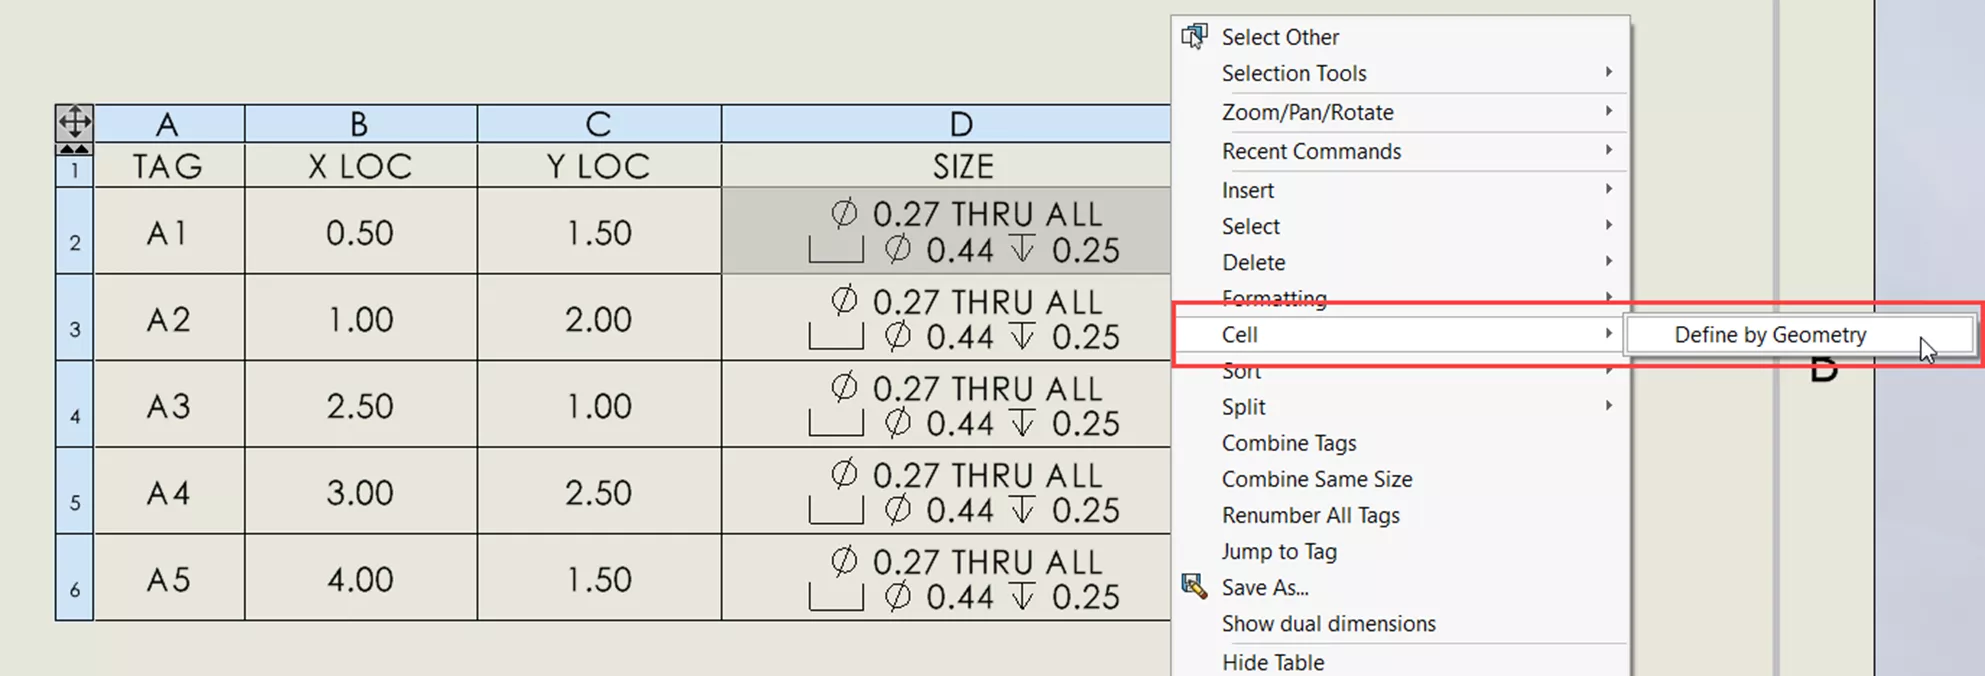
There are two options to define what is listed in the size column. It will either go by geometry or by Hole Wizard callout information for Hole Wizard holes. If you have Hole Wizard holes and want to show or hide the additional information, this can be changed by right-clicking on one of the size cells, then going to Cell, and choosing whether to define by geometry or the Hole Wizard.
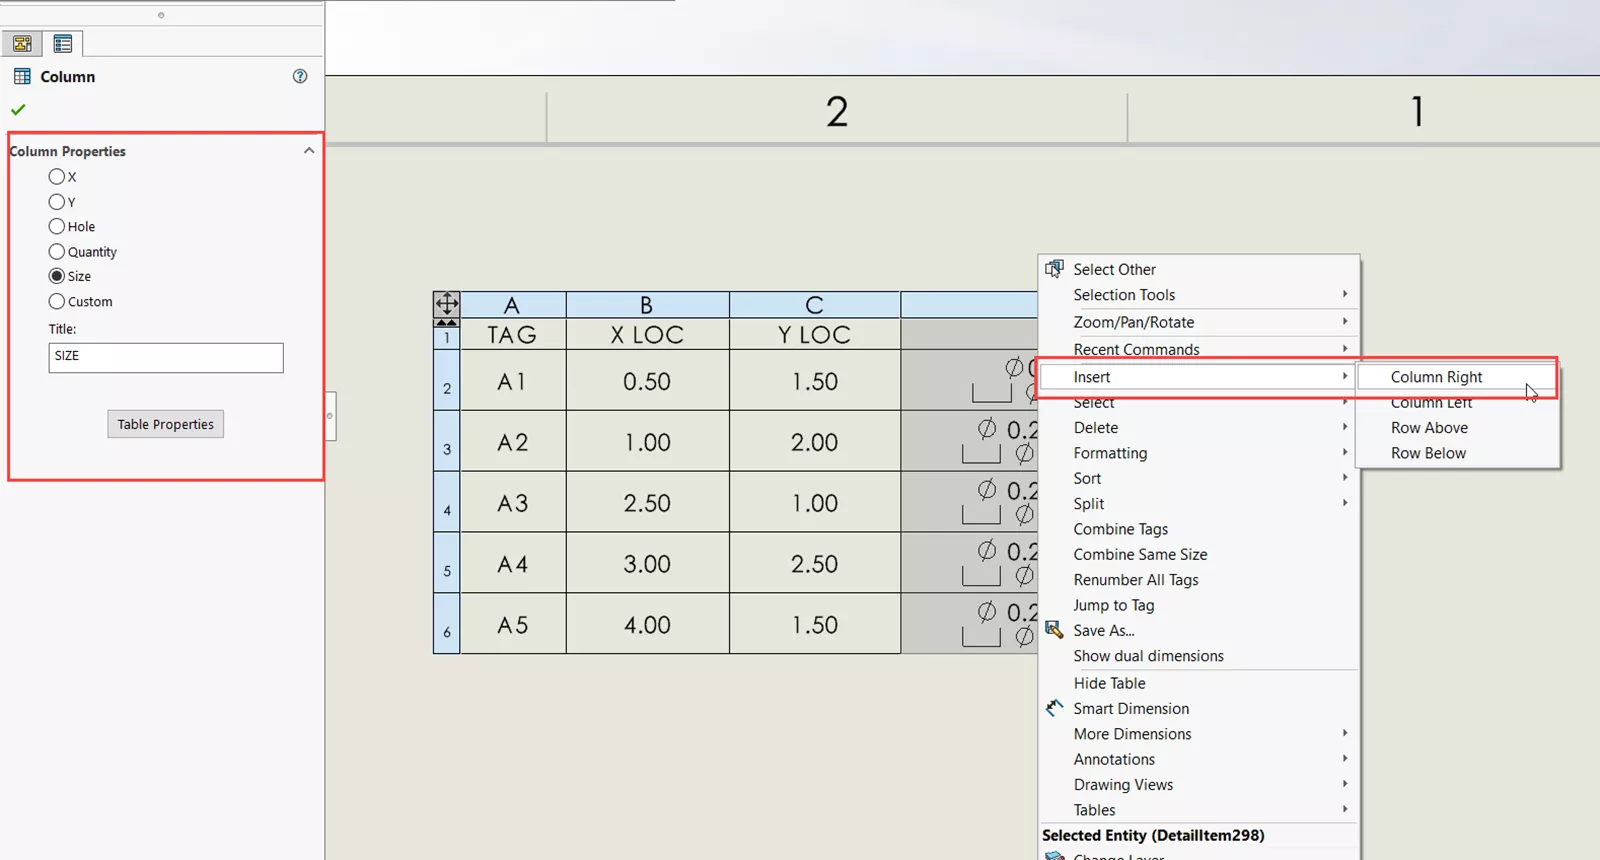
Other columns can be added to include more information. Right-click on a column and go to Insert > Column Right (or Left). Then, on the left-hand side of your SOLIDWORKS screen, the Column PropertyManager will appear and you can choose what you want the column to be.
As we can see, hole tables are an effective and clean way to display hole size and position data all without adding extra clutter to your drawings.
Want to learn more about SOLIDWORKS Hole Tables? Check out the articles listed below. Additionally, join the GoEngineer Community to create forum posts, enter design contests, and answer questions from other SOLIDWORKS users.

SOLIDWORKS CAD Cheat Sheet
SHORTCUTS ⋅ MOUSE GESTURES ⋅ HOT KEYS
Our SOLIDWORKS CAD Cheat Sheet, featuring over 90 tips and tricks, will help speed up your process.
Related Articles
SOLIDWORKS Hole Table Callout Options
SOLIDWORKS Design Tables Made Easy
How to Use SOLIDWORKS Fully Define Sketch

About Tashayla Openshaw
Tashayla Openshaw is a SOLIDWORKS Technical Support Engineer based out of our Headquarters in Salt Lake City, Utah. She earned her Bachelor’s degree in Mechanical Engineering from the University of Utah in 2018 and has been part of the GoEngineer family since February 2019.
Get our wide array of technical resources delivered right to your inbox.
Unsubscribe at any time.