Display SOLIDWORKS Sheet Metal Surface Area in Your Bill of Materials
Customers have asked me if it is possible to show the total surface area of a SOLIDWORKS sheet metal part in a Bill of Materials to calculate how much material was being used. In this tutorial, I'll demonstrate where this information is stored in the part file Cut-List Properties, and how to display it in your Bill of Materials (BOM).
Additionally, you'll learn how to create a Custom Property that will display this information and how it can be used.
Why not use the Cut-List Property Surface Area?
If you examine the Cut-List Properties of the sheet metal part, you will find a Property called Surface Area. (Figure 1) Your initial reaction may be to use this value as your total area of the flat part.
The catch is that this Property is the sum of all surfaces or faces of the part and is not an accurate representation of the total flat pattern surface area.
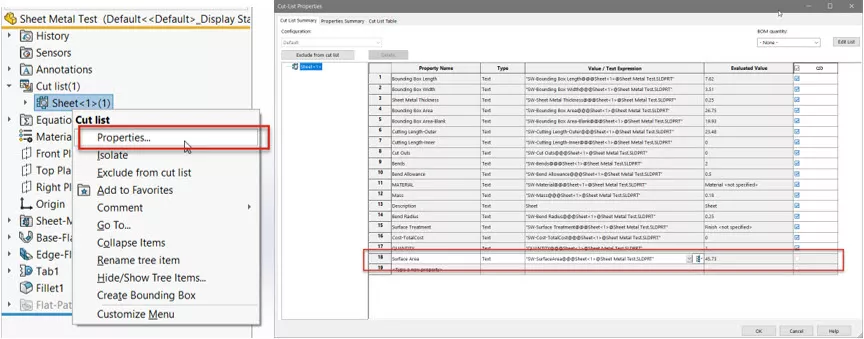
Figure 1. Cut-List Properties and Surface Area Property
If you were to go back to the list of properties in the cut list, there are two Cut-Lst Properties that we can use to calculate the total surface area of the flattened part. (Figure 2)
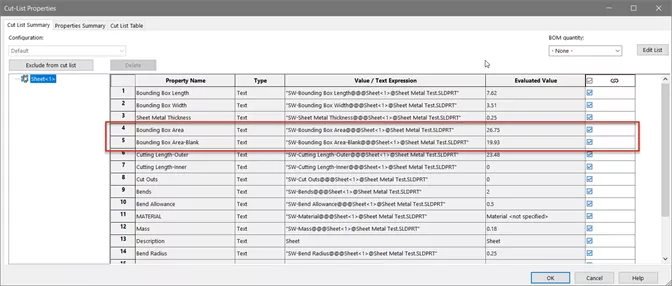
Figure 2. Bounding Box Area and Bounding Box Area-Blank
- Bounding Box Area – The calculated value of the overall flat pattern of the part (bounding box).
- Bounding Box Area-Blank – The empty space of the bounding box not filled in by the sheet metal body.
So, how do we calculate the Total Surface area of the part?
There are two methods to show the surface area of the part using the Cut-List Properties listed above.
Indented Bill of Materials
To use the Cut-List Property, you will need to first create an Indented Bill of Material. (Figure 3)
Select Indented and the No numbering option.
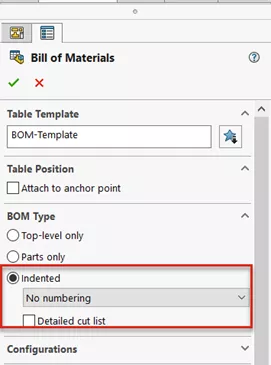
Figure 3. Indented Bill of Materials without numbering
In the Indented Bill of Materials, right-click on the Column Heading and select Insert > Column Right. (Figure 4)
You will see the two Custom Properties: Bounding Box Area and Bounding Box Area-Blank.
Select Bounding Box Area.
Right-click again and add a column to the right, using Bounding Box Area-Blank.
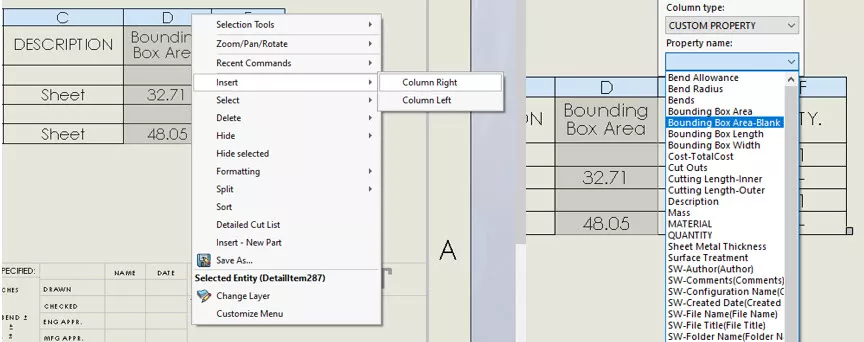
Figure 4. Add columns for Bounding Box Area and Bounding Box Area-Blank
To calculate the total surface, we need to add a third column (Figure 5) in which we can add equations to calculate the desired total surface area.
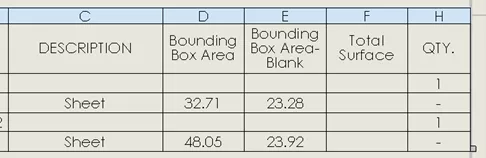
Figure 5. Add a third column for the Total Surface of each part
Select a cell and click on the equation symbol (∑).
In the Table Equation Editor (Figure 6), click on the two cells to be used in the equation. In this case, (Total Surface) = (Bounding Box Area) – (Bounding Box Area-Blank).
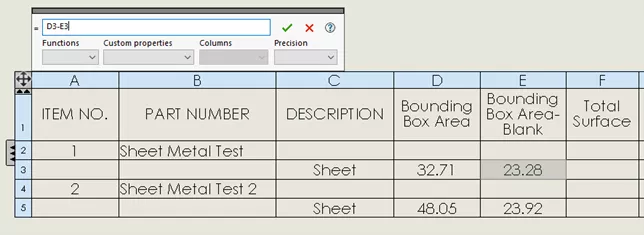
Figure 6. Using Equations to determine the actual Total Surface of the flattened part files.
If you wish to show only the Total Surface, select the two columns for the Bounding Box Area and Bounding Box Area-Blank, right-click and select Hide Selected (Figure 7) to clean up the Bill of Materials and focus on just the desired data.
You can also add a row at the bottom of the Bill of Materials and add an equation to show the Total Surface Area of all parts.
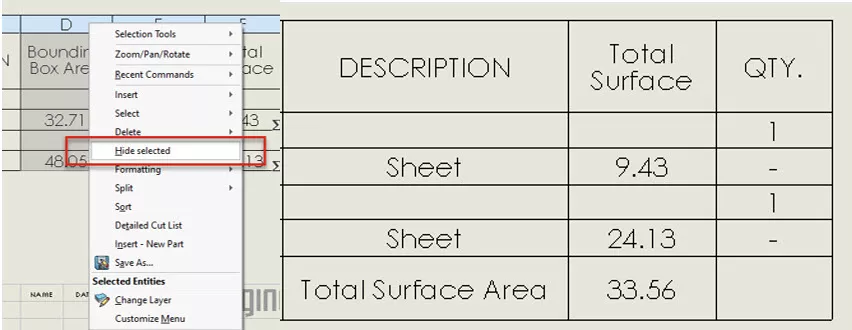
Figure 7. Hiding the extra columns and creating a Total Surface Area value.
BONUS: How to turn a Cut List Property into a File Custom Property?
If you don’t want to go through the process of creating an Indented Bill of Material, you can add the Cut-List Properties to your Part template.
Start with a blank Part file and go to File > Properties. (Figure 8). Create the two Properties; Bounding Box Area and Bounding Box Area-Blank. For the value of the two properties, you will enter the syntax used in the Cut-List Properties for each.
- “SW-Bounding Box Area@@@Sheet<1>@Part1.sldprt”
- “SW-Bounding Box Area-Blank@@@Sheet<1>@Part1.sldprt”
Click OK to close the Custom Properties and return to your blank part file.
Next, click File > Save As and change the file type to Part Template (.prtdot).
If you wish, you can save this as a new Part Template file for Sheet Metal Parts or override your existing Part File Template depending on your organization's Document Standards.
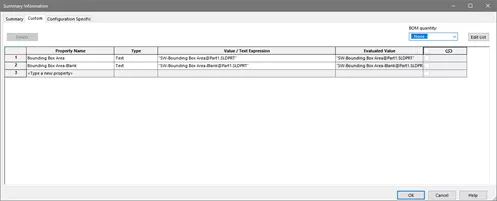
Figure 8. Creating File Custom Properties using Cut-List Properties
As you can see in Figure 9, the Bill of Material can be more compact simply by creating Custom Properties instead of using the Cut-List Properties.

Figure 9. Bill of Materials (non-indented) with Cut-List Properties displayed as Custom Properties
I hope you found this tutorial helpful. Learn more about this topic and others below.
More SOLIDWORKS Tutorials
Linking a Custom Cut-List Property to a SOLIDWORKS Drawing Balloon
SOLIDWORKS Cut List Properties: Where Do They Come From?
Showing Cut List Item Names in a BOM SOLIDWORKS Tutorial
SOLIDWORKS Sketch Text Tool Overview

About Brad Hakeman
Bradley Hakeman is an Application Engineer at GoEngineer. When he isn’t helping customers with their SOLIDWORKS related challenges, he is keeping up on the latest features of SOLIDWORKS. In his spare time, he’s trying to sort out his kids’ soccer schedules and working on household projects, many of which were designed in SOLIDWORKS. Most recently, he has taken up woodturning, currently focusing on pen making.
Get our wide array of technical resources delivered right to your inbox.
Unsubscribe at any time.