Recommended EPDM User-Controlled Settings
This document is a compilation of GoEngineer best practice recommendations for settings that we believe every user should be aware of and set for themselves on ‘day 1’ when initially beginning to use SOLIDWORKS Enterprise PDM (EPDM).
The use of the term user-controlled (in this context) refers to a variety of local environmental settings that affect the behavior of the EPDM client, and specifically, those settings that cannot be centrally managed or enforced globally by a vault administrator, thus the term ‘user-controlled’.
In other words, these are the key settings that users are individually responsible for on a per/machine basis.
What this article will cover
- Display Options
- Set focus to Active Configuration (Turn off)
- Show full UI in SOLIDWORKS preview (Turn on)
- Include SOLIDWORKS Simulation results in Check-In (Turn off)
- Windows Folder Options
- Navigation Pane (Turn on)
- Details display mode (all folders)
- Hide extensions for known file types (Turn off)
- Column Displays
- Contains (customize)
- Where Used (customize)
- Check In/Out (customize)
- Change State (customize)
- Within SOLIDWORKS
- EPDM Add-in Options > Prompt to checkout... (Turn off)
- SOLIDWORKS System Options> Don’t prompt to save... (Turn on)
1. Display >O ptions>
Within an EPDM File view folder (Windows Explorer UI) users will find a drop-list style menu bar called the Enterprise PDM menu bar. This menu contains choices for Actions, Modify, Display, Tools, and Search (magnifying glass). The three options we are interested in here are in the Display > Options menu:

Display > Options > Set focus to Active Configuration
This Setting is on (checked) by default and is typically good to turn off (uncheck). This setting affects the behavior of the data card configuration tab focus and causes the card (when checked) to always adjust to the active configuration tab when selecting a SOLIDWORKS part or Assembly.
Usually, it’s preferred to keep the focus on the ‘@’ tab which represents the CustomProperty block data. Once turning this off, the same tab will be kept (i.e. @) from file to file. Play with this setting to see which tab focus you prefer.
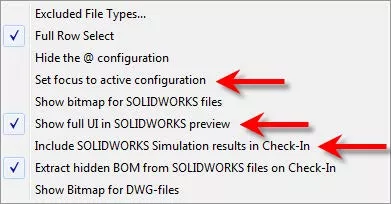
Display > Options > Show full UI in SOLIDWORKS preview
This Setting is off (unchecked) by default and should be turned on (checked). This setting affects the behavior of the preview tab and will enable the preview tab when showing eDrawings previews for CAD files. This setting turns on the eDrawings preview toolbar, which includes pan/zoom type of controls, as well as markup and measure tools for viewing redlines and dimensions.

Display>Options>Include SOLIDWORKS Simulation results in Check-In This setting is on (checked) by default and should typically be turned off (unchecked). This setting affects the behavior of the check-in dialogue for SOLIDWORKS parts and assembly models that contain simulation study information.
When on, it will try and include external study results as file references in the same way as an assembly would look for part files as references during check-in. It does this to show associativity between the model and the results data.
Typically though, it’s not a good idea to actually store Simulation study results (CWR) data in the vault. Often times the results files are lost or not available to the user checking in the files, and depending on user permissions this condition may entirely block the assembly or part from being checked-in when the results are Not Found. It’s best practice not to include results, so turning off this setting will tell the check-in to not look for them and ignore them.
2. Windows Folder Options
Because the EPDM UI embeds itself with the Windows Explorer environment for its vault browser and cache folder interface known as a File View, there are native Windows Explorer Folder settings that can be modified to optimize the vault interface for Windows.
The three settings we’ll highlight are found in the Folder Options dialogue.
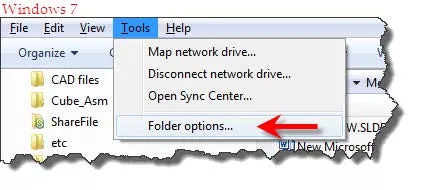
The process for opening a Folder Options depends on the operating system.
- For Windows 7, press the ALT key to expose the Windows Tools menu and then select Folder Options...
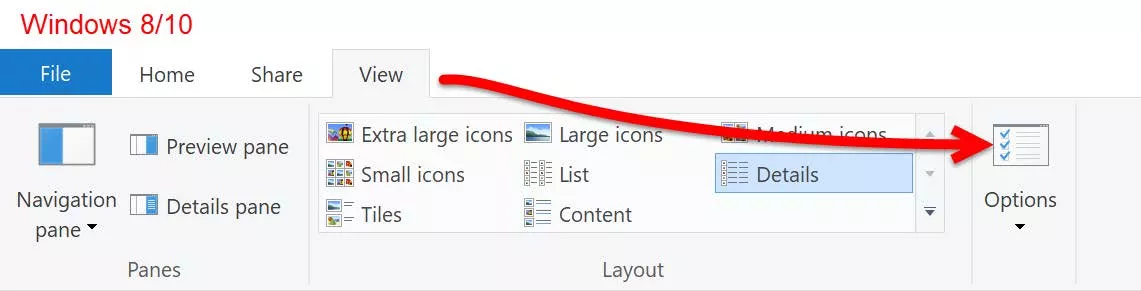
- For Windows 8, the selection is View > Options > Change folder and search options. These are settings that could be controlled by Windows Group Policy and so would be amenable to being controlled centrally by the IT dept via the domain, but most often these are left to the local user’s discretion, and typically are set contrary (by default) to these recommendations.
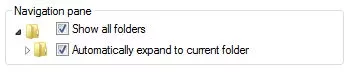
Folder Options > General > Navigation pane settings
In Windows Explorer, the navigation pane settings for Show all Folders and ‘Automatically expand to current folder’ are typically off (unchecked) by default. For EPDM, it’s good to encourage the use of the navigation pane in general (for efficient folder navigation) and these settings will cause the navigation pane to perform more optimally for this purpose. Turn these options both on (checked) Respectively: these settings will cause the navigation pane to show any available subdirectories at the current folder level, and then also cause the navigation pane to keep up with folder navigation from within the file view (otherwise the navigation pane stays static).
Folder Options>View>Folder views>Apply to Folders
Because EPDM makes use of Windows column information to display file meta-data (e.g., Checked Out By, workflow status, Description, Revision, etc.) it is vital that the vault folders always be viewed in Details view display mode (as opposed to Icons or Tiles, etc.).
Many users find that they set Details view mode one day but the next time they access the vault the folders revert back to another nonpreferred display mode. EPDM occasionally seems not to remember the view setting preferences from one session to the next.
The secret to enforce Details on all folders in the vault is to:
- Navigate one folder level up from the root file view blueberry folder (which is usually up to the C:\ drive root folder)
- Make sure this folder is displayed in Details mode: 3.) open the Folder Options dialogue/View tab
- Press the button labeled Apply to Folder’ and then
- Yes to the prompt: “Do you want all folders to match [these] view settings”. This enforces the current folder’s display style on all subdirectories. Since the EPDM file view folder is a subdirectory, it will now permanently remember to use Details view mode.

Folder Options>View>Advanced Settings>Hide extensions for known files types
This is another classic Windows setting (above) in Folder options that is turned on (checked) by default. Turn off this setting to ensure that the full file name (including extension) is always displayed even for recognized files types. It is always best practice to display the full file name (including extension) in the name column of Windows Explorer. Once turned off in order to have this setting take effect usually requires ending the explorer process and restarting from a Task Manager, or rebooting the machine.
3. Column Displays
There are a number of column view displays used within the EPDM environment. Some of these are centrally controlled administratively (e.g., BOM, Details view, and Search results columns) however, many of the column sets are now accessible and solely within the users’ purview to control, configure and optimize (e.g., Contains, Where Used, Check-In/Out, and Change State UI’s).
For these column sets, users are able to add/subtract to and from the available columns as desired. To configure these column views, the process is the same across all of these contexts. For this example, we’ll look at modifying the Contains tab report.
To modify the columns here is a very intuitive process: simply navigate to an assembly (or really any file), select it from the file view, and then go to the Contains tab. Within the Contains report, information is presented in a series of default columns:
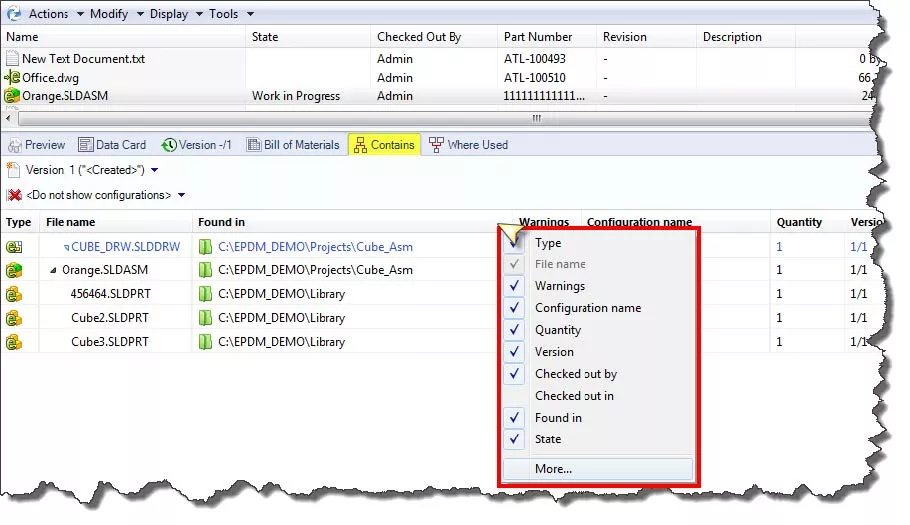
To add or subtract columns from the default set, right-click anywhere on the column header bar to see the available column list.
Select More... at the bottom of the list to add columns based on file data card property information. A great setup practice would be to keep the default set in place and add to it any key universal document identifiers (e.g., Description, Part Number, etc.) to help more easily identify the records shown within the report.
This is also a good opportunity to take a moment to thoughtfully re-order the columns (drag/drop) to arrange them in a preferred order. For example, moving Found in (on the end by default) to the left side next to the File name column is always useful. The same procedure can be repeated and applied similarly to the Where Used, Check-in/Out, and Change State dialogues. Modify these as well as you come across them in daily use.
4. Within SOLIDWORKS
EPDM Add-in Options
When using the EPDM Editor license within the SOLIDWORKS CAD software, CAD users have access to an additional EPDM interface called an Add-in.
By default, this add-in is accessed via a tab/toolbar on the right-hand side of the Window called the Task Pane.
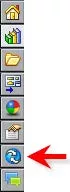
The EPDM add-in is easily identified by the blueberry PDM icon tab.
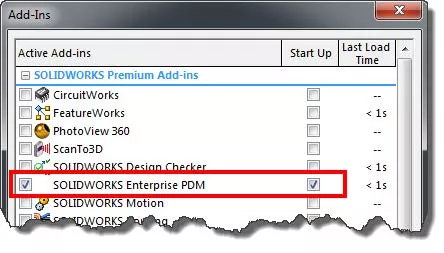
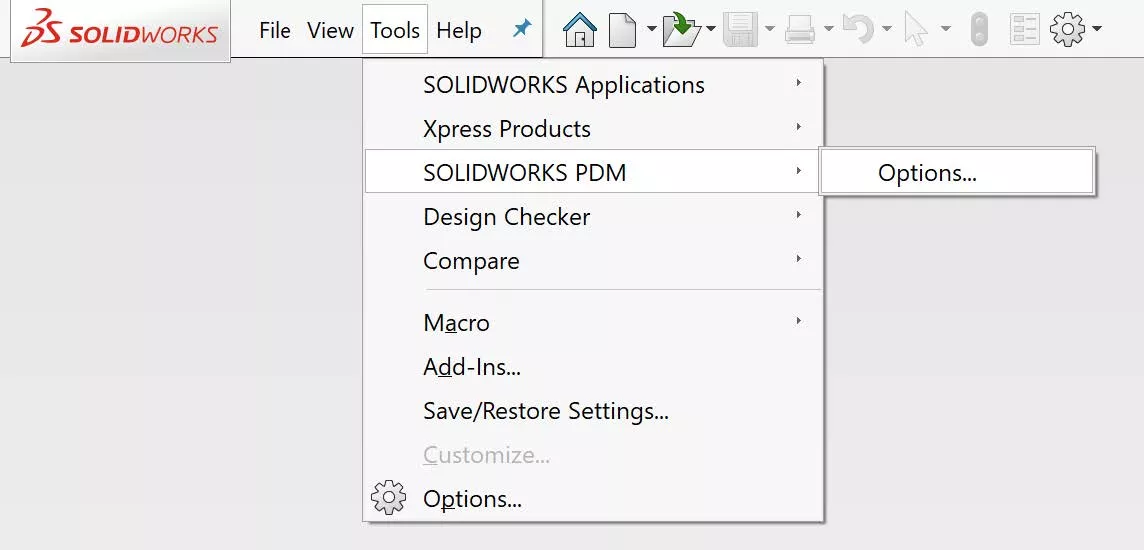
If the add-in is not available make sure it is turned on within the SOLIDWORKS Add-in menu (above). When the Add-in is on, this adds an additional EPDM menu on the SOLIDWORKS main menu bar at the top of the SOLIDWORKS Window. Select Tools\SOLIDWORKS PDM and then Options... from the menu. This will open the EPDM Add-in options menu.
Except those settings labeled as Vault Settings, these options are all local user-specific settings that affect the behavior of the add-in. The Vault Settings in contrast are global settings that must be set centrally by an administrator.
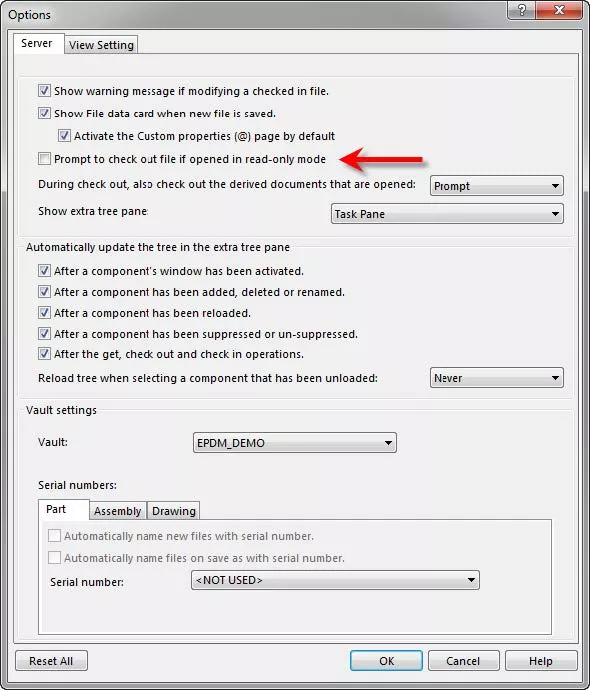
Of all the user-controlled settings within this dialogue, none of them typically warrant particular attention nor should be changed from their default settings (in most common situations) except the 4th check box from the top, Prompt to check out file if opened in read-only mode. This option is inappropriately turned on (checked) by default, and this is an important setting that should be turned off (and left off) in most instances. This setting causes a checkout dialogue prompt when opening read-only vault documents in SOLIDWORKS.
In a PDM system, it is a normal condition to be opening read-only documents (in fact this is one of the primary functions of PDM - to present most stuff to users as read-only).
In contrast, the primary reason the add-in exists is to allow users the ability to checkout files within SOLIDWORKS as needed anytime (permissions permitting). Therefore it’s both unnecessary and undesirable to prompt for checkout when merely opening files. This will cause inattentive users to inadvertently check out many more files than they intend or need to checkout (sometimes thousands more files than intended).
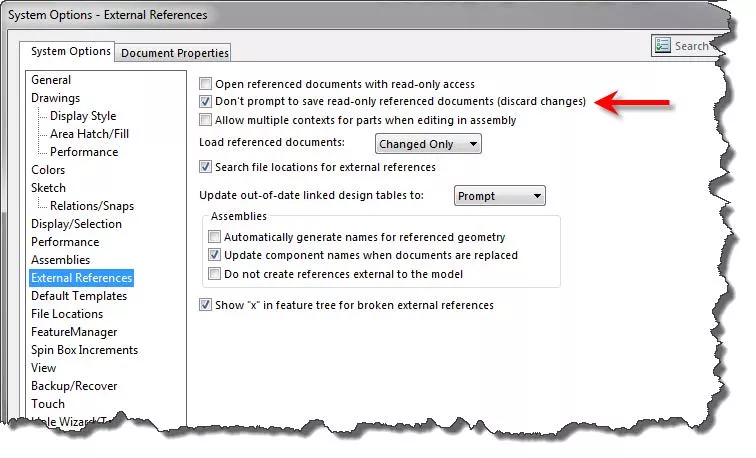
SOLIDWORKS System Options>External References
SOLIDWORKS has a number of System Options settings that control a multitude of behaviors within the CAD environment. In concert with the recommended Add-In setting (above) regarding opening read-only files, this SOLIDWORKS setting deals in a similar vein with the behavior expected when saving parent files referencing read-only components.
Given that this is PDM we’re talking about, most of the components in an assembly will typically be left read-only during the design process (as items are only checked out if they need to be directly edited). Thus we want SOLIDWORKS to ignore read-only reference files and not prompt to save-as for all the read-only components. This setting is typically off (unchecked) by default, and it’s recommended to turn it on (checked) for use with EPDM.
SOLIDWORKS System Options can be pushed out to all users uniformly using the SOLIDWORKS Copy Settings Wizard or direct registry updates. If that is the case, this setting should be turned on for all SOLIDWORKS users with access to EPDM.
More SOLIDWORKS PDM TUTORIALS
How to Set Up Dynamically-controlled Card Lists in SOLIDWORKS PDM
SOLIDWORKS PDM and SQL Server Performance Considerations
New SOLIDWORKS PDM Column Configurations
SOLIDWORKS PDM Web2 Guide: Server Setup, Accounts, Application Pools & Testing
![]()
About GoEngineer
GoEngineer delivers software, technology, and expertise that enable companies to unlock design innovation and deliver better products faster. With more than 40 years of experience and tens of thousands of customers in high tech, medical, machine design, energy and other industries, GoEngineer provides best-in-class design solutions from SOLIDWORKS CAD, Stratasys 3D printing, Creaform & Artec 3D scanning, CAMWorks, PLM, and more
Get our wide array of technical resources delivered right to your inbox.
Unsubscribe at any time.