SOLIDWORKS MBD Custom 3D PDF Template Tutorial
The SOLIDWORKS Model Based Definition (MBD) add-in includes the capability to generate 3D PDFs of parts and assemblies created in SOLIDWORKS. 3D PDFs can be opened with the standard, free Adobe Reader program and contain 3D Views and Product Manufacturing Information (PMI). This article is a companion to this video, which walks through creating and using custom 3D PDF templates by modifying default templates included with SOLIDWORKS MBD.
Using the 3D PDF Template Editor
In order to publish 3D PDFs, you need the SOLIDWORKS MBD add-in. With it, in the MBD tab of your CommandManager, you will see a button for 3D PDF Template Editor. Clicking it opens the 3D PDF Template Editor application.

Figure 1. 3D PDF Template Editor button location in MBD tab
You can make a template from scratch, but this article and its associated video tutorial will focus on modifying an existing, default template.
To do this, start by selecting the Open button. If you do not see 3D PDF templates initially, you may need to use the Browse button to select the default location: C:\Program Files\SOLIDWORKS Corp\SOLIDWORKS\data\themes
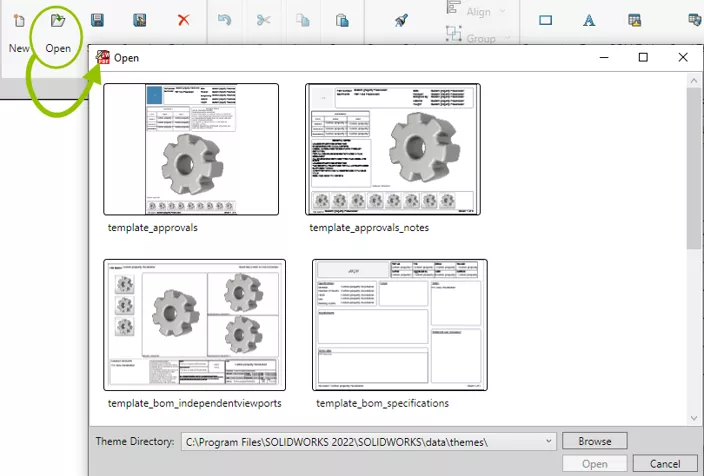
Figure 2. Open dialogue in 3D PDF Template Editor
In the following example screenshots, we will be editing the template_bom_independent viewports template.
To delete views, text fields, and rectangles, left-click to highlight them, then press the Delete key on your keyboard. Similarly, to change the size of views, text fields, and rectangles, click to highlight them, then click and drag their edges.
The Thumbnail Carousel is associated with the Primary Viewport. Thumbnails act as navigation buttons that allow you to switch between default standard views. Clicking and dragging the border of the Thumbnail Carousel changes how many thumbnails are displayed. When a 3D PDF is generated, if the Thumbnail Carousel is too small to display all the Primary views, users will be able to scroll through them.
The Rectangle tool makes a rectangle. After selecting Rectangle, left-click to place it then click and drag the border to change its size.
Left-clicking the rectangle again will pull up the Insert Rectangle flyout. Here, you can change the thickness and color of the border, the color of the fill, and set a corner radius.

Figure 3. Insert Rectangle flyout dialogue
In the bottom left corner of the template editor, you'll see tabs that list existing pages and the option to add more. Many of the default templates include multiple sheets.
If you are creating a custom 3D PDF template by opening and modifying an existing one, check to see if there are extra pages and use the red X to delete them if you do not need or want them.
You can place text boxes by left-clicking after clicking the Text button.
There are four types of text:
- Text Fields
- Template Text Fields
- Custom Property Fields
- PDF Form Fields.
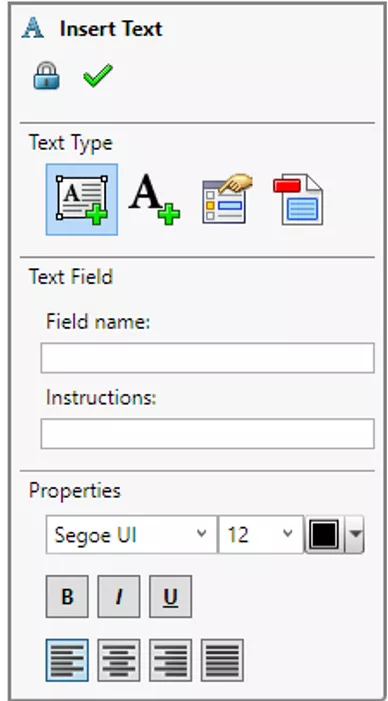
Figure 4. Insert Text dialogue with Text Type set to Text Field
Text Fields are spaces for text entered by the template-user as the 3D PDF is being generated. When publishing a 3D PDF using a template that includes a Text Field, you will have an option to enter text that will appear in that Text Field. When inserting a Text Field, you can give it a name and add instructions to indicate to the template-user what kind of information they should enter.
Template Text Fields are fixed blocks of text. What you enter in a Template Text Field in your template will appear in a published 3D PDF.
Custom Property Fields reference specific SOLIDWORKS custom properties in your model. When a 3D PDF is published, Custom Property Fields are populated by the values of the custom properties they reference. If you're editing a default template, check the existing Custom Property Fields to make sure they're referencing custom properties that exist in your models. The name entered needs to be the same in order for the link to work.
PDF Form Fields create fields that can be filled in after the 3D PDF is created when it’s opened in an Adobe Reader.
Saving and Using a Custom 3D PDF Template
The default PDF template location is read-only. Instead of attempting to save there, create a new folder in a location to which you have full read-write access. The added benefit of this workflow is that this custom location will never be deleted or cleared out by uninstalling or upgrading SOLIDWORKS.
Add this folder to System Options > File Locations > 3D PDF Themes in SOLIDWORKS so that your customized templates will automatically be available when you're publishing to a 3D PDF and you will not need to browse for them.
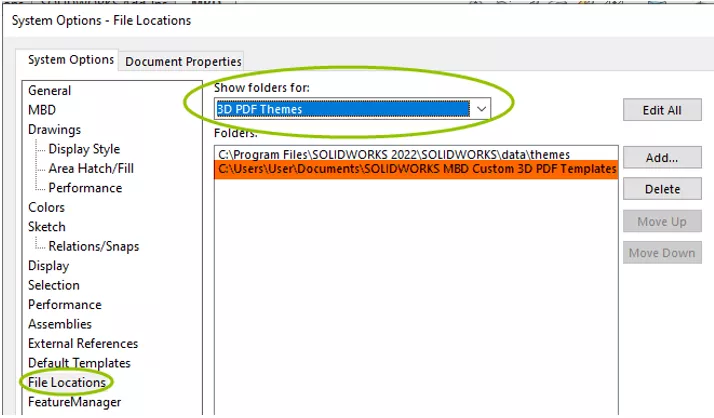
Figure 5. SOLIDWORKS MBD File Locations System Options page with an example custom 3D PDF template location
In the 3D PDF Template Editor, select Save As. In the Save As dialog that opens, browse to your custom template folder and select it. Then give your template a name and save it.
To use your new 3D PDF template, return to SOLIDWORKS and click on the Publish to 3D PDF button in your MBD CommandManager tab. This activates the Publish to 3D PDF PropertyManager. If Publish the 3D PDF is greyed out, make sure that you've used the Capture 3D View command to create 3D Views of your model.
The Primary & Thumbnail Views section of the PropertyManager determines which views will be in the Primary Viewport and Thumbnail area.
To add views, click in the selection box to highlight it, then click on 3D Views in the 3D Views tab. The first view in the list will be the one initially visible in the Primary Viewport. Which views will appear in Independent Viewports are set in the Independent Viewport section. The Custom Property Fields section lists the names of your Custom Property Fields and to which SOLIDWORKS Custom Property they're linked.
If you created a Text Field, the Publish to 3D PDF PropertyManager will include a Notes & Text Area section where you can fill those fields out. If your 3D PDF template includes multiple sheets, use the Next and Back arrows at the top of the PropertyManager to switch between pages.
Clicking the green check opens a Save As window where you can specify where your 3D PDF will be created.
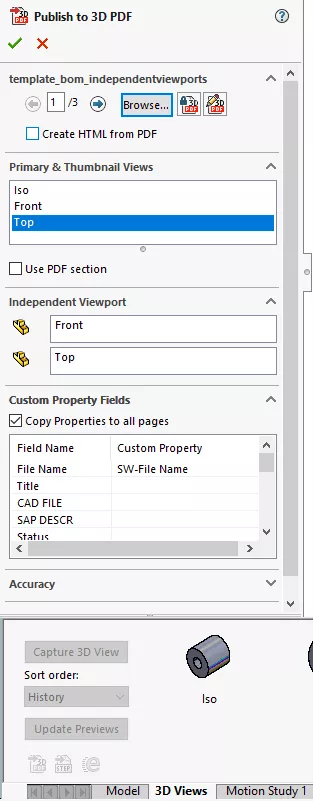
Figure 6. SOLIDWORKS MBD Publish to 3D PDF PropertyManager and 3D Views tab
I hope you found this tutorial helpful. Check out more SOLIDWORKS tutorials below.
More SOLIDWORKS Tutorials
SOLIDWORKS Path Mate Motion Analysis Tutorial
SOLIDWORKS Sheet Metal Gusset Tool Tutorial
Using the SOLIDWORKS Temporary Fix/Group Command
Easy Ways to Model a Wye Pipe in SOLIDWORKS

About Lauren McGarry
Lauren McGarry is a Certified SOLIDWORKS Expert based out of San Diego, California. She earned her Bachelor of Science degree from Case Western Reserve University and has been with GoEngineer as a Technical Support Engineer since 2016.
Get our wide array of technical resources delivered right to your inbox.
Unsubscribe at any time.