Using PDM Templates Inside SOLIDWORKS
PDM templates have the power to radically change how files are created. In this article, we'll demonstrate how we can use templates to create folder structures and files from existing templates inside of PDM and SOLIDWORKS, using inputs to create a semi-intelligent part number system. Gathering all of this information at once reduces the number of manual clicks and keystrokes otherwise needed.
PDM Templates take input through various means. The most efficient method would be through a data card. We design these data cards as we would any other data card in the admin tool.
Quite often, if we are going to capture data for a SOLIDWORKS file we can borrow and save the existing data card as a Template card. In the example below, we’ll walk through using an existing data card for SOLIDWORKS parts to capture data and intelligently name the file.
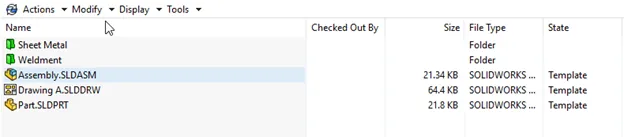
Start by deciding what to use as a template. In my vault, I have a set of SOLIDWORKS files with my custom properties and units defined as I like to use them. I store them in the vault, as this is a requirement for PDM templates. Here I have a SOLIDWORKS Part and a SOLIDWORKS Assembly as well as some other things. We’ll need the part going forward for the example.
We also need to determine what information about this file we want to capture and place in its data card. We’ll start by looking at the data card for SOLIDWORKS files.
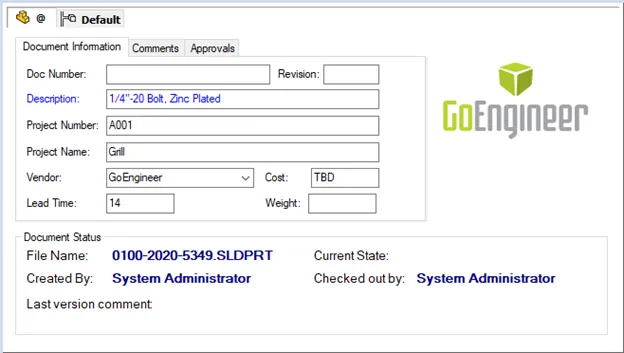
We can see that a few of these fields will be driven by the model (weight) or PDM (revision). We can also trim out the status information, as this will be a new part and so won’t need this information collected. Taking some of these fields out leaves us with a cleaner card with only the inputs that we’d like to consider for a new file.
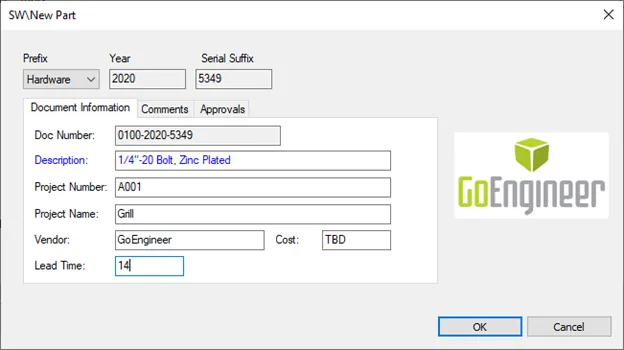
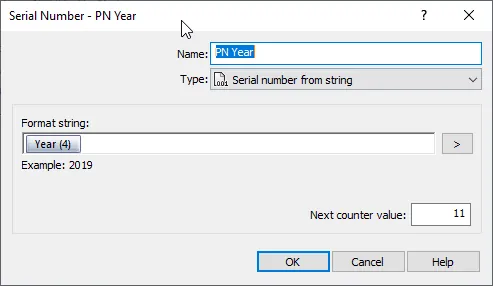
We’ll also make an addition to this card to capture some new information to build a file name and part number. Begin by creating new variables. My part number will be three segments long, so I’ve created three variables to match the prefix, body, and suffix. Two of these fields will be driven by serial numbers – a serial number to keep track of the year and a serial number to keep a count of parts I’ve created. The serial number for the year may not seem like it needs to be a serial number, but currently, we lack a special value of just a year in our data card creation.
We’ll use this to handle this field that should update on its own, in the long run, the specific value for this serial won’t matter. The year will be our part number’s middle section.
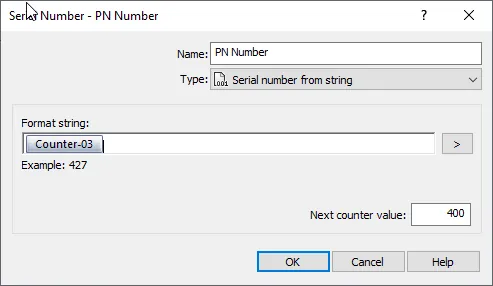
The serial number to count has just been configured as a serial with two leading zeros. This will be the part number’s suffix.
For the prefix of the part number, we can create a list to get intelligence about what the part number may mean. For this example, we’ll even use an aliased list so that the prefix number values won't need to be known by the end-user.
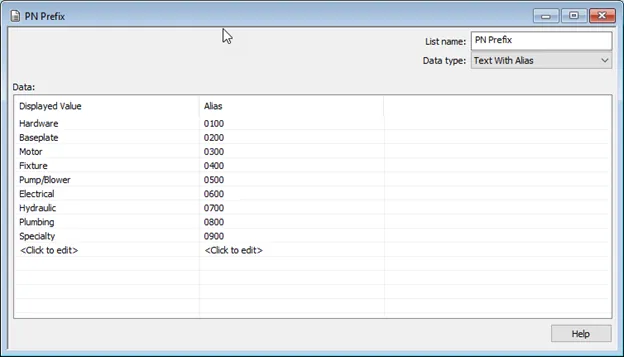
Setting this up is simple and only requires typing out these values. Any values can be created and chosen here. If we don’t need to use an alias list, a normal or SQL list would work as well. Using SQL we could potentially be pulling this information from another piece of software such as an ERP/MRP.
With our part number pieces available to us, we need to put them on the data card and then put them to use.
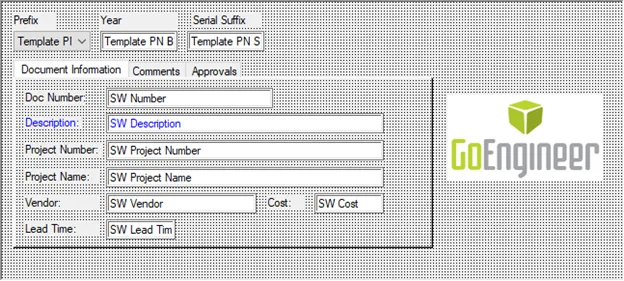
In the data card editor, we’ve placed three fields across the top. For the prefix, I’ve used a list; for the body and suffix, a text box will work.
The text boxes we will want to make read only so that no one is changing our serialized values before the file can be created.
We may be inclined to attempt to set a default vault to the prefix list. If using an aliased list, this will cause some problems in generating part numbers automatically. In that case, we suggest simply making that variable mandatory so that a user cannot click OK without setting the value.
In the Number field, we should use the input formula to concatenate the components of the part number and set it to read only. This will calculate our serial based on our selections and pass it along to name the file.

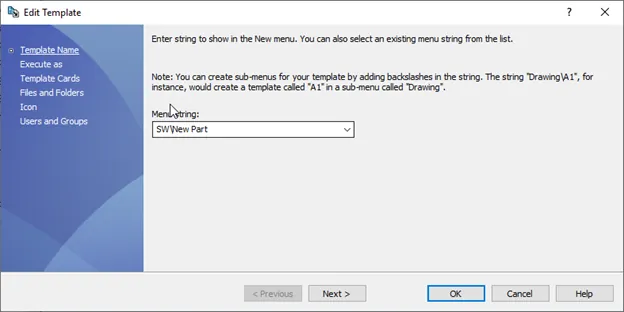
Our data card is all set, now it's time to create the PDM template itself. The first page of the template wizard is related to what we’d like to see as our menu option in the right-click menu of the vault. There aren’t any restrictions on this and it can be whatever works best for you.
Depending on the permissions of the users executing this template, we may need to decide to have this template executed as a specific user on the “Execute As” page. We can use this in scenarios where we may also want to create folders, but normal users do not have that permission. Putting Admin credentials in would allow them to create the folders – but only through this template.
On the template card page, we will add the template card that we created for this purpose.
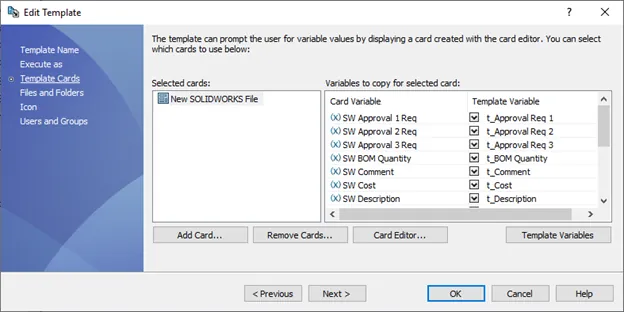
We will see a list of variables that are available on the card, ready to capture data. The next steps are to create a place to put that data in the template. We do this by pressing the Template Variables button. We are confronted with a dialog to create variables with various methods of input.
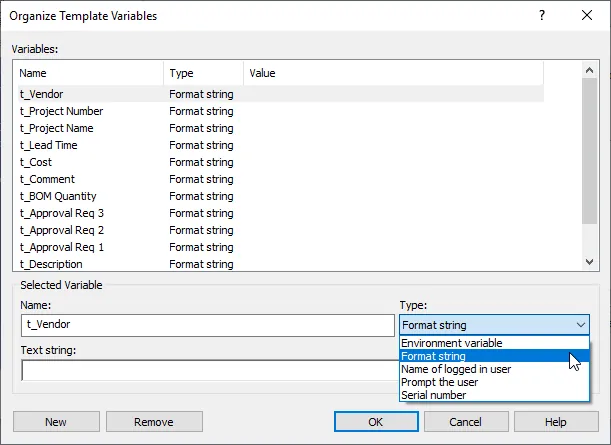
In most cases, we’ll want to use Format String that lets us take data from the card. If we don’t need a data card because we are only collecting a single item, Prompt the user may be a good option.
In the dialog, create a variable for each piece of data wanted on the data card. I don’t want to capture my prefix, body, and suffix separately so I will not be making variables for them. It’s also recommended that you name them in a way to distinguish them from normal variables - it’s not necessary but helpful. Here I’ve added a “t_” to all the names. Set these to Format string and click OK.
Back in the wizard, go through the list on the right side and select the correct template variable for the data card variable from the drop-down (skipping any we don't want for the final file). The screenshot above shows what this should look like when all the values are mapped.
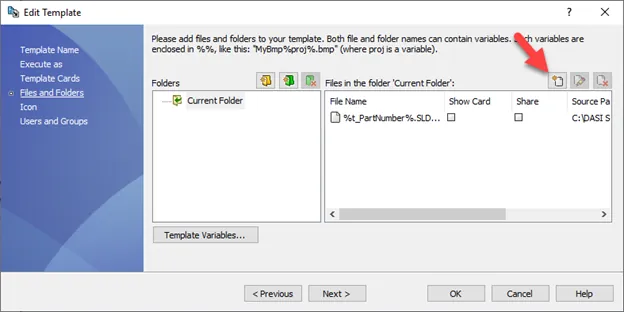
On the File and Folders page, we can determine a folder structure and what files we are adding.
We don’t have to do both. PDM Templates can create a folder structure alone, or if we do not specify a folder structure for a file, it will place it wherever we have performed right-click > New. Here I have added my SOLIDWORKS file from the first few steps. Add files by clicking the New File button and browsing to the file.
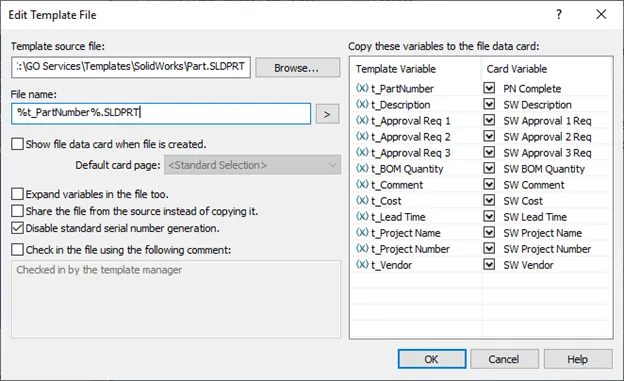
Since we are generating our serial numbers in the template card, we will need to disable standard serial number generation for this file. We will also be renaming the file according to our Part Number variable that we created. We include variables in the file names by enclosing them in ‘%’ as shown above. We can then also map any variables we have picked from the template card into this file. Click OK when finished.
To use this template inside of SOLIDWORKS, one important setting must be performed. On the next page of the wizard, we can set an icon to show in our right-click menu. If we choose a SOLIDWORKS file type (e.g., .SLDPRT) it will show in our New File menu.
![]()
The final page is for user and group permissions. Check all groups and users that you would like to be able to use this template.
The template is now complete and ready to be used in PDM. If you would like to use this in SOLIDWORKS, you must first right-click and use it one time in PDM. This caches the information for use in SOLIDWORKS. The templates will show on a SOLIDWORKS PDM tab. When selected, they will prompt for a location in the vault to place the file and give us the data card to make our selections.

Expand Your SOLIDWORKS PDM Skillset
Sharing Your SOLIDWORKS PDM Vault without Sharing Licenses
Enabling the SOLIDWORKS Administration Tool Shortcut
How to Move Files to a New Workflow in SOLIDWORKS PDM

About Bryce Hooper
Bryce has been using SOLIDWORKS since 2008 in multiple roles across multiple industries from industrial vacuum to RV frame design. He spent many of those years spent as a PDM administrator, implementing 3 PDM vaults along the way. He earned his CSWP in 2019, followed by his CSWE in 2013. Programming is a passion that has followed Bryce through his various positions, writing custom business applications to improve design processes. In his spare time Bryce is a gamer, a maker, and a brewer.
Get our wide array of technical resources delivered right to your inbox.
Unsubscribe at any time.