Add Comments in SOLIDWORKS to Document Your Design
Planning out your product design with great design intent makes your part and assembly models easy to change, but only if your intentions are clear to anyone who needs to make changes. Deadlines, combined with confusion from poorly documented models, can cause many designers to delete and quickly rework parts and assemblies for simple changes.
Be aware that when someone deletes Sketch Entities or Part Features in SOLIDWORKS, their existence is erased from the model.
Since there is a timeline in our FeatureManager Design Tree, the side effects can include some or all of the following:
- Dangling Sketches
- Downstream Feature errors
- Broken Assembly Mates
- Dangling Drawing dimensions.
In short, the children are altered - if they survive. This I refer to as the Delete Paradox, as at first deleting items seems easy for making quick changes, but the end result is a lot of wasted time spent correcting the unintended but consequent resulting damage to referenced documents.
If you’re wondering if you can borrow a Time Machine to rewrite the design history or give yourself more time before the deadline to fix this, the answer is no.
However, there is a good solution to this problem in your future - communication. Communication is the key to successfully navigating someone else’s design quickly, or guiding others safely through your designs. One of the best ways to communicate your design intent is to document your design is to add comments in SOLIDWORKS.
How to Add Comments in SOLIDWORKS
You can add comments to Part Features or Assemblies that clarify and explain vital information necessary for making accurate changes* (thus avoiding the entire Delete Paradox).
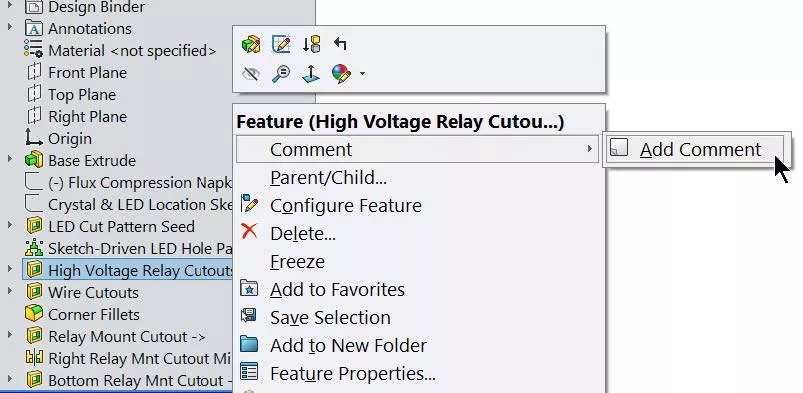
To add a comment in SOLIDWORKS, right-click on any Feature and select Comment > Add Comment.
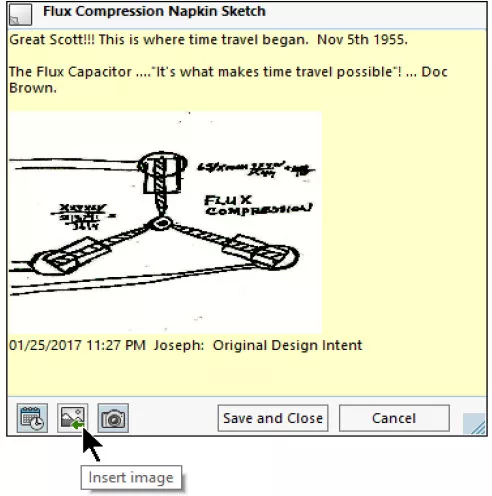
In the Comments dialog, you can add notes, pictures, or screenshots showing information necessary for making changes. This could also include Design for Manufacturing Information or additional notes that clearly explain your reasons and design considerations that support decisions made for given features.
In addition, you can add a Date/Time Stamp to clarity who made the comment and when.
You can even add pictures to clarify comments!
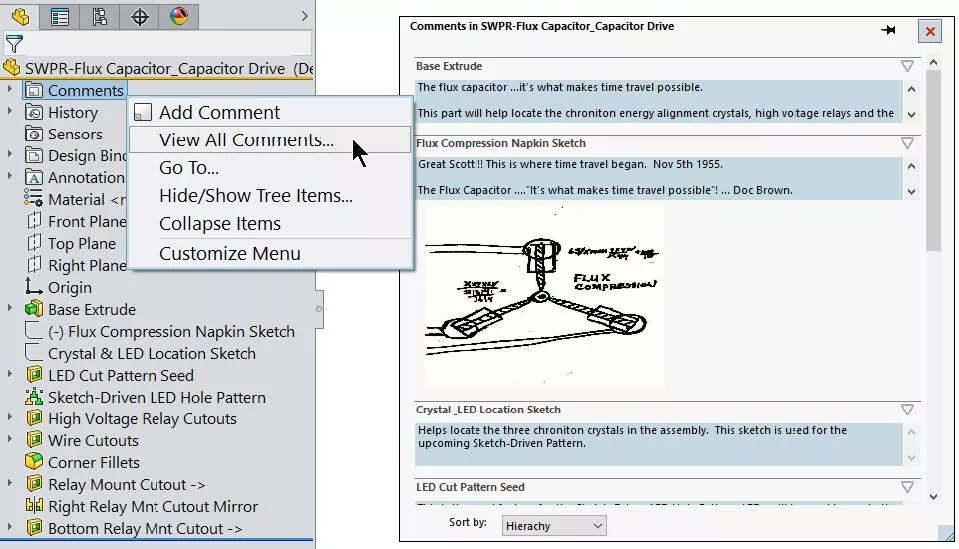
The comments you have added will appear at the top of the FeatureManager Design Tree inside of the Comments folder. To see the model comments right-click on the Comments folder in order to View All Comments…
Any comment can also be reviewed in the form of a balloon when positioning the mouse pointer over the commented feature.
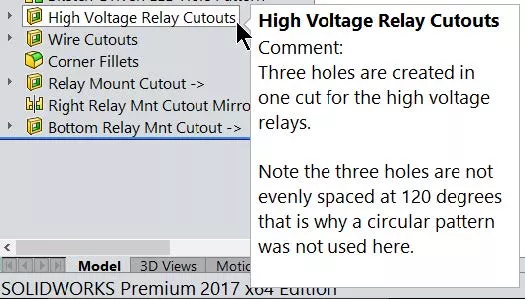
See all commented features
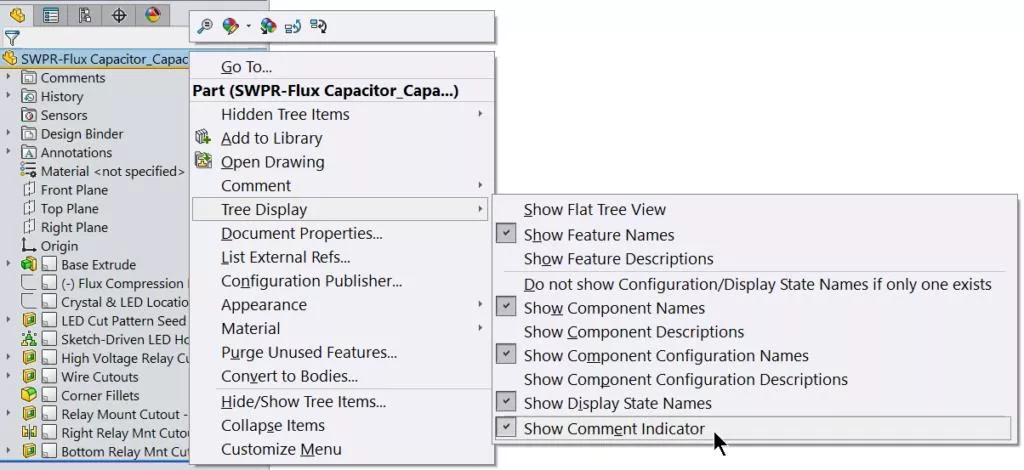
To quickly identify every single commented feature, right-click on the name of the Part or Assembly in the FeatureManager Design Tree and use the setting from the Tree Display option of Show comment Indicators. This reveals a comment icon which will be shown to the right of the commented features icon.
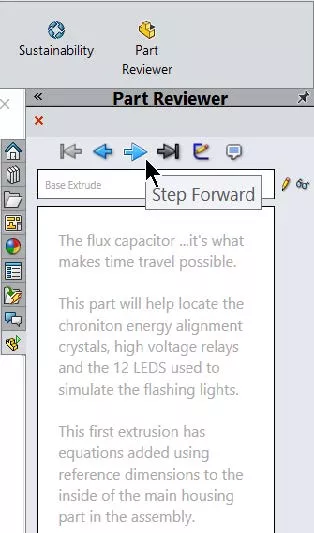
Another recommended use for adding comments is training. Using the SOLIDWORKS Part Reviewer, found on the Evaluate toolbar, you can interrogate any model and review the comments applied to each feature.
Using comments you could document a sample design project that reflects your company’s product standards, expectations, and procedures. This sample design project could then be given to newly hired Designers for study. This training data set will help to get them up to speed quickly. To see some great examples for learning different techniques in SOLIDWORKS with the help of the Part Reviewer and Comments, please find these models located on 3D ContentCentral.
Suggested Article >> 3D ContentCentral for SOLIDWORKS Users
To see Doc Brown’s SOLIDWORKS Flux Capacitor design on 3DContentCentral you can check it out here.
More SOLIDWORKS Tutorials
SOLIDWORKS Display Scaling Solutions
Inserting Logos Into SOLIDWORKS Parts and Drawings
SOLIDWORKS Copy and Paste Features: Same or Different Parts
How to Create a Lip/Groove Feature in SOLIDWORKS

About Joseph Richter
Joseph is usually teaching in the Classroom instructing Engineers and Designers looking to get the most out of SOLIDWORKS. He is passionate about design and explains that it is not about what ‘he can do in SOLIDWORKS’, but rather what he can help others learn and accomplish in SOLIDWORKS. He has been serving the SOLIDWORKS community with excellence in Arizona since 2004.
Get our wide array of technical resources delivered right to your inbox.
Unsubscribe at any time.