Managing Members in 3DEXPERIENCE
Managing the members in your 3DEXPERIENCE Tenant is a common task. As employees leave and new hires join the company, the Platform Administrator must control users’ access to the 3DEXPERIENCE platform. New members are added, assigned appropriate Roles, and given access to a Collaborative Space. Members who no longer need access are removed. This blog will go through the settings to add, remove, and manage members in 3DEXPERIENCE.
Inviting Members and Granting Roles
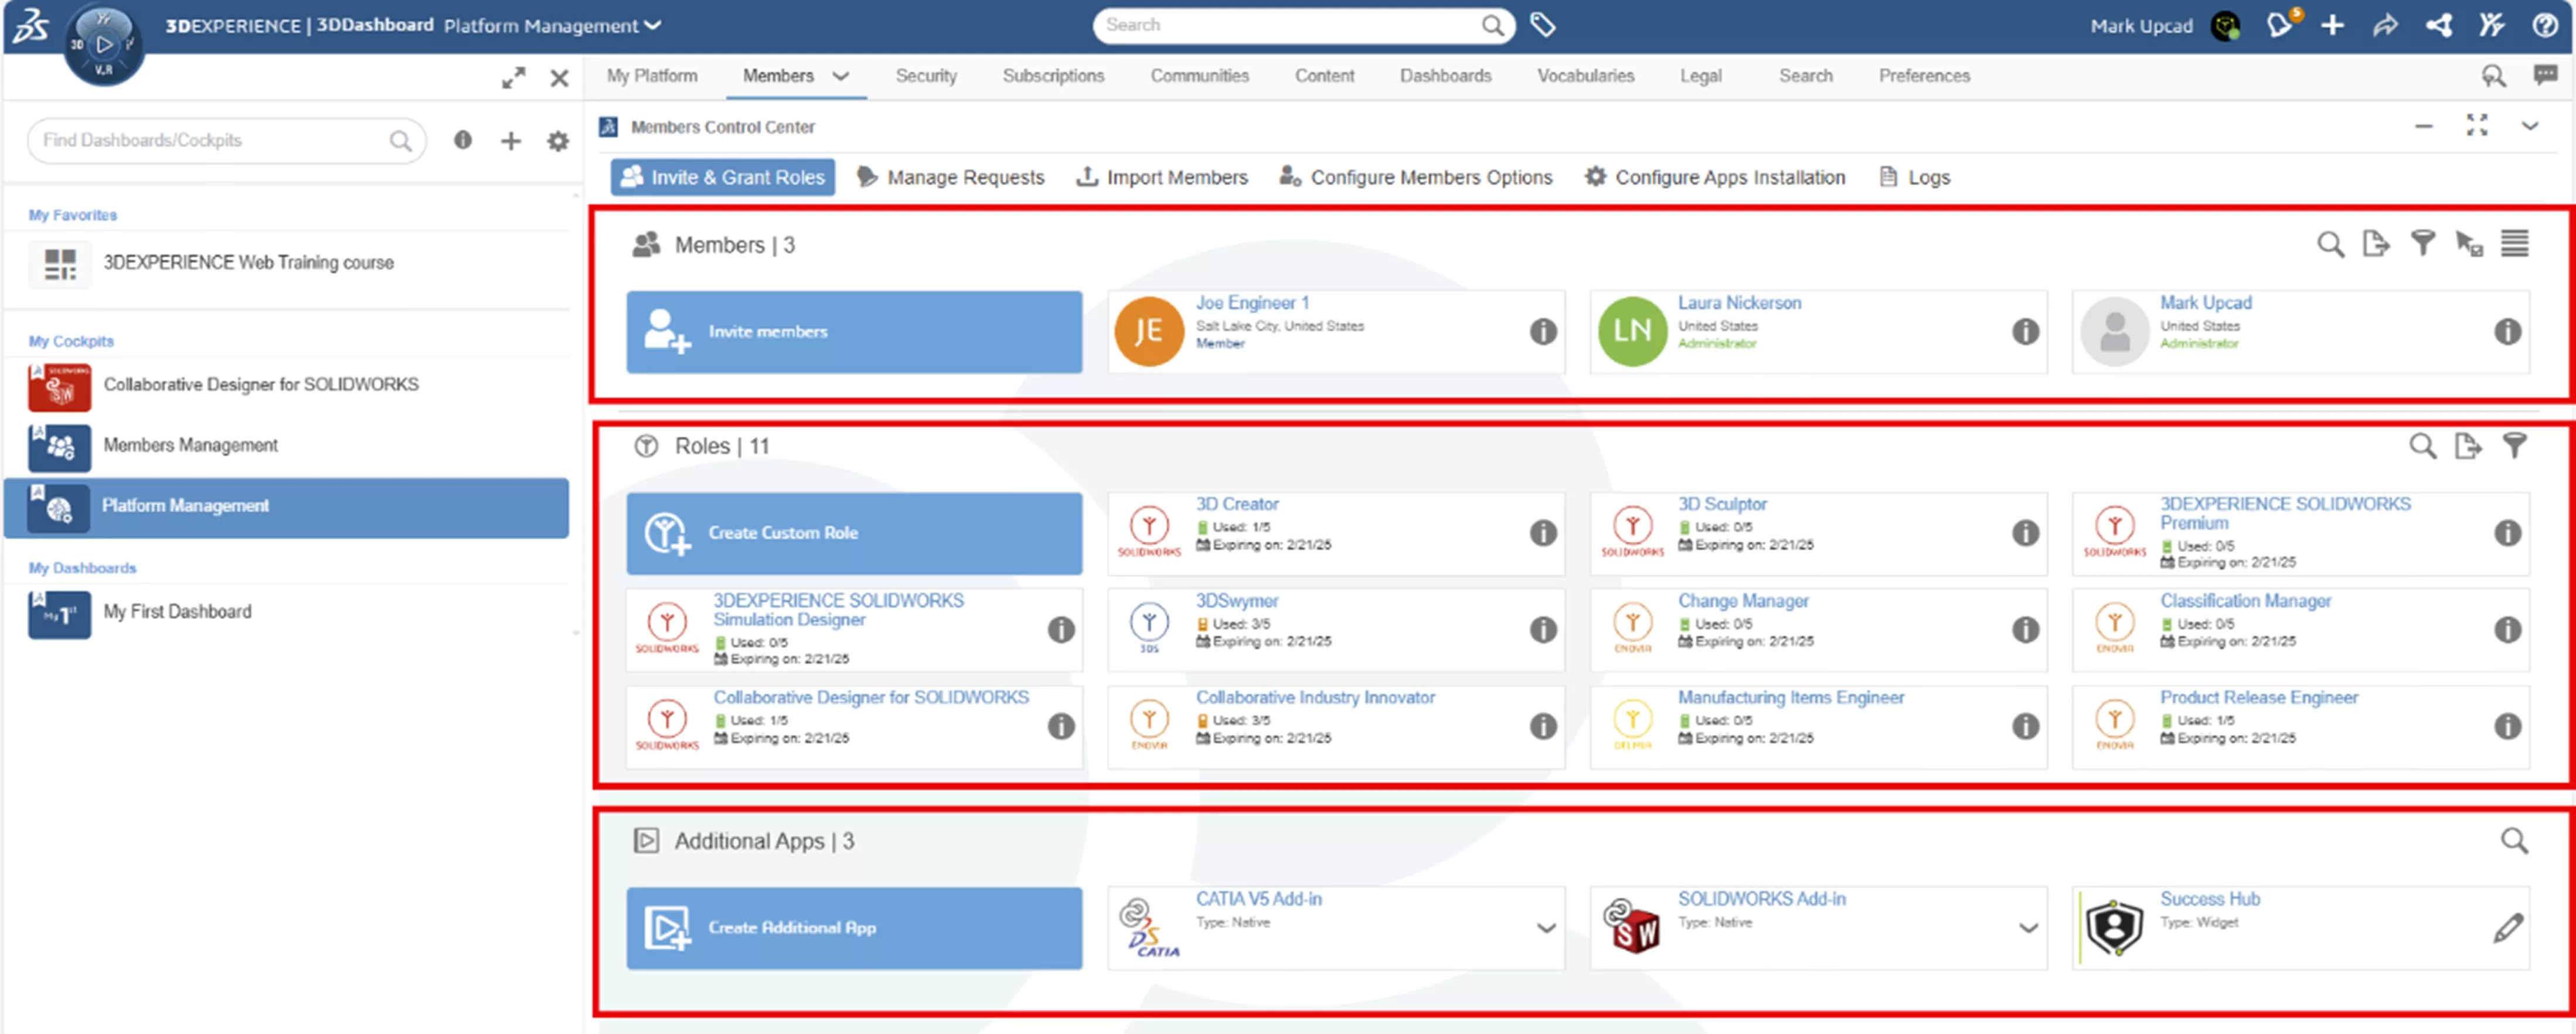
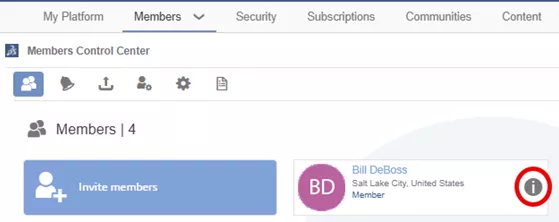
In the Platform Management Dashboard, the Members tab contains the Members Control Center app. This lists the current Members of the Tenant, the Roles purchased, and the Additional apps. Additional settings are found in tabs across the top of the widget.
The Members section shows the member’s name, location, and user rights. The Information icon at the end of a Member’s tile will manage this Member’s Roles.
The Roles section shows all the roles purchased. A Role is a license to use the software, and it contains the apps (the software tools) to perform a certain function in the platform. The Roles section also displays a count of how many roles are assigned out of the total number purchased, along with the expiration date per role.
The Additional Apps section displays any auxiliary apps and the option to create user-defined apps.
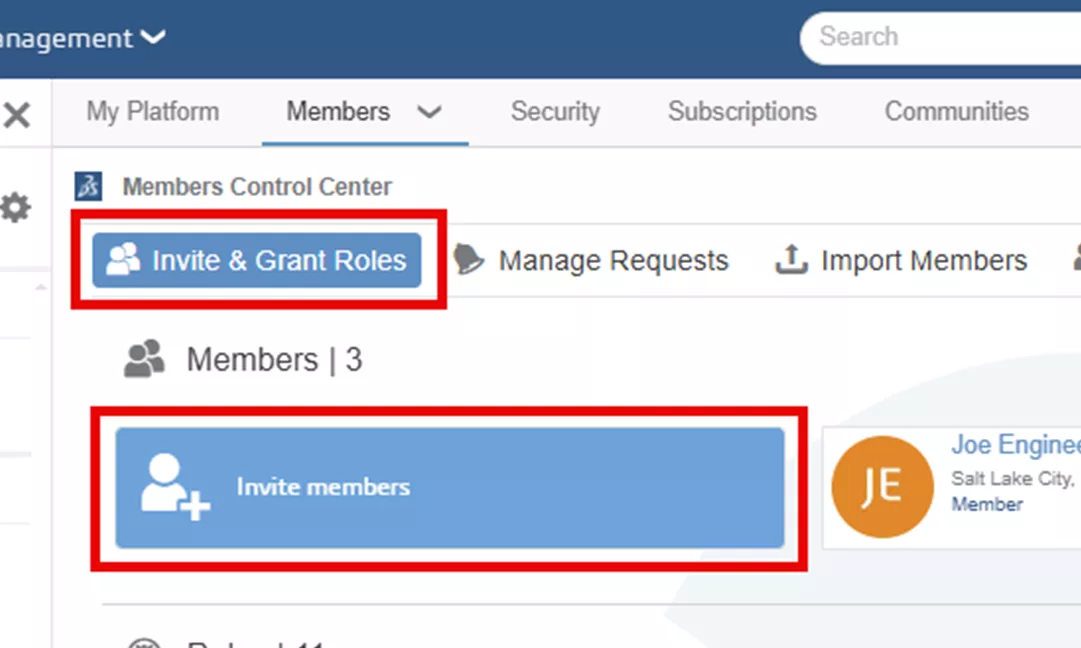
Invite Members
In the Invite & Grant Roles tab, the Invite Members command will launch the Invite Members dialog box allowing the Platform Administrator to invite new members to the platform and assign their roles.
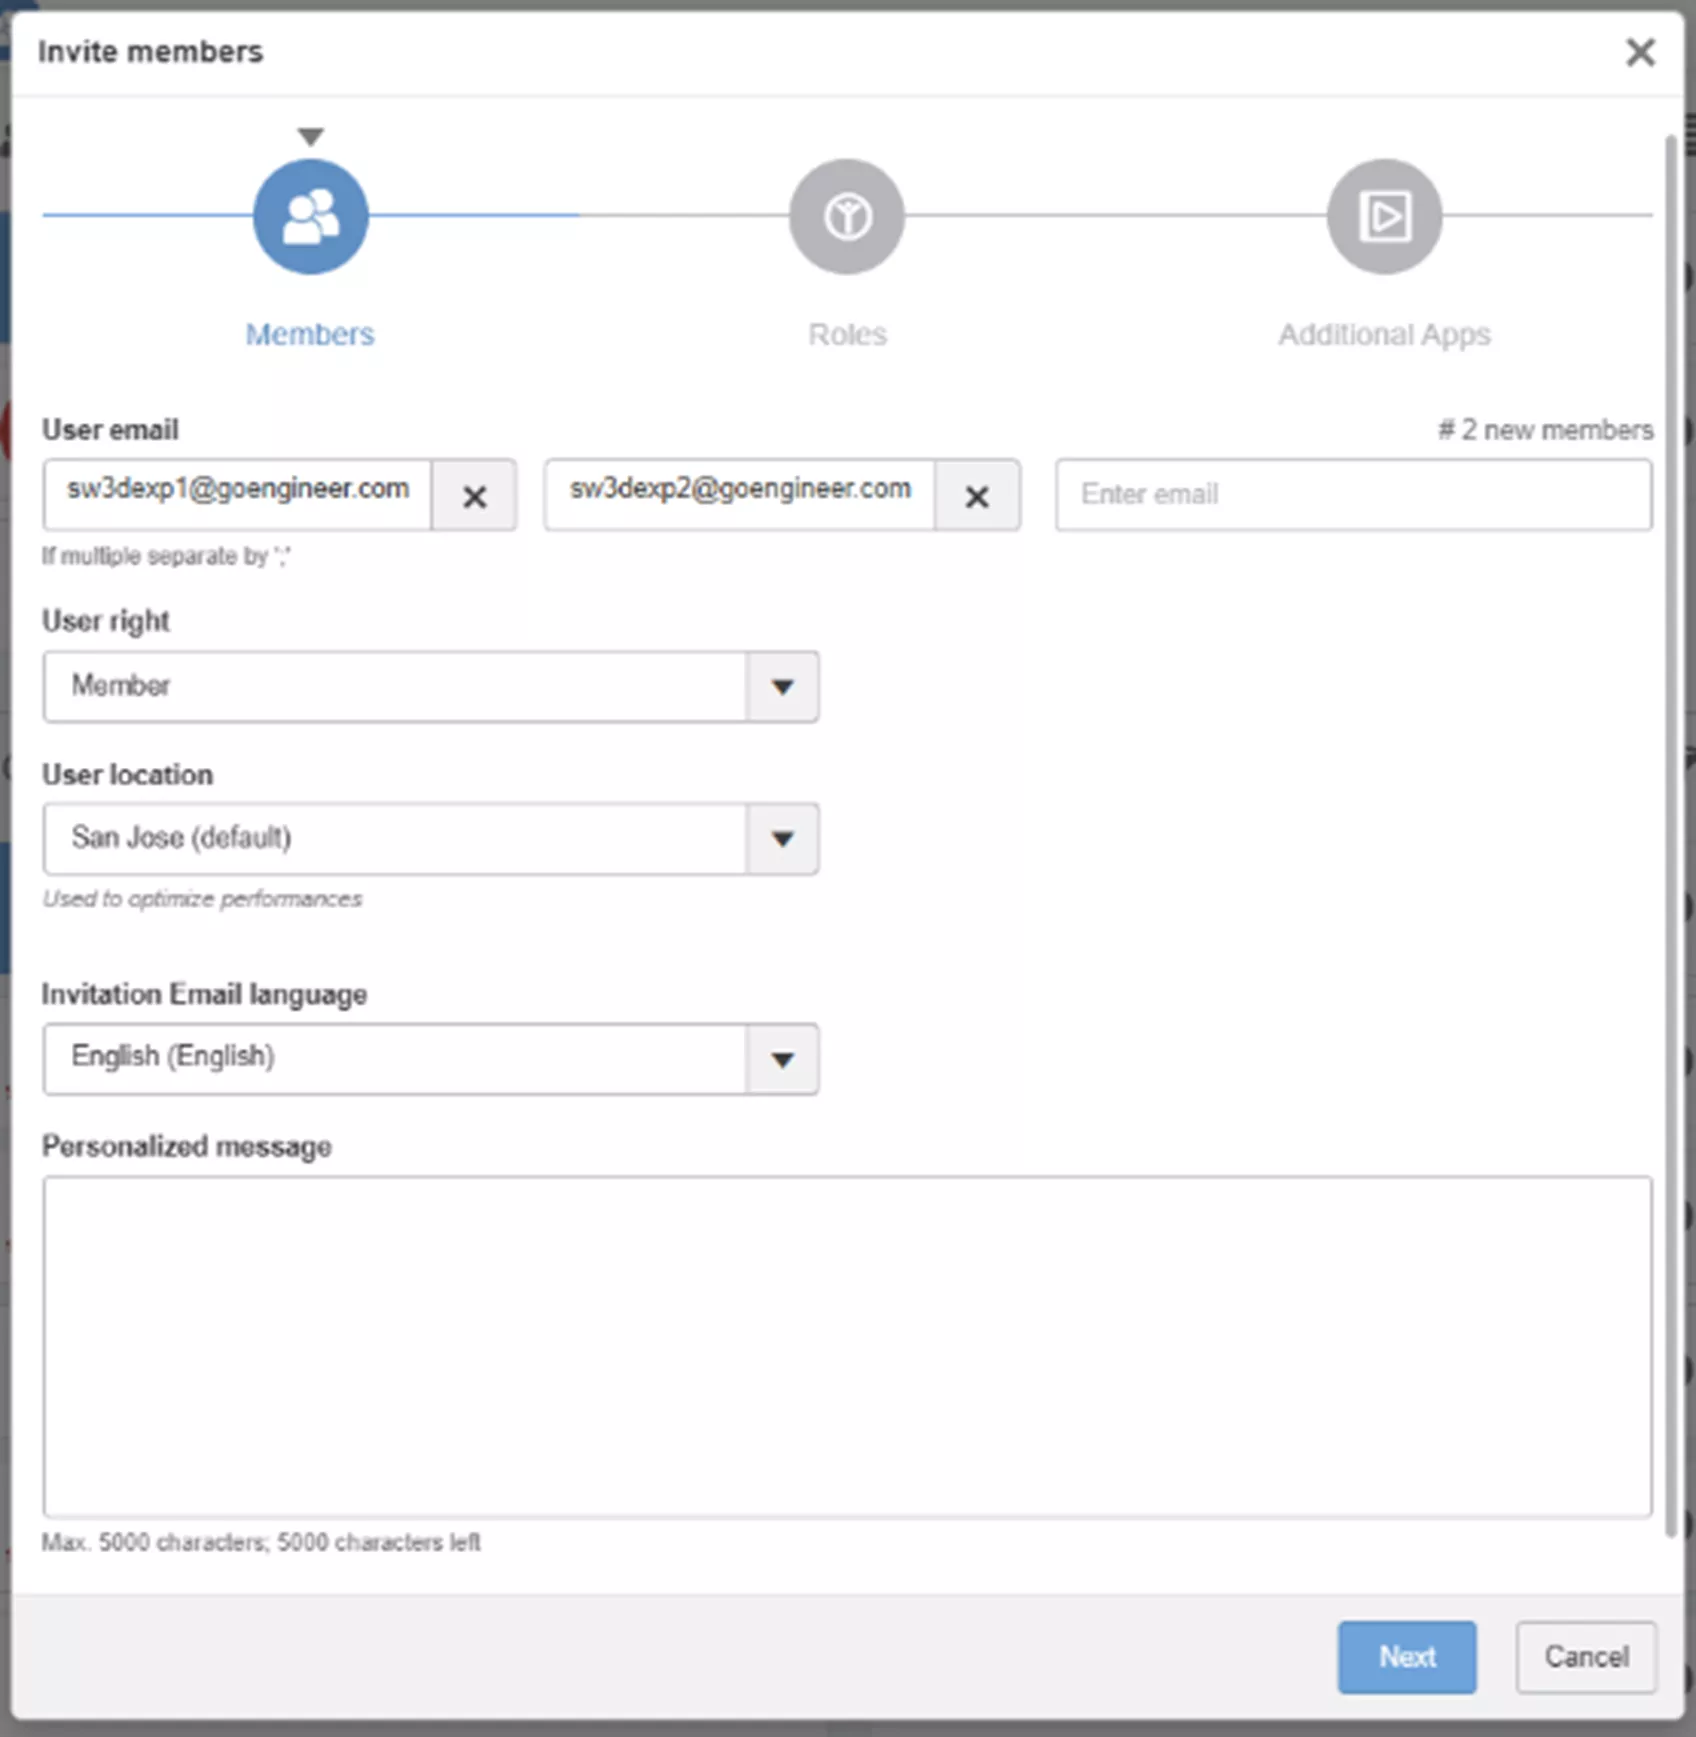
In the Members window, under User Email, enter the user’s email address. Multiple user email addresses can be added at the same time.
Select the User Rights: Administrator, Member, or External
Generally, it is best to have only 2 or 3 Platform Administrators. Administrators have access to all the settings and commands in your 3DEXPERIENCE environment. All other users will be Members. Members are the users and do not have access to the Platform Administration commands.
An External user will have the same access as a Member; they are simply noted as an External user in the Members Control Center.
Select the User location.
This defines the Data Center where the user will log in. It is recommended to use a single User location for all users. While the User location can be changed for individual users, doing so will duplicate the data on another server, increasing data usage.
Select the Invitation Email language and optionally add a Personalized Message.
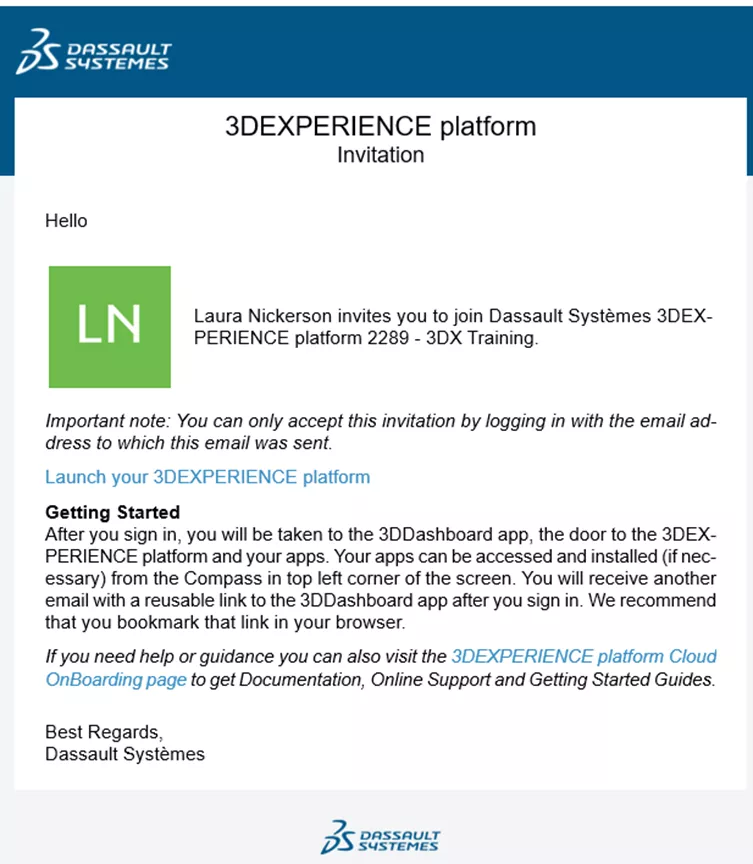
Upon clicking Invite, the Member will receive an Invitation to the Platform email.
Click Next.
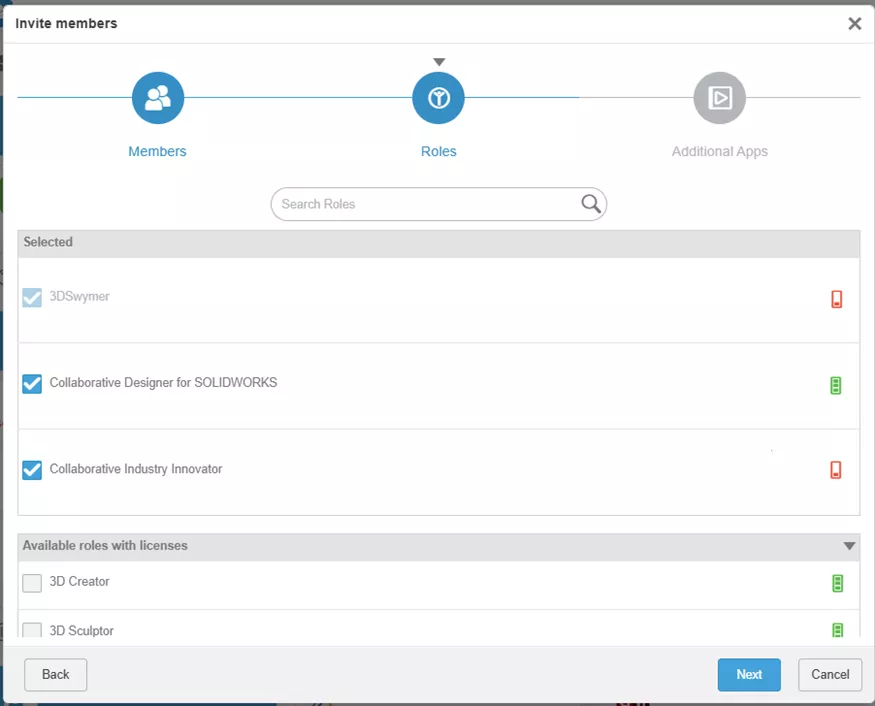
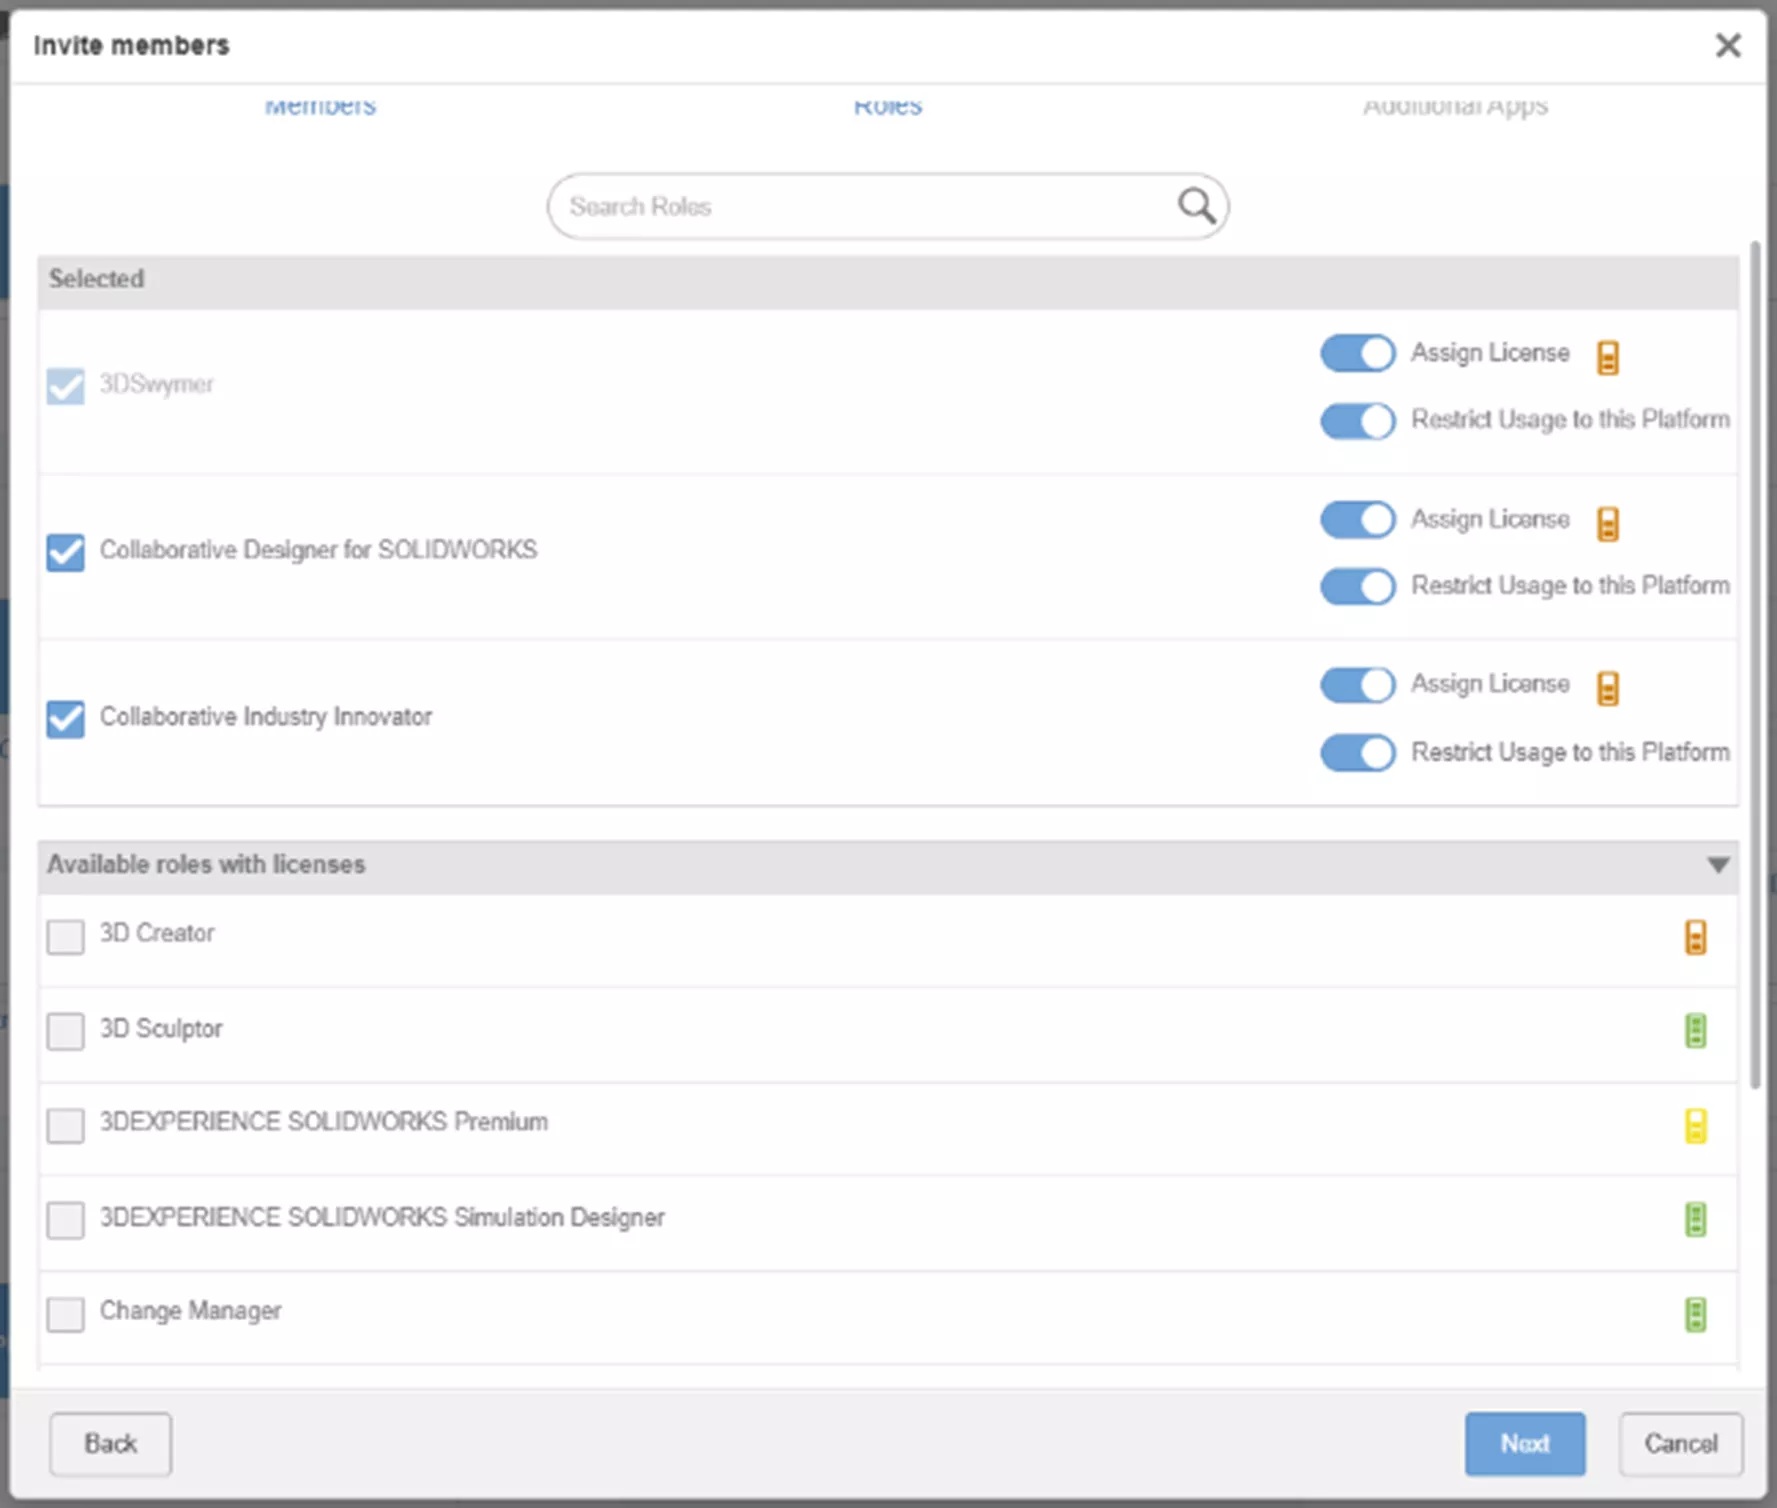
Assign Roles
The Roles window shows all the available roles that can be granted to this Member(s).
Click the checkbox to assign the role.
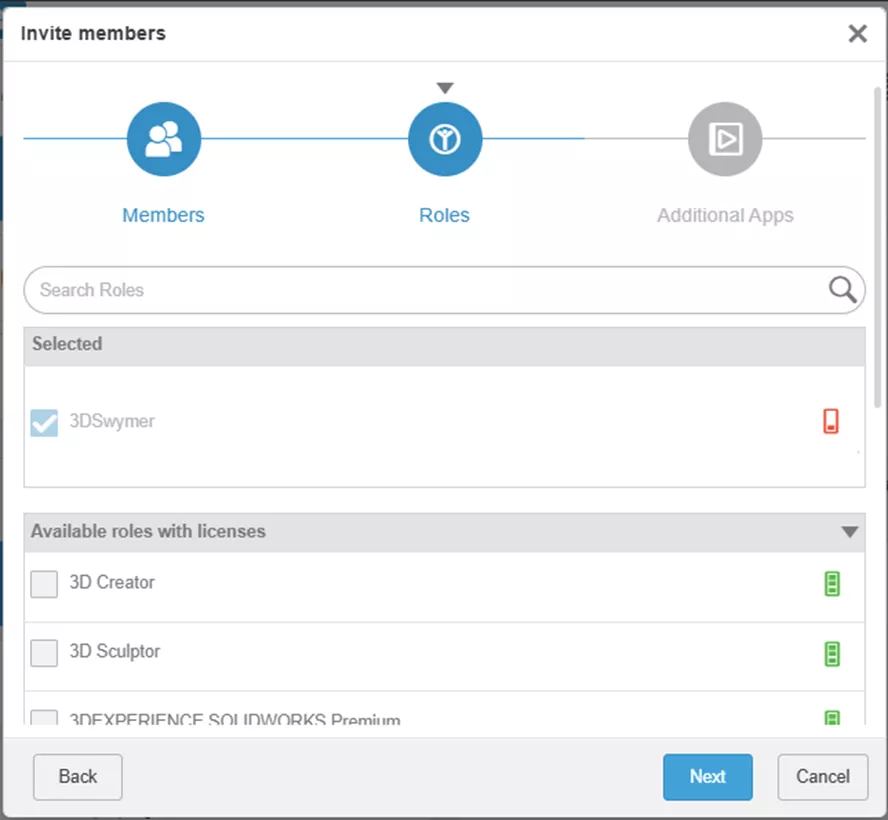
The 3DSwymer Role is granted by default. This role allows the Member to have access to your Tenant.
The Collaborative Industry Innovator role provides the essential tools to interact with the platform. If the Member will be saving data (such as SOLIDWORKS data) to the platform, they must be assigned the Collaborative Industry Innovator role.
As the Platform Administrator, the Collaborative Industry Innovator role unlocks the tools to set up the PLM functionality in your Tenant.
If the member is a SOLIDWORKS user, they must be assigned either the Collaborative Designer for SOLIDWORKS role or the 3DEXPERIENCE SOLIDWORKS role. The required Collaborative Industry Innovator role will also be assigned automatically.
Click Next.
Additional Apps
The Additional Apps window shows all the additional apps that can be assigned.
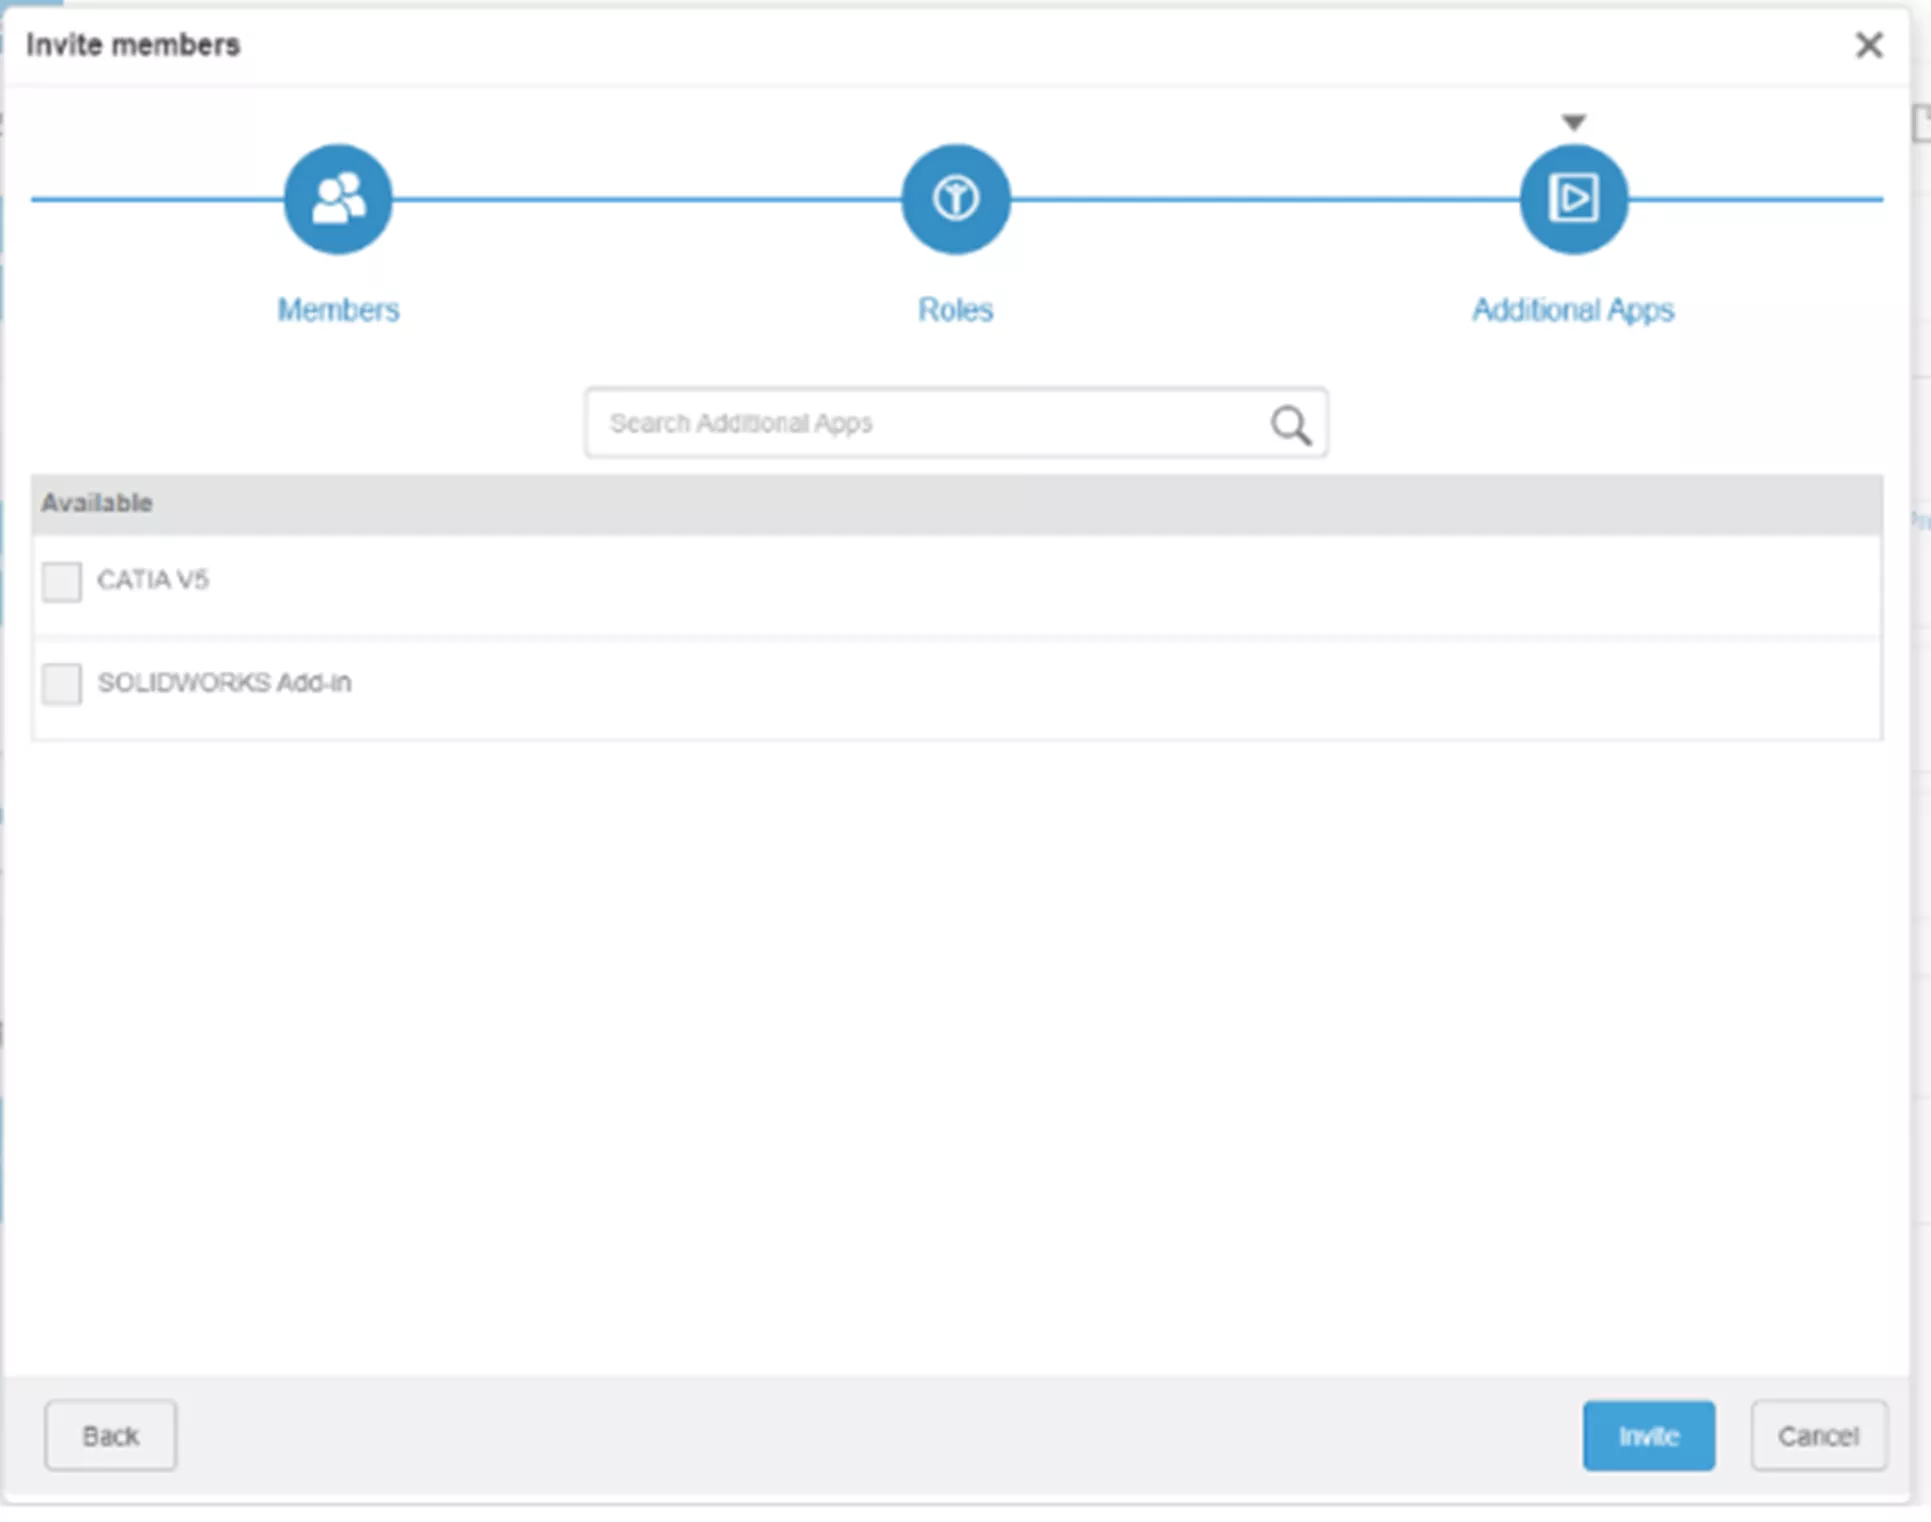
The SOLIDWORKS Add-in is required for the web-based CAD roles, such as 3DCreator and 3DScuptor, enabling these models to be opened in SOLIDWORKS. However, it is not required for SOLIDWORKS users who have been assigned the Collaborative Designer for SOLIDWORKS or 3DEXPERIENCE SOLIDWORKS roles.
30-Day Lock
As soon as the Member uses the roles/licenses, the clock starts and the license is tied to that user for 30 days. After the initial 30 days, the role can be removed and reassigned to a different Member.
Click Invite.
The Member(s) will receive an email with a link to log into the platform (or create a 3DEXPERIENCE account) using the email address associated with the invitation.
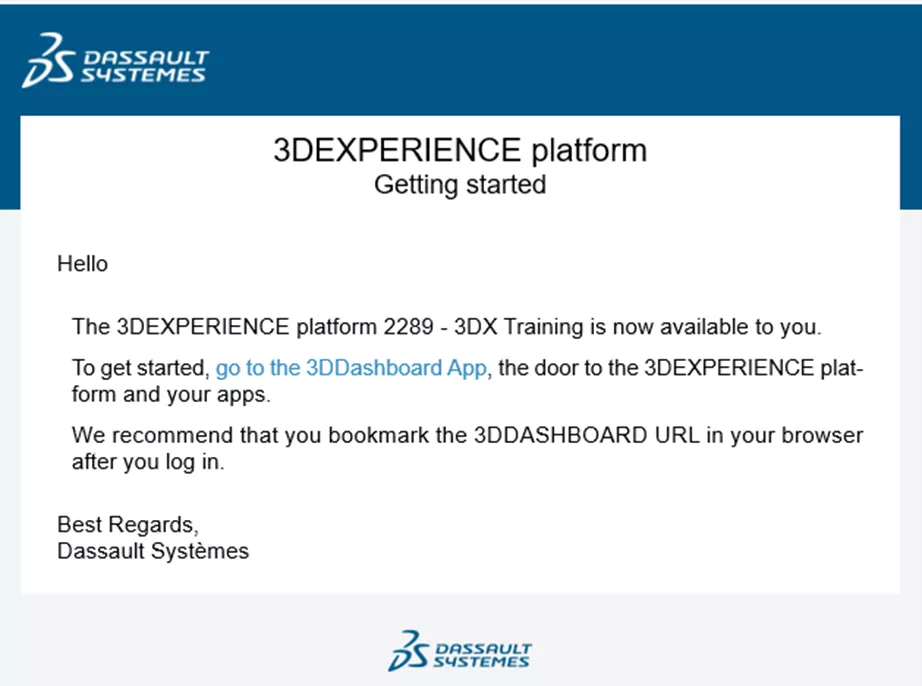
A second email is sent with a reusable link to the 3DDashboard app. It is recommended to bookmark or create a favorite to this URL in the browser.
Configure Member Options
There are some important settings in the Configure Member Options tab.

Enable the option to Automatically ungrant expired roles from members or groups.
If a role expires, it will be removed from the user. This will eliminate errors when the user is trying to connect to the platform.
If you're working with external collaborators who have their own 3DEXPERIENCE licenses or if your members will be working in multiple Tenants, consider the option Allow administrators to grant roles without assigning automatically the associated license.
With this setting enabled, there are additional options available when assigning roles.
Assign License and Restrict Usage to the Platform
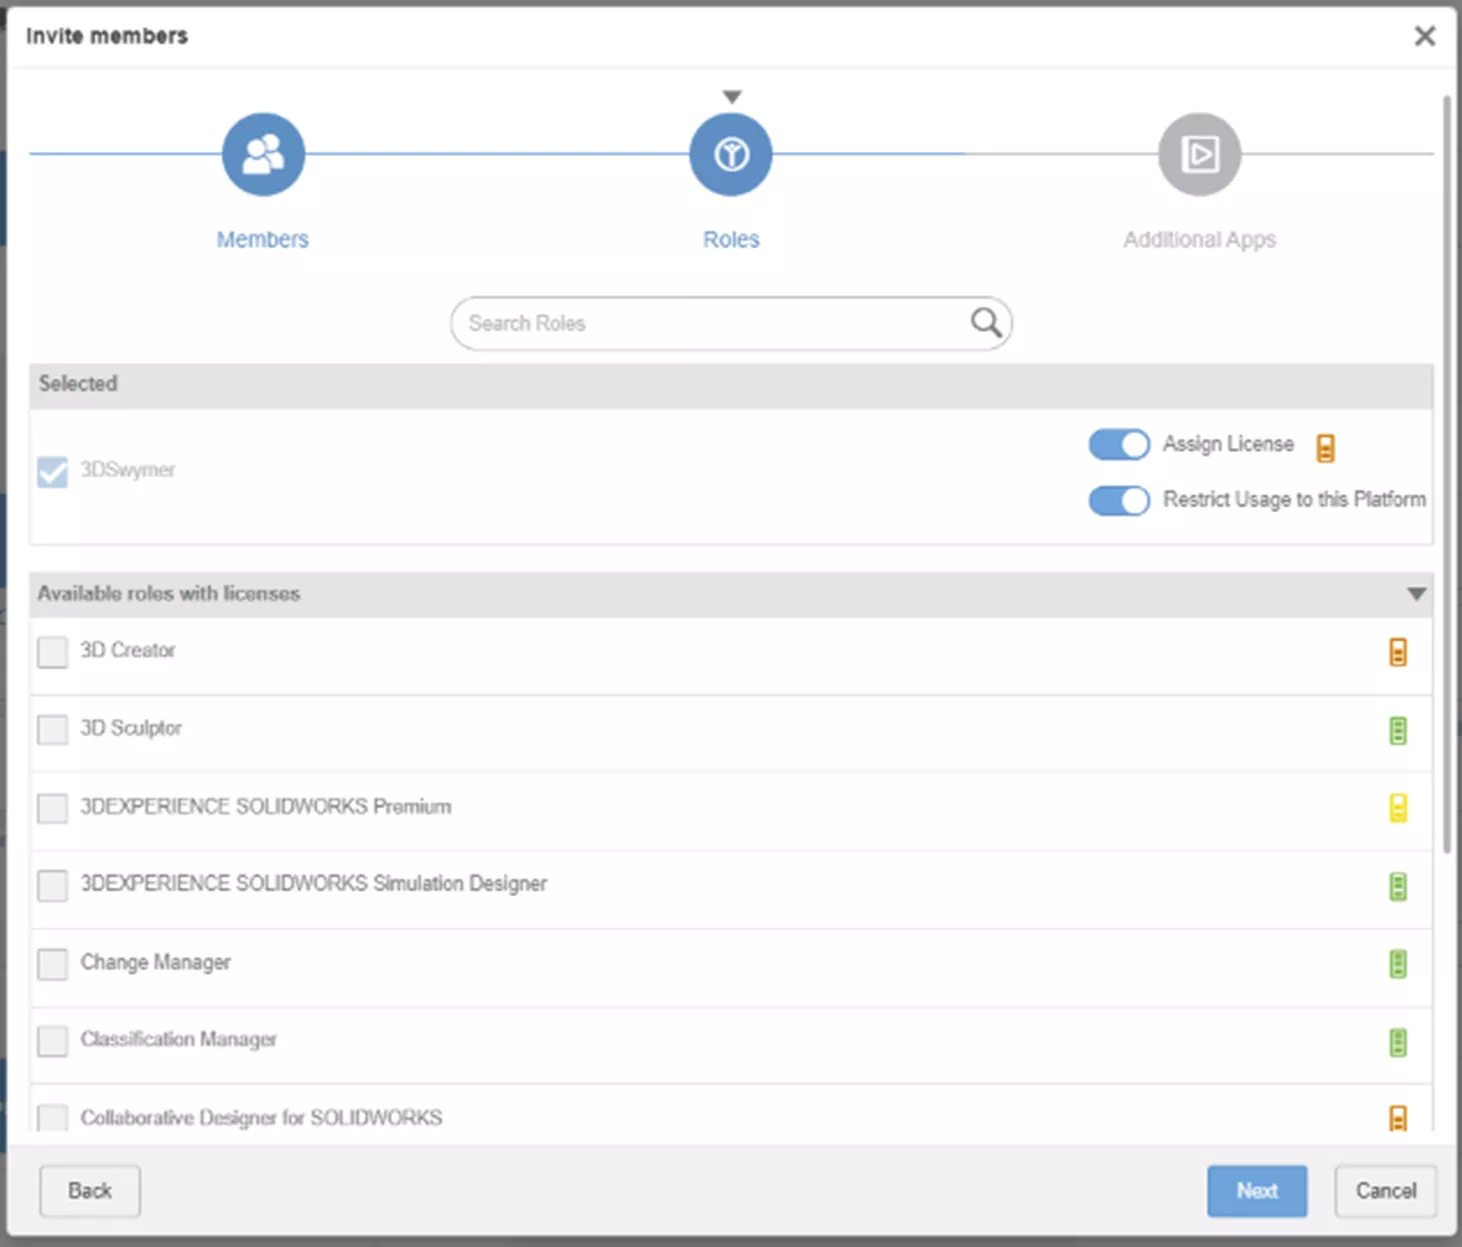
Assign License
Enabling Assign License will consume a purchased license in your Tenant.
Disabling Assign License will not consume one of your purchased licenses, and the Member will be bringing their own 3DEXPERIENCE license from another Tenant.
Restrict Usage to the Platform
Enabling Restrict Usage to the Platform will not allow a purchased licenses to be used outside your Tenant.
Disabling Restrict Usage to the Platform will allow the Member to use their assigned licenses in other external Tenants.
Generally, members of your Tenant will consume a role, thus Assign a License is ENABLED.
If your member will not be logging into other Tenants using this license, Restrict Usage is ENABLED.
Collaborative Space
A new Member should also be invited to a Collaborative Space.
From the Platform Management dashboard, under the Content tab, the Collaborative Spaces Control Center manages Collaborative Spaces and the Members within them.
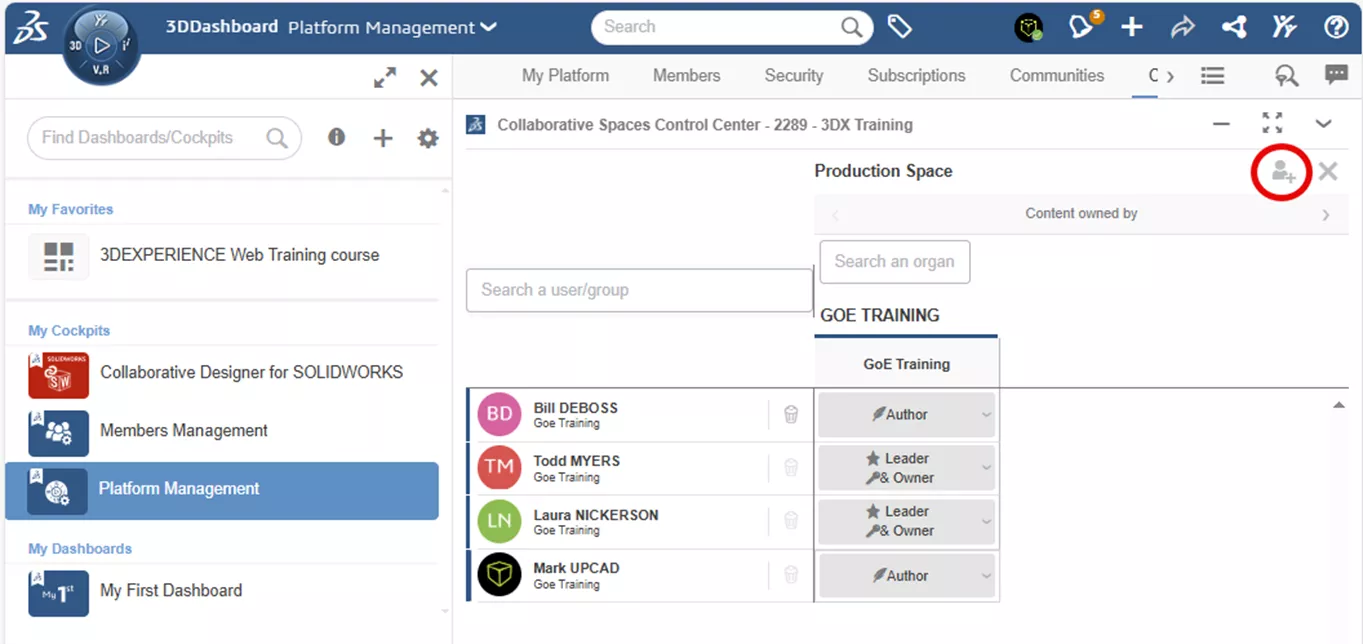
Add Members to a Collaborative Space
The Add Member ![]() icon will open a dialog box to assign access rights governing what the Member can do and see in the Collaborative space.
icon will open a dialog box to assign access rights governing what the Member can do and see in the Collaborative space.

| Contributor | Can view and comment on data in the Collaborative Space |
| Author | Can add data to the Collaborative Space |
| Leader, Owner | Can add and manage data in the Collaborative Space |
Start typing the Tenant Member’s name in the field that corresponds to their user right access. Select the Member’s name from the popup list.
User Groups can also be used to invite Members to a Collaborative Space.
Click Add Members at the bottom of the dialog box to complete the command.
New Members are all set. They have been invited to the 3DEXPERIENCE platform and have accepted the invitation by creating a 3DEXPERIENCE login. They have been assigned the appropriate roles and given access to a Collaborative Space.
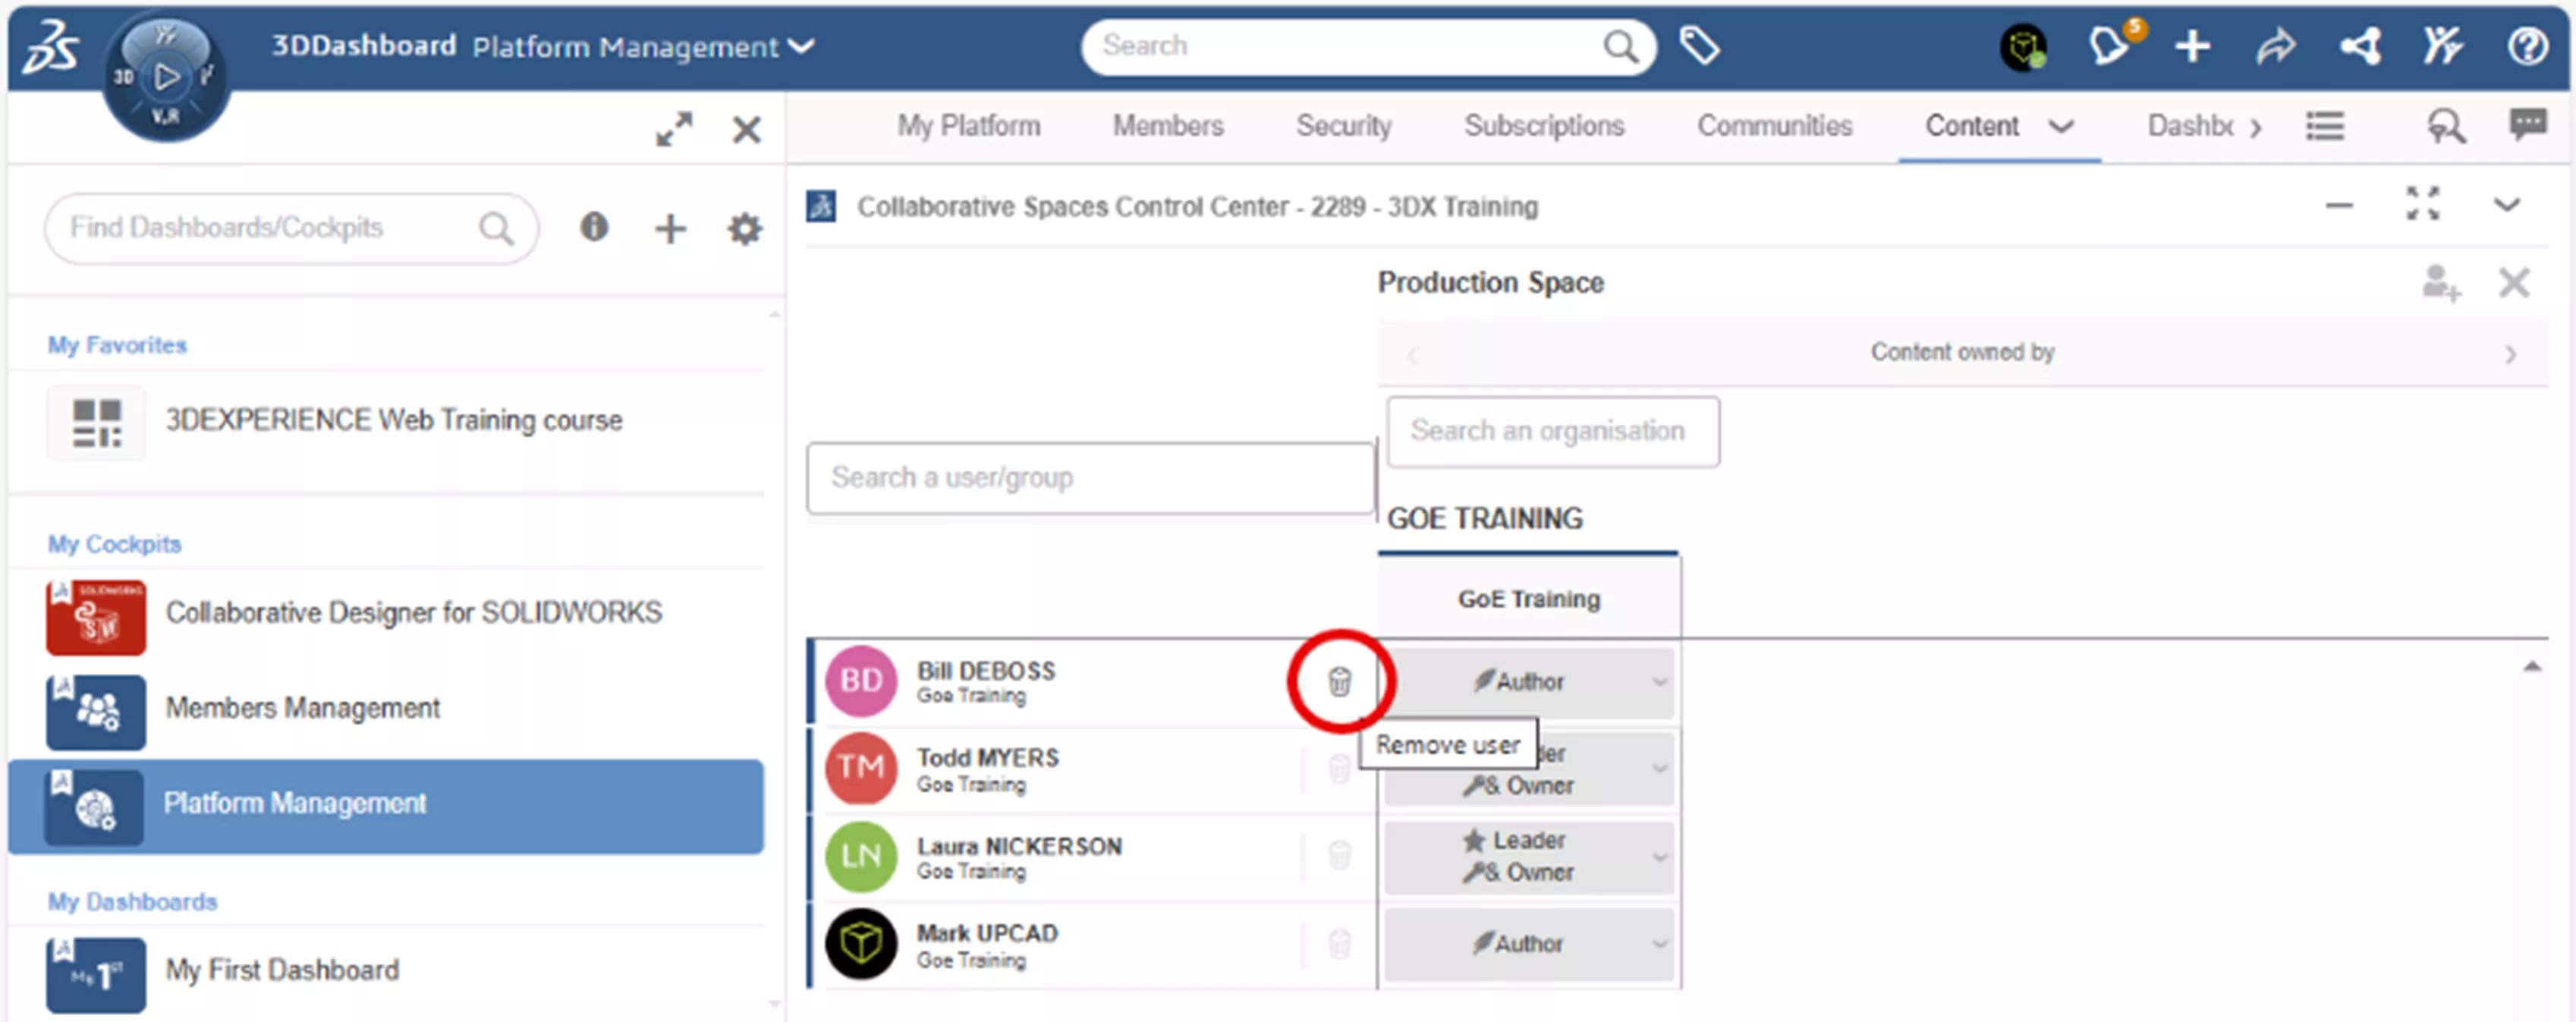
Remove Members from a Collaborative Space
The existing Member’s trashcan icon will remove access to the Collaborative Space.
Note: This does not remove access to the 3DEXPERIENCE platform.
Managing Existing Members
In the Members tab, the Information icon ![]() at the end of a Member’s tile allows Platform Administrators to manage that Member’s access to roles and the 3DEXPERIENCE platform.
at the end of a Member’s tile allows Platform Administrators to manage that Member’s access to roles and the 3DEXPERIENCE platform.
Removing or Assigning Roles
A Role can be removed from or assigned to an existing Member from the Member’s Information icon.
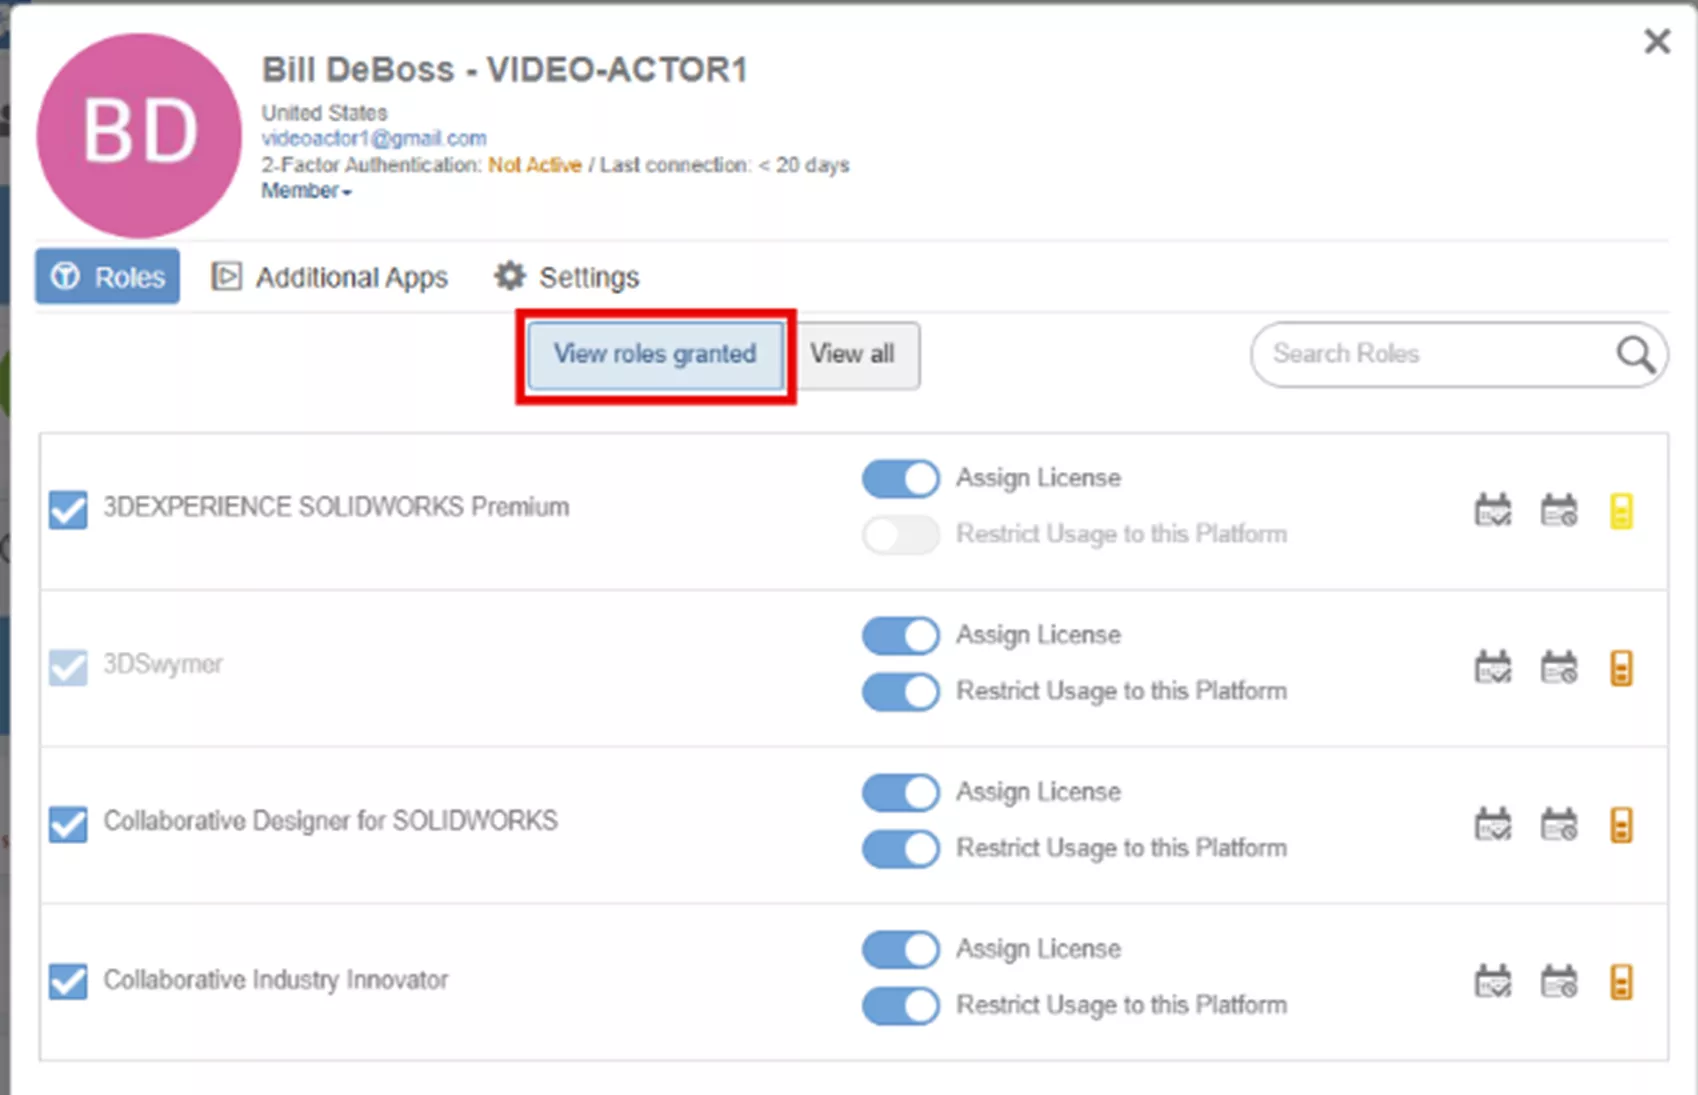
View Roles Granted tab lists all the roles assigned to the Member.
Uncheck an assigned role to remove it from the Member. A role cannot be removed if the user is logged in and actively using the role, and/or it is within those initial 30-day lock.
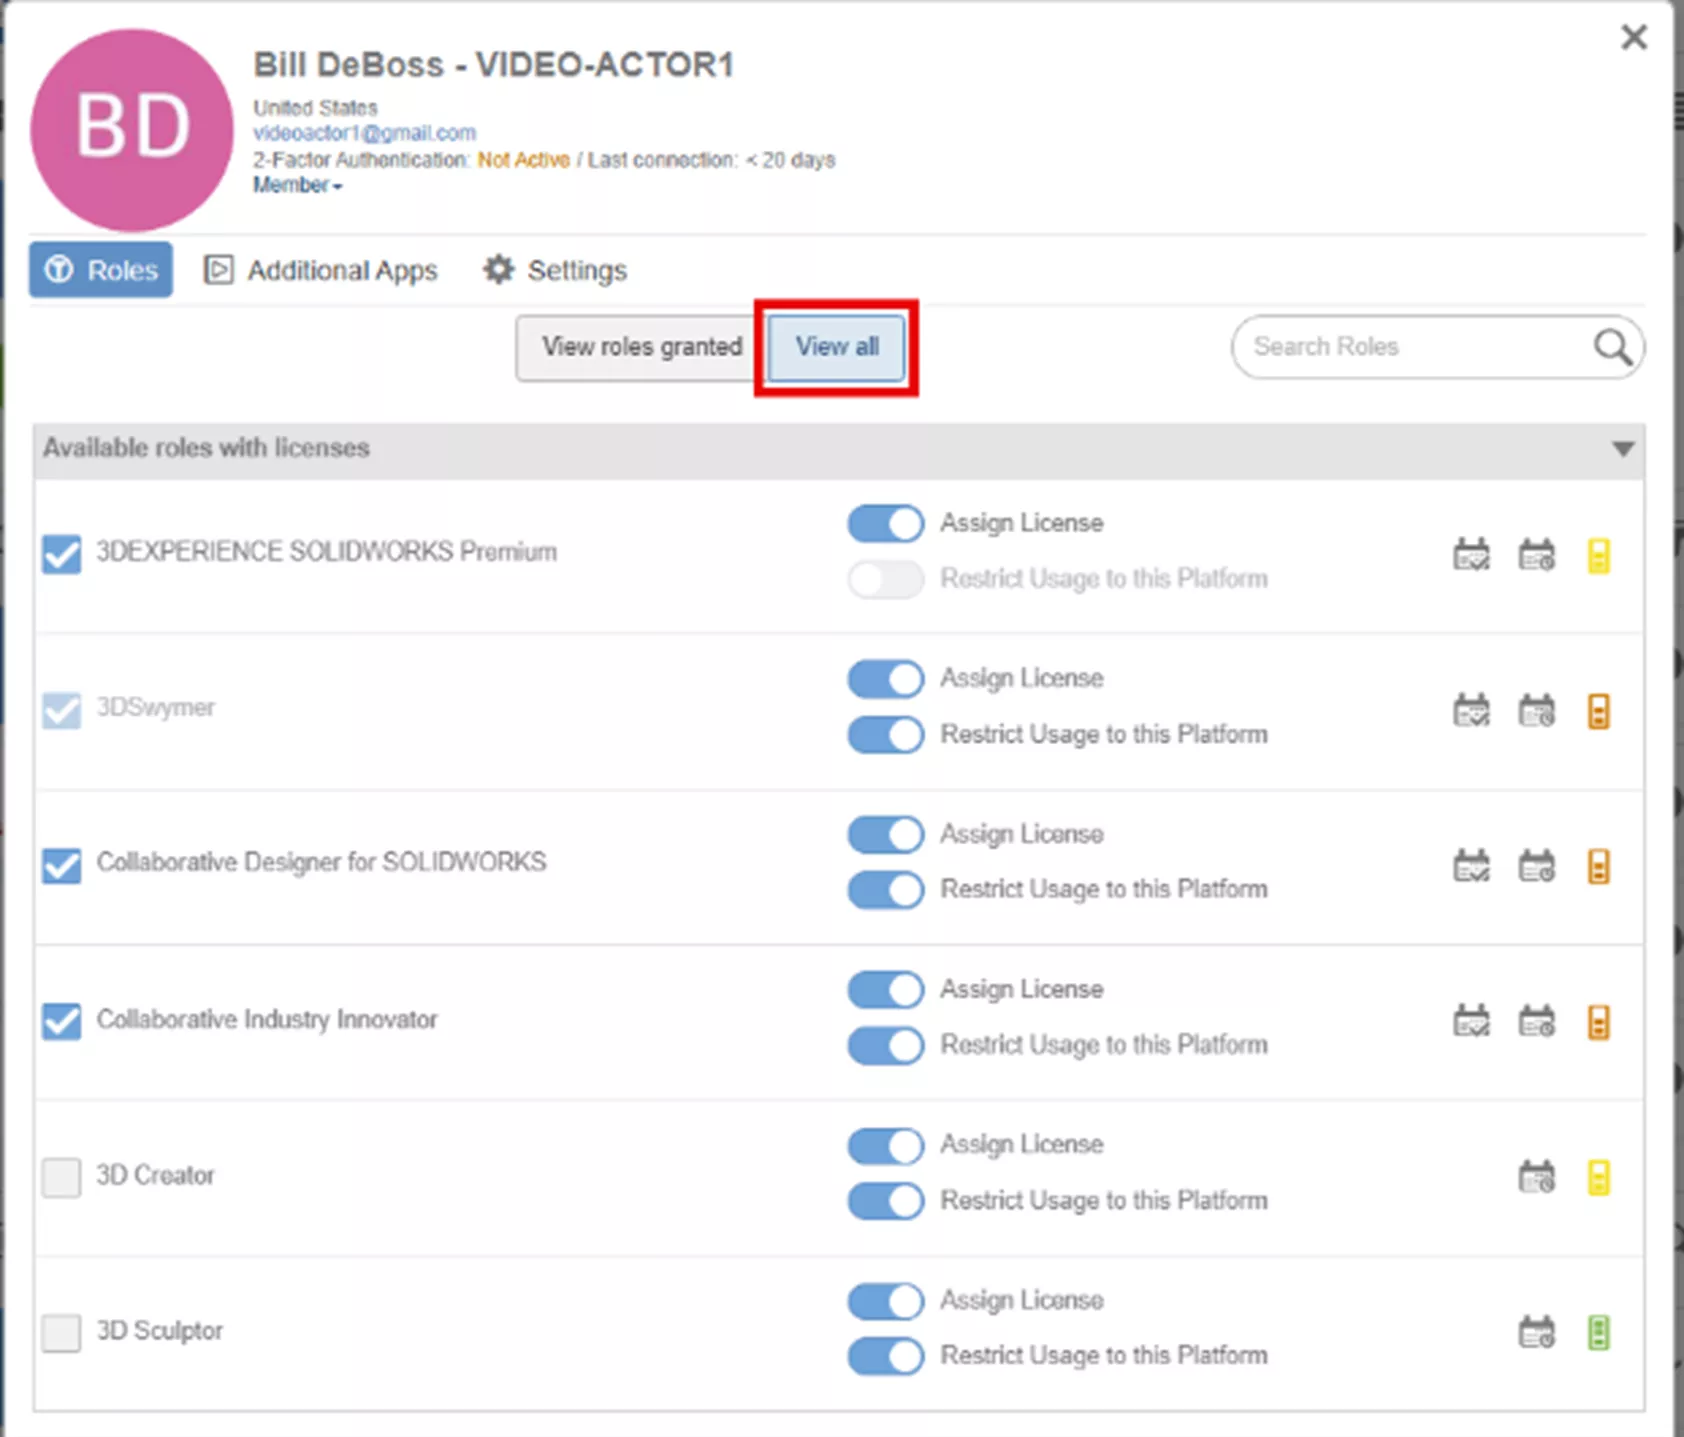
View all tab lists all the available roles purchased with checkmarks indicating the role is assigned to the Member. Enable a checkbox to assign the role to the Member. Removing roles is also available in the View All tab by simply unchecking a checkbox.
Remove a Member from the Platform
Note: It is best practice to remove any assigned roles prior to removing Members from the platform to free up the licenses.
An existing Member’s access to the Tenant can be removed from the Member’s Information icon in the Settings tab.
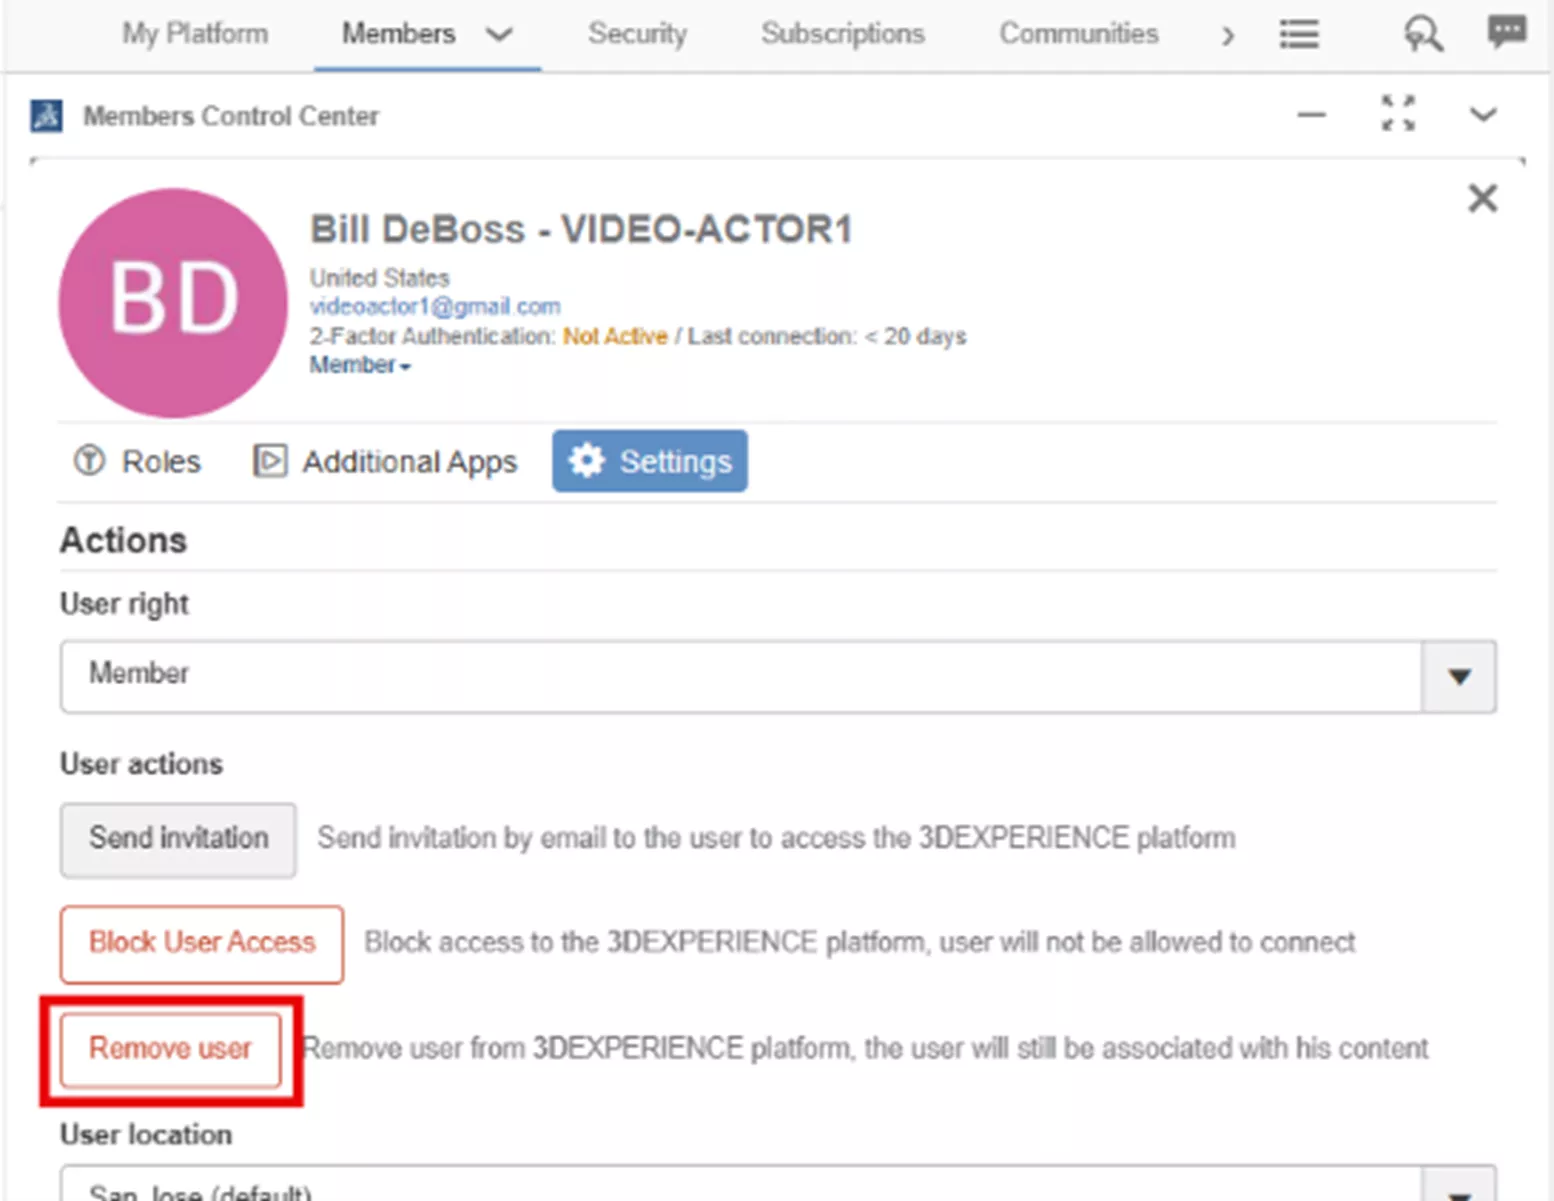
Remove User will revoke the Member’s access to the Tenant. Confirm to remove the user in the confirmation window.
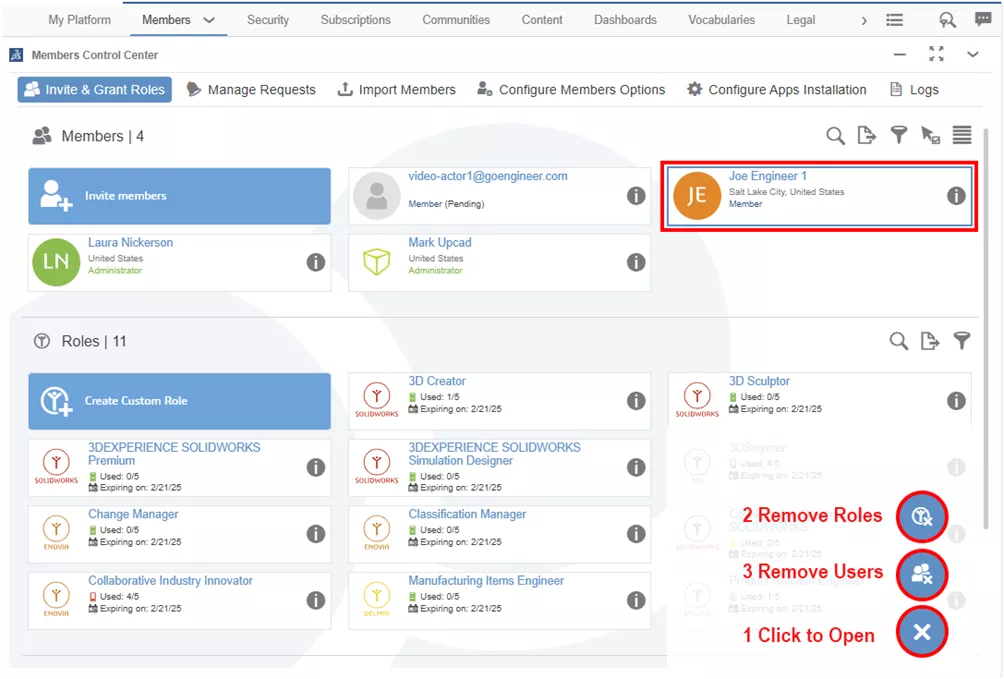
Tip: There are blue icons at the bottom of the Invite & Grant Roles user interface to facilitate removing granted roles and removing users. After selecting the Member to be removed, click to open the blue circle at the bottom of the user interface.
The top blue icon will remove any granted role that is eligible for removal (not within the 30-day lock and not being used).
The middle icon will remove the user from the platform.
Summary
The Platform Administrator can manage existing Members of the Tenant and add new Members from the Members tab and the Content tab of the Platform Management dashboard.
If GoEngineer is your VAR, please contact Technical Support if you need help or have any questions.
I hope you found this article for managing members in 3DEXPERIENCE helpful. Learn more about the 3DEXPERIENCE platform below. Additionally, join the GoEngineer Community to participate in conversations, create forum posts, and answer questions from other 3DEXPERIENCE Admins and users.
Related Articles
Tenant Activation Process for 3DEXPERIENCE Administrators
Getting Started with 3DEXPERIENCE: Setup, Dashboards, Connectors & More
How to Create User Groups on the 3DEXPERIENCE Platform
3DEXPERIENCE Apps Local Installation: Setup, Versions, and More
2 Ways to Mass Upload SOLIDWORKS Files to the 3DEXPERIENCE Platform

About Laura Nickerson
Laura Nickerson is a Senior Application Engineer with GoEngineer. She is a Certified SOLIDWORKS Expert with many certifications in SOLIDWORKS and the 3DEXPERIENCE Platform applications. She has 17 years of experience in the consumer appliance industry working as an industrial designer and mechanical designer. Laura is detail-oriented, a problem solver, and is listed as co-inventor in over 40 patents.
Get our wide array of technical resources delivered right to your inbox.
Unsubscribe at any time.