SOLIDWORKS Composer Top-Level and Subassembly Update Tool Best Practices
SOLIDWORKS Composer is a great tool for making technical documentation for your product designs, from work instructions to technical specifications. However, there may be instances during a project when changes need to be made to the CAD design. Once the mechanical design is updated, what should you do? Start the technical document from scratch using the new model and hope it won’t need further updates?
This blog walks through using the SOLIDWORKS Composer Update Tool and the best way to set up a Technical Document to update individual subassemblies and avoid having to update the top-level subassembly every time.
Updating SOLIDWORKS Composer Files
To use the Update tool, with a project open in Composer (.smg), go to File > Update > SOLIDWORKS Composer Document.

This will prompt you to select the file you are updating the Composer Documents with. Once selected, Composer will use that updated file set to update all of the views in your Document.
This process, while simple to use, can have some pitfalls. Luckily, SOLIDWORKS has released a solution (S-060115), available in their Knowledge Base.
Rules and Best Practices
- If you update with a SOLIDWORKS file, the SOLIDWORKS file must have the same name as the SOLIDWORKS file (the source file) that you used to create the Composer document.
The name under the root node of the Assembly Tree and the name of the SOLIDWORKS file must always match. You can change the name under the root node or change the name of the SOLIDWORKS file so that they match, however, you may see unexpected results when you update.
For example, say you import 'Assembly1' to create a Composer document, then modify and save that assembly as 'Assembly2'. If you update with 'Assembly2', the update fails. In order for the update to be successful, you must change the name under the root node to 'Assembly2', or you must change the SOLIDWORKS file name to 'Assembly1'.
- Do not update from another Composer document whose actors have different NetGuids.
You can change the names of actors in the Assembly Tree, however, this does not change their NetGuid. The NetGuids are created during an import or update process only.
- If you update with a SOLIDWORKS assembly file, the translation process must load the assembly file fully resolved.
To ensure that this happens, in SOLIDWORKS, turn off system options: Use Large Assembly Mode, Automatically Load Components Lightweight, and Use Large Design Review. If you use SOLIDWORKS Translator, see S-053656 for more information.
Related article >> How to Tell if the SOLIDWORKS Composer Importer/Translator is Installed
- Use the same import options that you used to create the Composer document.
You cannot rearrange geometry, part, and assembly nodes in the Assembly Tree. The update process overwrites the existing Assembly Tree with the Assembly Tree of the updating file.
- Do not merge CAD files or other Composer documents into the Composer document that you update.
If you do, you violate rule #5. The update process removes merged documents from the Composer document.
- Do not apply kinematics (parent/child relationships) to geometry actors. If you do, you violate rule #5.
- If you update with a SOLIDWORKS file, do not create meta-properties in the Composer document.
The update process removes Composer-created meta-properties from the Composer document because the meta-properties do not exist in the SOLIDWORKS file.
If you update from another Composer document, the update process does not remove Composer-created meta-properties. However, the update process will not update the meta-properties if both Composer documents contain the same meta-properties.
Following these rules should lead to a successful update of your SOLIDWORKS models.
Updating Subassemblies Only
Now that we know how to update top-level assemblies, what happens when only a subassembly needs to be updated? We could run the same update process as before, but that may not be needed. Depending on how your Composer Document has been set up, you could update the subassembly itself.
The first step in setting up a Composer Document to be able to update individual subassemblies is to save your newly imported assembly as a .smgxml. If you have an already existing .smg you can also save it as a .smgxml. This will break up the document into the child files: .smgxml, .smggeom, .smgsce, and .smgview.
Once complete, all subassemblies should be opened and saved as .smgxml files. From there, close all subassemblies and reopen the top-level assembly .smgxml.
Now add the subassembly .smgxmls to the top-level file by going to the Assembly tab, expanding the tree, finding your subassembly, and right-clicking. In the right-click menu, find the Product menu and expand it. Then select Add Product.
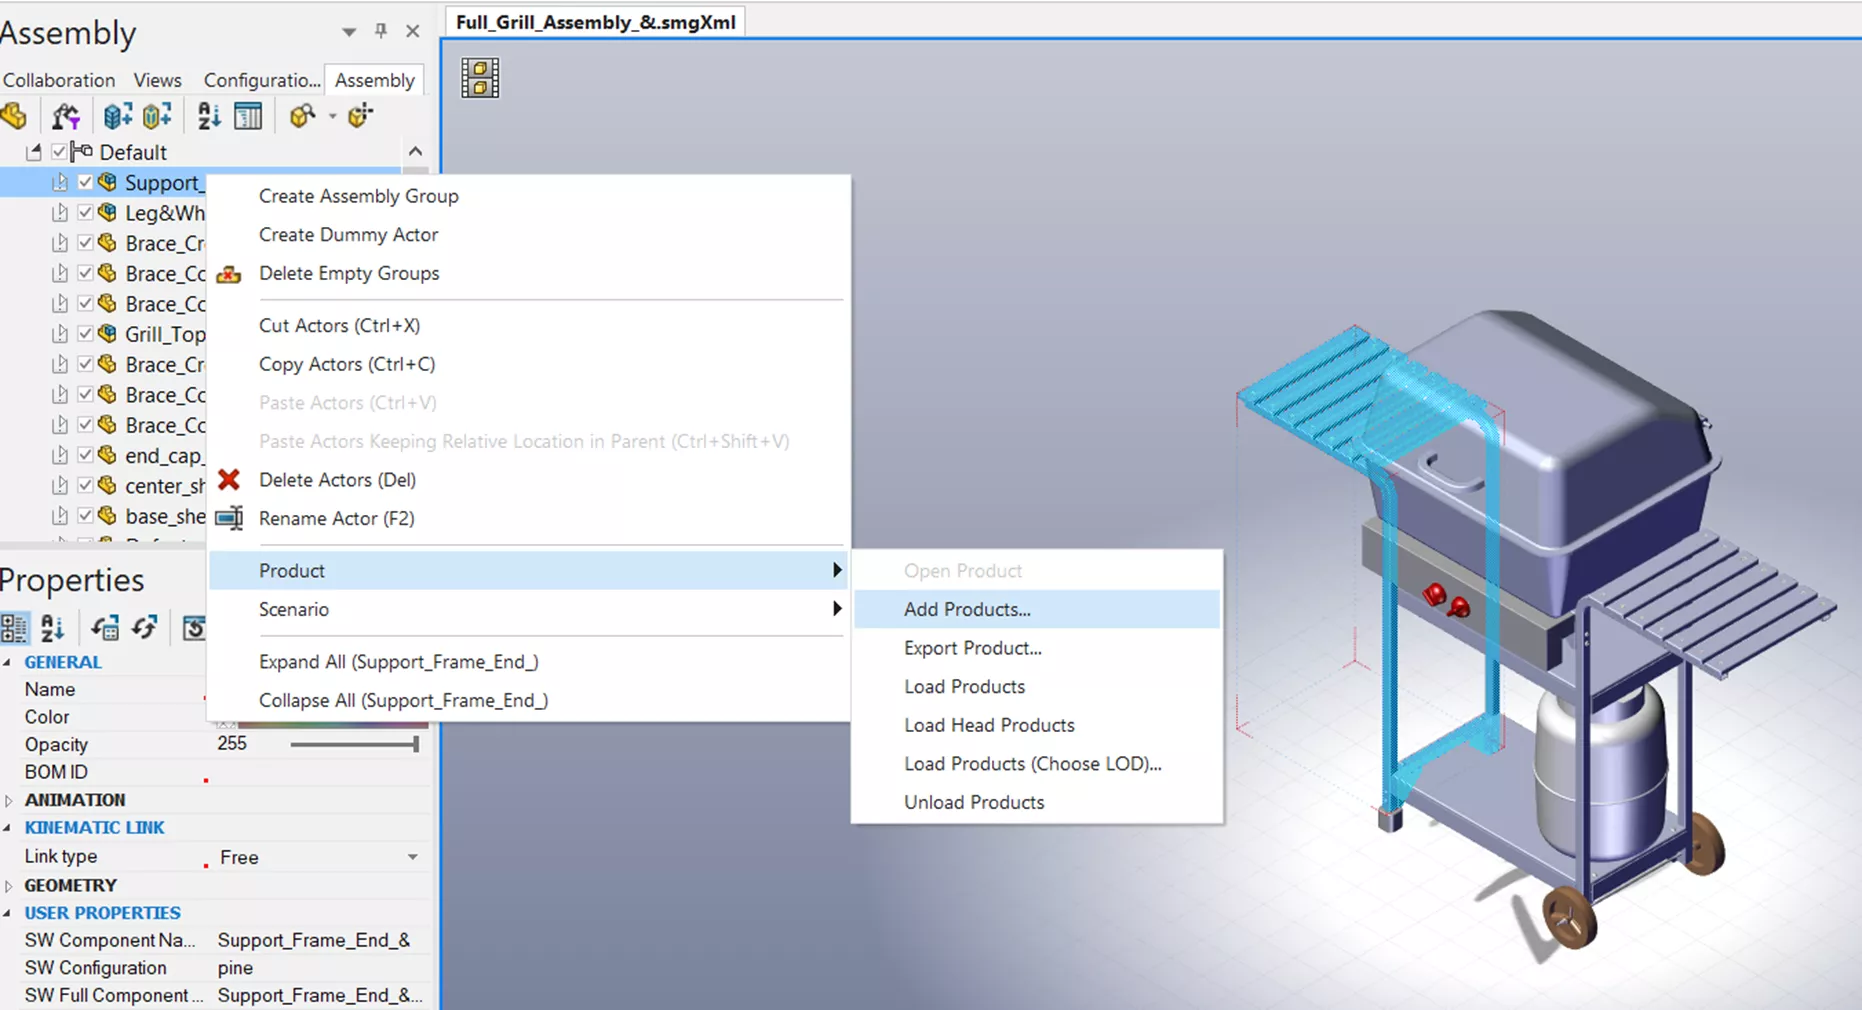
This will allow you to select the file. Repeat this process for all the subassemblies. Note: When you perform this action, it is important to ensure you are at the subassembly level when adding the product. This will embed the product at that level, preserving the actor's position in the view. If you were to add the product at the toplevel, it would still be added, just in the wrong position.
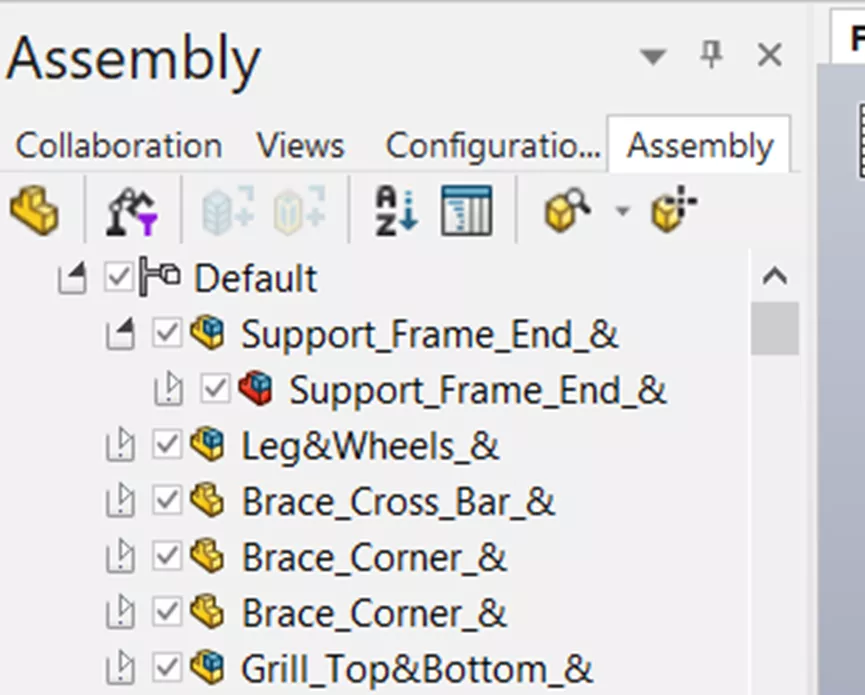
Once all the subassemblies have been added, you will see a red assembly icon.
![]()
This is the product you just added from the .smgxml file. Notice that the subcomponents of this subassembly are still here. Delete them.
When finished updating all the subassemblies this way, open the subassembly .smgxml and use the Composer Document update method from above. Then, the next time you open the top-level assembly file, the changes will appear. If, by chance, you open the top-level assembly file and the actors are missing, just go to the Assembly Tree and turn them back on.
Using the update tool will save you a lot of time and work when a mechanical design change occurs, like they often do. And, knowing how to make these updates even simpler using a structure that utilizes native Composer file types. Combining these two should allow you to create and modify your Technical Documents with ease.
I hope you found this article helpful. Check out more tips and tricks below. Additionally, join the GoEngineer Community to create forum posts, enter design contests, and answer questions from other SOLIDWORKS users.
Composer Training
Want to take your Composer skills to the next level? Our SOLIDWORKS Composer training course covers how to use the software to create 2D and 3D output from CAD design data.

Related Articles
How to Make Callouts Visible in SOLIDWORKS Composer Digger Tool
SOLIDWORKS Composer: Solving Missing Actors
SOLIDWORKS Composer: Setting Up Actors for Kinematic Relationships
SOLIDWORKS Composer – Editing Camera Views While Maintaining Their Orientation
![]()
About Nathen Blas
Nathen Blas is a SOLIDWORKS Technical Support Engineer based out of our Headquarters in Salt Lake City, Utah. He earned his Bachelor’s degree in Mechanical Engineering at the University of Utah in 2018 and joined the GoEngineer family that same year.
Get our wide array of technical resources delivered right to your inbox.
Unsubscribe at any time.