Pressure Potential in SOLIDWORKS Flow Simulation Explained
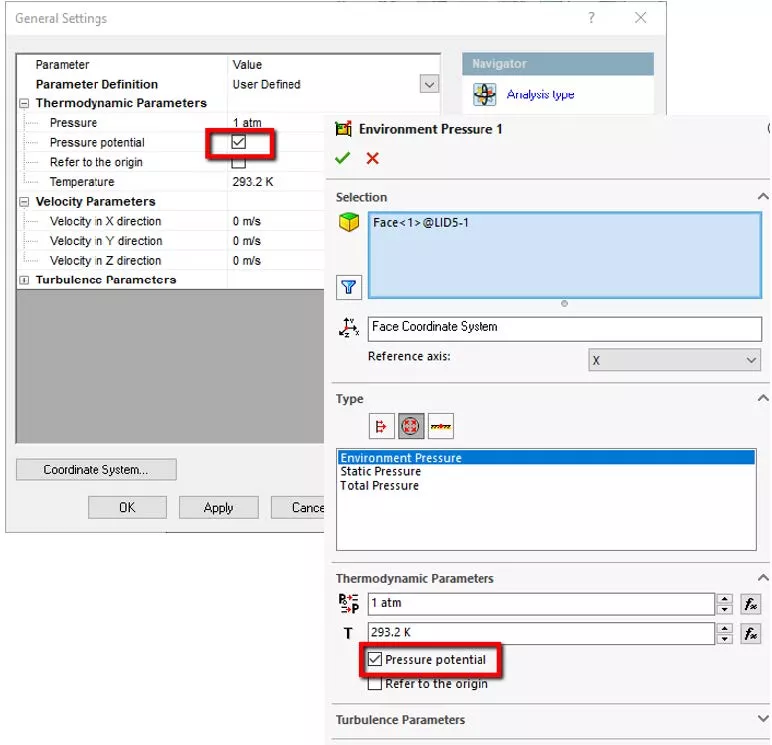
“What is Pressure potential?” is one of the most common questions I get asked from students on the first day teaching our SOLIDWORKS Flow Simulation training class. Pressure potential in SOLIDWORKS Flow Simulation is a simple check box in the initial conditions section of the project’s general settings. This option is also accessed locally in its corresponding property manager for the various pressure boundary conditions.
If the Pressure Potential option is not properly addressed, it can lead to incorrect pressure results. The scary part is that it could happen without being noticed.
Lastly, you may have seen that sometimes the pressure potential check box is present and sometimes it is not. This can happen when using the project wizard or when going back and editing the general settings and local boundary conditions. This behavior is expected since the pressure potential check box becomes active when you turn on gravity in your flow simulation project.
What is the Pressure Potential check box for?
The pressure potential check box changes how hydrostatic pressures are calculated for your project. The most popular example of this is felt when one is swimming in a pool or the ocean and then decide to dive downward. You can feel the increased pressure in your ears and head the further down you dive.
This check box helps determine the reference point of this effect for your project. When checked on, Flow Simulation will apply the default/initial pressure obtained from the general settings at the height specified by the zero position in the project’s global coordinate system. This is also the global coordinate system of the model by default. The calculated change in static pressure will then be determined by the direction of the gravitational pull.
If the check box is cleared out, then the hydrostatic pressure distribution will be calculated based on the position of your locally applied pressure conditions.
SOLIDWORKS Flow Simulation Pressure Potential Example
In the following example, we have a 45-gallon fish tank filled with water. Gravity is turned on pulling downward on the water. We also have an environment pressure boundary condition at the top of the tank of 1atm.

When we solve the project with the pressure potential option checked on, our results seem a bit strange. Please examine the pressure plot below.
We would expect to have our 1atm pressure at the top of the tank. Our pressure result plot indicates a 1atm pressure at the green coordinate system located at the bottom of the tank and a lower than 1atm pressure (less pressure) at the top of the tank of 0.96atm.
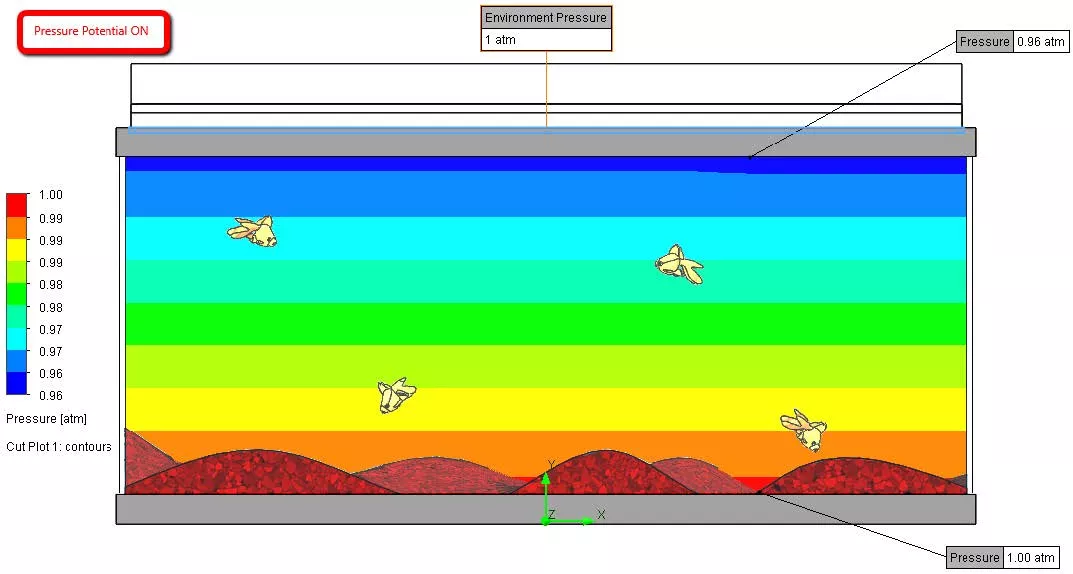
As explained previously, the SOLIDWORKS Flow Simulation is using the coordinate system’s zero-position to input its default pressure value to calculate the hydrostatic pressure distribution. Therefore, we see a 1atm pressure at the bottom of the tank despite the local boundary condition being at 1atm at the top of the tank.
The Fix
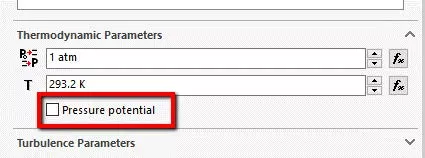
Let us re-run the very same project again but this time we will first edit the environment pressure boundary condition and clear out the pressure potential check box:
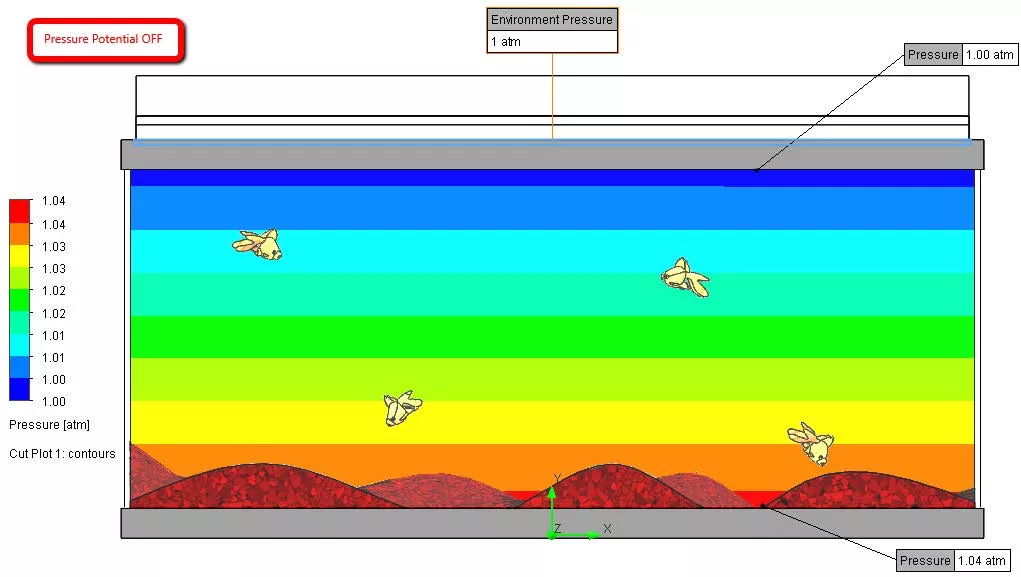
Notice that pressure results are now in-line with what we were expecting initially. The calculation of pressure is using the position of the locally applied environment pressure at the top of the tank for its reference. The pressure plot reports a 1atm pressure at the top of the tank while the bottom of the tank reports a higher than 1atm (more pressure) of 1.04atm.
This fix is fine if the size of the project is manageable, or if your model environment fits within the design domain of SOLIDWORKS. If you are trying to perform an analysis that involves hydrostatic pressures on a project with a much larger scale use the following suggestion:
- Turn on pressure potential and enter the appropriate pressure for the known depth under the general settings of the project
- Ensure that your coordinate system is in the desired location, either at the center of the model or sufficiently close to your geometry.
A typical use-case scenario for this is examining a structure at the bottom of the ocean. If your coordinate system is not in an optimal location in your 3D space, you can turn on the check box Refer to the origin to specify an alternate coordinate system. This option will give you more control over the exact placement of your default pressure reference and direction by selecting an alternate coordinate system from the SOLIDWORKS FeatureManager design tree.

Final Thoughts
Hydrostatic pressure calculation happens for all fluid mediums in flow simulation with gravity but is easier to detect on more dense fluids such as liquids. It is also easier to detect with larger changes in depth and distance. One last tip, if you are going to use the pressure potential check box and change the default pressure potential option in the general settings of the project, be sure to also edit the locally applied pressure boundary condition as well. The general settings in the project will not retroactively update your existing boundary conditions but only newly created boundary conditions.
Learn More About SOLIDWORKS Flow Simulation
SOLIDWORKS Flow Simulation Flux Plot Explained
How to Handle a Vortex Across a Pressure Boundary in SOLIDWORKS Flow Simulation
5 Steps to Take Before Every SOLIDWORKS Flow Simulation Analysis
Customizing SOLIDWORKS Flow Simulation Feature Tree Categories

About Enrique Garcia
Enrique has been involved in technical training since 2007 with SOLIDWORKS and Simulation tools and currently specializes in Simulation Products. He is a CSWE and was given Elite Application Engineer status at SOLIDWORKS world in 2018. Enrique holds a Bachelor's Degree in Biomedical Engineering from Arizona State University. He has worked alongside and learned from companies in the medical device industry developing orthodontic devices that specializes in the rehabilitation needs of many types of patients.
Get our wide array of technical resources delivered right to your inbox.
Unsubscribe at any time.