How to Create a SOLIDWORKS Rx in SOLIDWORKS, Electrical, and Composer
When something can go wrong, it will go wrong. That always seems to be the case, especially when you are in a rush, right? If you find yourself with a mountain of work to do, SOLIDWORKS is acting up, and not enough time to dedicate to troubleshooting, you may opt to create a support case via email. When creating the case, there is an extremely useful zip file of information that you can provide the GoEngineer Technical Support Engineers to help determine the root cause of the issue, rule out other variables, and get you to a solution quicker. This zip file is known as a SOLIDWORKS Rx log.
What is a SOLIDWORKS Rx Log?
The SOLIDWORKS Rx log includes information like machine specs, registry information, event logs, a video recording of you recreating the behavior, and a Pack & Go of the affected files. This article includes the instructions for running a SOLIDWORKS Rx problem capture in SOLIDWORKS, SOLIDWORKS Electrical, and SOLIDWORKS Composer. (It can also capture behavior in File Explorer, eDrawings, and Visualize, which we'll also cover.)
SOLIDWORKS
- Type SOLIDWORKS Rx in Windows search and choose the appropriate version. Alternatively, open SOLIDWORKS, select the ? in the top right of the screen, and choose SOLIDWORKS Rx from the menu.
- Click on the Problem Capture tab and allow the System Information dialog to complete processing before moving forward.
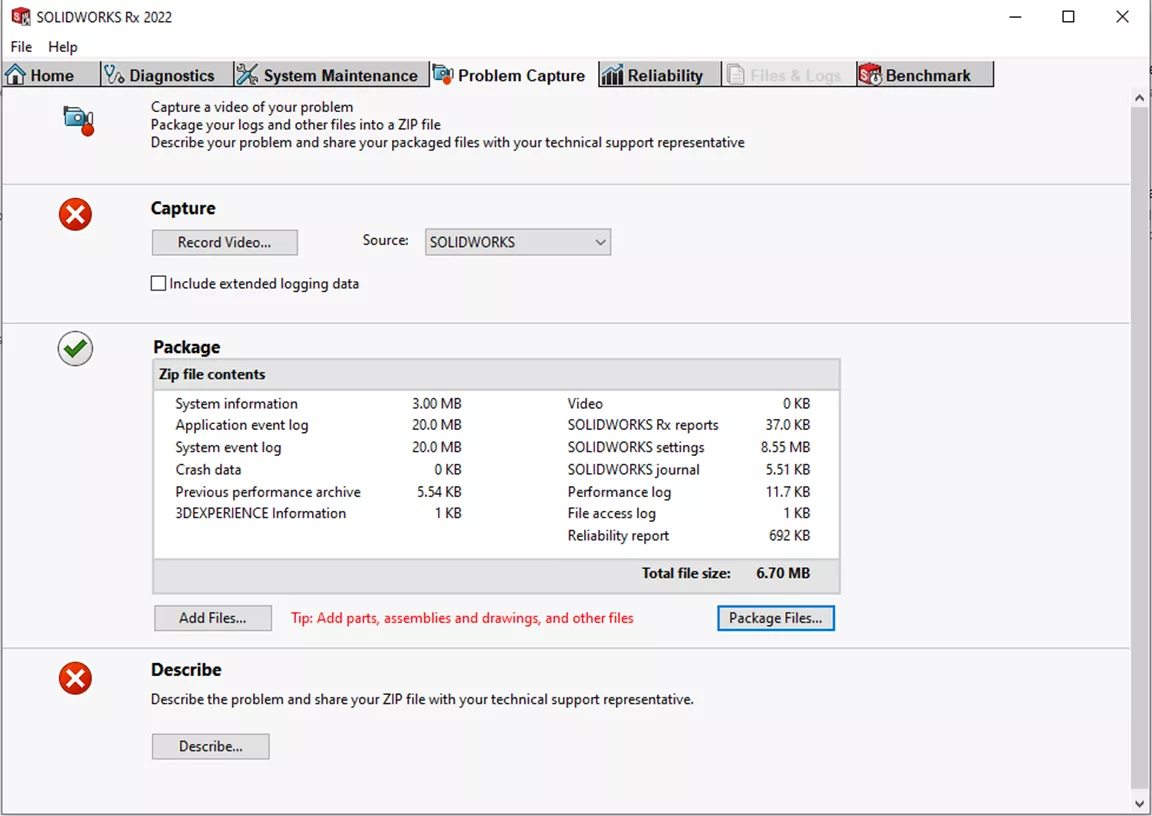
- Proceed to Step 1 (Capture): Ensure the source drop down menu is set to SOLIDWORKS. Then, select Record Video…. If SOLIDWORKS is already started, choose to Use Current Session or Restart SOLIDWORKS Now.
- Click on Start Recording.
- Recreate the issue you are experiencing (the SOLIDWORKS Rx captures these steps in a video as well as an event log). When finished, hit Finish Recording; this will shut down SOLIDWORKS and return you to the SOLIDWORKS Rx session.
- Go to Step 2 (Package): Select Add More Files to Zip…, and verify that all model, format, template, etc., files that are required are in the window. Use the Browse button to add any additional files.
- Select the Package Files Now… button, and save the Zip file in a location you can easily find and share with Technical Support when done.
- Once the package is complete, click the Continue to Step 3 button in the window.
- Step 3 (Describe): Select the Describe button. Provide a brief summary and enter a description of the steps needed to reproduce the issue.
- Select Impact level (how critical is the issue?) and provide the reason for your selection. Select OK.
- A window will appear to Exit SOLIDWORKS Rx or Create a New Problem Capture. Exit SOLIDWORKS Rx will close the Rx window.
(To view each step of this process with images, visit our tutorial "How to make a SOLIDWORKS RX Problem Capture")
SOLIDWORKS Electrical
-
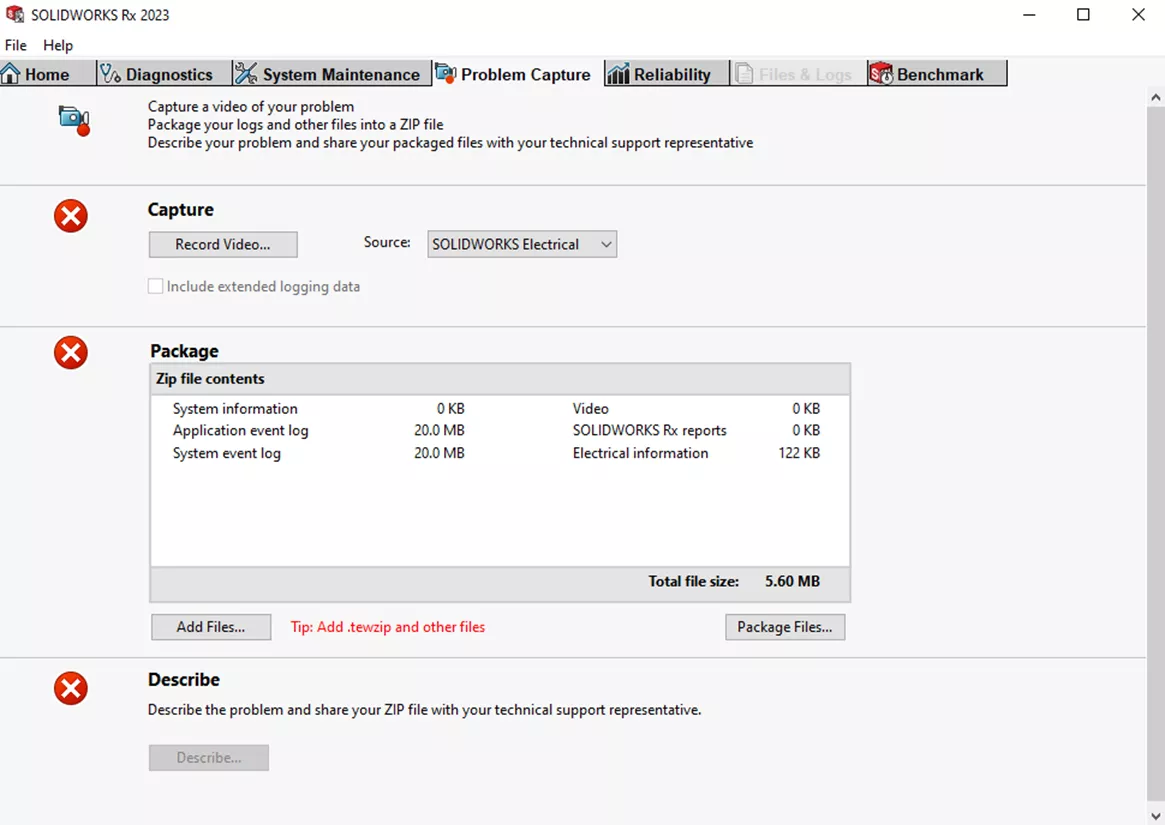
Open SOLIDWORKS Electrical, navigate to the Help banner and select SOLIDWORKS Rx. Alternatively, type SOLIDWORKS Rx in Windows search and choose the appropriate version (if multiple years are installed).
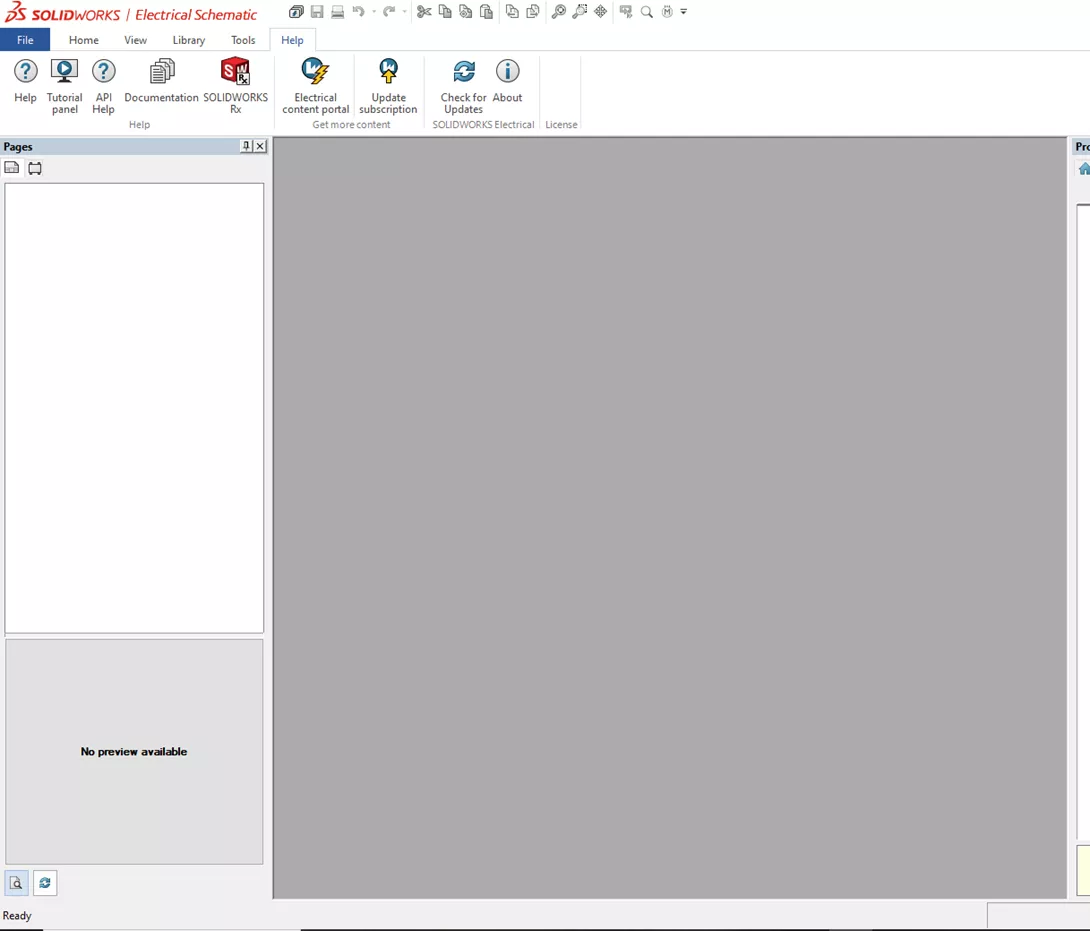
- Click on the Problem Capture tab and allow the System Information dialog to complete processing before moving forward.
- Proceed to Step 1 (Capture): Ensure the source drop down menu is set to SOLIDWORKS Electrical. Once done, select Record Video… If SOLIDWORKS Electrical is not started, it will start now.
- Click Start Recording.
- Recreate the issue you are experiencing (the SOLIDWORKS Rx captures these steps in a video as well as an event log). When finished, hit Finish Recording; this will shut down SOLIDWORKS and return you to the SOLIDWORKS Rx session.
- Go to Step 2: Select Add More Files to Zip… and verify that all files that are required are in the window. Use the Browse button to add any additional files. It is helpful to include an archive of the electrical project causing the problem.
- Select the Package Files Now… button and save the Zip file in a location you can easily find and share with Technical Support when done.
- Once the package is complete, click the Continue to Step 3 button in the window.
- Step 3 (Describe): Select the Describe button. Provide a brief summary and description of the steps needed to reproduce the issue.
- Select Impact level (how critical is the issue?) and provide the reason for your selection. Select OK.
- A window will appear to Exit SOLIDWORKS Rx or Create a New Problem Capture. Exit SOLIDWORKS Rx will close the Rx window.
SOLIDWORKS Composer
-
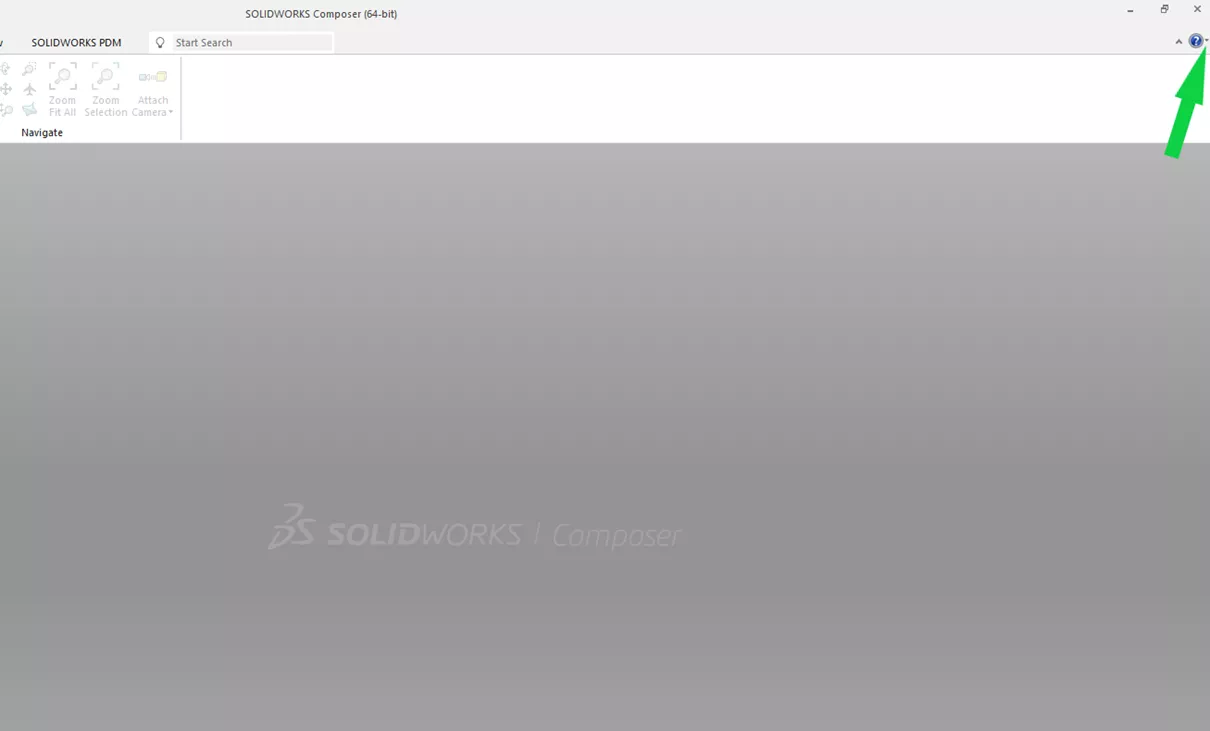
Launch SOLIDWORKS Composer and click on the dropdown arrow to the right of the "?" in the top right of the screen. In the dropdown menu, select SOLIDWORKS Rx. Alternatively, type SOLIDWORKS Rx in Windows search and choose the appropriate version (if multiple years are installed).
-
Click on the Problem Capture tab and allow the Refreshing System Information dialog to complete processing before moving forward
- Proceed to Step 1 (Capture): Ensure the source drop down menu is set to SOLIDWORKS Composer. Once complete, select Record Video…. If SOLIDWORKS Composer is not started, it will start now.
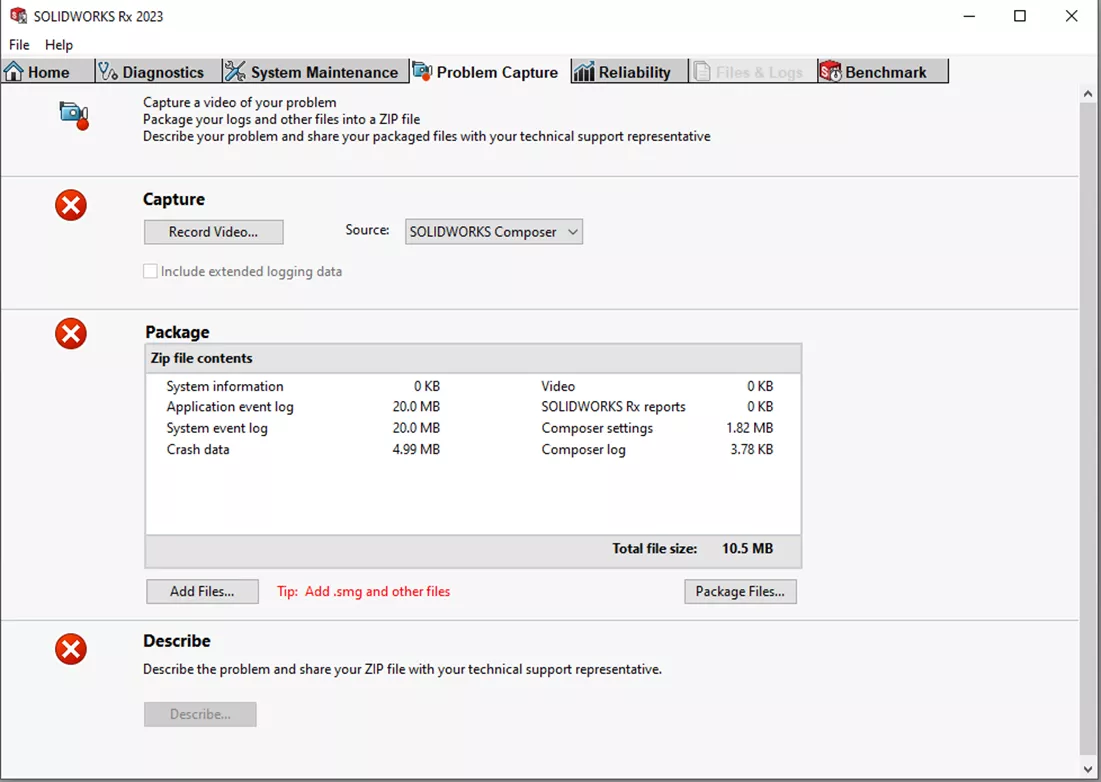
- Click Start Recording.
- Recreate the issue you are experiencing (the SOLIDWORKS Rx captures these steps in a video as well as an event log). When finished, hit Finish Recording; this will shut down SOLIDWORKS and return you to the SOLIDWORKS Rx session.
- Go to Step 2: Select Add More Files to Zip…, and verify that all files that are required are in the window. Use the Browse button to add any additional files.
- Select the Package Files Now… button, and save the Zip file in a location you can easily find and share with Technical Support when you are done.
- Once the package is complete, click the Continue to Step 3 button in the window.
- Step 3 (Describe): Select the Describe button. Provide a brief summary and description of the steps needed to reproduce the issue.
- Select Impact level (how critical is the issue?) and provide the reason for your selection. Select OK.
- A window will appear to Exit SOLIDWORKS Rx or Create a New Problem Capture. Exit SOLIDWORKS Rx will close the Rx window.
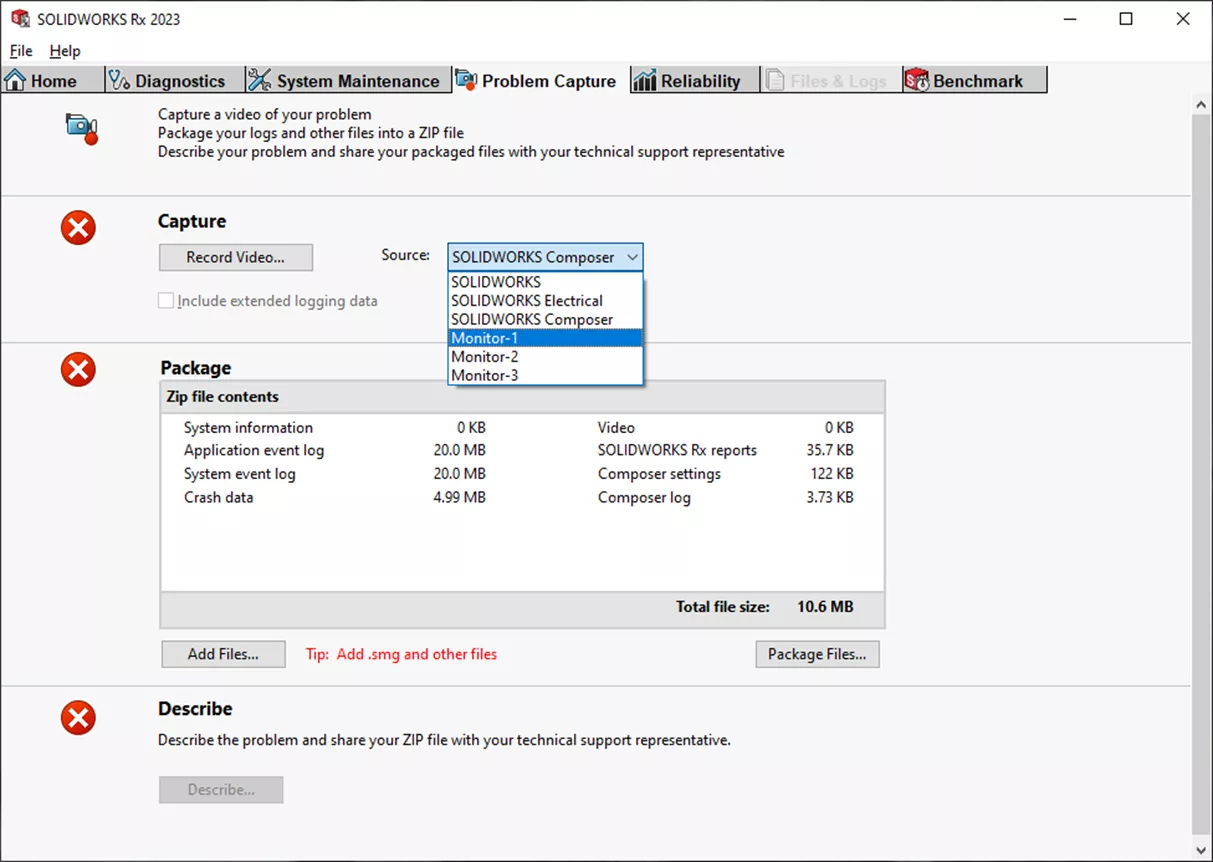
Other Software
If you are experiencing issues with SOLIDWORKS File Utilities, eDrawings, Visualize, opening SOLIDWORKS, Electrical, or Composer or opening files in them, follow the steps below.
- Type SOLIDWORKS Rx in Windows search and choose the appropriate version (if multiple years are installed).
- Click on the Problem Capture tab and allow the System Information dialog to complete processing before moving forward.
- Proceed to Step 1 (Capture): Ensure the source drop down menu is set to the monitor to capture the behavior on. For example, the drop down menu will show Monitor-X where “X” is the number monitor. These numbers correlate to the monitor numbering in Windows Settings > System > Display. When finished, select Record Video…
- Click Start Recording.
- Recreate the issue you are experiencing (the SOLIDWORKS Rx captures these steps in a video as well as an event log). When finished, hit Finish Recording; this will shut down SOLIDWORKS and return you to the SOLIDWORKS Rx session.
- Go to Step 2 (Package): Select Add More Files to Zip…, and verify that all model, format, template, etc., files required are in the window. Use the Browse button to add any additional files.
- Select the Package Files Now… button, and save the Zip file in a location easy find and share with Technical Support when you are done.
- Once the package is complete, click the Continue to Step 3 button in the window.
- Step 3 (Describe): Select the Describe button. Provide a brief summary and description of the steps needed to reproduce the issue.
- Select Impact level (how critical is the issue?) and provide the reason for your selection. Select OK.
- A window will appear to Exit SOLIDWORKS Rx or Create a New Problem Capture. Exit SOLIDWORKS Rx will close the Rx window.
I hope you found this tutorial helpful. Check out more SOLIDWORKS tips and tricks below.
More SOLIDWORKS Tutorials
7 Important Tips for New SOLIDWORKS Users
Best Workstations for SOLIDWORKS: Hardware Configurations
New Updates! GoEngineer Customer Portal: Manage Assets, Maintain Users, & Training
Updated! How to Submit a SOLIDWORKS Enhancement Idea

About Curran Kneebone
Curran Kneebone is a SOLIDWORKS Technical Support Engineer based out of Pennsylvania. He has been supporting SOLIDWORKS users since 2021 in SOLIDWORKS 3D CAD, Routing, Electrical, Composer, & Visualize. He earned his Bachelor's degree in Mechanical Engineering from Philadelphia University in 2015.
Get our wide array of technical resources delivered right to your inbox.
Unsubscribe at any time.