Getting Started with 3DEXPERIENCE CST Connector: Setup, Saving & Solving on the Cloud, and All-Physics Analyst Tools
Desktop CST Studio Suite users need not be limited by their local computing resources for saving, solving, and viewing simulations. By adding one supplementary license to their CST, they can save, organize, and run their simulations on 3DEXPERIENCE cloud HPC resources.
The 3DEXPERIENCE All-Physics Analyst role is a “cloud enabler” for desktop SIMULIA users, whether they’re using CST Studio Suite, Abaqus, or a handful of other traditional CAE tools. This role contains the following applications that are beneficial to CST Studio Suite:
![]() Connector for CST - Run the desktop CST Studio Suite application with models from the 3DEXPERIENCE cloud platform.
Connector for CST - Run the desktop CST Studio Suite application with models from the 3DEXPERIENCE cloud platform.
![]() Simulation Manager - Solve CST projects with cloud solvers.
Simulation Manager - Solve CST projects with cloud solvers.
 Physics Simulation Review - Review results from CST studies on the 3DEXPERIENCE platform.
![]() Collaborative Lifecycle - Manage part revisions and releases.
Collaborative Lifecycle - Manage part revisions and releases.
![]() Performance Trade-off - Conduct performance trade-off studies of CST projects to determine the best fit to specific goals.
Performance Trade-off - Conduct performance trade-off studies of CST projects to determine the best fit to specific goals.
Table of Contents
This article will cover:
- Setting up the 3DEXPERIENCE platform
- 3DEXPERIENCE login
- Installing the CST Connector
- Launching CST from the 3DEXPERIENCE platform
- Saving CST projects to the platform
- Using Simulation Manager to run the CST study
- Getting the simulation data back to CST desktop
- Other All-Physics Analyst tools
The software licensing scenario for this functionality is:
- CST Studio Suite Desktop – Already Installed. (S2K, S2X)
Note: If you have not installed CST Studio on the computer, follow our SIMULIA CST Studio Suite Installation Guide with Managed DSLS License Server Option. - 3DEXPERIENCE Platform – All Physics Analyst Role (PXK)
- SRU Tokens or SUN Credits On Cloud – For Solving
Setting Up the 3DEXPERIENCE Platform
Before getting started, make sure your account manager knows who should oversee your platform. That person will receive an email with a confirmation link to accept the license agreement and start the process.
This will take you to your order consent page. If you already have a 3DEXPERIENCE ID, you can log in using that; otherwise, you’ll need to create a new login. Agreeing to the terms finalizes the purchase, and you will receive a confirmation email indicating that you should watch for the final and most important email. You or your designated administrator will click the link and become an administrator for your platform.
It’s important to note that this does not have to be the same person who received the email.
- Suggested Article: Tenant Activation Process for 3DEXPERIENCE Administrators
After the platform administrator activates the 3DEXPERIENCE Tenant, they must invite users to the platform and assign the necessary roles.
The roles that need to be assigned for a CST Connector user are:
3D Swymer role – Granted by default, this role allows the Member to have access to your Tenant.
Collaborative Industry Innovator role – Provides the essential tools to interact with the platform. If the Member will be saving data (such as CST data) to the platform, they must be assigned the Collaborative Industry Innovator role.
All-Physics Analyst role – Provides the CST Connector to allow users to save CST Studio projects to the 3DEXPERIENCE platform and the Simulation Manager Application to allow for cloud solving.
Our article Managing Members in 3DEXPERIENCE explains how to invite members and grant access to roles.
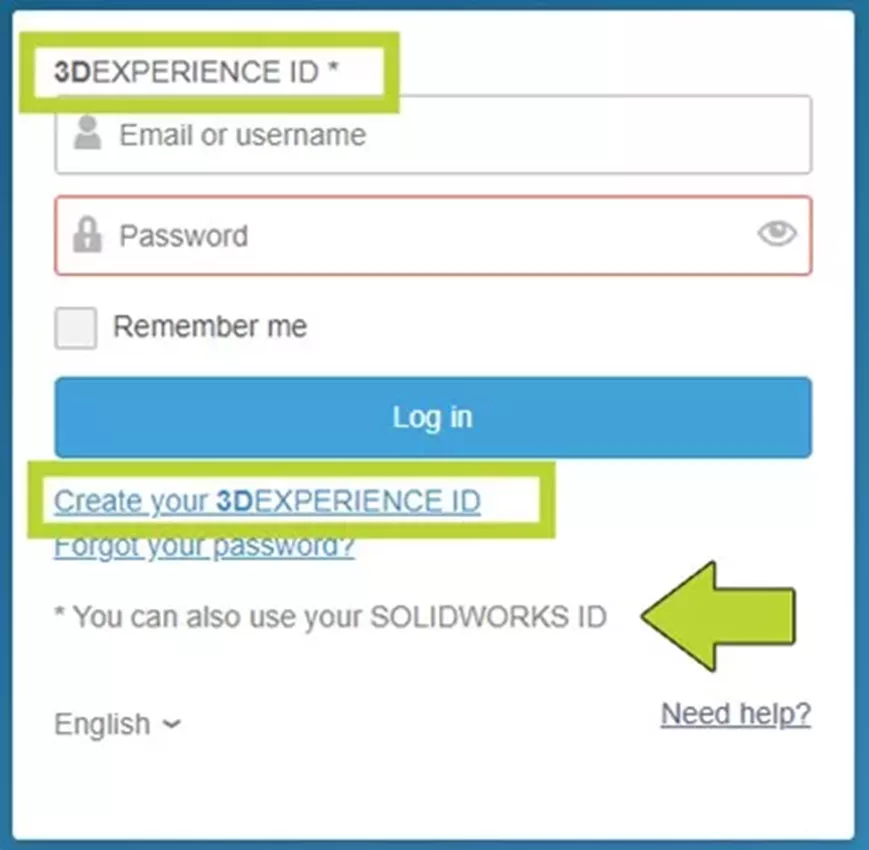
3DEXPERIENCE Login
If you already have a 3DEXPERIENCE ID, you can log in using that; otherwise, create a new account.
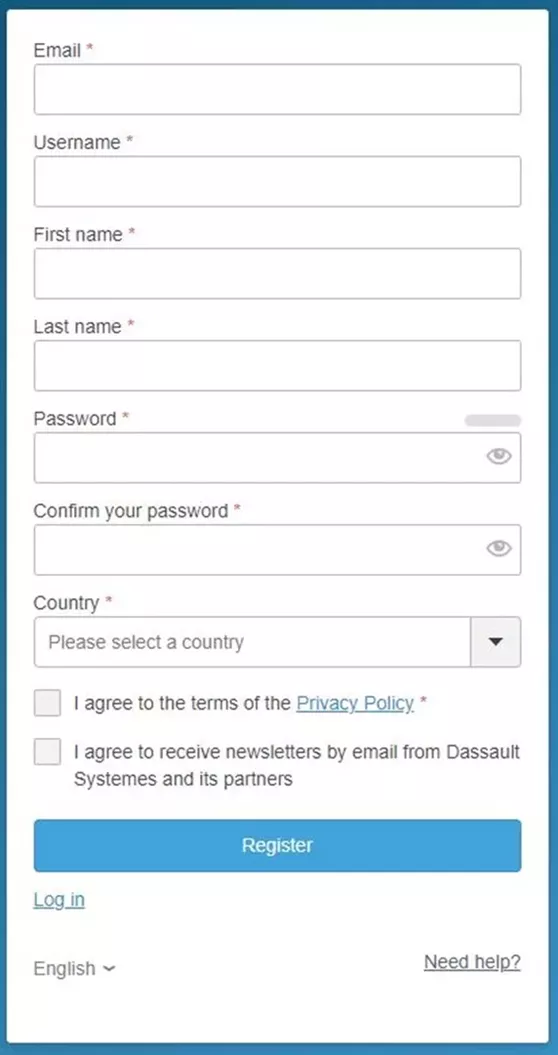
If you create a 3DEXPERIENCE ID, you will be prompted for the following information. When finished, click Register.
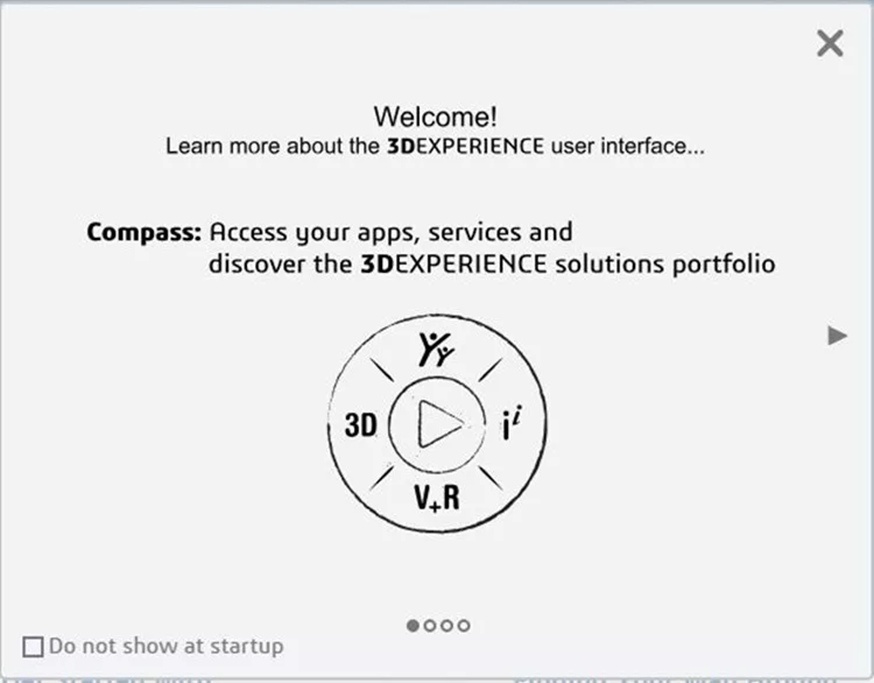
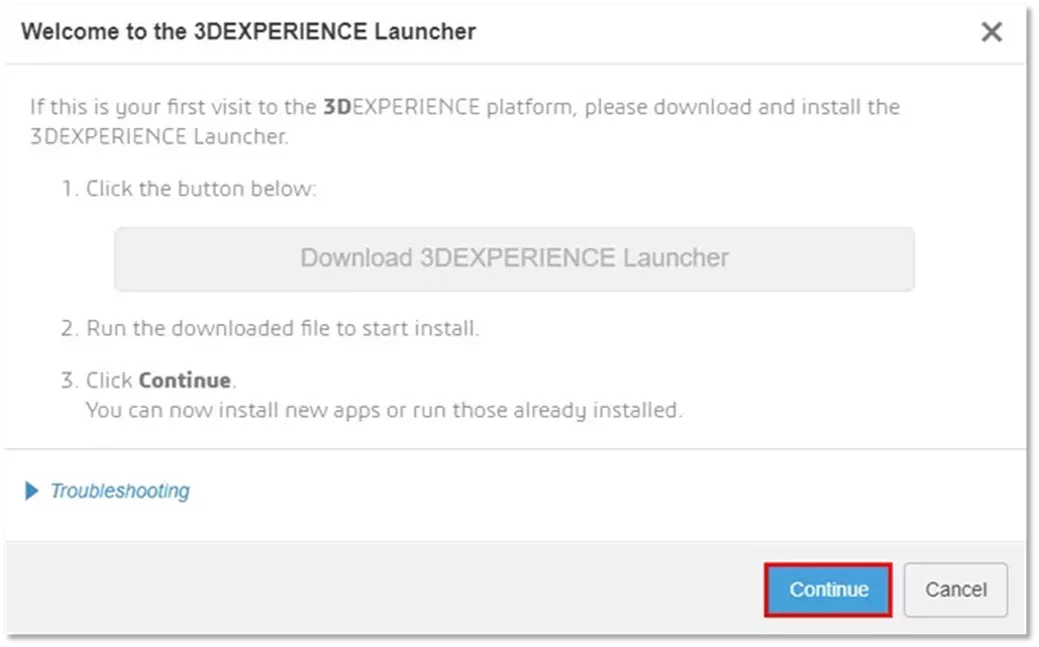
Once registered and logged in, you will be greeted with the 3DEXPERIENCE Welcome pop-up window. This is useful information if you are opening the platform for the first time. The arrow on the right side of the window will scroll to display instructional information for getting started with the 3DEXPERIENCE platform.
Installing the CST Connector
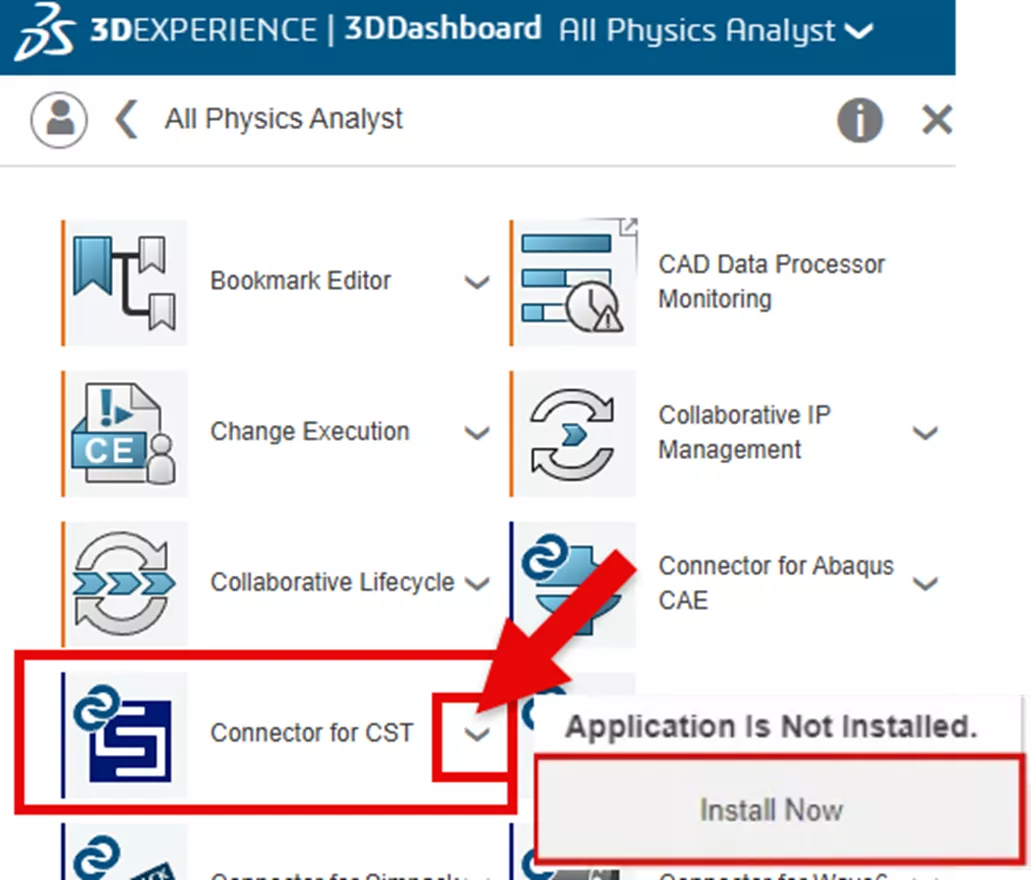
To install the CST Connector from inside the 3DEXPERIENCE platform, select the Compass on the top left of the web browser window and then select the All-Physics Analyst role.
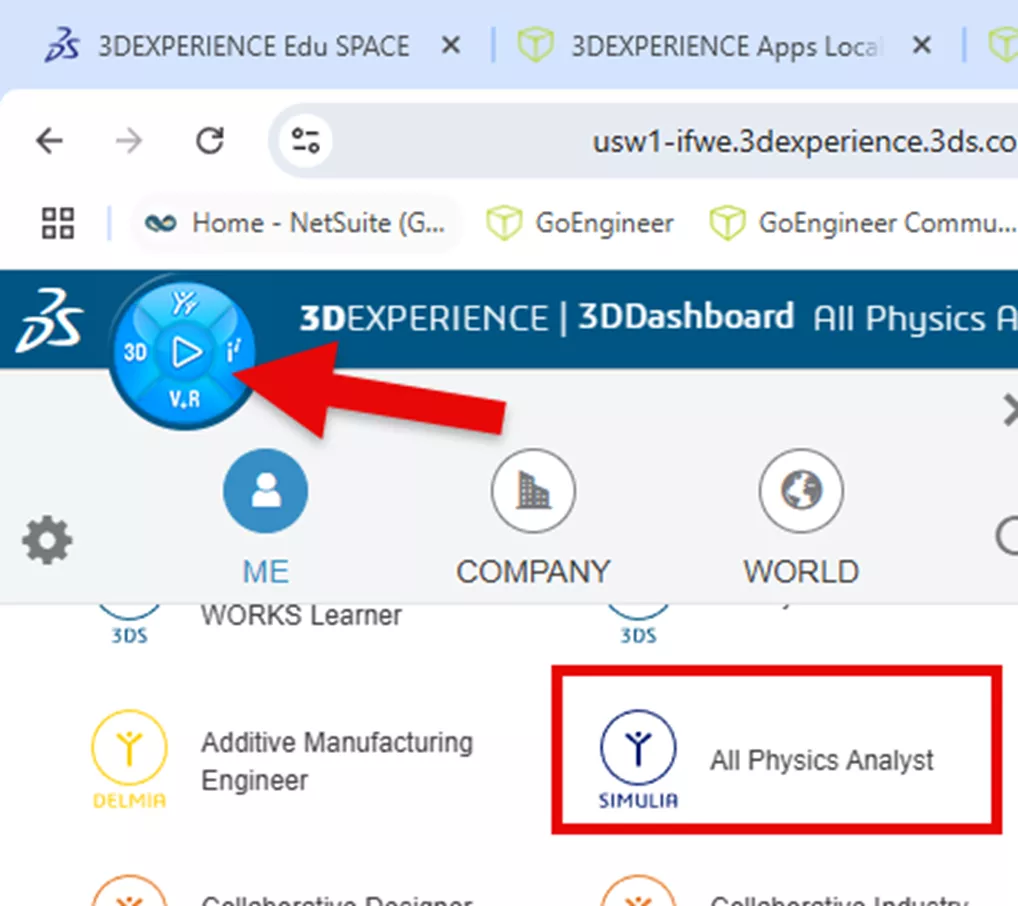
This will switch the pane to the All-Physics Analyst applications menu.
Next, select the dropdown arrow next to the CST Connector application and choose Install Now.
For a first-time setup, the 3DEXPERIENCE Launcher will be installed before any other applications. The Launcher runs in the background and places an icon in your system tray to launch the 3DEXPERIENCE platform.
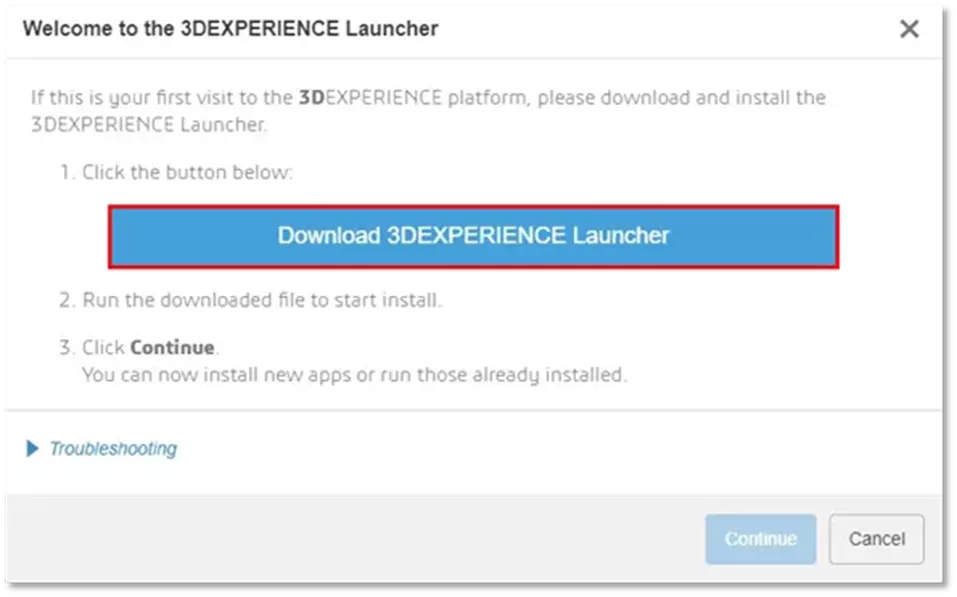
Select Download 3DEXPERIENCE Launcher to download the .MSI installer. Run the .MSI to begin the installation of the launcher. Once the installation starts, the 3DEXPERIENCE Launcher Setup page will load. Click Next to proceed with the installation.
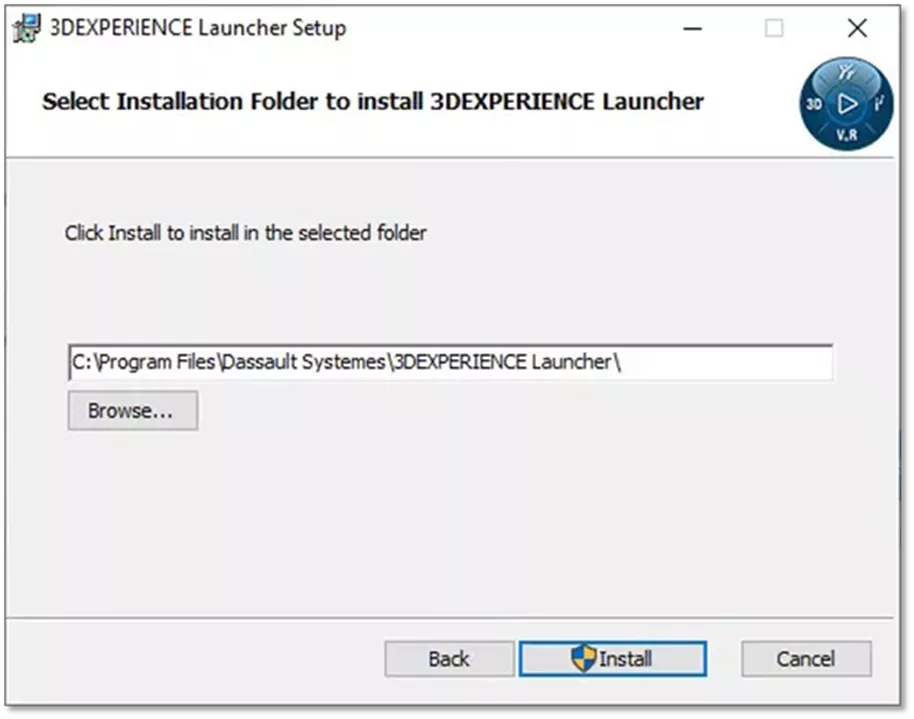
Select Install to accept the preferred installation location.
The Launcher Setup will show the Completed Setup screen once it is complete.
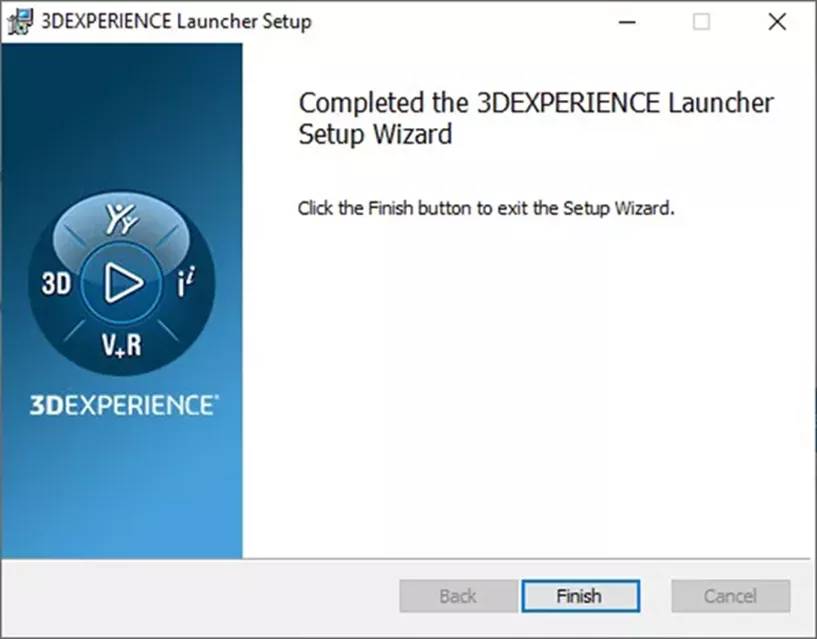
Back on the 3DEXPERIENCE web page, select Continue to continue installing the CST Connector.
After selecting continue, another dialog will appear prompting to Install All Granted Roles or Install All Roles Containing CST Connector.
It is preferred to select the Install All Granted Roles option to install all the roles.
You'll likely see a message stating that you do not have Java Runtime installed on your machine. Do not exit the installation. The message contains two links to download Java Runtime. Click the second link to open the Java Runtime installation page.
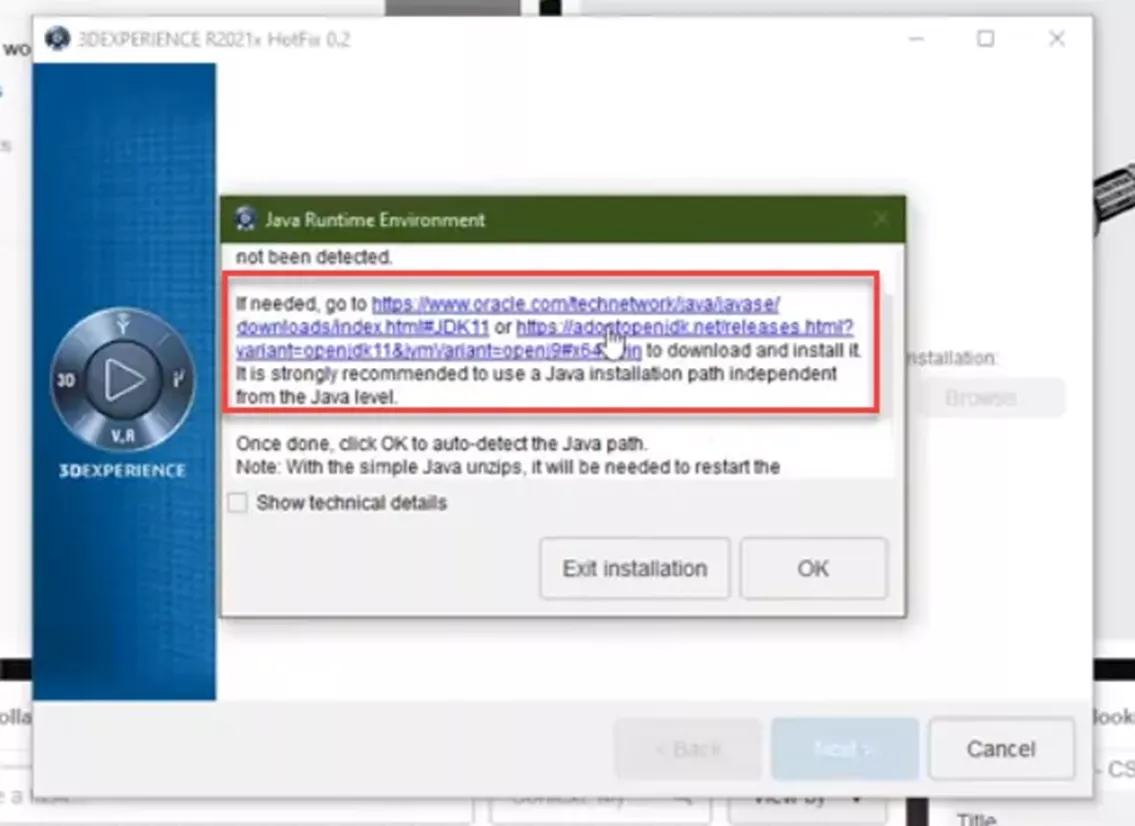
Select Windows x64 and choose the JRE option. Once the download is complete, select the file to launch it, and it will install Java Runtime (the default settings are sufficient). Once this installation is complete, go back to the 3DEXPERIENCE installation and select OK.
The required files will be downloaded and installed onto the computer. This includes modifying the CST desktop installation for access to the 3DEXPERIENCE platform.
Launching CST from the 3DEXPERIENCE Platform
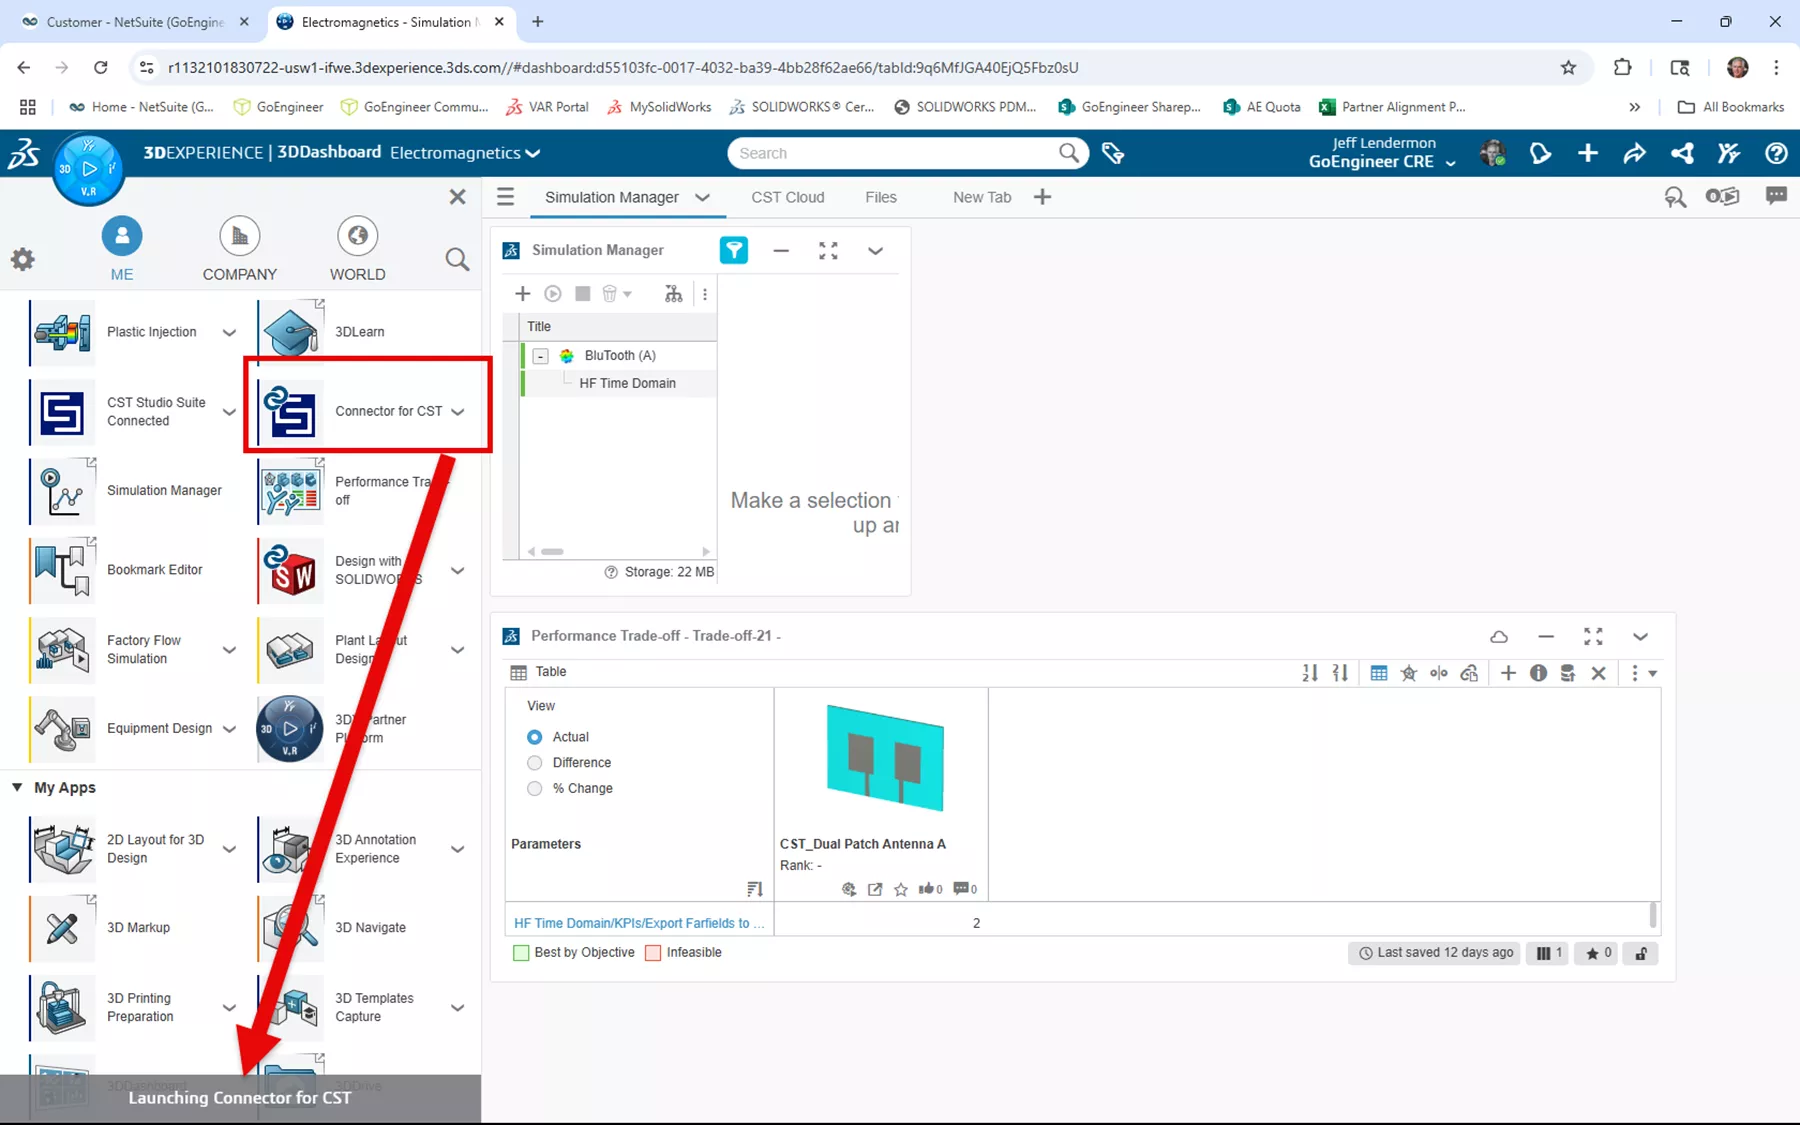
Now that the CST Connector is installed, the CST desktop application can be launched directly from the 3DEXPERIENCE platform. Select the Connector for CST icon from the left-side pane. A message will appear at the bottom of the pane stating that it is launching Connector for CST. The CST desktop program will launch.
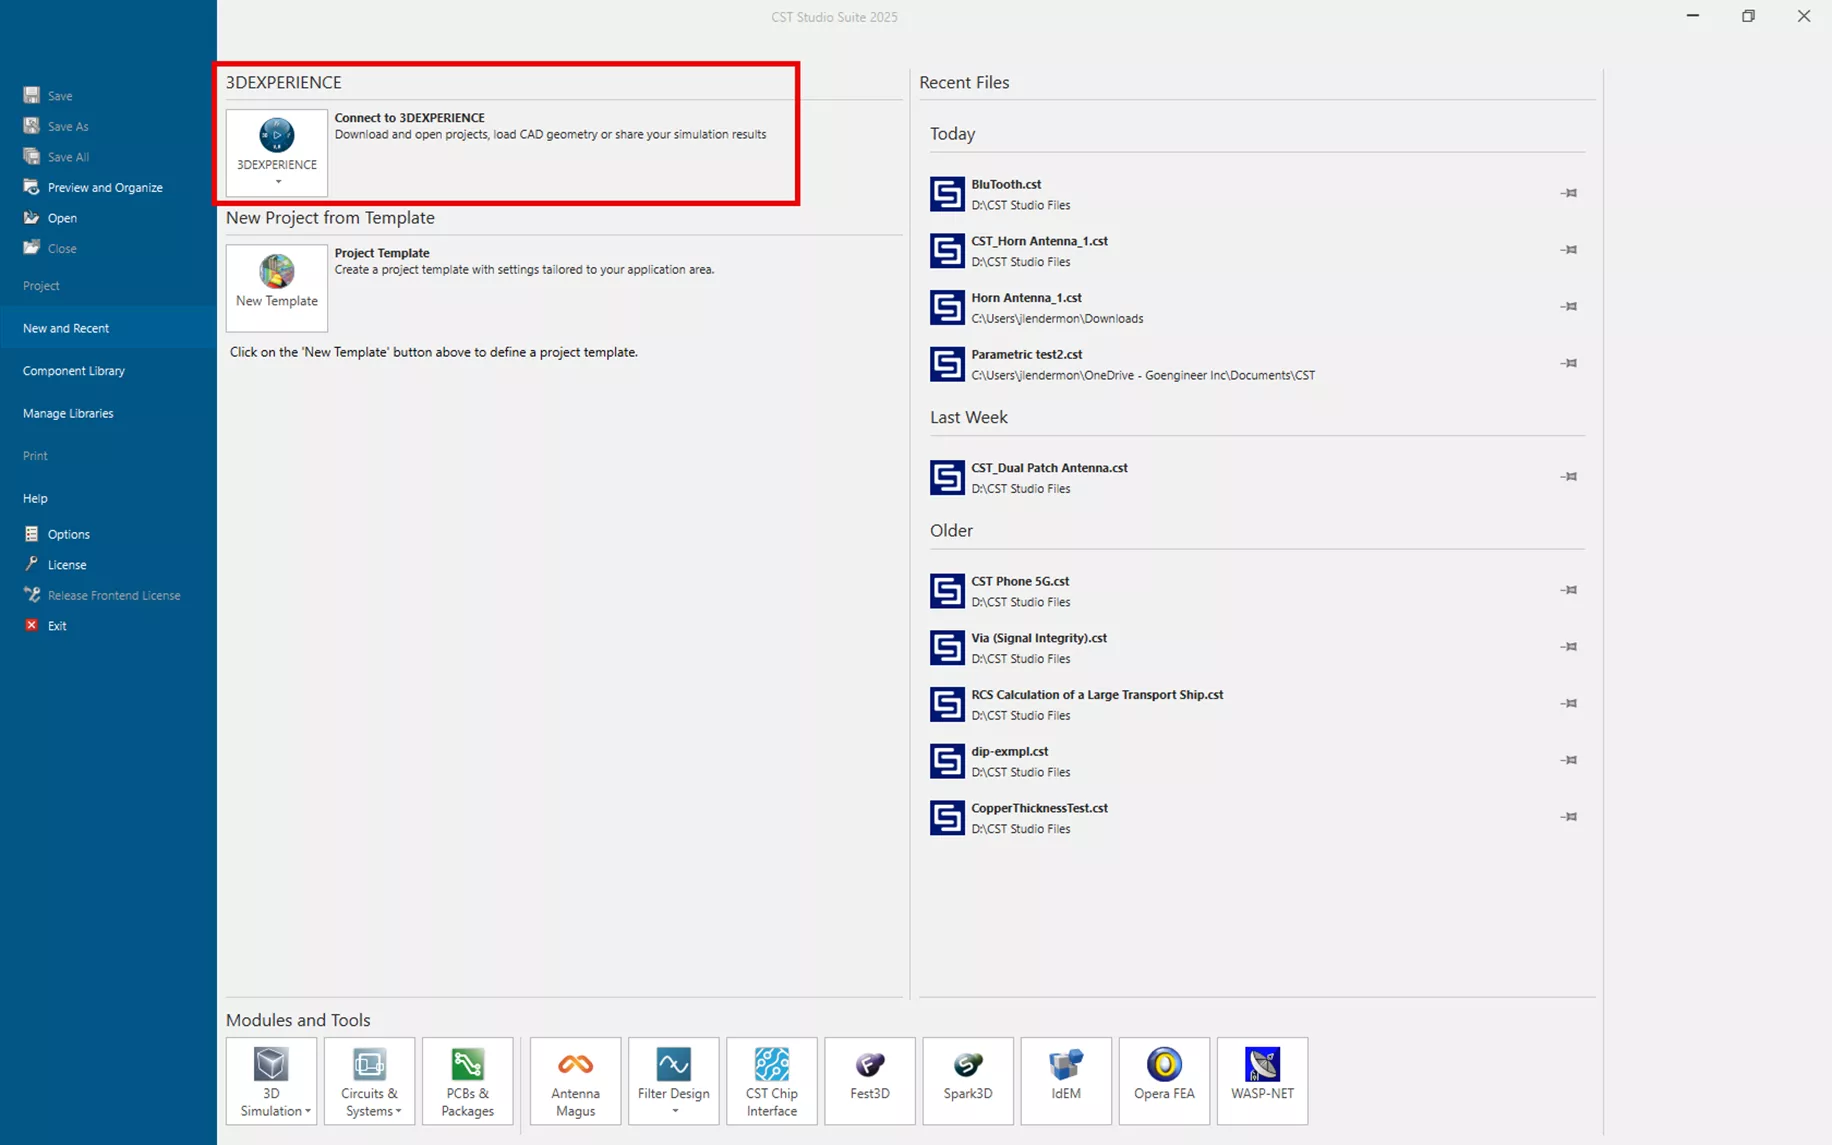
Once CST Studio Suite is open, notice that there is a Connect to 3DEXPERIENCE option on the New and Recent page. This contains the save and load options for your CST content to and from the 3DEXPERIENCE platform.
Saving CST Projects to the Platform
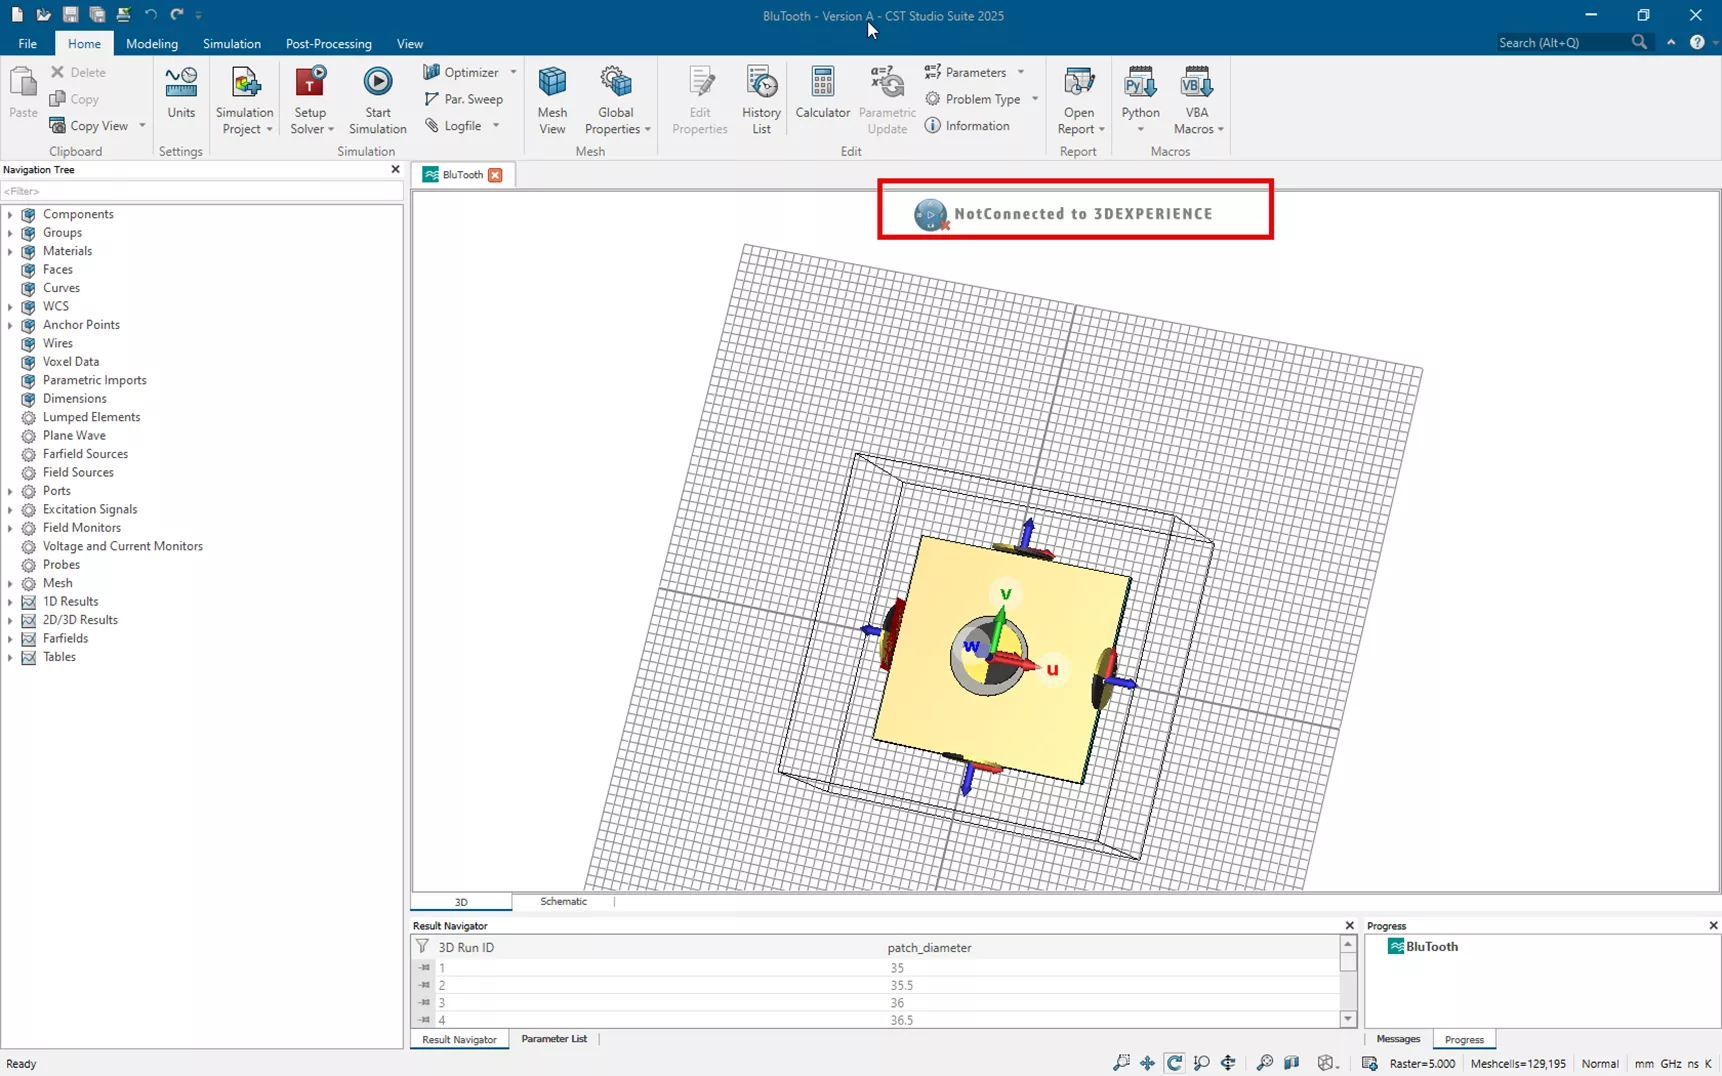
Normally, CST project files that have been opened and saved in CST desktop will be found locally on the computer. To save a CST project to the 3DEXPERIENCE platform, first open the project on CST desktop. When the file opens, you will see the message Not Connected to 3DEXPERIENCE at the top of the viewport.
Switch to the File tab at the top of the menu and choose the dropdown in the Connect to 3DEXPERIENCE box. Choose Save 3DEXPERIENCE Model…
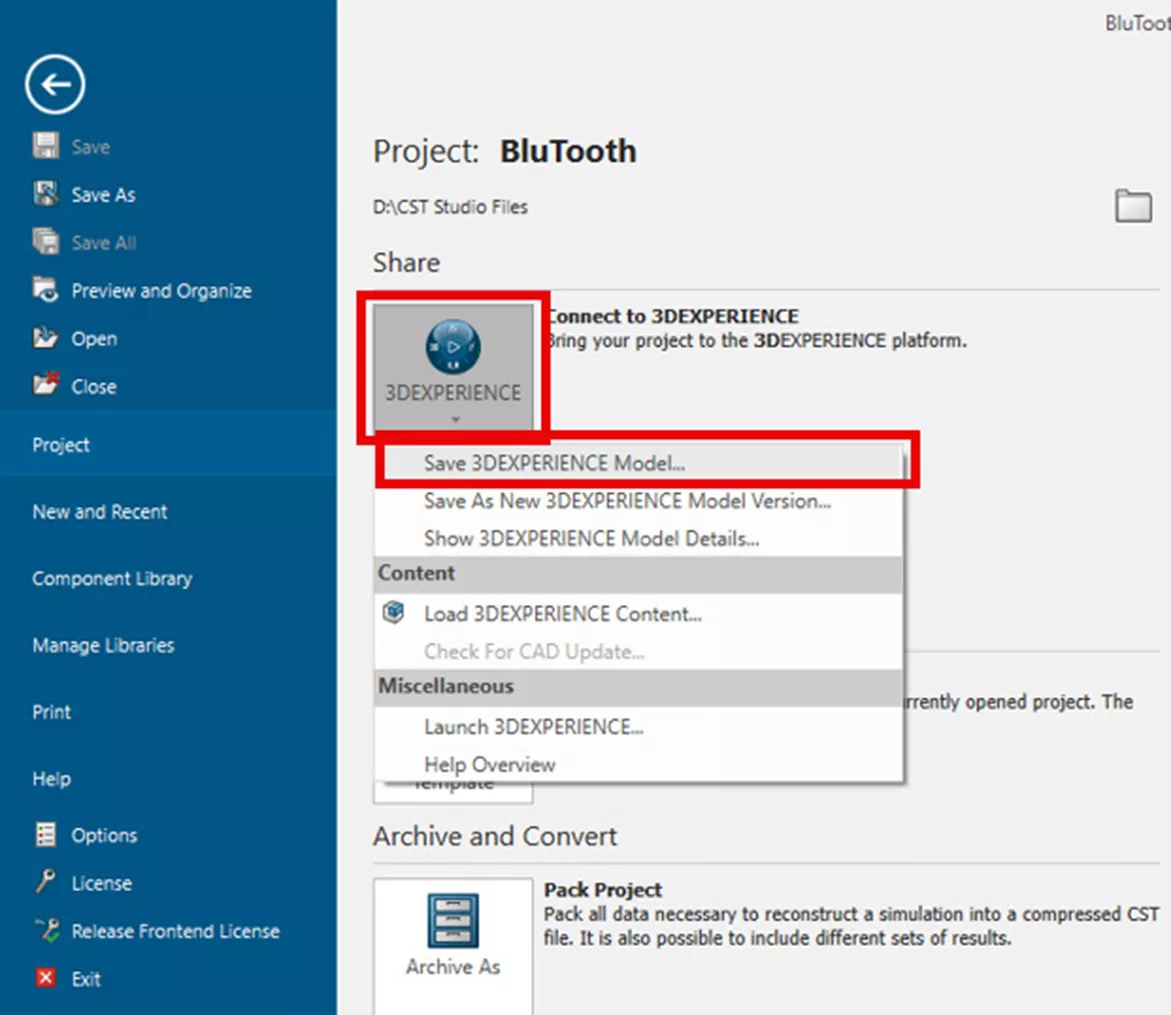
The program will connect and log in to the platform, and the Save to 3DEXPERIENCE task pane will open. A description can be entered if desired. Choose what to upload to the platform in the project structure section. The Project, Model, and 3DEXPERIENCE Simulation Review Data are selected by default.
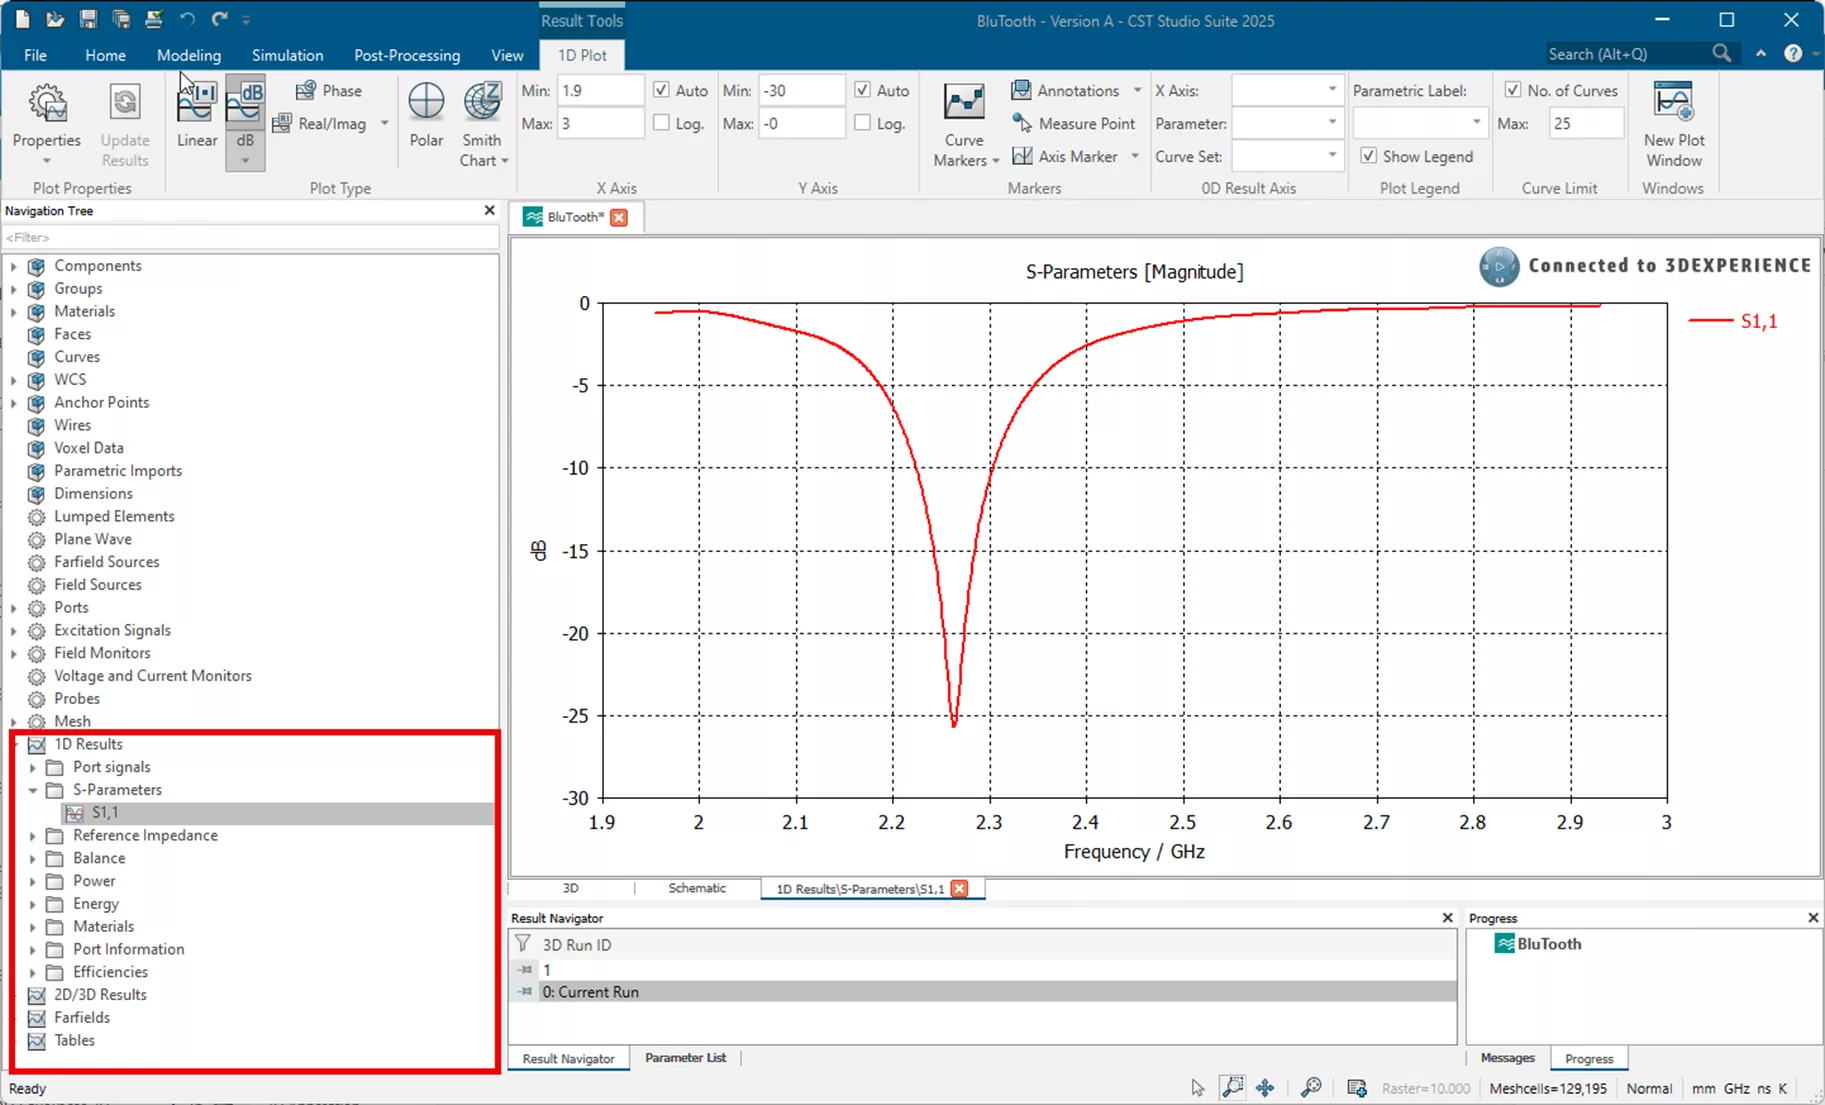
To upload existing simulation results to the cloud, select the Simulation Data checkbox and then hit OK to start the upload process. Once uploaded, the simulation will be ready to solve using 3DEXPERIENCE cloud HPC resources. At this point, the CST desktop application can be closed to release the license if needed.
Using Simulation Manager to Run the CST Study
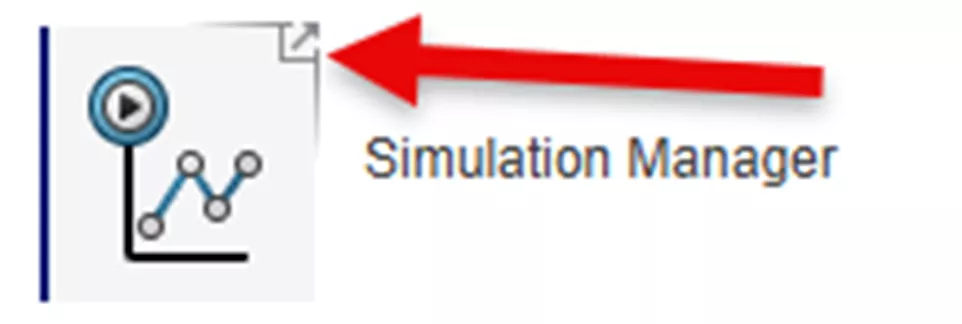
The Simulation Manager is a web application that runs in a browser window. In the 3DEXPERIENCE platform, this is called a ”widget”. Widget applications are indicated by the small arrow in the upper-right corner of the icon.
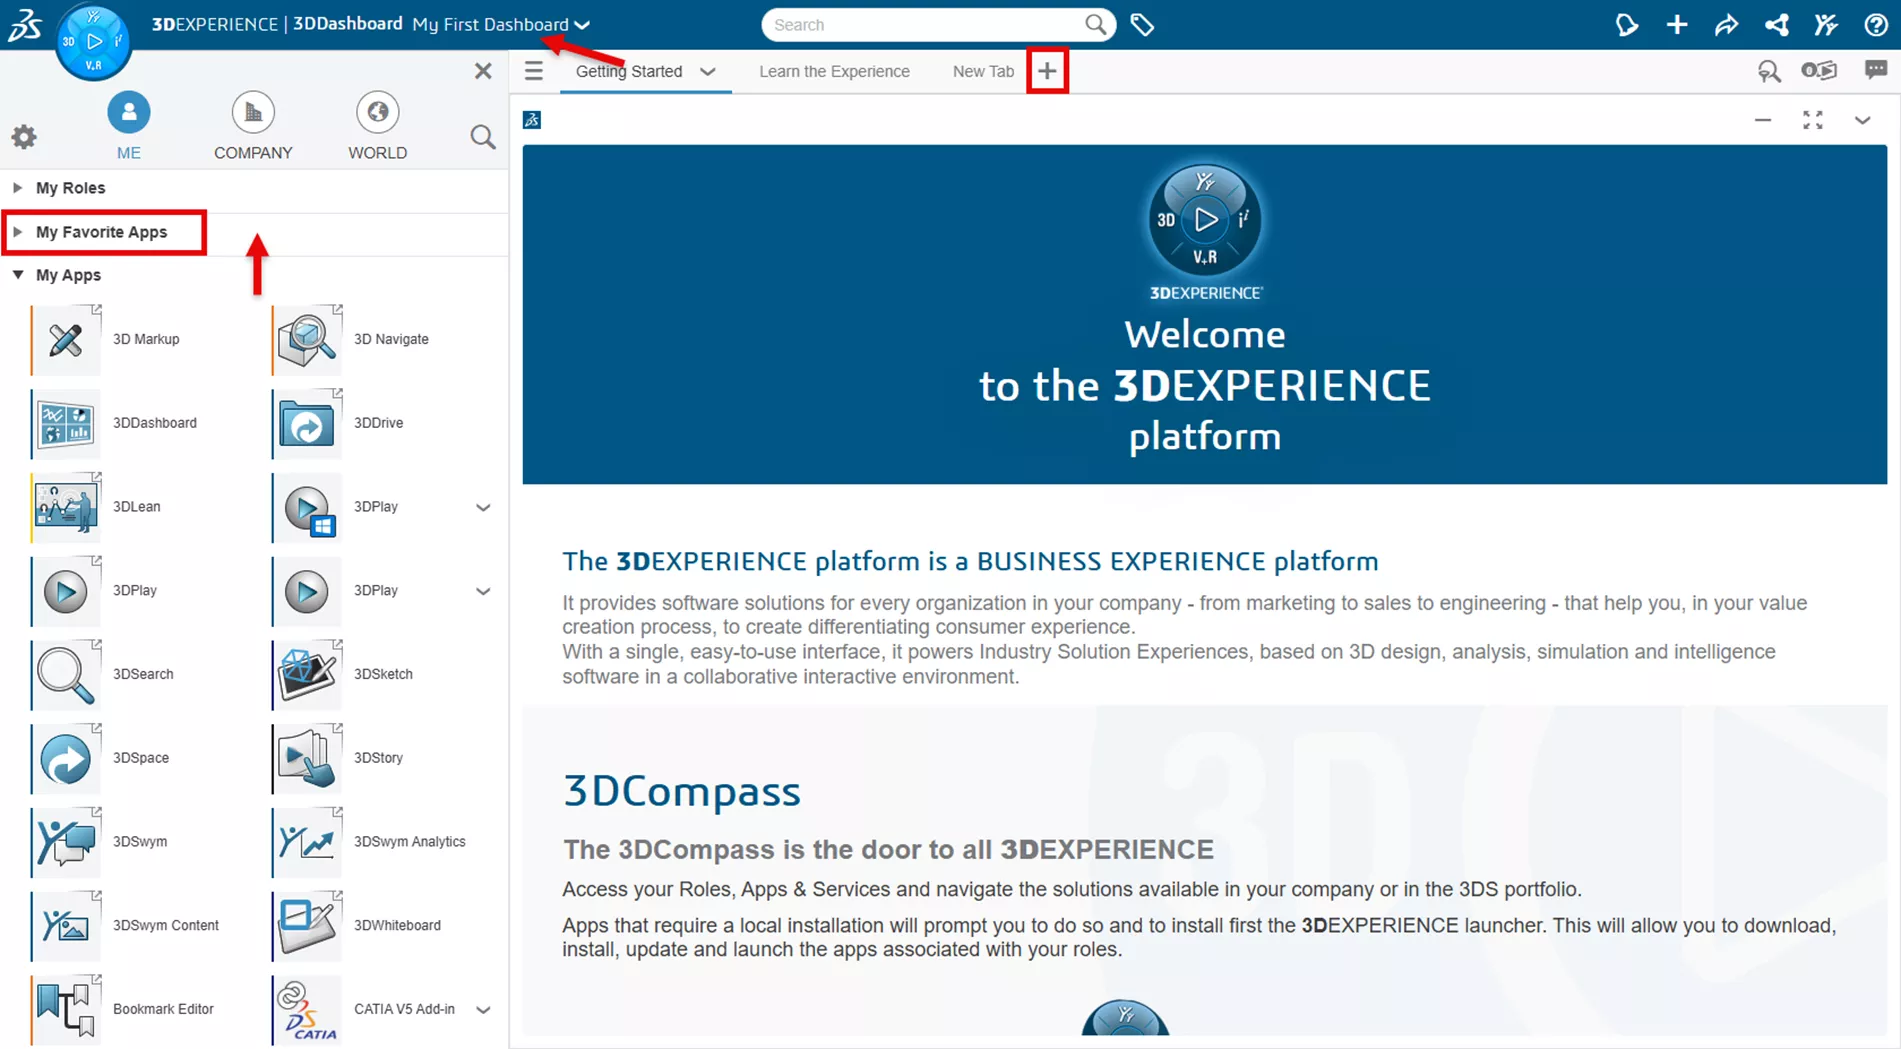
New 3DEXPERIENCE platform users will see the browser window set up much like this. Typically, a My First Dashboard is set up by default. A dashboard allows users to have defined tabs that will load widgets when opened. This dashboard can be modified or deleted. Other dashboards can be created and configured.
- Suggested Article: Creating a 3DEXPERIENCE Dashboard: Step-by-Step Guide
There are sections for My Favorite Apps and My Apps in the pane on the left when you select the Compass at the top of the browser window. Drag applications from the My Apps section and into the My Favorite Apps section to get a more organized area to work.
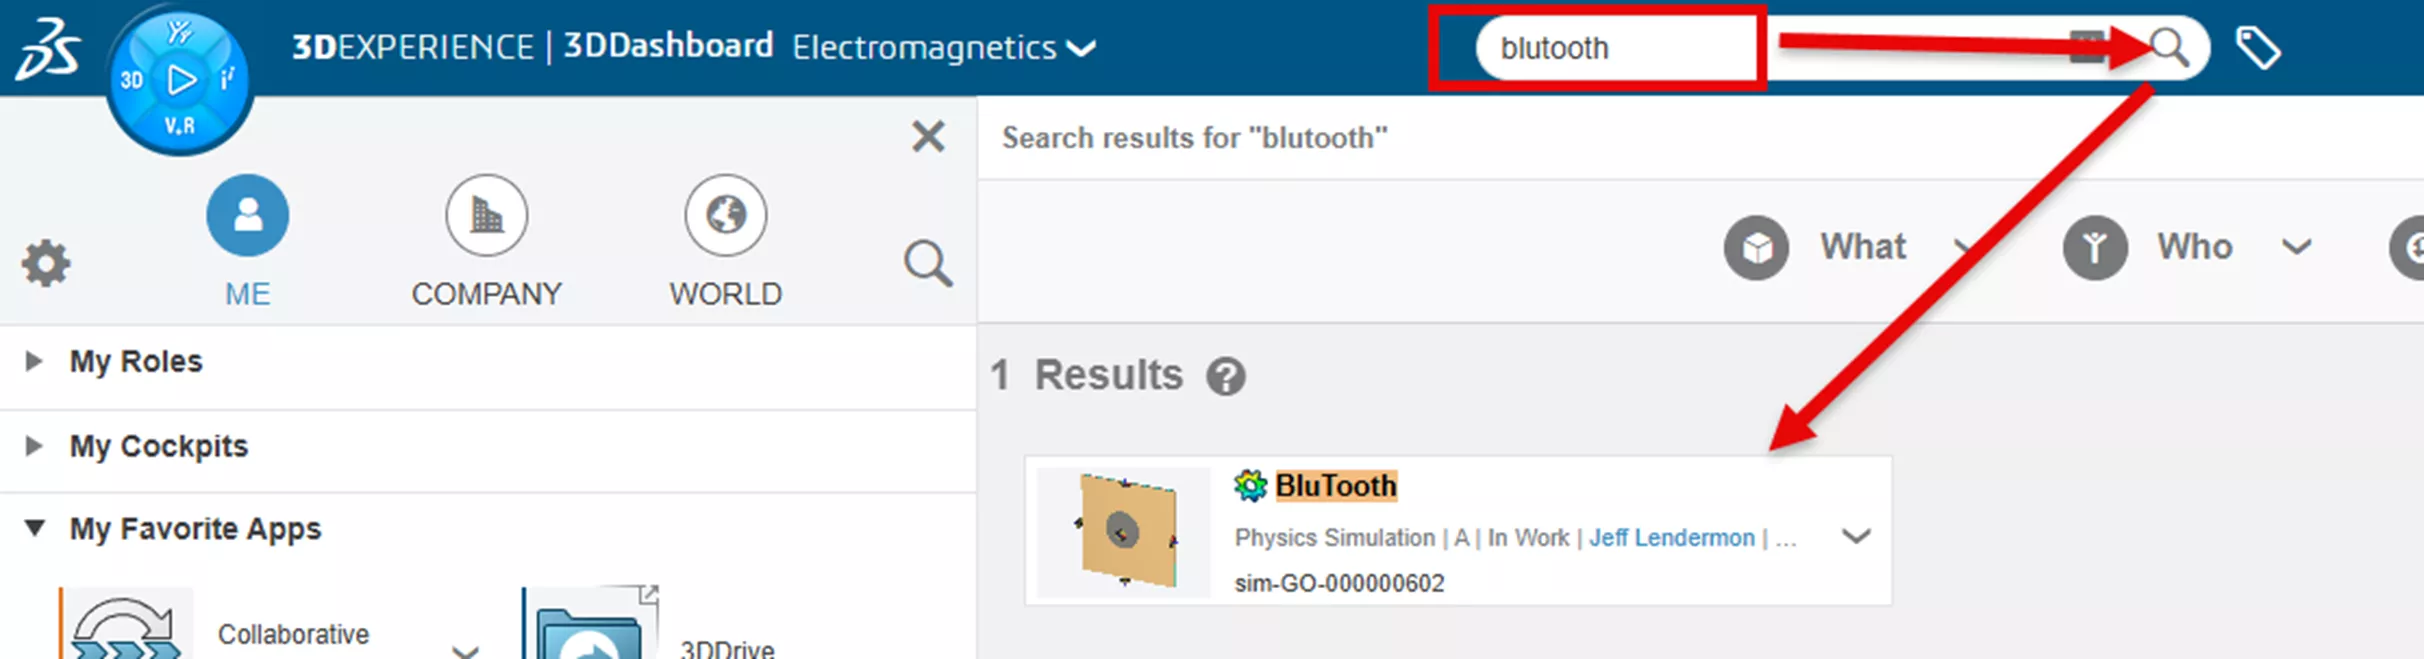
To run the CST simulation, first, locate the CST file that was saved to the platform. Select the Search Bar at the top of the browser window and type several letters from the name of the study that was saved, and click the search magnifying glass. This will display the results of the search in the window.
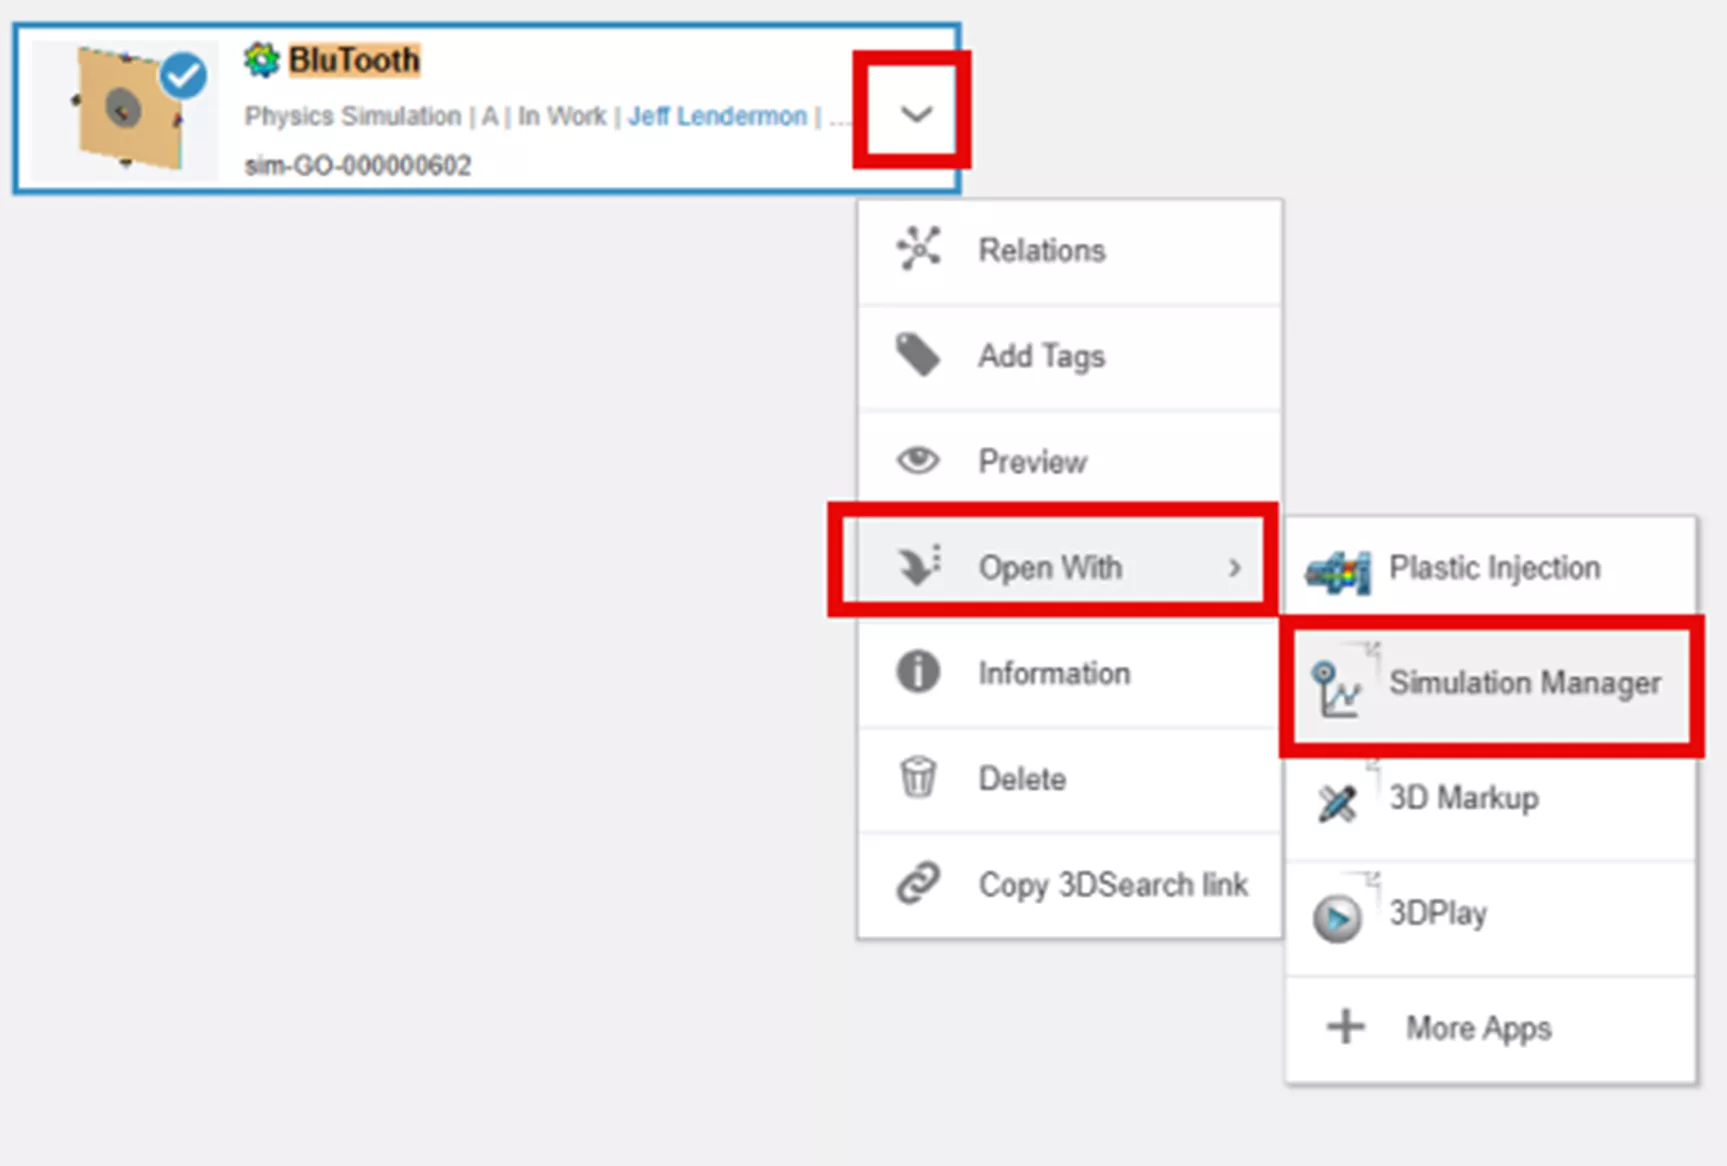
Select the dropdown in the file preview results, choose Open With, and then select Simulation Manager. This will open the CST Study in the Simulation Manager widget.
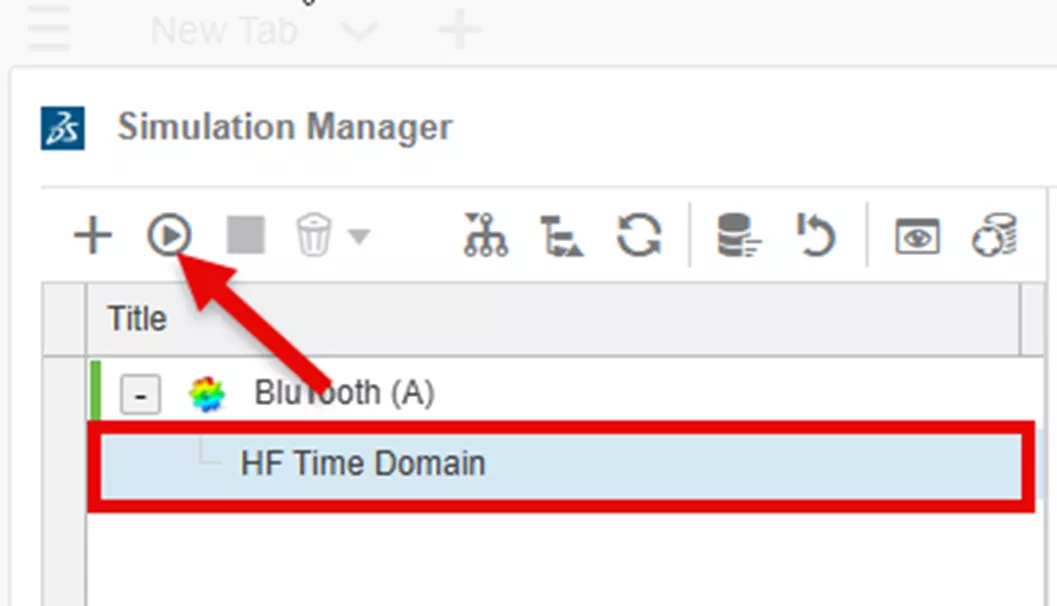
In the Simulation Manager, select the study type that is listed below the simulation file name (in this case, it is HF Time Domain). Select the Run icon to open the solver run options.
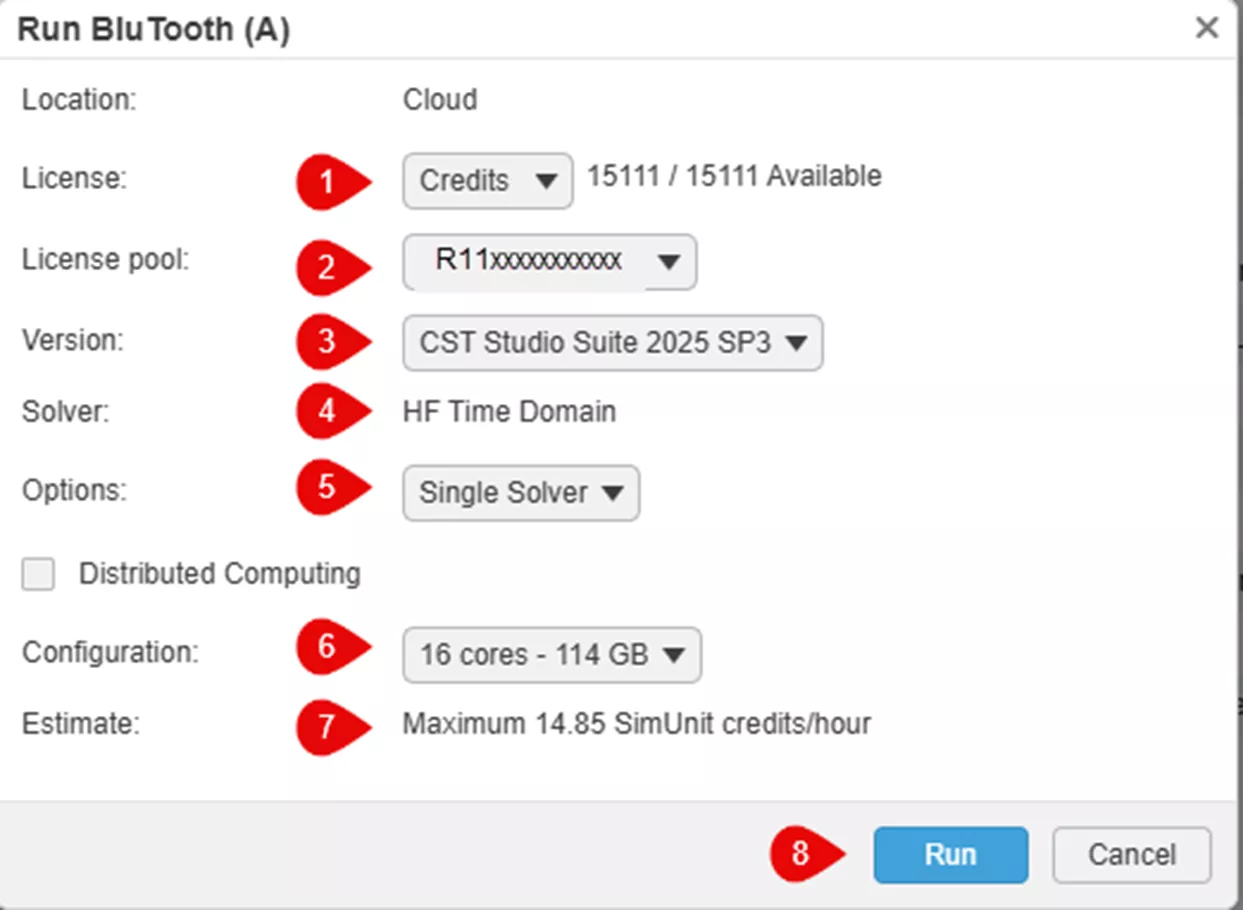
The solver options are as follows:
- License: This dropdown allows you to choose between Credits or Tokens used for solving. The total on the side shows how many are available for use.
- License Pool: This is the Tenant identification of the license pool of tokens or credits
- Version: The version of CST file being used.
- Solver: This is the solver type that the CST study was set up with in the CST desktop application.
- Options: Here, you can choose Single Solver or, if a Parametric Study or Schematic Task was defined in CST, these can be run by selecting them from the dropdown.
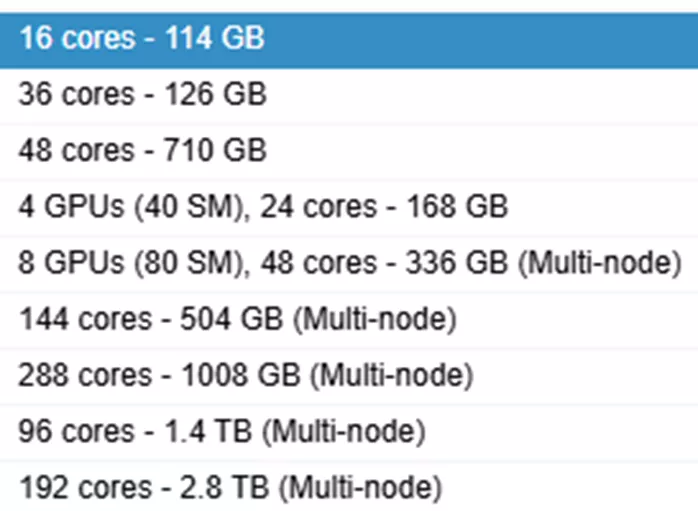
- Configuration: This is where the solver compute power is chosen. More compute power will require more tokens or will consume more credits.
- Estimate: Is the estimated Credits or Tokens usage needed for the options that were chosen.
- Run: This starts the cloud solver with the options chosen.
Choose the appropriate settings and compute power, then select Run. The simulation status can be seen on the Simulation Manager.
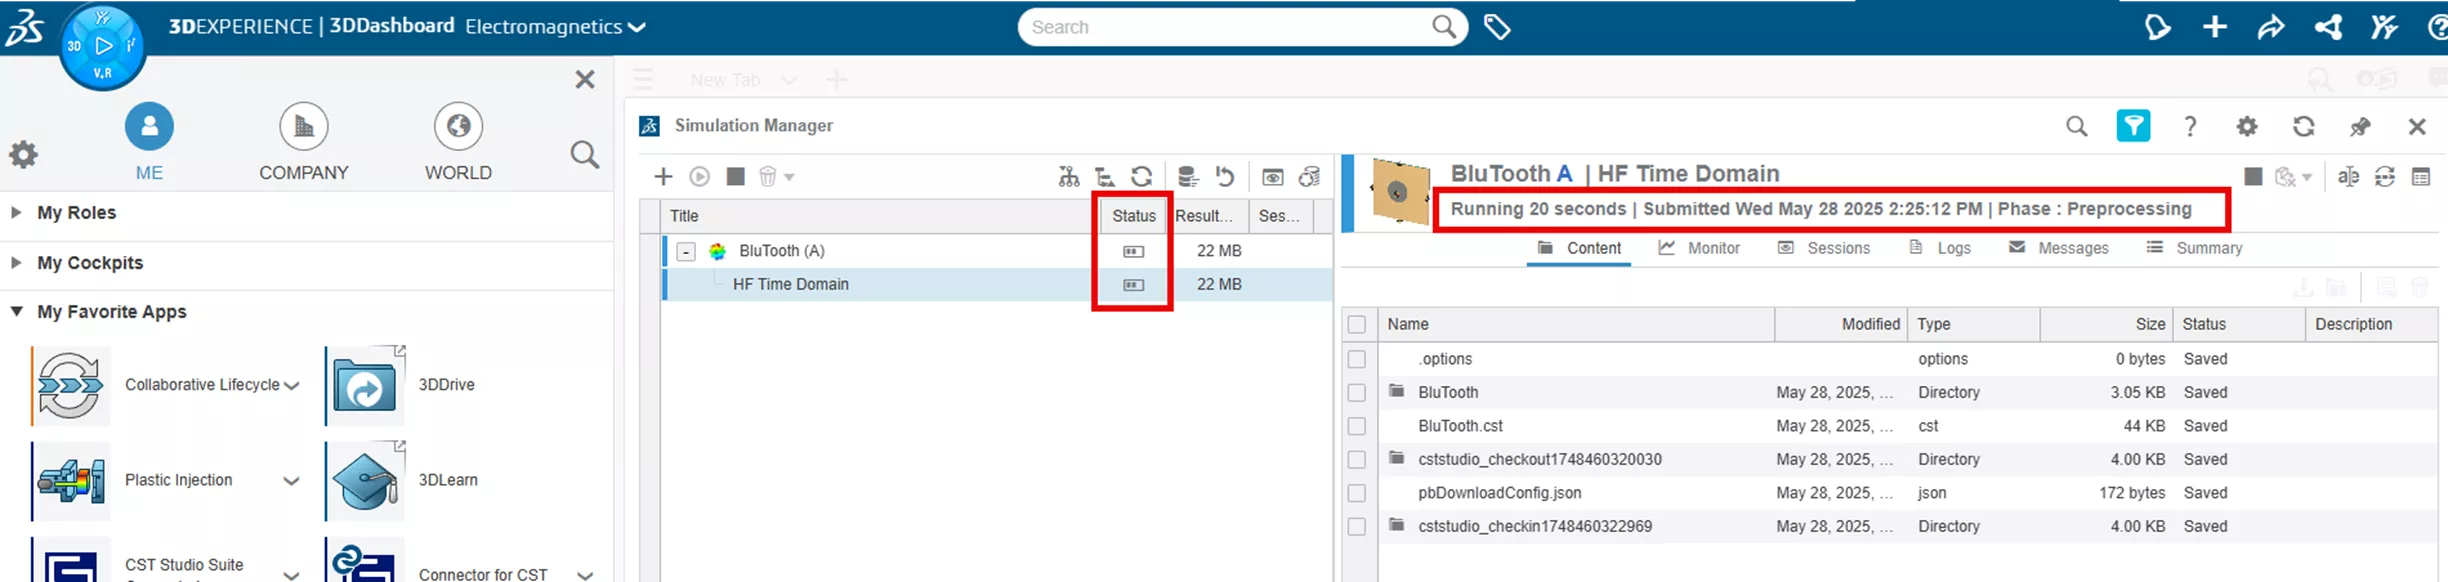
The status will change to Completed when the simulation is finished. A notification will also be sent to alert you that the simulation has finished.

Getting the Simulation Data Back to CST Desktop
After the simulation is complete, search for the file again and choose Open With > More Apps, then select the Connector for CST application from the tree on the left. This will launch the CST desktop application and load this CST study directly.
When CST launches, you'll be prompted for a Description, Revision Comment, and a local path.
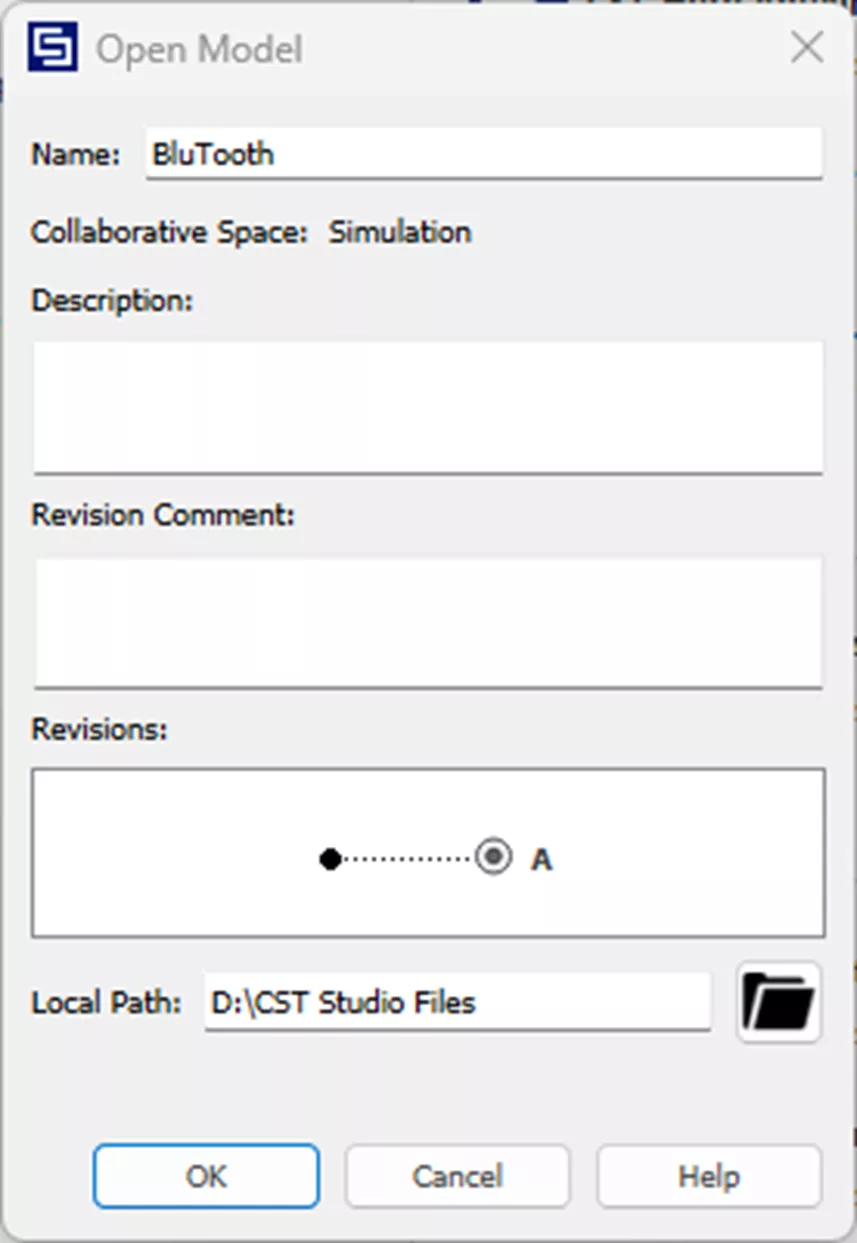
Enter any information needed and select OK.
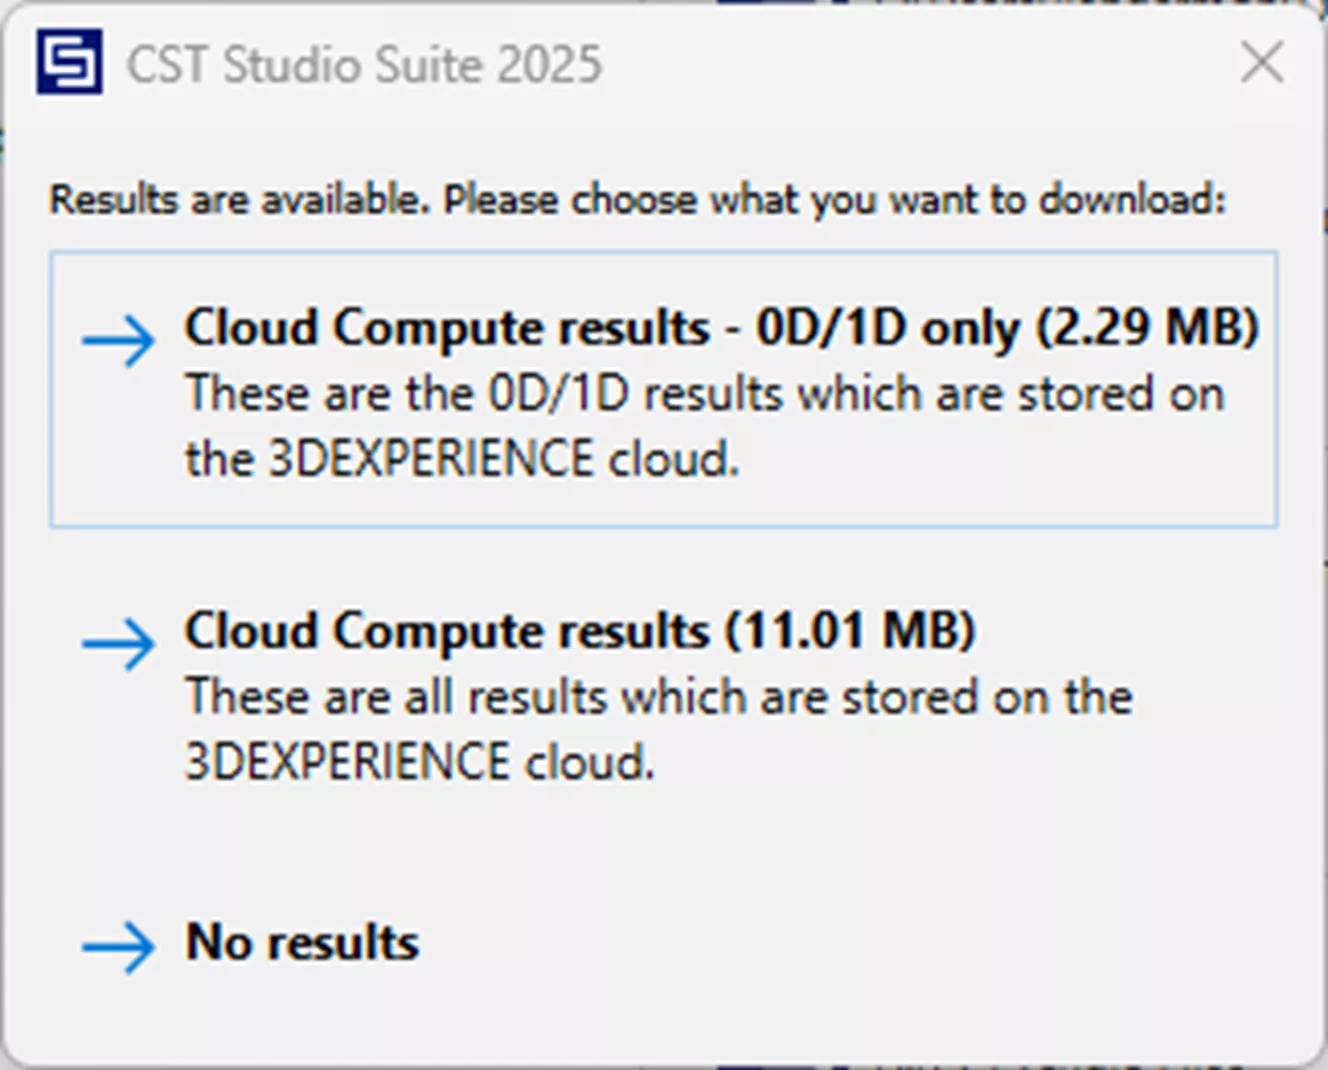
This will begin the download of the CST project from the platform. You'll be prompted to choose what you want to download.
Cloud Compute Results of OD / 1D only
Cloud Compute Results – All results
No Results
Once the selection is made, the study and results are downloaded and opened in CST desktop.
Other Tools from All-Physics Analyst
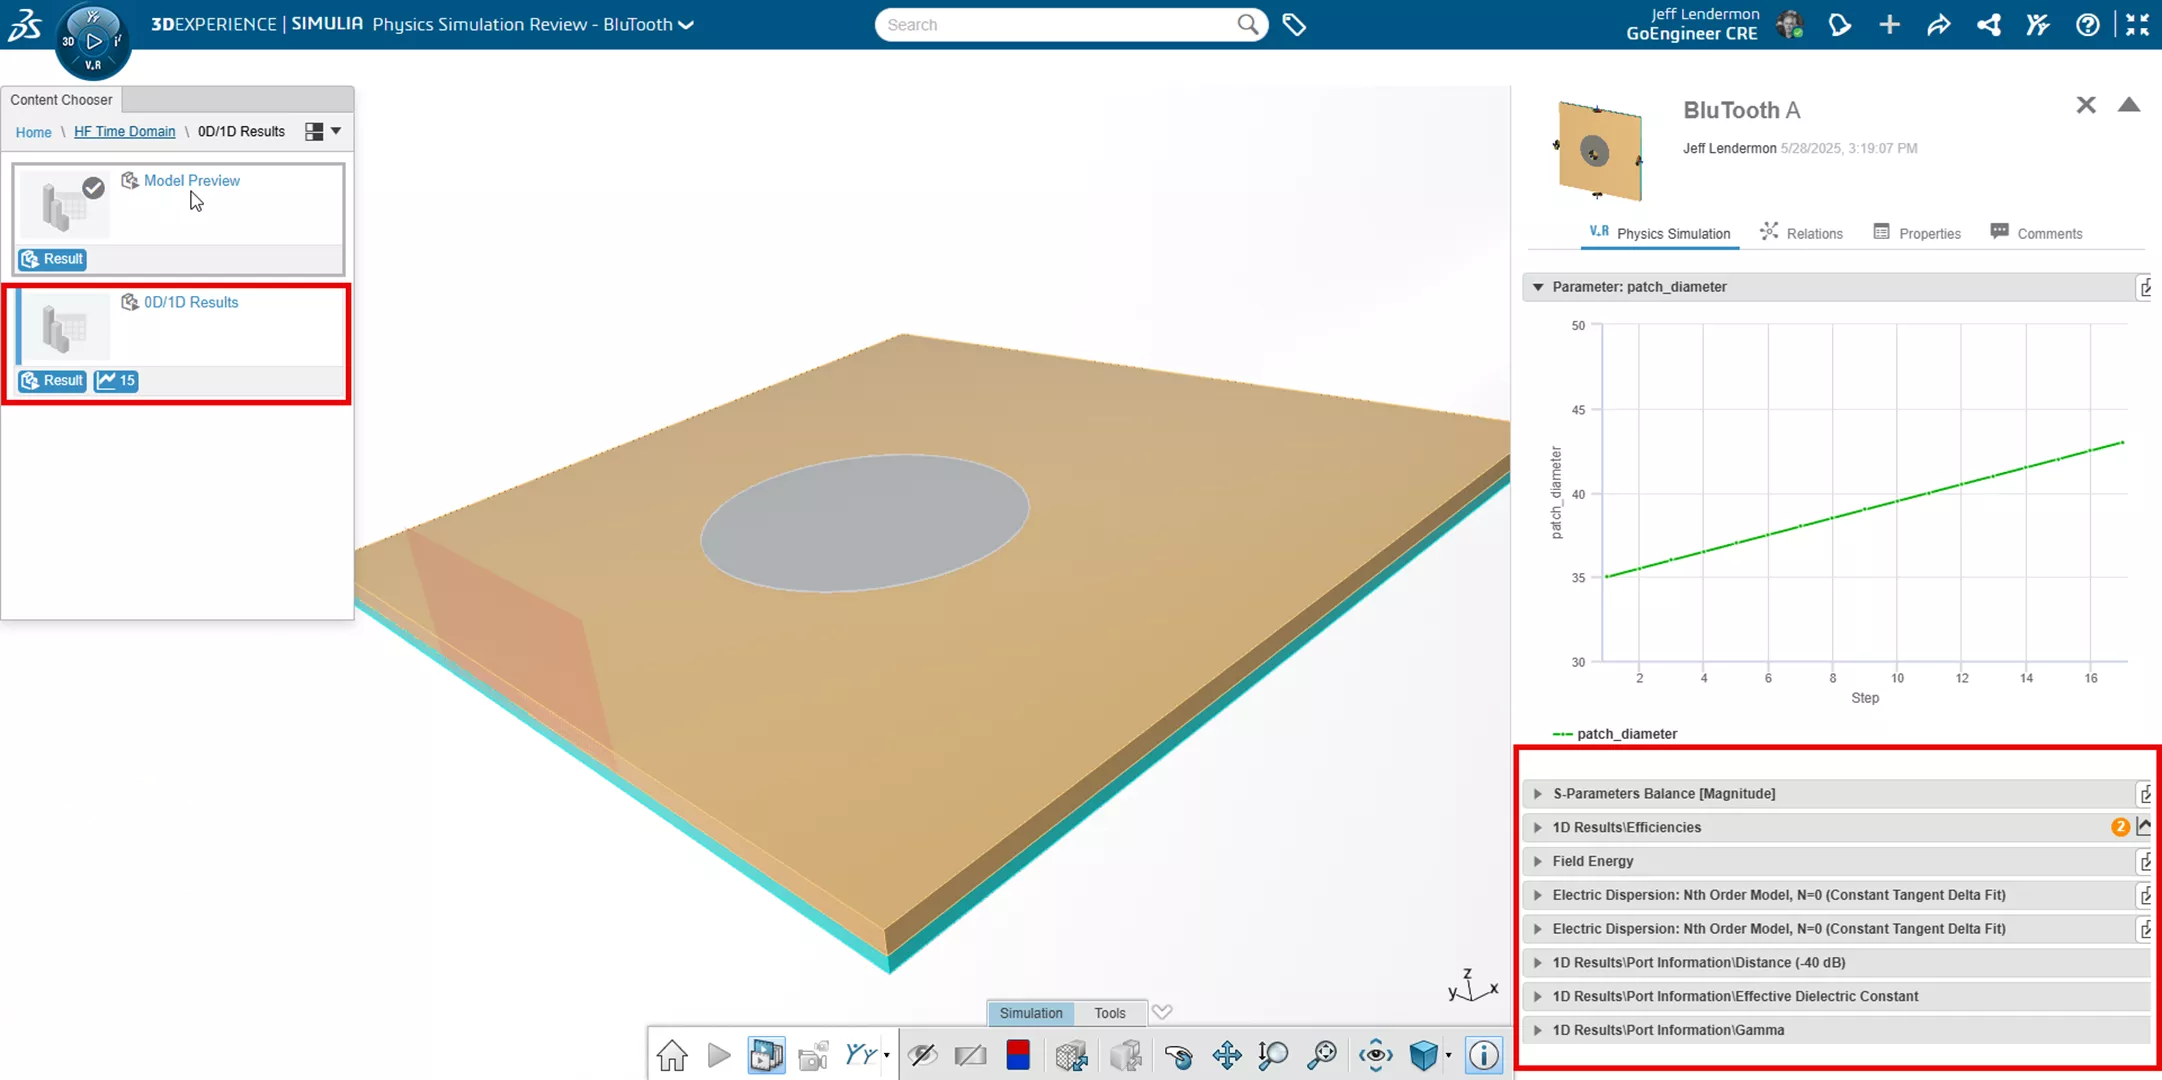
Physics Simulation Review
Review results from CST studies on the 3DEXPERIENCE platform without having to open CST Studio Suite.
There is a model preview window that provides information about the study and lists parameters that were set in the model.
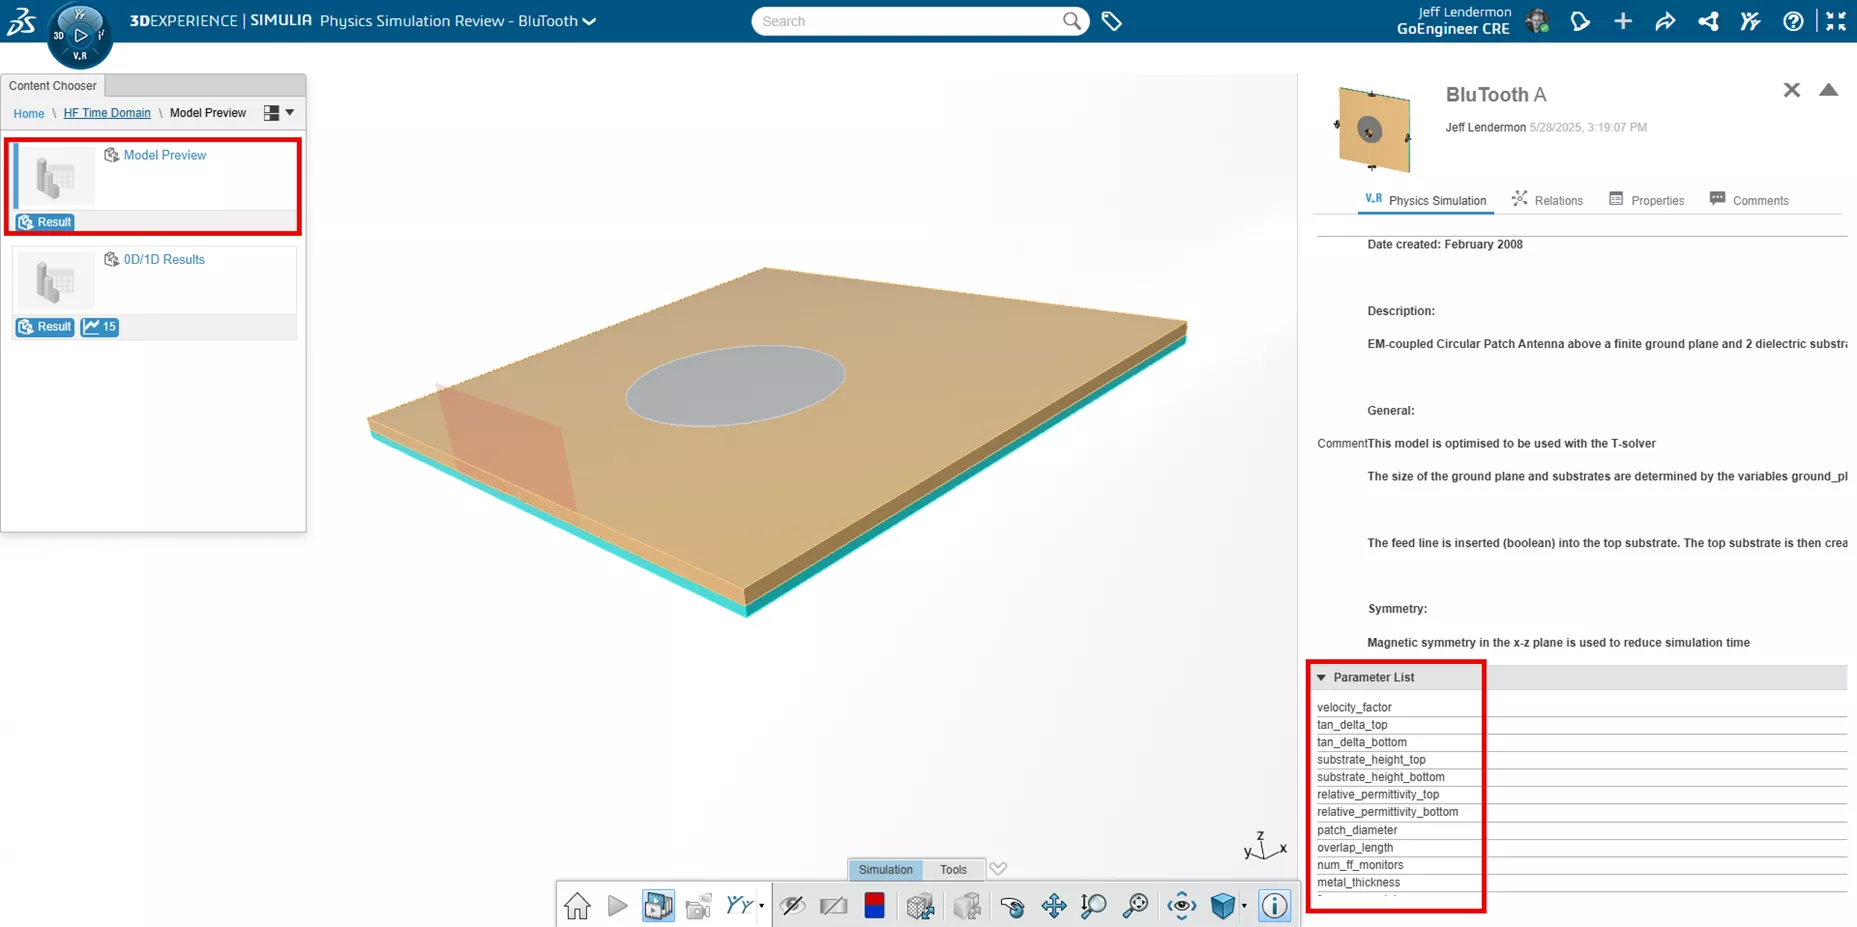
There is also a 0D/1D result viewer by default that lets you browse results from the study saved to the platform. Additional result plots can be defined in CST Studio Suite, such as 3D far fields (which will also be displayed).
![]() Collaborative Lifecycle
Collaborative Lifecycle
Collaborative Lifecycle manages the part revisions of the products or product lifecycle management (PLM).
Part models and simulation studies can have revisions as the part design progresses.

![]() Performance Trade-off
Performance Trade-off
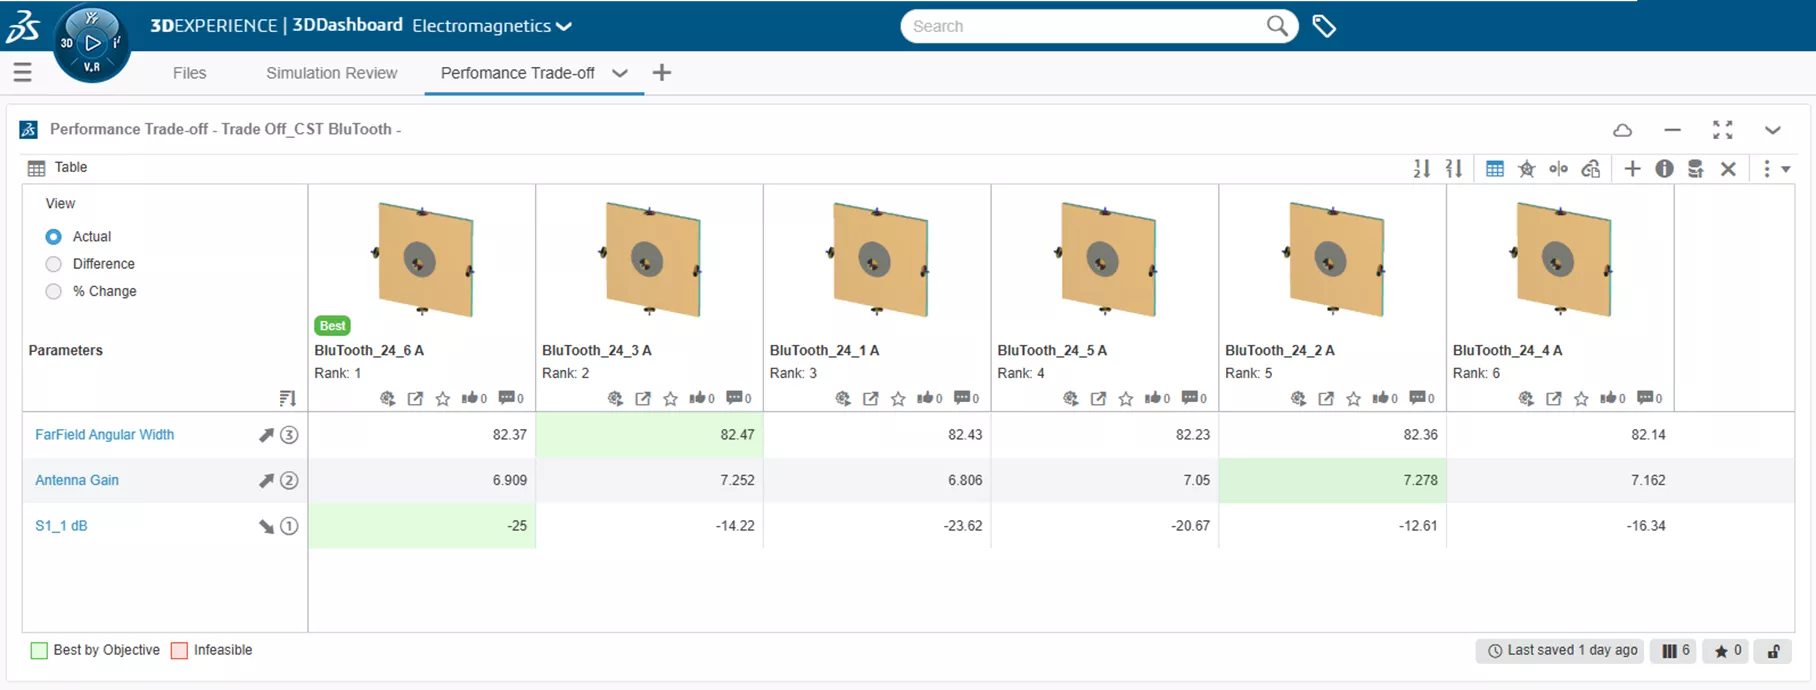
Conduct Performance Trade-off studies of simulation projects to determine the best fit to specific goals.
With CST studies, 0D result plots can be used to add parameters to find the best fit based on parameter goal rank.
A comparison between the antenna bandwidth, gain, and return loss is shown below:
I hope you found this guide to getting started with 3DEXPERIENCE CST Connector helpful. Check out more CST Studio Suite articles below.
Learn More
CST Studio Suite Hybrid Solver for System-Level Electromagnetic Analysis
Introducing the Unified License Model for CST Studio Suite
CST Studio Suite for Electronic Design
CST Studio Suite: Antenna Design and Analysis
Advancing Engineering Simplicity: SIMULIA’s New Unified Licensing Model

About Jeff Lendermon
Jeff Lendermon is an Applications Engineer for GoEngineer supporting the SOLIDWORKS Plastics simulation software. Jess has over 30 years of experience in the Plastic Injection molding industry, he applies his experience and knowledge of the industry to help customers see the benefits of utilizing the tools within SOLIDWORKS Plastics.
Get our wide array of technical resources delivered right to your inbox.
Unsubscribe at any time.