Benefits of 3DEXPERIENCE Duplicate Function

Many engineers use past projects as a starting point for a new design. Reusing components and concepts shortens a project's timeline. Additionally, modularity and customization allow customers to mix and match according to their specific needs.
Pack and Go
Pack and Go is often used to create a copy of a previous project, with all its references, into a new folder, with a prefix or suffix added to differentiate the new files. This results in an entirely separate project that can be stored or sent to a customer without fear of breaking references.
But this workflow consumes a large amount of storage, often resulting in hundreds or thousands of redundant files. Some users may try to reduce this number by using Save As.
Save As
When performing a save, SOLIDWORKS will detect in-context references in an assembly and allow the user to redirect references in the new assembly to the new project or leave them pointed to the old file. But this can be tedious and complicated, especially as projects grow in size. Not to mention, this does not work the same when saving to the 3DEXPERIENCE platform.
What if there were a way to duplicate a project that has already been completed, but which also allows users to exclude or rename individual parts quickly and easily?
In 3DEXPERIENCE, there is!
Duplicate in 3DEXPERIENCE
The 3DEXPERIENCE Duplicate function in 3DEXPERIENCE DESIGN with SOLIDWORKS and SOLIDWORKS Connected allows users to duplicate entire assemblies, with the ability to exclude, rename, or duplicate parts from the old assembly. This function may not be as well-known because the icon for it is hidden by default. To use this function, start by clicking the down arrow next to the Cut icon.

This will open a drop-down menu that includes the Duplicate option.
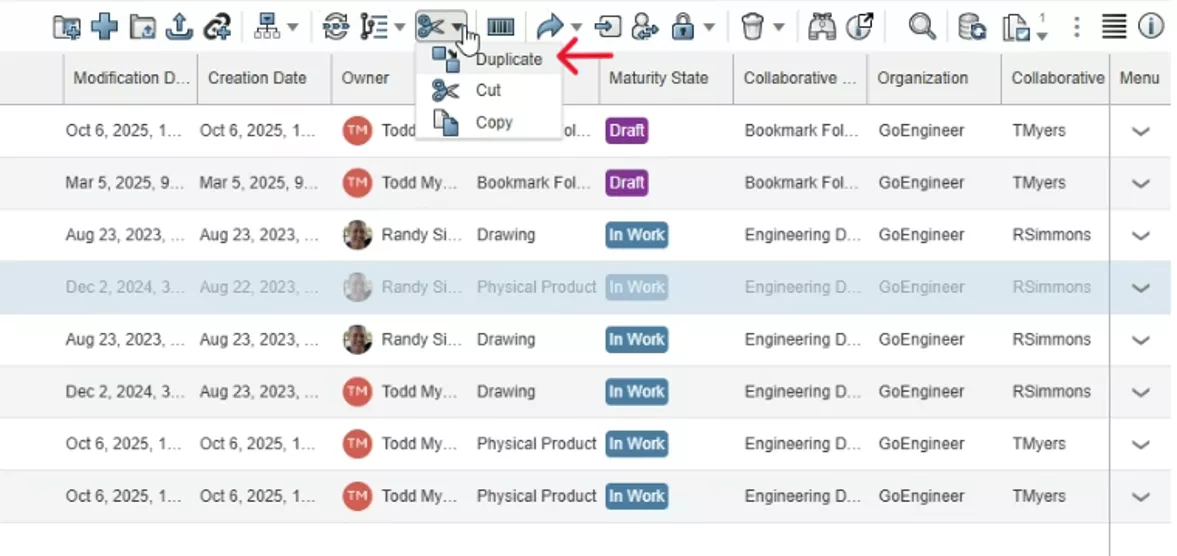
After selecting Duplicate, it will replace the Cut icon until the next time you use Cut (or Copy). This will open the following dialog box.
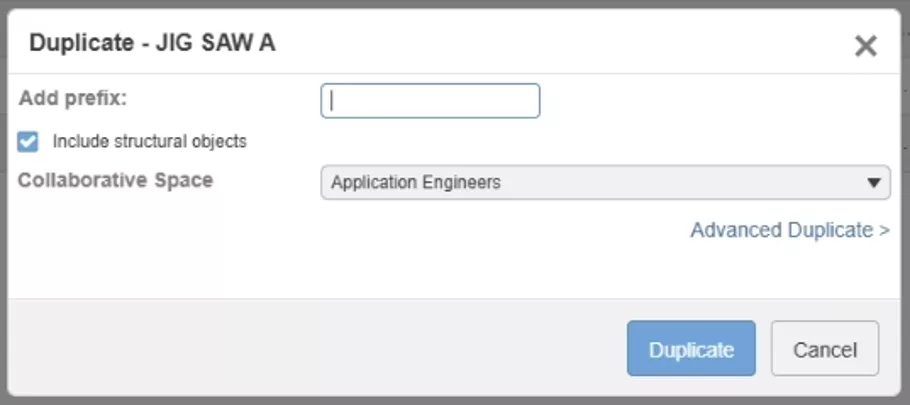
Here, you can choose to add a prefix to the duplicate project to help you differentiate between new and original. You can also choose the collaborative space you would like to save it in. Even more options are available by clicking Advanced Duplicate.
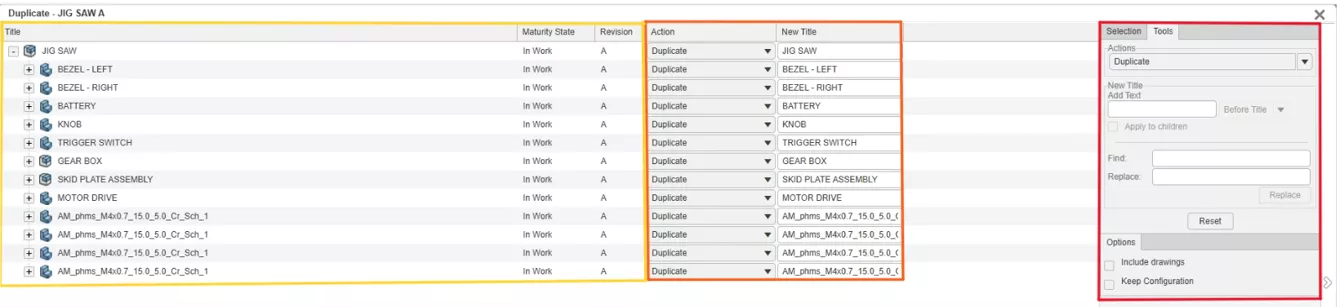
In the screenshot above, the area outlined in red shows the action being applied to most of the files in the dialog. In this window, you can add text to the selected files (either before or after the existing title). You can also find and replace files in the project (similar to the File Utilities function in SOLIDWORKS). Last is the option to choose whether to keep the current configuration and/or include the drawing from the project.
Outlined in orange is the action being performed for each file along with its new title. You may change this action for each file individually by selecting the down arrow next to the action. Or, you can change the action for all the files at once by selecting the top of the column, then selecting the action in any of the action fields. (This can save you hours in larger projects.)
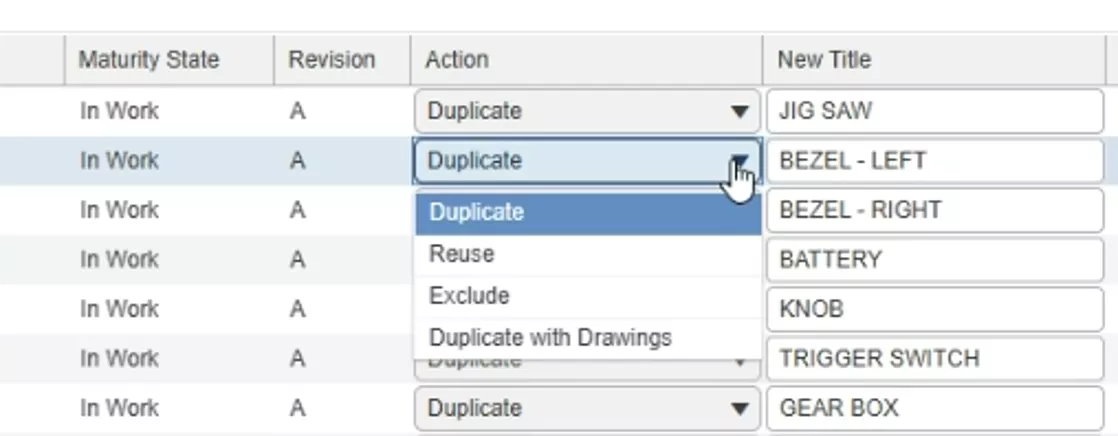
The available actions are:
- Duplicate creates a copy of the file.
- Reuse points the project to an existing file. The duplicate project's file references will point back to the original part, rather than create a copy (this is especially useful for standard items like hardware).
- Exclude allows you to ignore or remove a file or part from the new project.
- Duplicate with Drawings creates a copy of the part or assembly as well as its drawings.
Finally, (outlined in yellow) are the Title, Maturity/State, and Revision for each file.
Want to learn more? Check out more tutorials and tips below, or check out the GoEngineer Community, where you can create forum posts, enter design contests, and answer questions from other SOLIDWORKS users.
Related Articles
Modeling Conveyor Belts with Cleats in SOLIDWORKS
Intro to SOLIDWORKS Sketch Blocks
Adding O-Ring Grooves to a SOLIDWORKS Part
Change Your 3DEXPERIENCE Platform Name & Organization Title

About Palmer Bubb
Palmer Bubb is a Technical Support Engineer and Certified SOLIDWORKS Expert (CSWE). Prior to joining the technical support team in 2021, Palmer designed retail fixtures for major retailers such as Lowes, Publix, Meijer, and Harbor Freight. He graduated from Northern Illinois University with a degree in Mechanical Engineering. Palmer enjoys weightlifting, local coffee shops, book stores, and live music.
Get our wide array of technical resources delivered right to your inbox.
Unsubscribe at any time.