Overriding Mass Properties Using SOLIDWORKS Design Tables

Table of Contents
In certain situations, it can be beneficial to override the mass of a part. For simple SOLIDWORKS parts with a single configuration, this process is straightforward: open Mass Properties, click Override Mass Properties, and then check Override Mass. But what if you have a part file with multiple configurations? You would need to do this with each configuration, manually overriding the mass and then manually inputting the new mass. Fortunately, you can override the mass and control it through a Design Table; it just takes a bit of preparation. And since you are using multiple configurations, you may already be using a Design Table!
The process can be broken down into several simple, straightforward steps:
Step 1: Overriding the Mass Properties
The first step for setting up the Design Table override is the same as for a single Configuration Part. Open the Part File and make sure you have the Configurations created. You can also create the Design Table by clicking Insert >Tables > Excel Design Table. Learn more about creating Design Tables here: SOLIDWORKS Design Tables Made Easy.
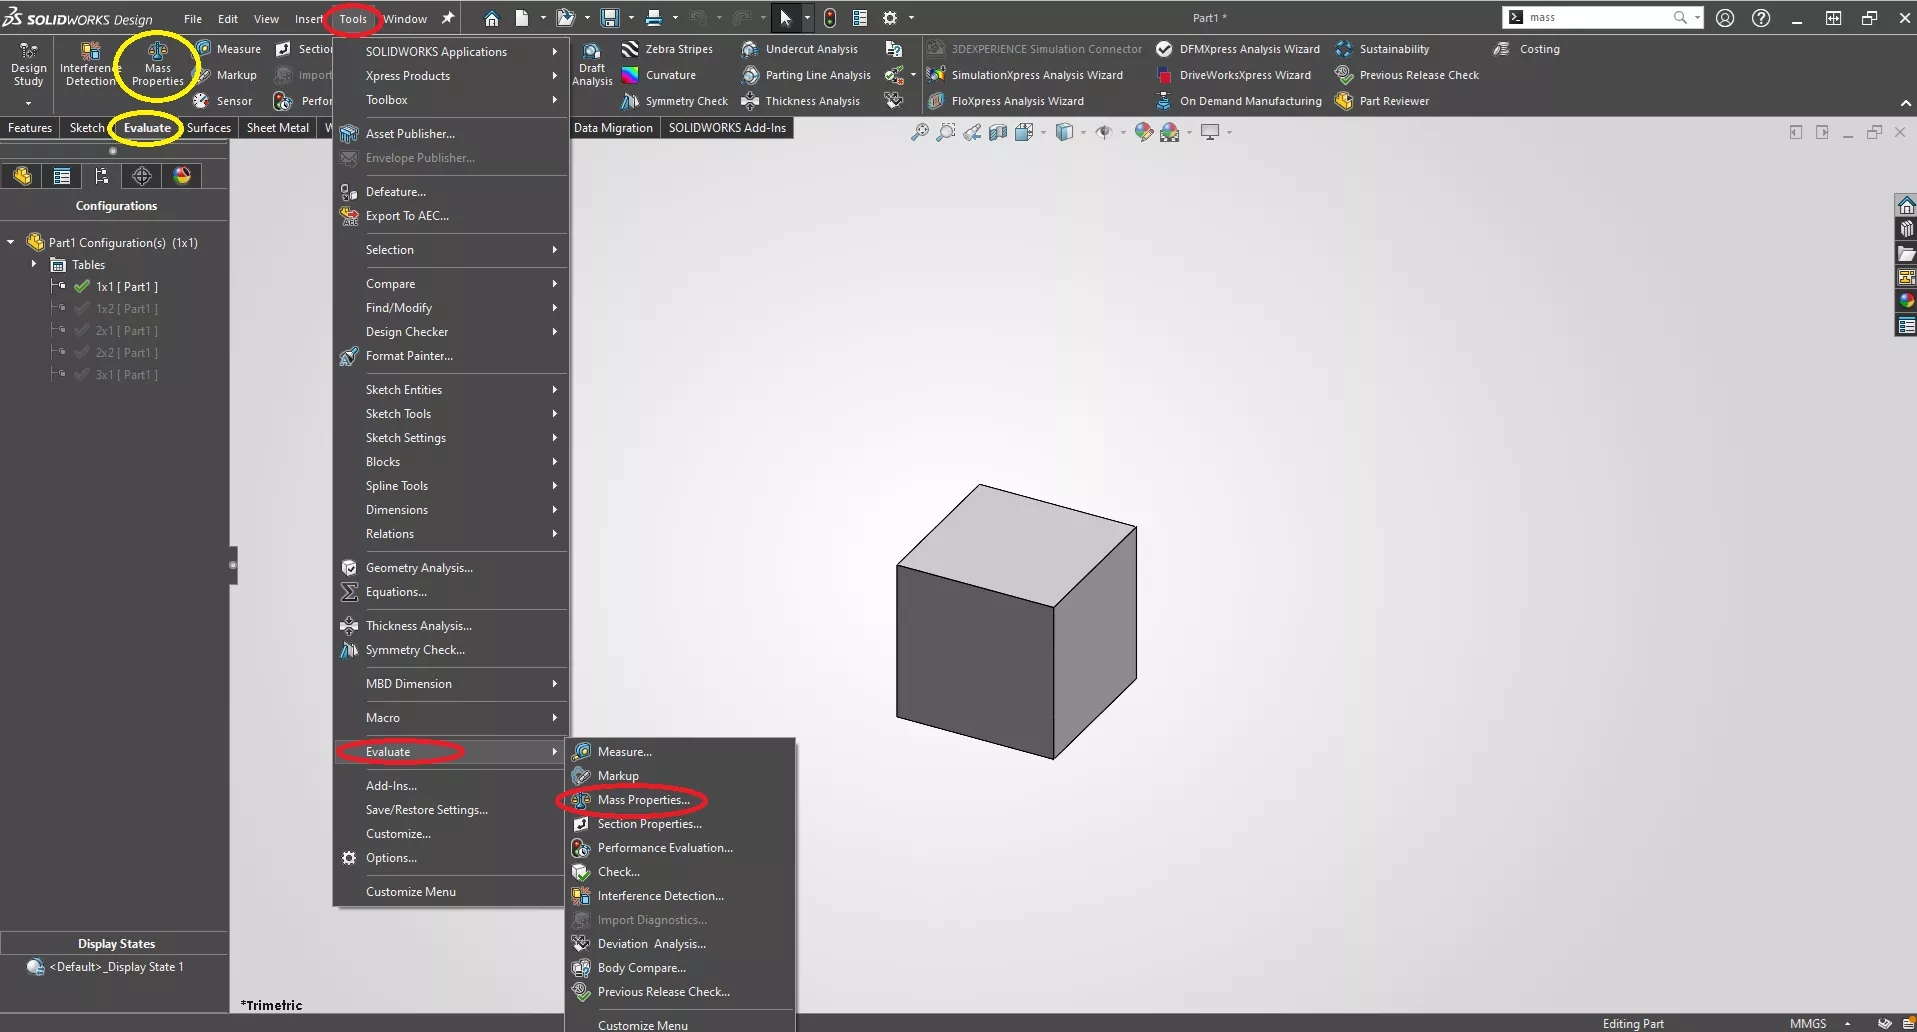
Once created and set up with the configurations, you will want to override the Mass Properties. Click the Evaluate tab and then Mass Properties. Optionally, go to Tools > Evaluate > Mass Properties.
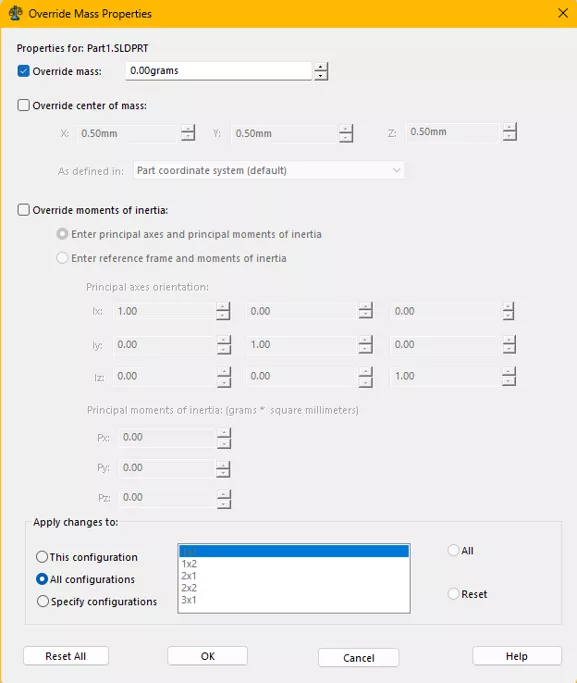
Once in the Mass Properties, click Override Mass Properties. This will open the Override window. Check the Override Mass box, but don’t worry about putting in a number. The most important part is to make sure that the Apply Changes To section at the bottom is set to All Configurations. Once set, hit OK.
Step 2: Creating the Design Table Cell
Next, we need to add the correct Column to the Design Table. Go to the Configurations section of the FeatureManager Design Tree, and expand the Tables section.
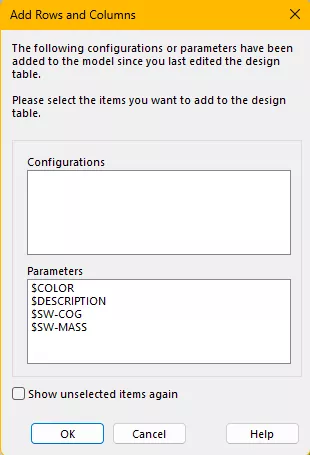
Right-click on Excel Design Table and choose Edit Table. A small window should appear where you can choose different parameters, select $SW-MASS, and press OK. If this window does not appear, you can manually add the column to the table by clicking an empty Column Header and typing $SW-MASS.
Step 3: Adding Your Mass Values
The final step is to add your values for the mass of each configuration. If the Add Rows and Columns window appeared and you added the $SW-MASS that way, then you will see values already populated. Simply remove the value that shows for each configuration and add your own. Once finished, click out of the table to have it close and update. You can also press the green check in the upper right of the graphics area.
If you had to manually add the $SW-MASS, then no values will be present. Simply enter your values for each configuration, then click out of the table to have it close and update. You can also press the green check in the upper right of the graphics area.
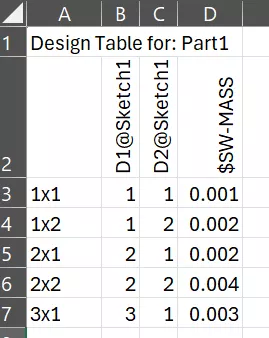
And that’s it! Upon closing the table, the mass properties of each configuration will update to show the new values entered. You will then be able to update the values as needed using the single table, instead of manually changing each configuration.
SOLIDWORKS CAD Cheat Sheet
SHORTCUTS ⋅ MOUSE GESTURES ⋅ HOT KEYS
Our SOLIDWORKS CAD Cheat Sheet, featuring over 90 tips and tricks, will help speed up your process.

To learn more about SOLIDWORKS, check out the articles listed below. Additionally, join the GoEngineer Community to participate in discussions, create forum posts, and answer questions from other SOLIDWORKS users.
Related Articles
Using Section Scope to Customize Section Views in a SOLIDWORKS Drawing
Using the SOLIDWORKS Sheet Metal Jog Feature
How to Create a Spring That Will Expand and Compress in a SOLIDWORKS Assembly
Replace a SOLIDWORKS Sketch Entity Without Rebuild Errors

About Joshua Irwin
Josh Irwin is a SOLIDWORKS Technical Support Engineer at GoEngineer.
Get our wide array of technical resources delivered right to your inbox.
Unsubscribe at any time.