3DEXPERIENCE SOLIDWORKS Import/Export Package - Getting Started Guide
Table of Contents
If you’ve ever collaborated in SOLIDWORKS, you may already know the Pack and Go tool. Packages on the 3DEXPERIENCE platform work in much the same way, letting you combine all CAD files referenced in an assembly into a compressed folder that can be easily shared outside your organization.
This blog will explain how to use the Import and Export Package tools, cover common pitfalls with Pack and Go, show how to resolve cache issues using V6 files, and explain how to replace geometry with the Replace Content feature for supplier updates.
Why Not Use Pack and Go?
If you need to share files that are saved on the platform with an external user, the Import/Export Package is the way to go. Packages ensure that the link between the files on the platform and the files in the package is maintained. If you use Pack and Go to share files with an external user, the 3DEXPERIENCE platform will see them as new files when you get them back and attempt to save them again.
How to Export a Package
Export Package can be found on the MySession Action bar > Collaboration tab.
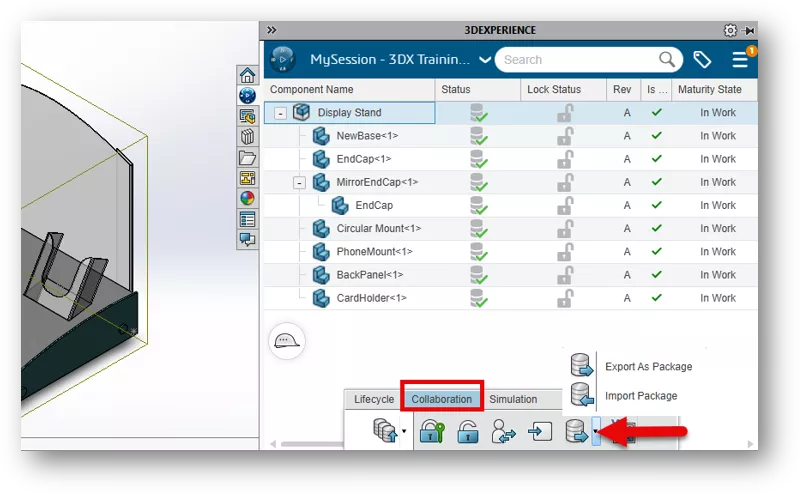
To start the package export, highlight a file and select Export As Package. When you start a package export, you’ll notice features that aren’t available in Pack and Go. For example, the package tracks the revision state of every file, preserving the lifecycle history you’ve carefully maintained.
Another feature you’ll notice is the option to assign a purpose to each file, which lets you define its Read and Write permissions. This helps protect files you don’t want altered by preventing unintended edits. For each file, you can choose between Read-Only and For Edit.
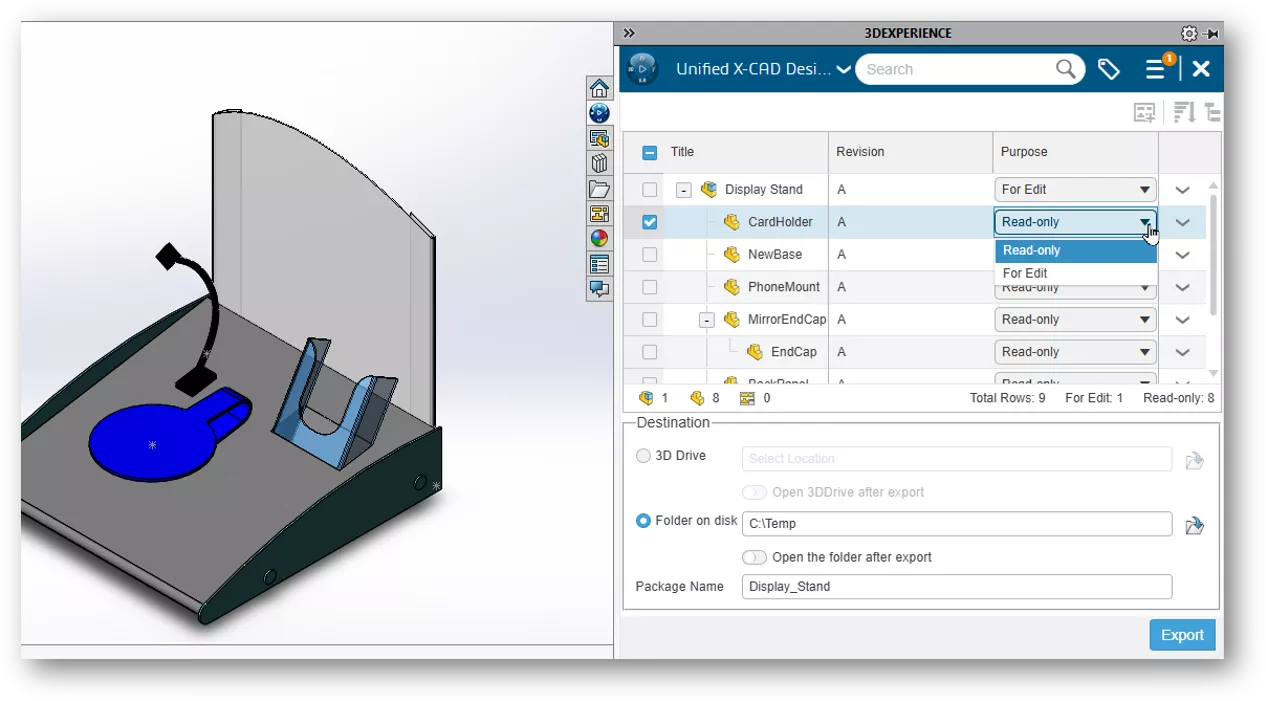
The next step is to name the package and save it. You can choose to save the package to a local Windows folder, which is useful if you plan to attach it to an email or upload it to a file share site. You can also sync it directly to your 3DDrive folder, which has the added convenience of generating a shareable link.
A package file is saved with a “.sldpkg” extension and includes everything required to open the packaged assembly.
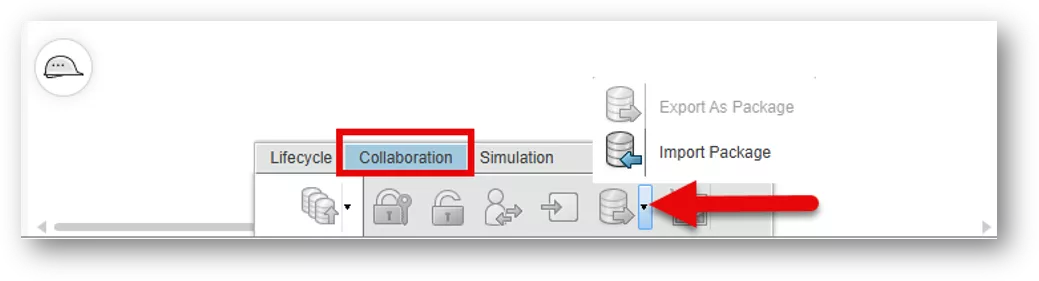
How to Import a Package
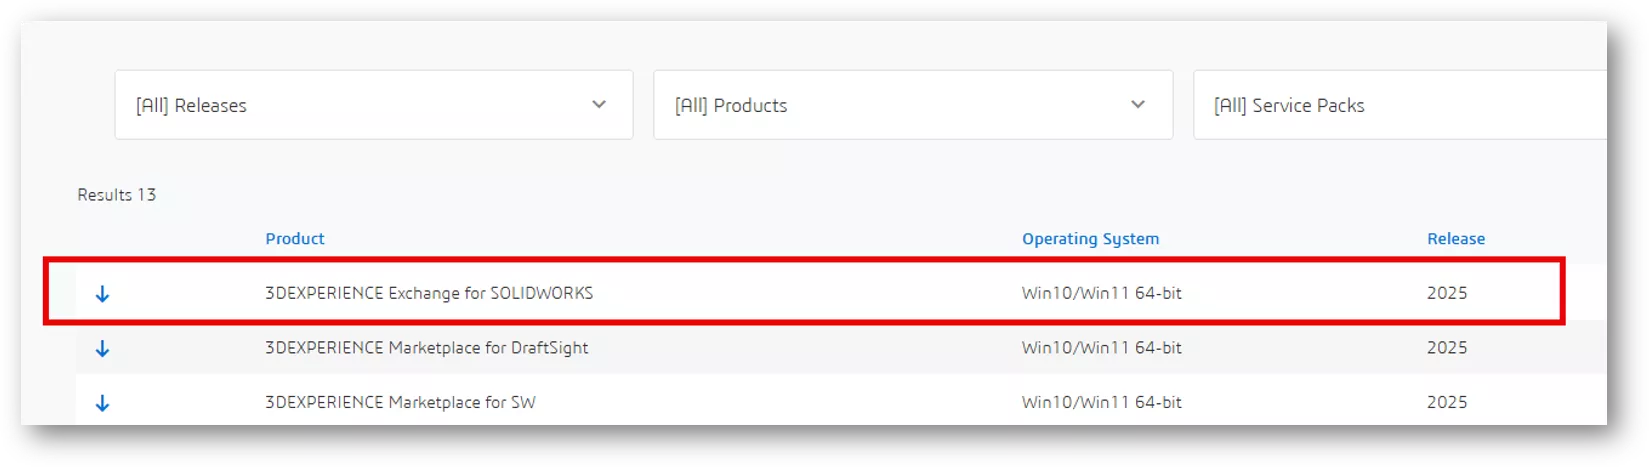
In the same way the package was exported, a package can be imported into SOLIDWORKS Connected or SOLIDWORKS Desktop with the 3DEXPERIENCE add-in. If the recipient’s SOLIDWORKS Desktop is not connected to the 3DEXPERIENCE platform, the user can still import using the free 3DEXPERIENCE Exchange for SOLIDWORKS add-in.
Import Package can be found on the MySession Action bar > Collaboration tab.
You’ll be prompted to browse for the packaged file. The package can be imported from a 3DDrive or by using the File on disk option. Browse for the “.sldpkg” file and click Open.
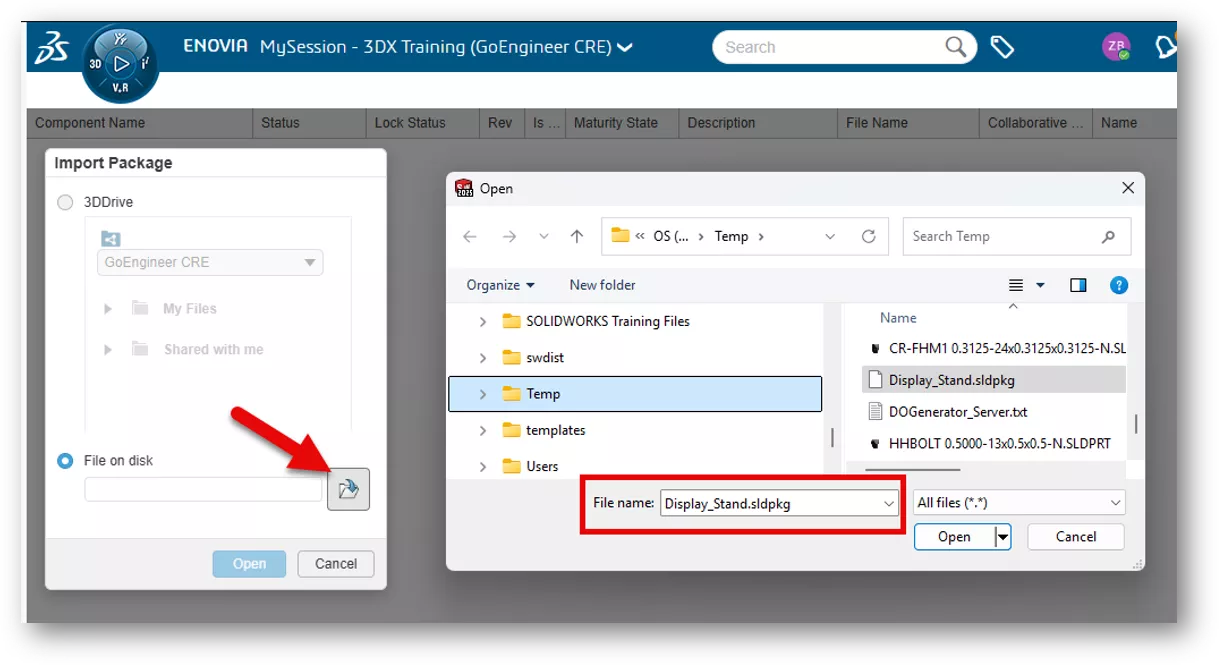
Once the file has been imported, the details will show up in the MySession task pane. Click Open in the lower right to open the assembly in the SOLIDWORKS graphics area. Only the files set to For Edit will be available for write access.

Now What?
Once the external user finishes their changes, they’ll use the Export Package process (described earlier) to repackage the files and send them back to you. You’ll use the Import Package process (just outlined) to reimport the files into SOLIDWORKS to save them back to the platform.
What if I Used Pack and Go to Share Files Externally?
As noted earlier, the Export Package feature lets you share files externally while preserving their revision history. By contrast, if you use Pack and Go, the platform treats the returned files as entirely new once they’ve been edited. In the following sections of this post, we’ll walk through how to address this issue.
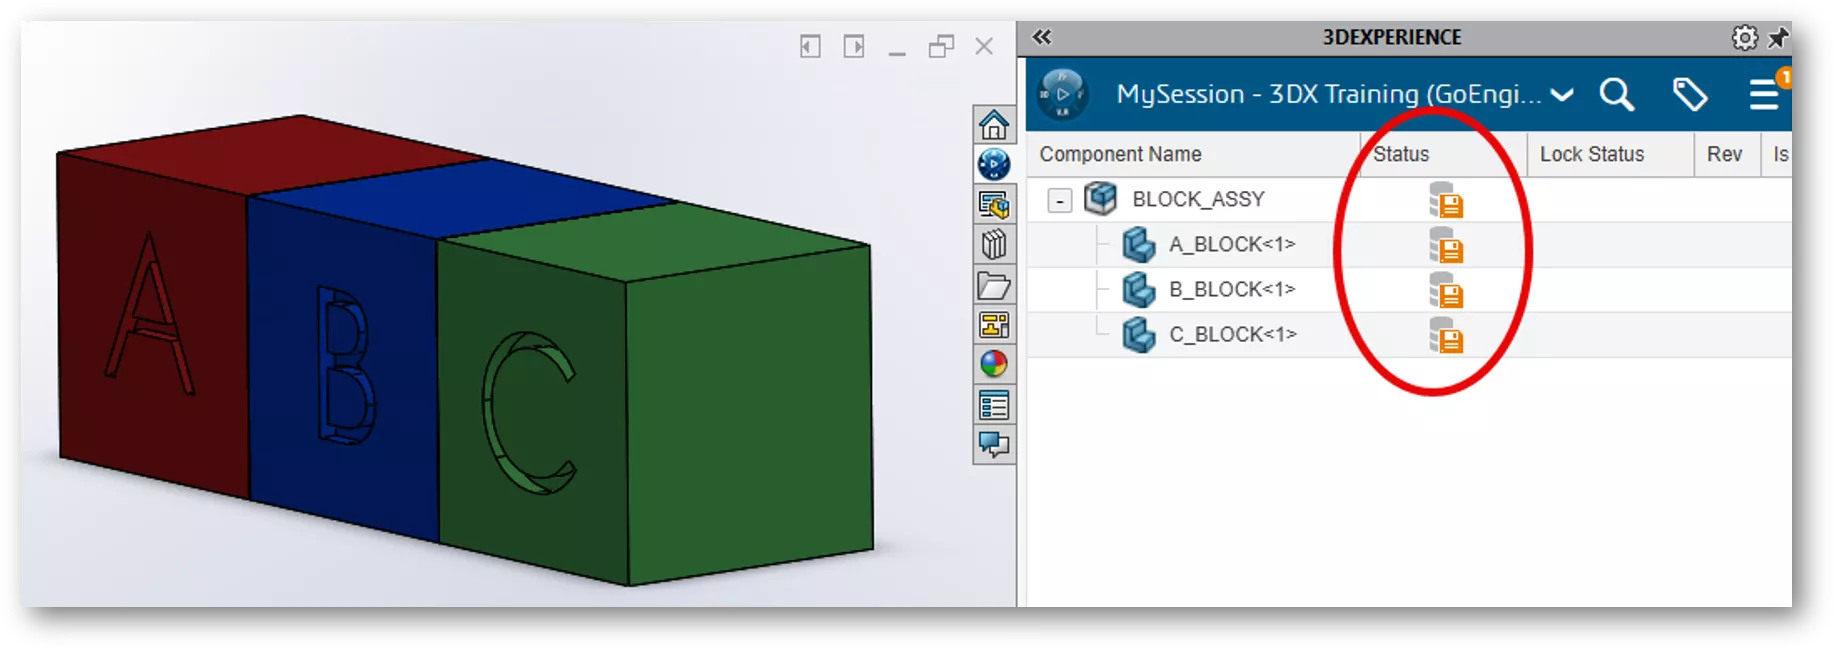
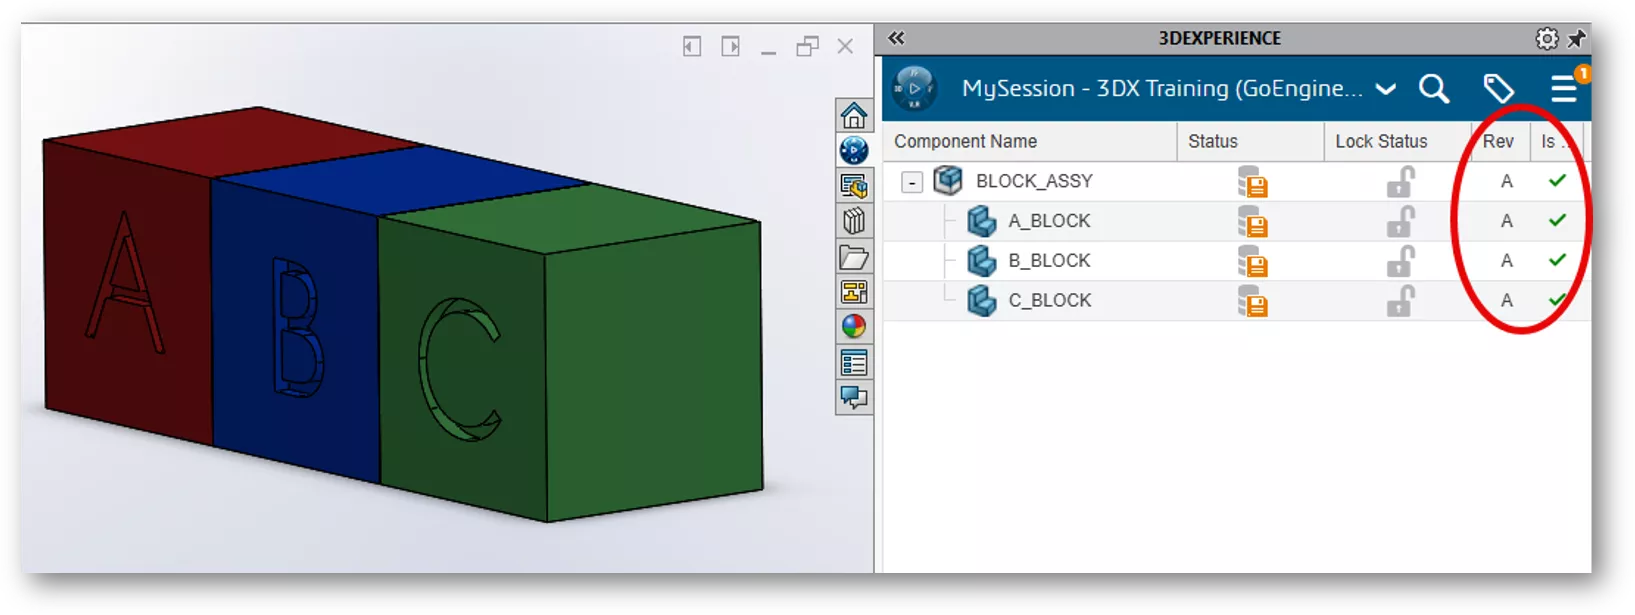
For the next example, we’ll use a rudimentary “ABC” block assembly. In the image below, we can see that this is an assembly of three components that have been saved to the platform at rev A. The files exist in the local work folder.
- For SOLIDWORKS Desktop using the 3DEXPERIENCE add-in, the local work folder is in C:\3DEXPERIENCE.
- For SOLIDWORKS Connected, the local work folder can be found in C:\Users\<username>\AppData\Local\DassaultSystemes\3DEXPERIENCE

To simulate sending the assembly to another user for editing, we’ll use Pack and Go to save the files outside of the work folder. For this example, we’ll save the files to another folder on the C drive. We’ll edit the blocks to include a color (so that they are different), then open the files from this folder in SOLIDWORKS. Even though these are the same files that exist on the platform, the MySession status column shows them as new files - not saved to the platform.
The platform fails to recognize the files as the same for two main reasons.
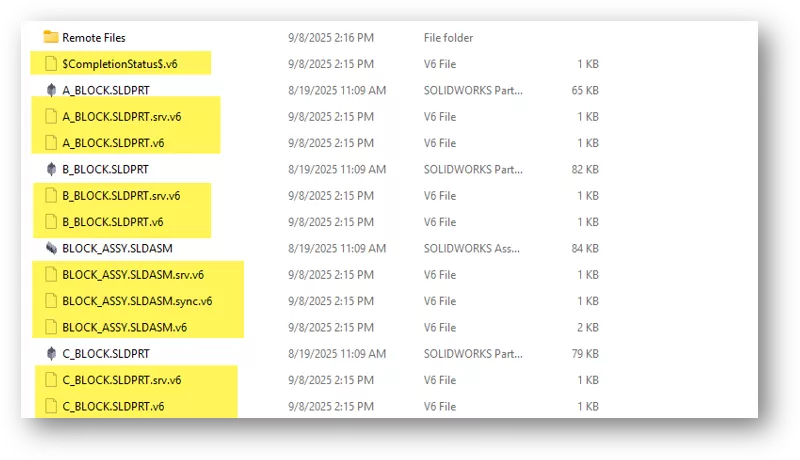
First, they exist outside the 3DEXPERIENCE cache (local work folder). Second, the local work folder contains hidden files that link the parts and assemblies to the platform. These hidden files share the same name as the part or assembly but use a “.v6” extension (referred to here as V6 files). Both conditions must be met for the platform to identify them as the same files stored on the cloud server.
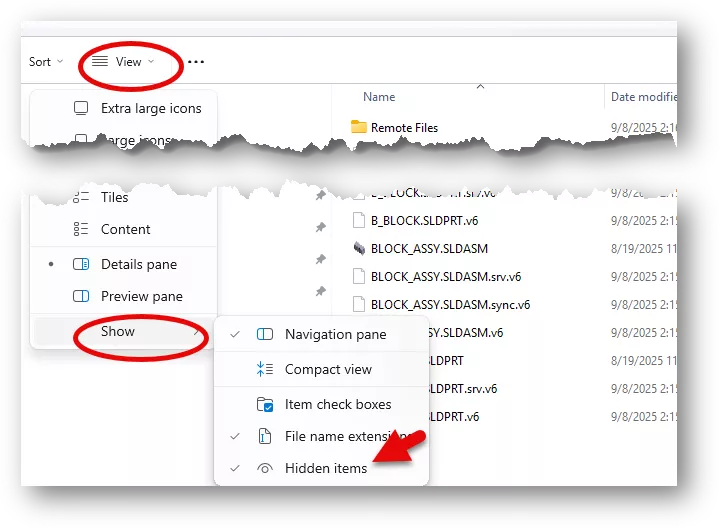
Since these are hidden files, we’ll need to show them. In Windows Explorer, click View > Show > Hidden Items.
Note: The V6 files can only be shown when using SOLIDWORKS Connected. If using SOLIDWORKS Desktop, you’ll need to copy the work folder to another location, then show hidden items to see if they exist.
Now that we know these two conditions, we can resolve the issue by meeting them. However, this must be done in a specific manner.
It's important to ensure that the V6 files with the same name as our SOLIDWORKS files do exist in the local work folder. If the local cache was cleared, the V6 files no longer exist.
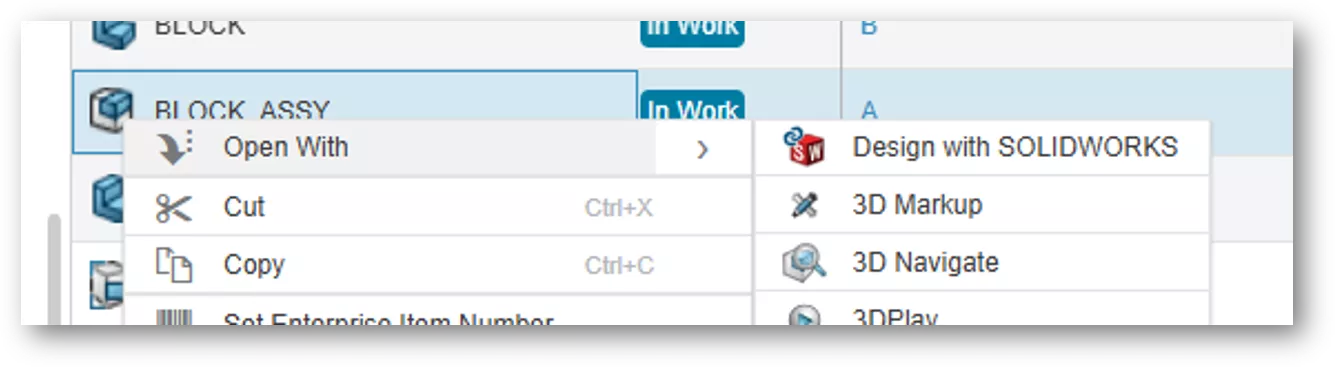
Show hidden items shows whether they exist or not. If they do not exist, we must redownload the files from the server. To do this, first make sure the edited files are not open in SOLIDWORKS. Then, find the file on the platform, right-click, and choose Open With SOLIDWORKS Connected or Design with SOLIDWORKS. This will repopulate the local work folder with the SOLIDWORKS files and their hidden V6 files.
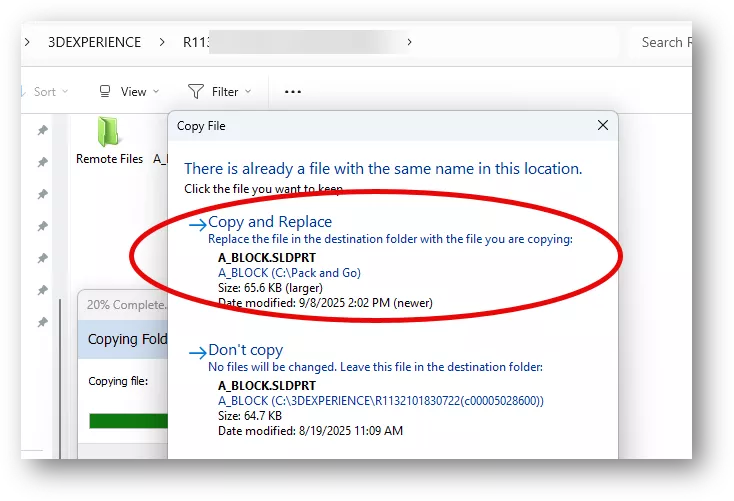
The next step is to place the edited files back into the local cache, replacing the ones recently downloaded from the server. This should be done using either Pack and Go or the standard Windows Copy and Paste function. If you instead open the edited files in SOLIDWORKS and use Save As to the local cache, the files will be overwritten correctly – but the associated V6 files will be removed, breaking the connection to the platform.
For this example, we have used copy and paste to move the edited files back to the 3DEXPERIENCE local cache. We will choose to replace the existing files with our copied files. This will overwrite the non-edited files with the edited files without overwriting our hidden V6 files of the same name.
Now, we can open the assembly in SOLIDWORKS, and notice the MySession pane identifies the edited files as the same revision A files that already exist on the platform. At this point, we are ready to lock and save the files to complete the process.
Replace Content
In this section, we’ll look at replacing geometry using a function called Replace Content. Suppose you have a supplier that sends you a file and you save it to the platform, but then they send you an updated file with different features and a different name. We can use Replace Content to replace the geometry of the file on the platform with the different version.
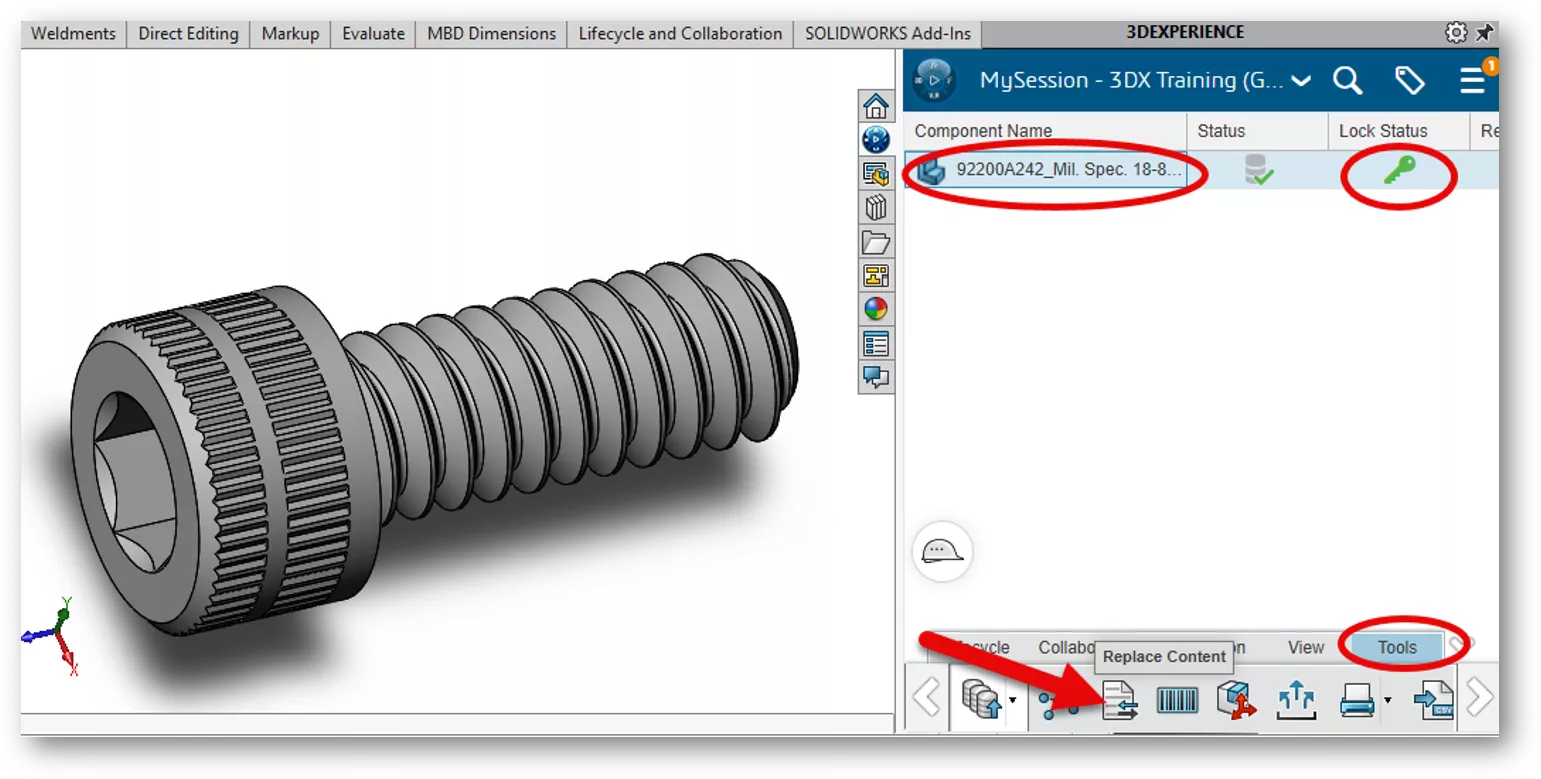
In this example, we have hardware from a supplier saved on the platform, but they have sent us an updated part file with different features and a different name.
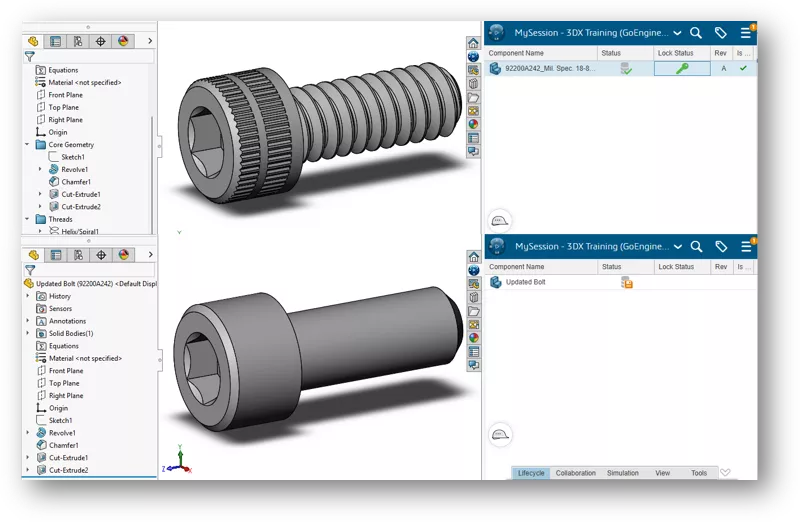
With the original file opened in SOLIDWORKS, highlight it in MySession, then go to Tools and choose Replace Content.
Note: The file must be locked in status before content may be replaced.
You’ll be prompted to browse for the replacement. Highlight the part, then click Open.
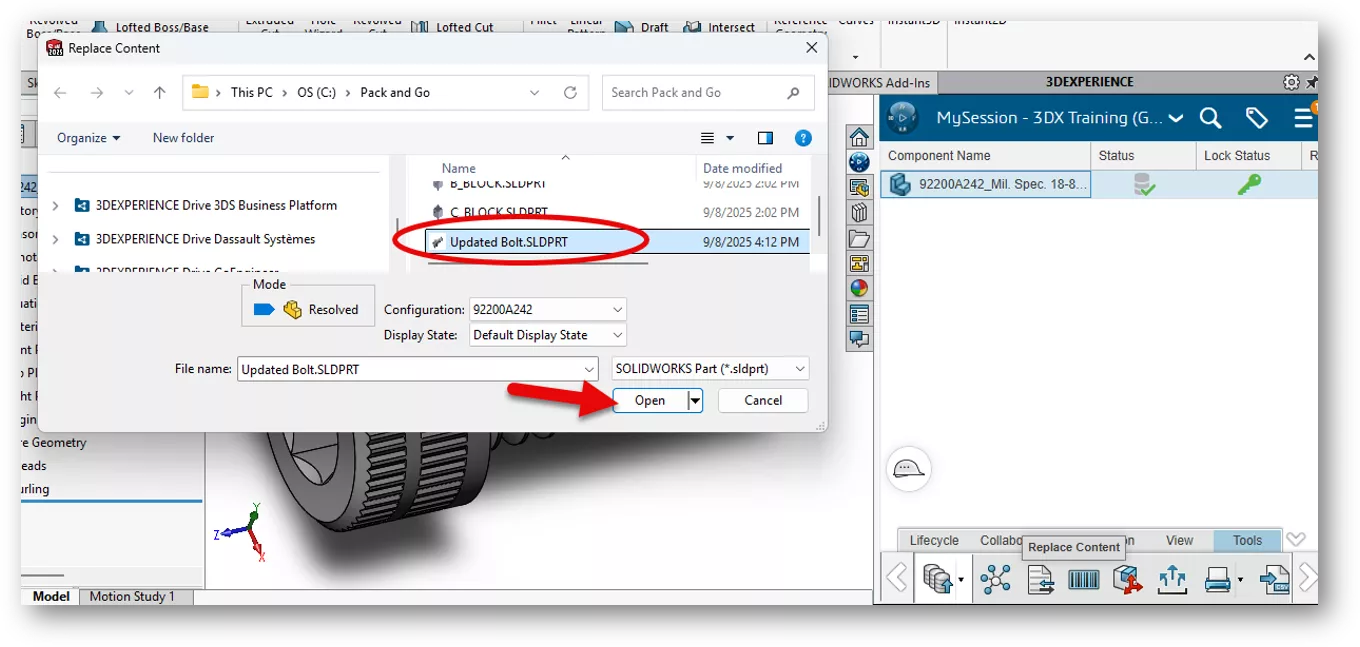
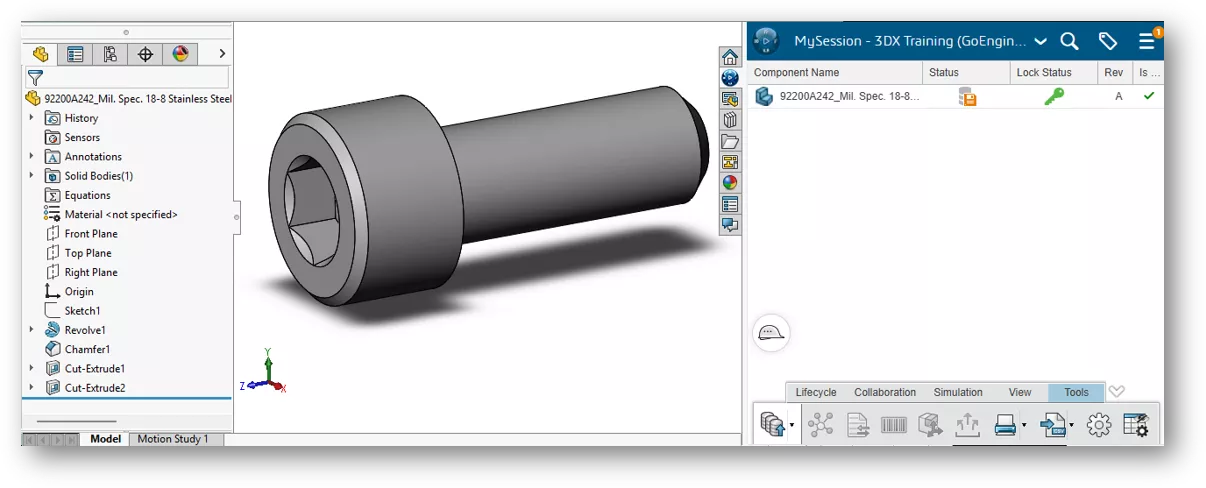
The geometry is replaced, but the title remains the same. You can then save the file to complete the process. The revision history, along with all relationships, is maintained. As you could imagine, this process may cause downstream issues, so proceed with caution.
Note: When you replace the content of a multiconfiguration object with the content from another multiconfiguration object:
- The selected configuration replaces the active configuration
- Other configurations in the existing object to be replaced are removed
- Other configurations in the selected object are added
Want to learn more? Check out more tips and tutorials listed below or on our 3DEXPERIENCE YouTube Channel. Additionally, join the GoEngineer Community, where you can create forum posts, design contests, and answer questions from other 3DEXPERIENCE SOLIDWORKS users.
Related Articles
CAD Families, Physical Products, and Representations: What They Are & When to Use Them
Sharing Designs Using the 3DEXPERIENCE SOLIDWORKS Export as Package
Benefits of 3DEXPERIENCE Duplicate Function
Change Your 3DEXPERIENCE Platform Name & Organization Title
5 Advanced SOLIDWORKS Patterning Techniques to Supercharge Your Workflow

About Zach Brown
Zach Brown is a certified SOLIDWORKS Expert and a Technical Support Engineer. Prior to working at GoEngineer, he spent 15 years as a mechanical designer, CAD support tech, and instructor using SOLIDWORKS. His hobbies include playing guitar, riding motorcycles, and skiing.
Get our wide array of technical resources delivered right to your inbox.
Unsubscribe at any time.